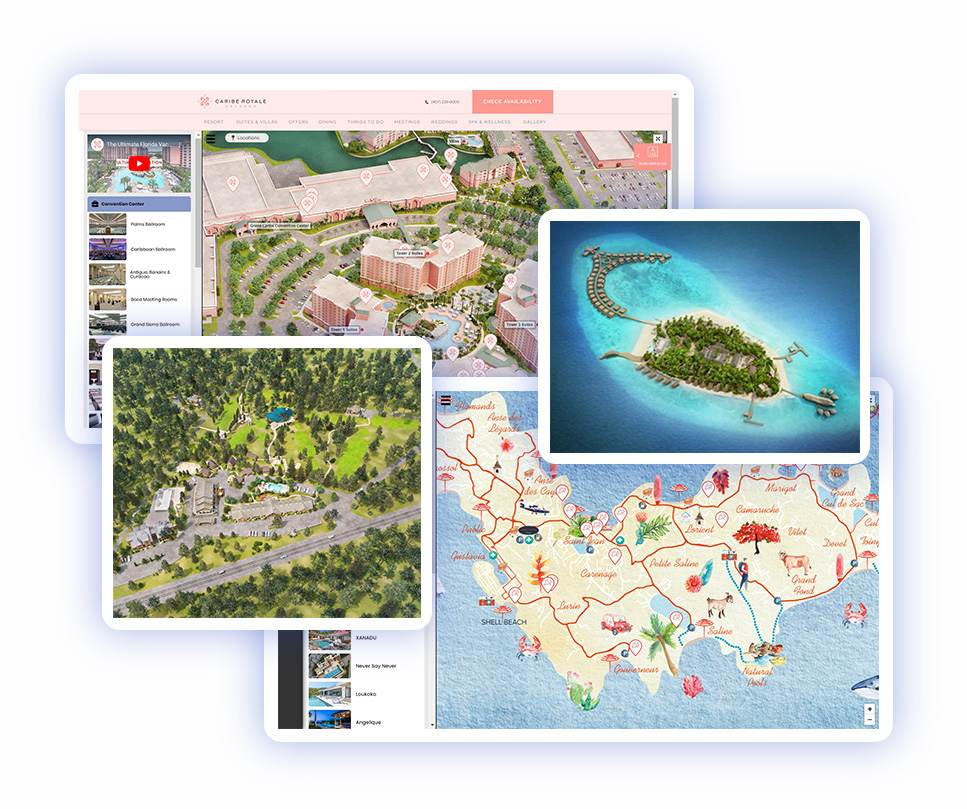
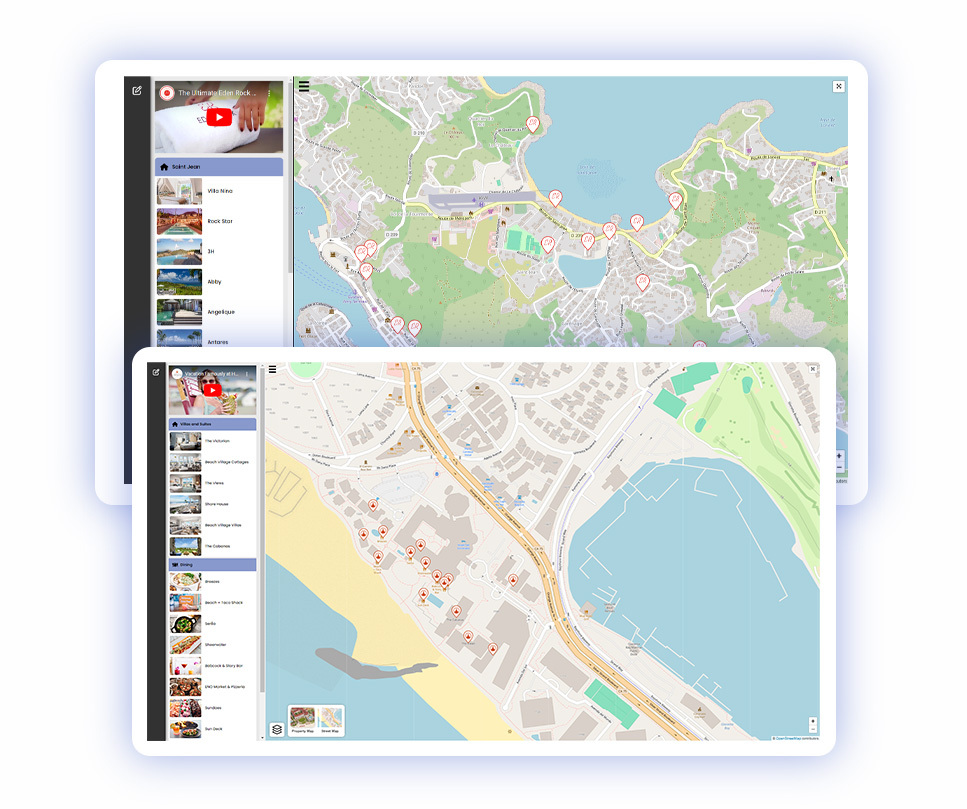
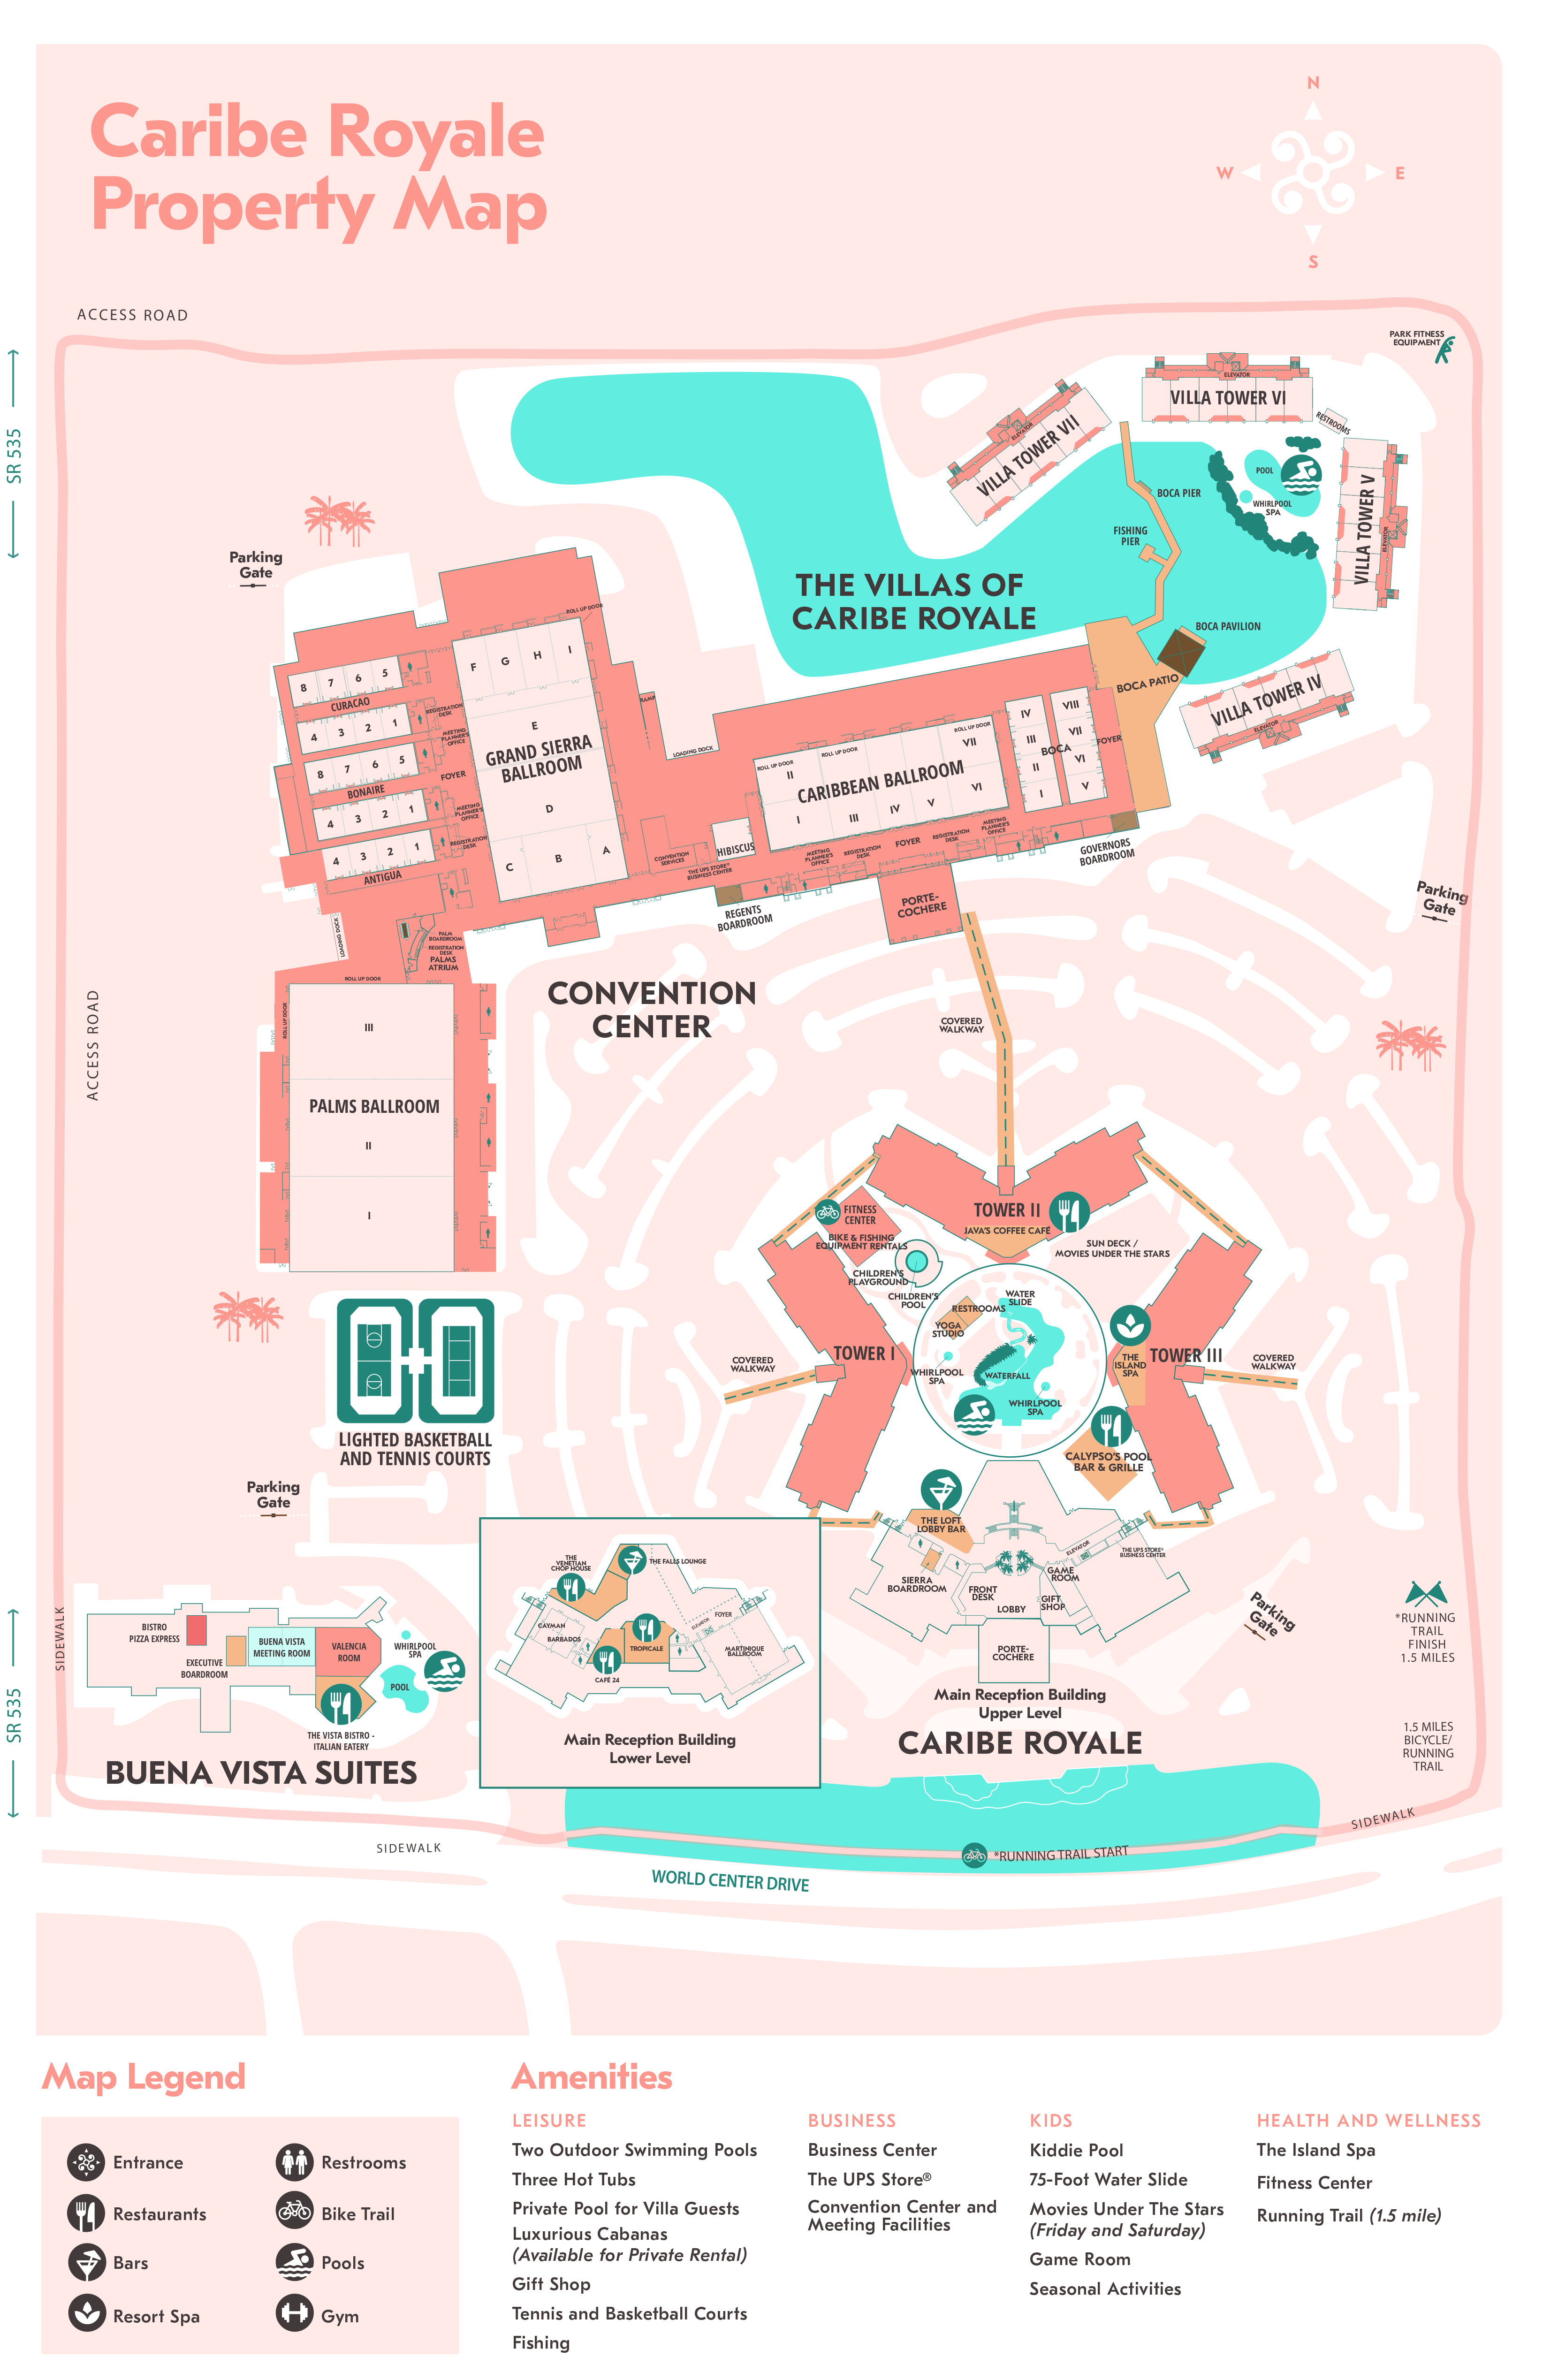
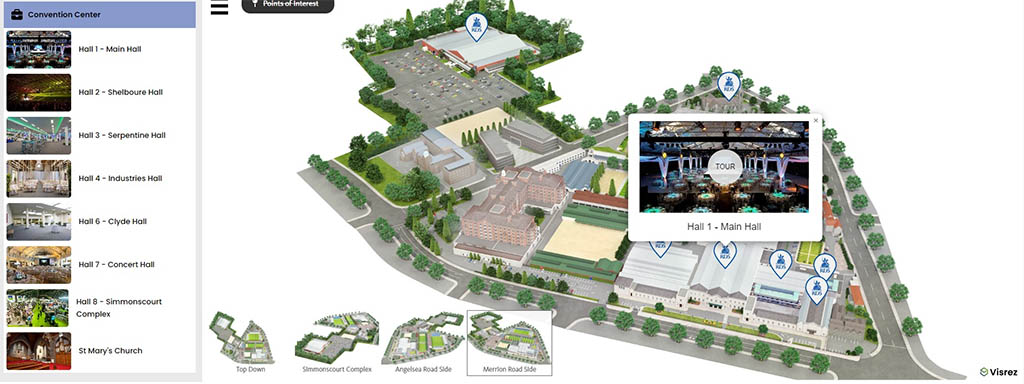
Interactive maps are one of the most useful tools to research a leisure or conference destination as they can provide a visual overview of the amenities along with a list of available rooms, event spaces, F&B and leisure outlets. Visrez Map Builder allows clients to generate their own Interactive Property Maps with branded markers, internal pages and galleries featuring visual assets from any source in an easy to use editor.
Visrez maps allow users to create, share and manage detailed interactive maps in house with training provided by our team. Visrez maps are used worldwide by some of the most famous brands in the industry.
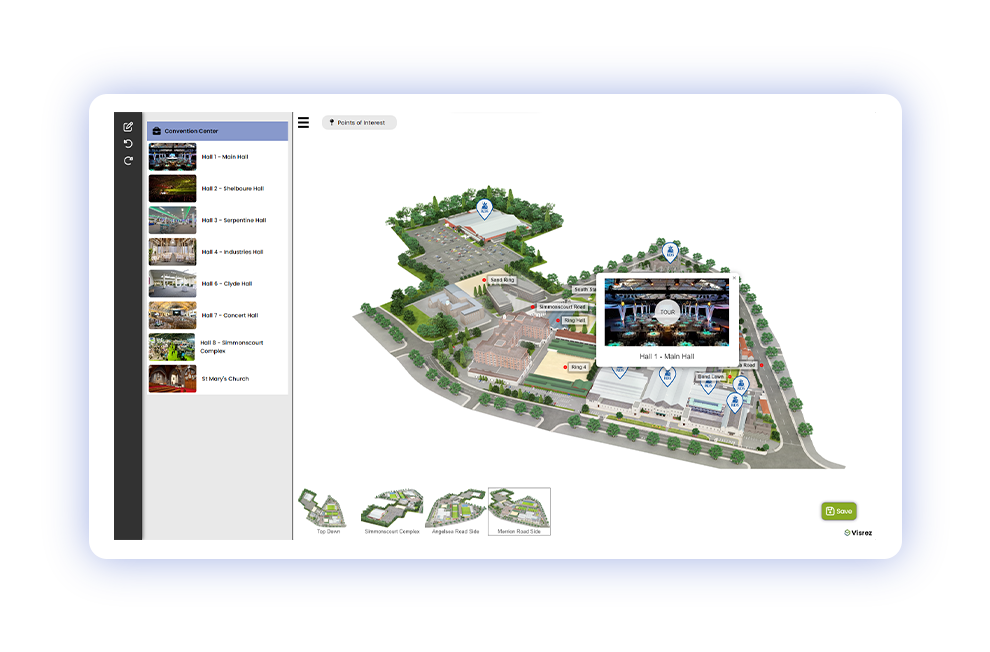
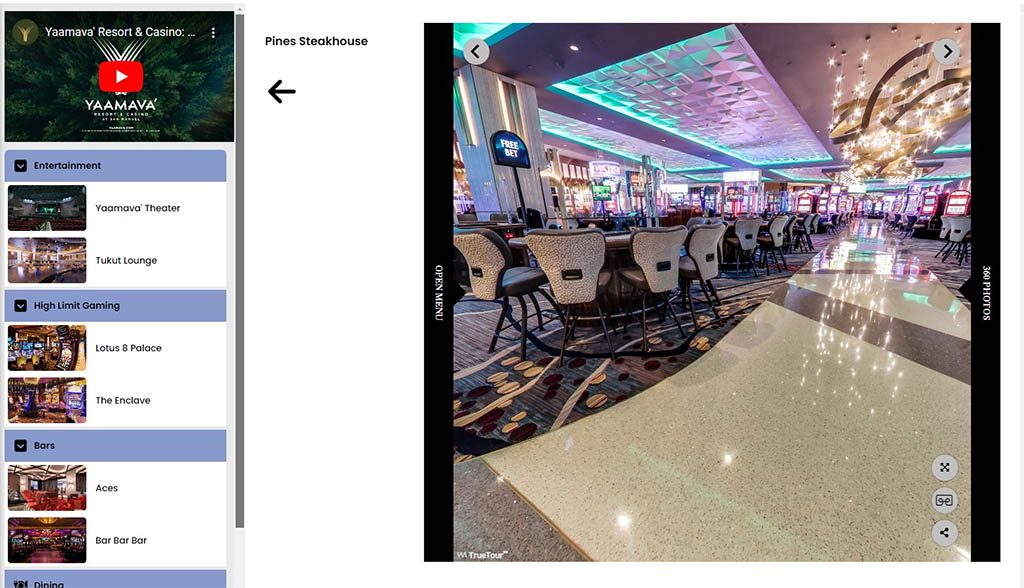
Users can add branded markers to the maps by opening the editor and clicking to add the marker. These can link to internal pages in the map to allow users to learn more or tour the spaces. Markers can also be linked to your website or reservations system so a user can click a marker to reserve a specific seat or area in a venue. Visrez map builder is easy to use and training is provided to your team once the interactive map is built. All changes appear instantly in your site when saved in Visrez map builder.
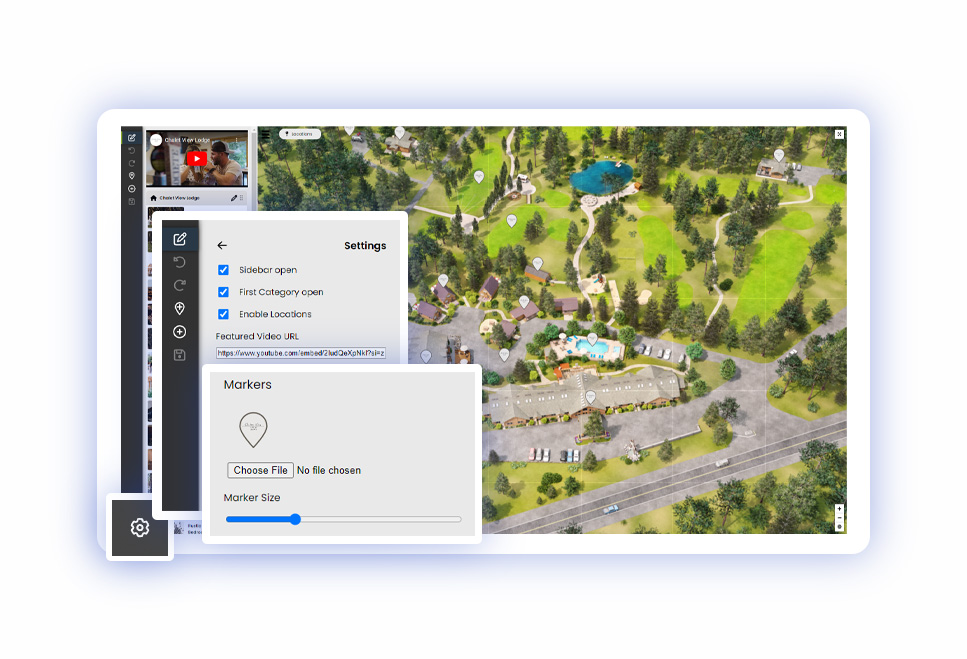
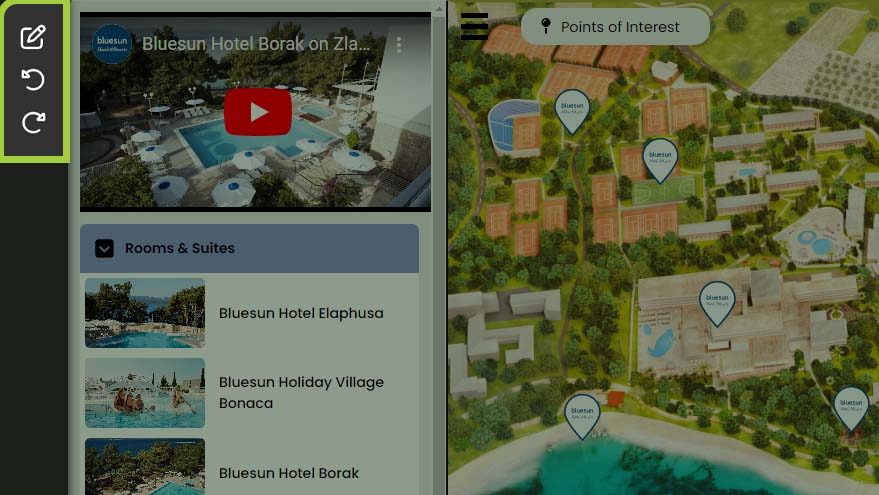
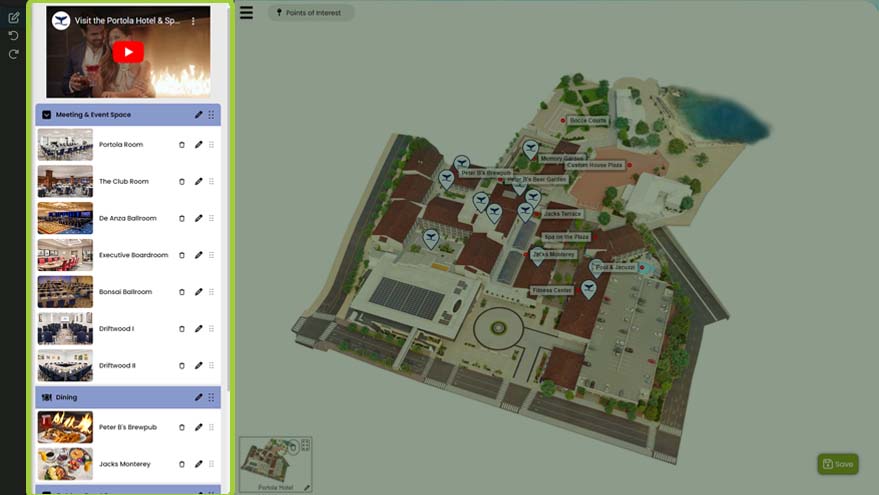
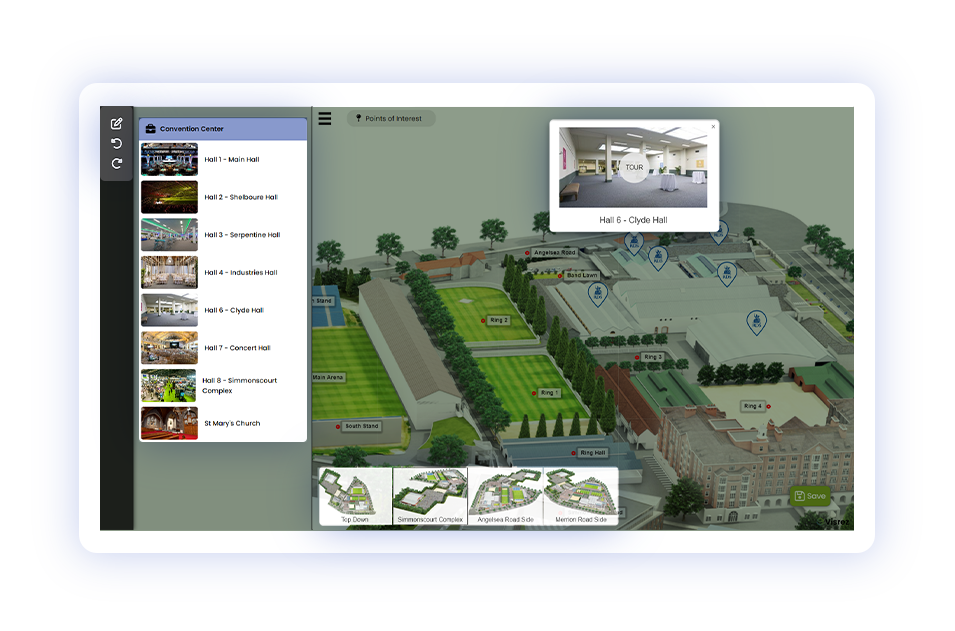
To add a marker activate Edit Mode from the top left corner button and then click anywhere on the map to drop a marker onto the map. The Undo and Redo options are under below.
Markers can be branded with an icon from the Settings panel at the bottom and marker size can be adjusted.
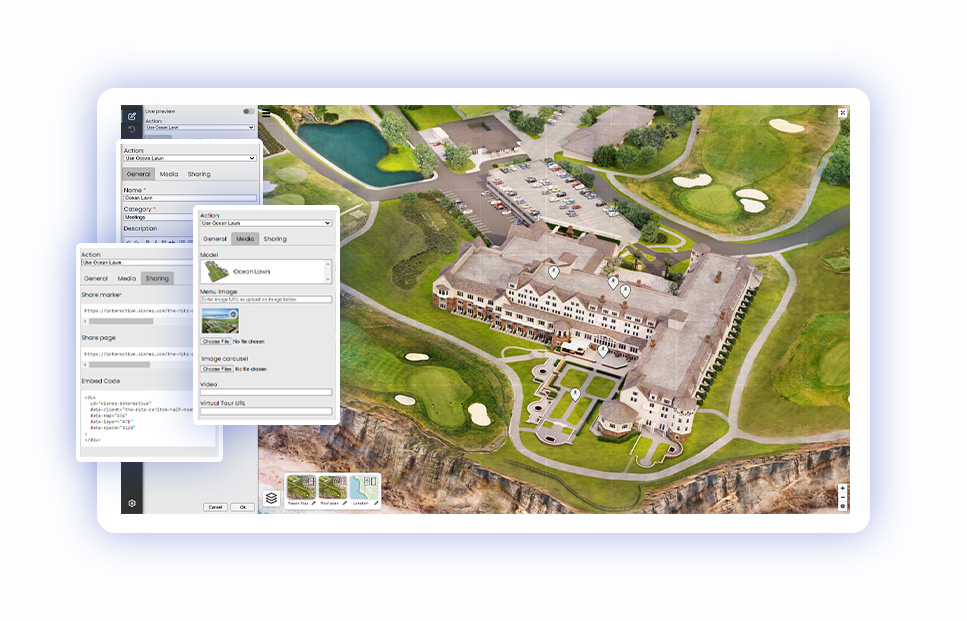
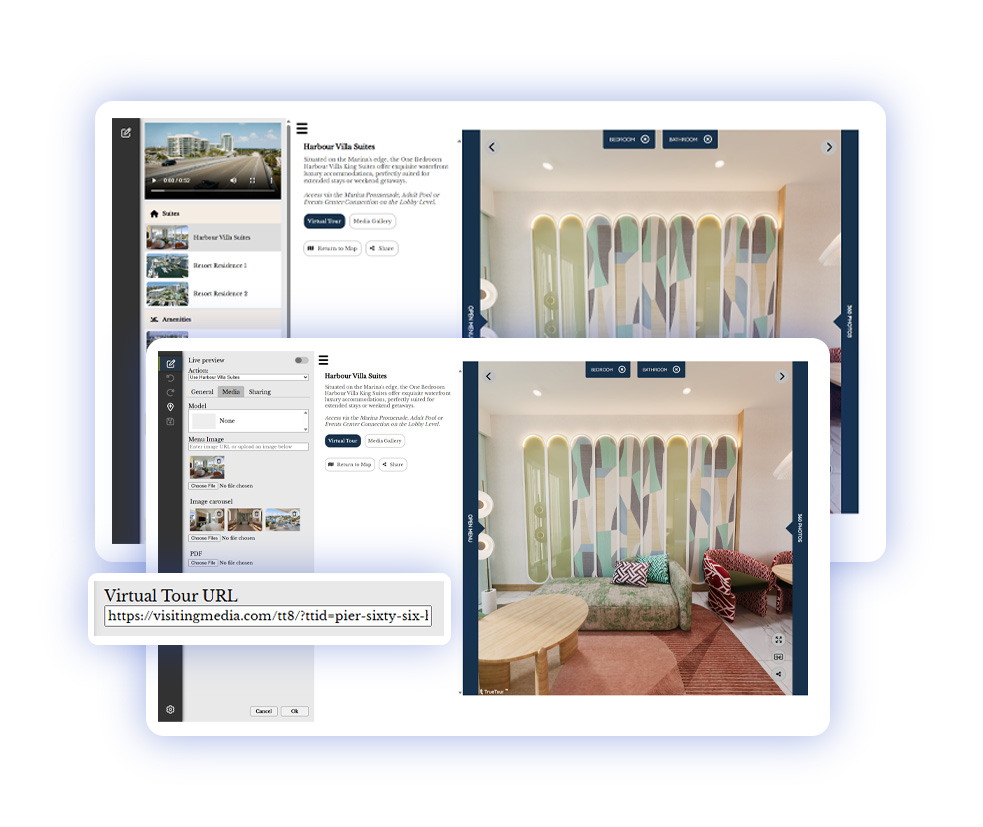
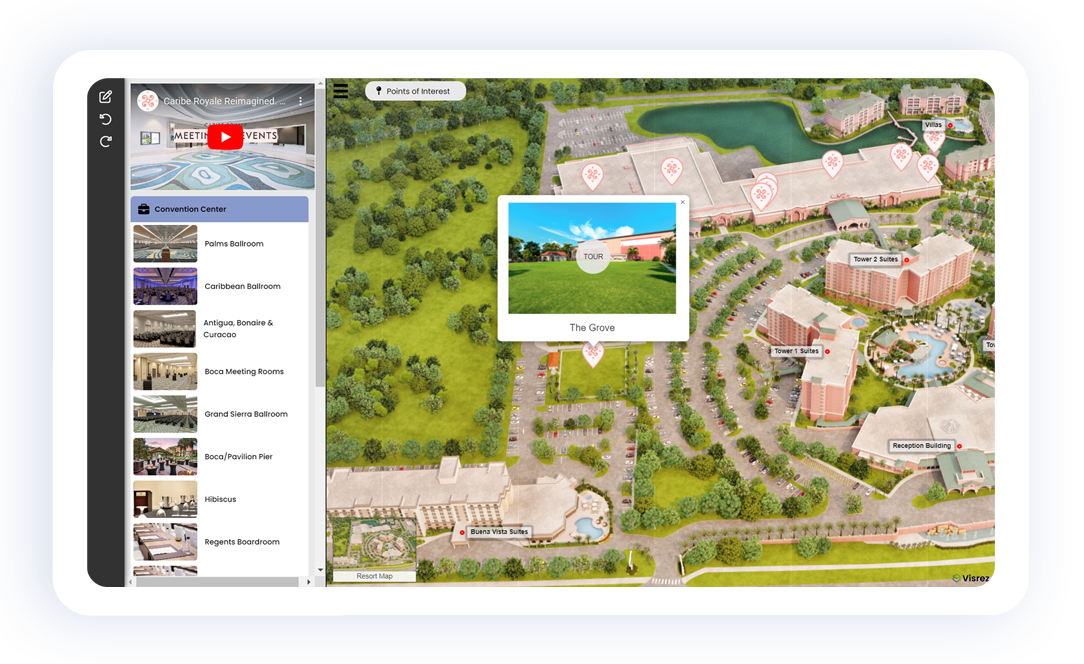
Visrez Maps support all assets formats including still photos, videos, virtual tours so once a marker has been added you just double click it to add content for that marker or page. Markers can show preview images and can link away to any other URL if you don’t require an internal page for that area.
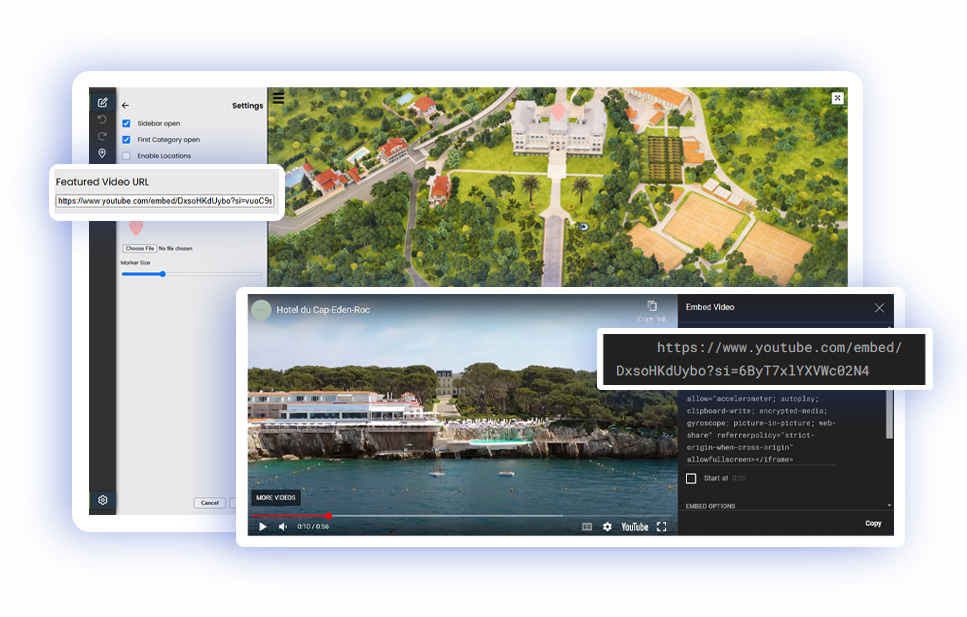
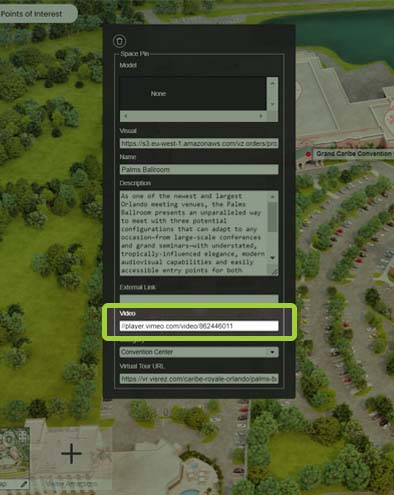
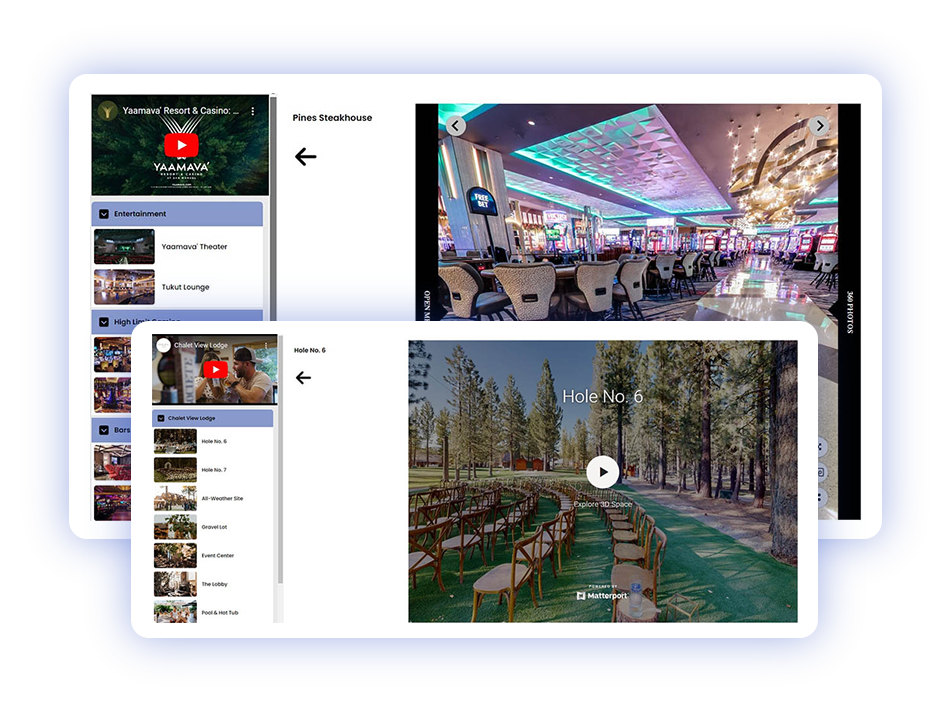
A lot of time and money goes into the production of photos, videos and virtual tours so we wanted to ensure that Visrez clients could use all their visual assets within the property map. Users can add YouTube videos, Matterport Virtual Tours or any other media to the interactive maps just by pasting the code into the editor.
Users can paste in Matterport Virtual Tours or Visrez Tours into the Tour Field for any event space.
Videos can be added to the Maps just above the main menu by pasting the video url into the settings.
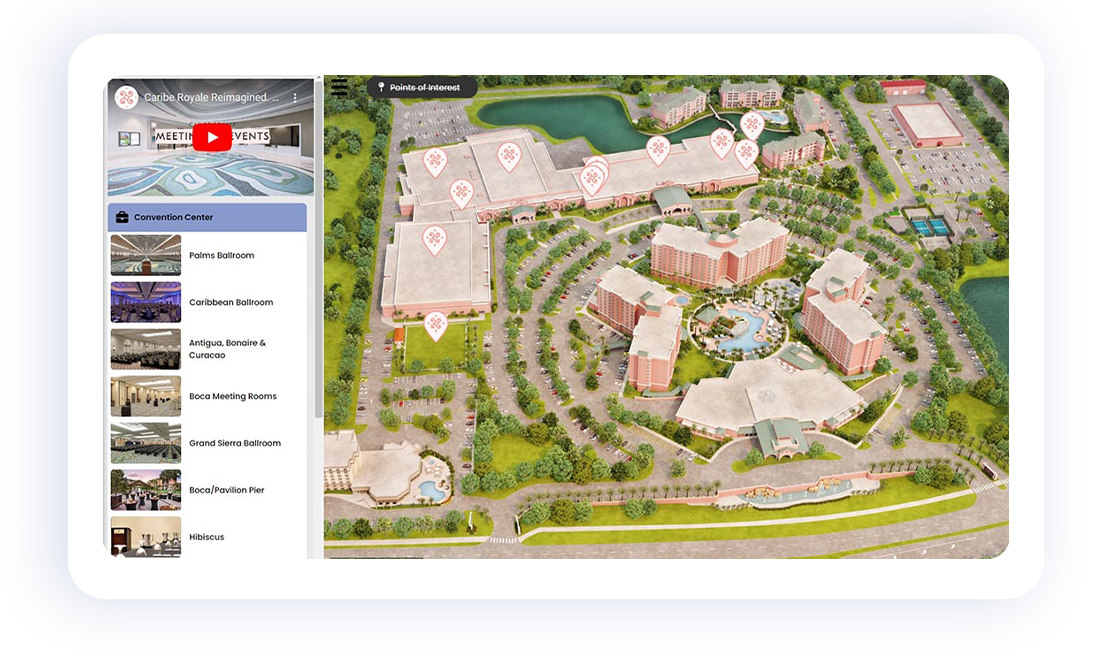
Categories can be created and organized in the main menu using a simple drag & drop editor. Menu Images can be uploaded or linked from a URL into the editor. Visrez Interactive Map Builder has an icon library to allow users to choose an appropriate icon for each category in the menu.
Visrez works with any source map format, ideal for clients who wish to utilise existing assets. Accounts which do not require 3D map production can be activated at a lower cost. To use an existing map file it must be a minimum of 6k pixels resolution and can be uploaded directly to Visrez once your property has been set up.
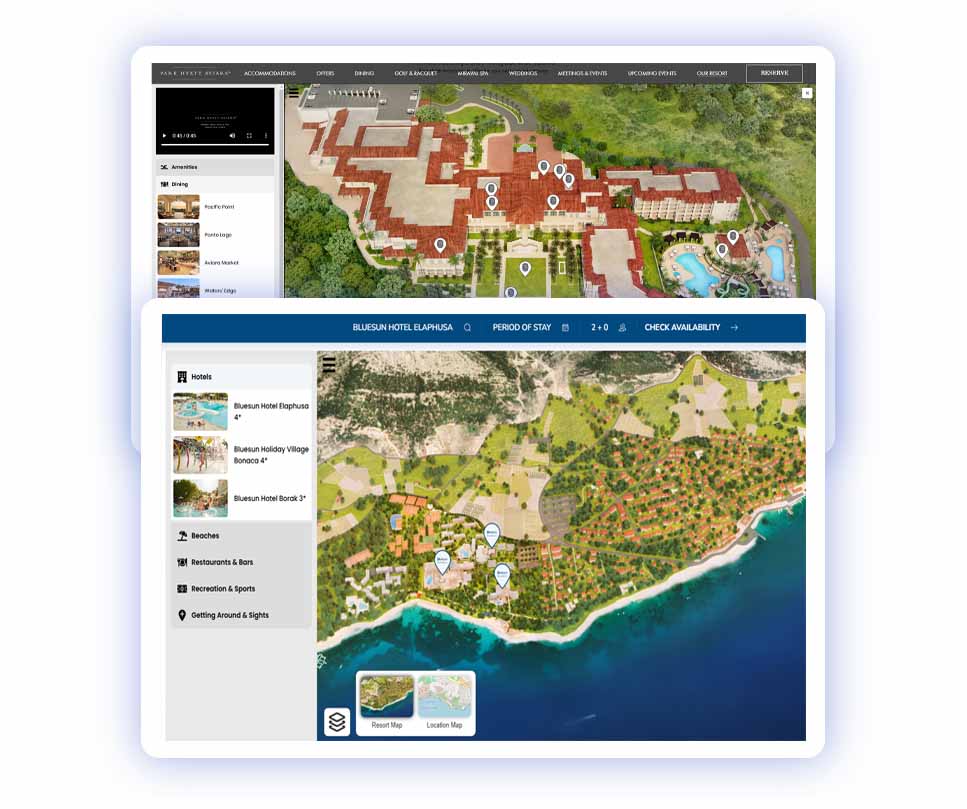
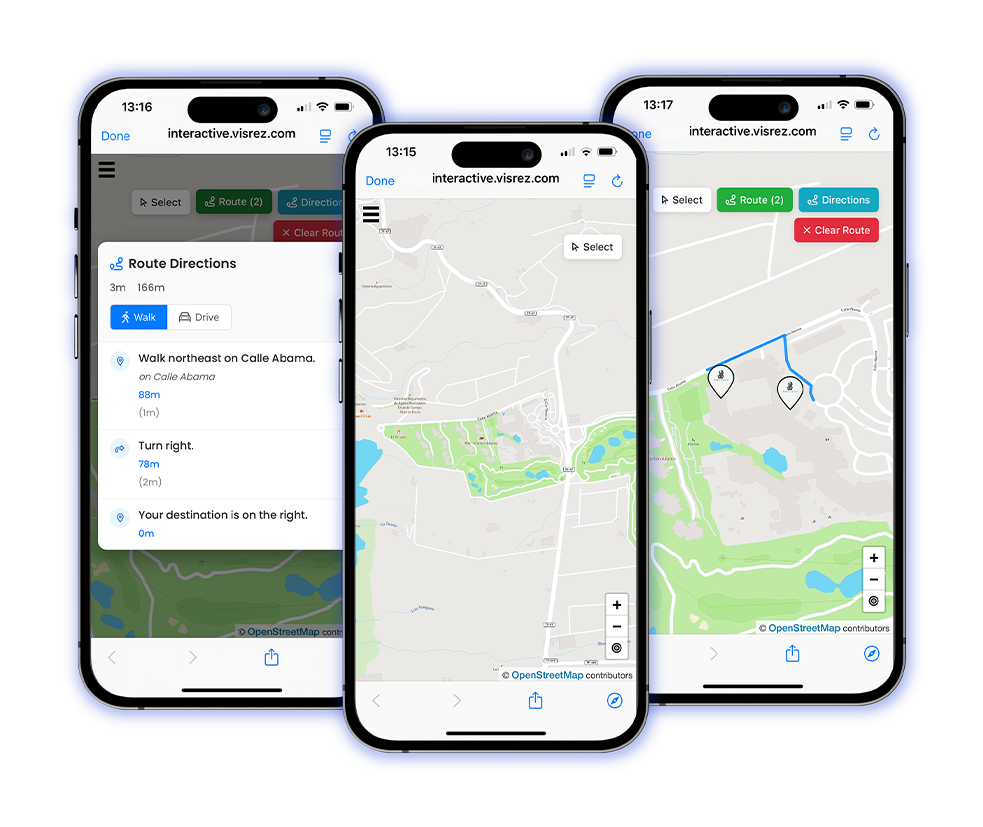
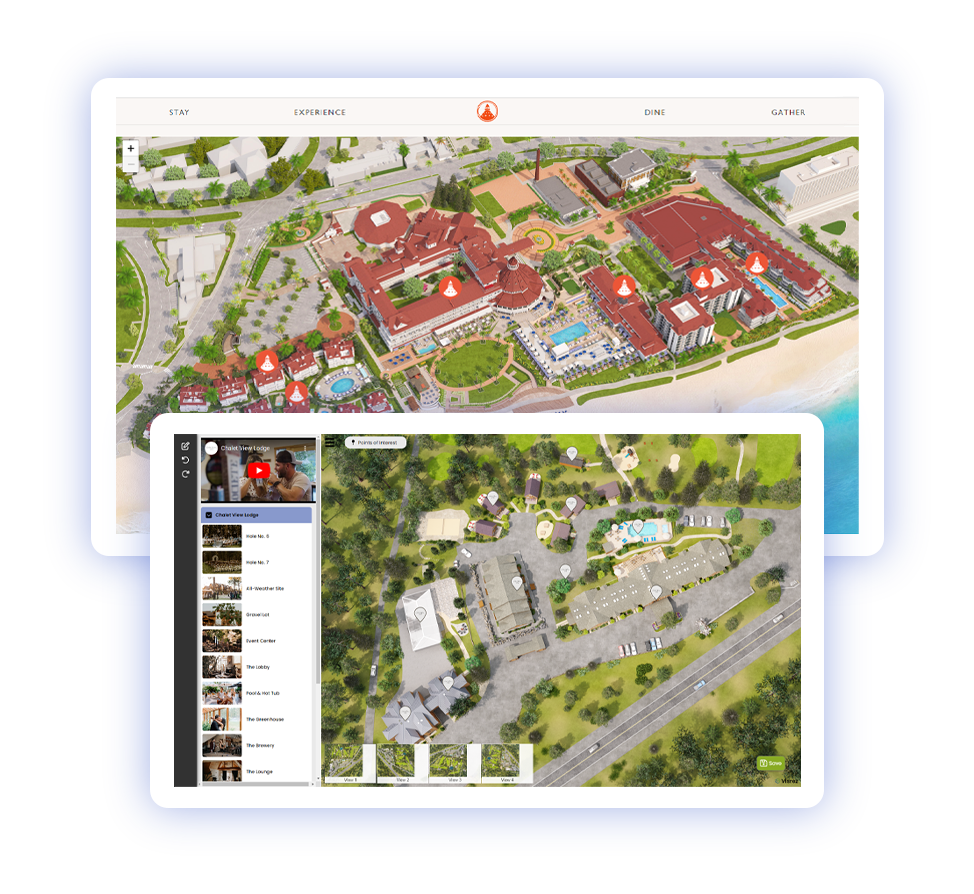
Give users relevant location information using a built-in OpenStreetMap without displaying competitor information or unrelated business in your website. All the marker pins can be copied onto an OpenStreetMap application within the interactive map. This can be loaded in the layers tool which lets users switch between the property or resort map and geographical map which does not track user activity in your site.
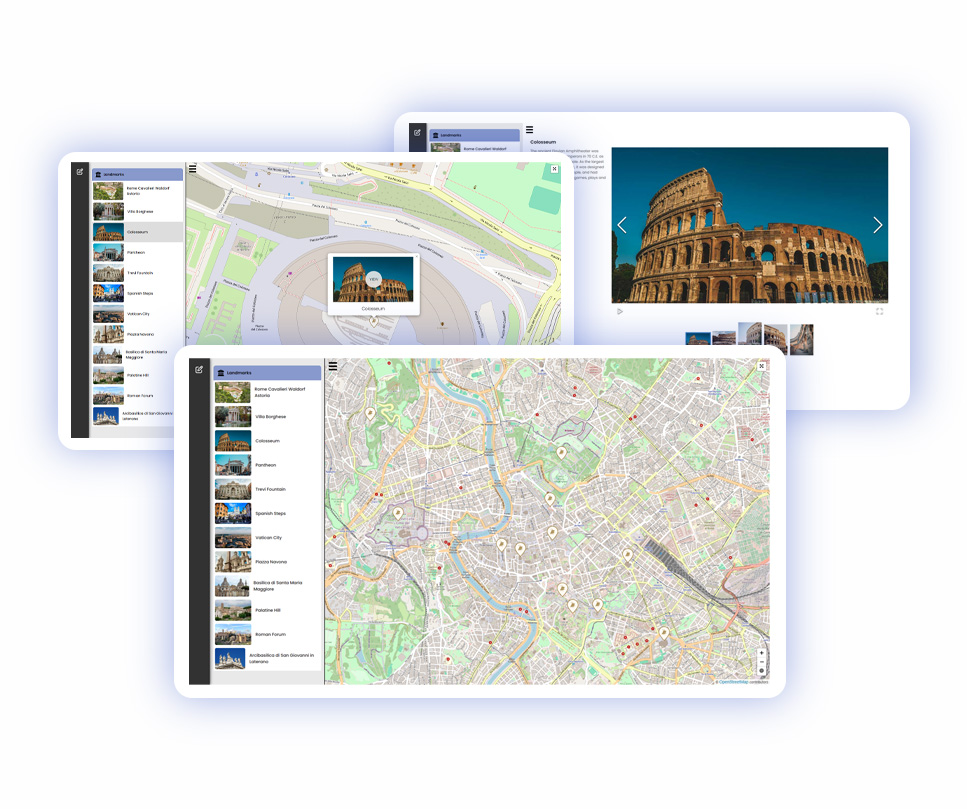
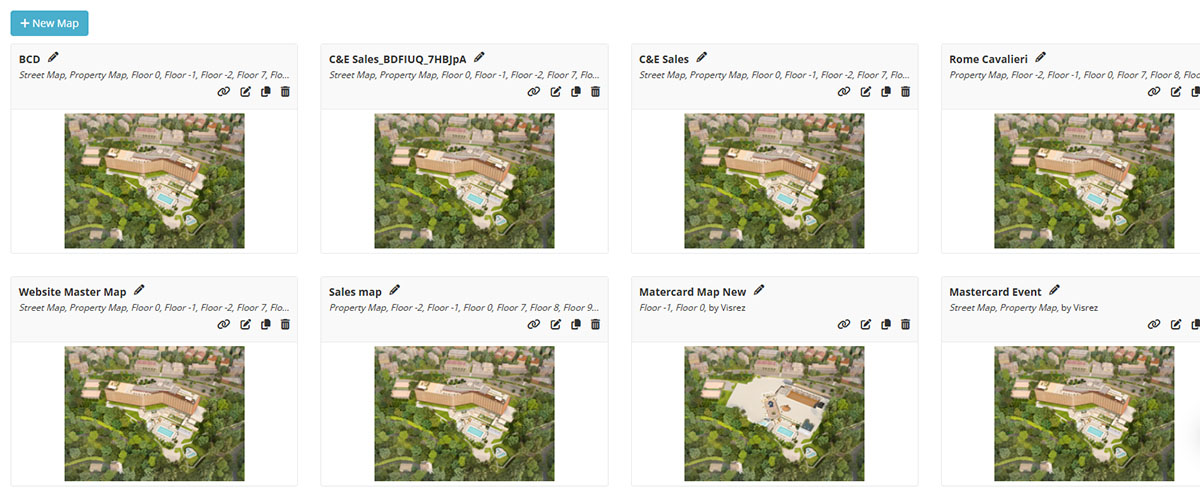
New street maps can be created at any time with branded markers on a geographic map so say for example your team wanted to create a unique map showing landmarks or local attractions this can be easily done by clicking on New Map in Visrez. Each account can have unlimited maps so you can generate any number of guest maps which can include galleries, videos and virtual tours. These are a great way to communicate location or suggested trips and can be shared or embedded in a website. Below is an example of local landmarks map of Rome built out by a client in Visrez.
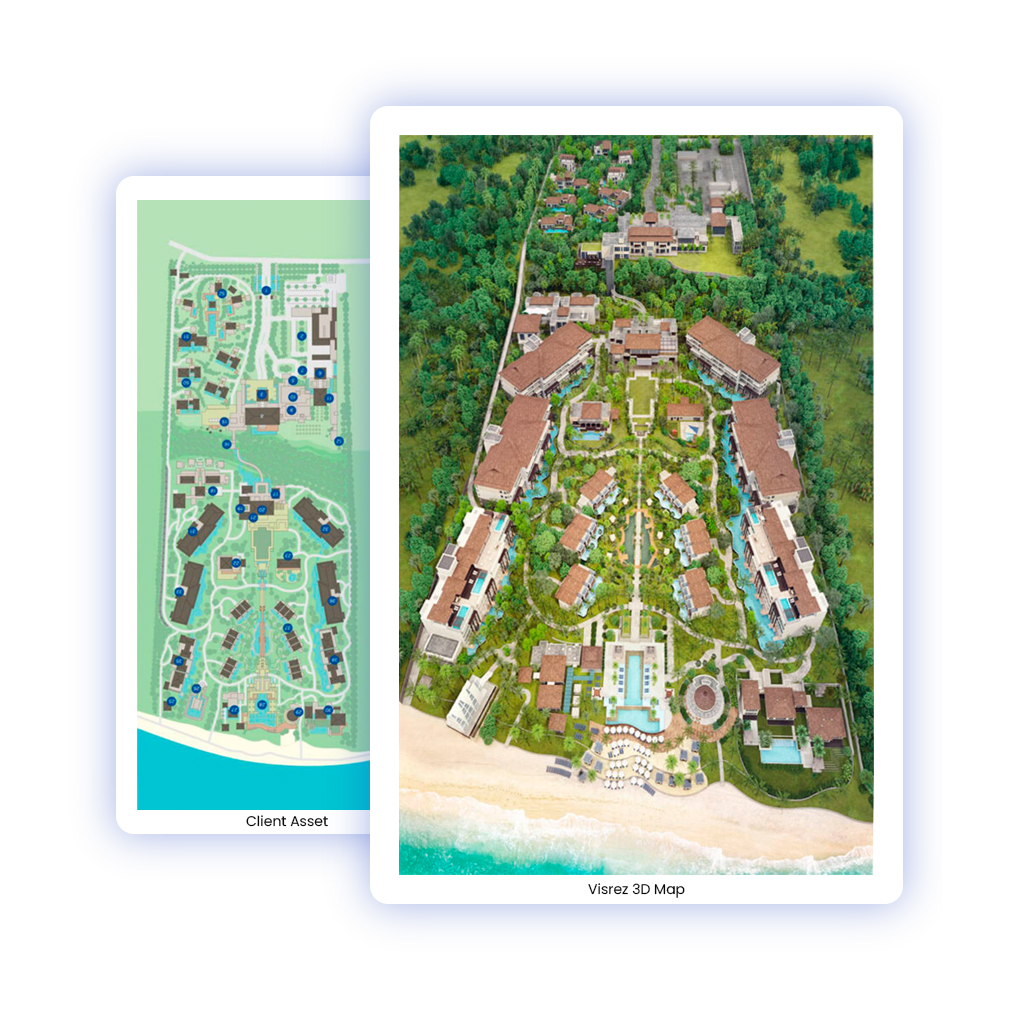
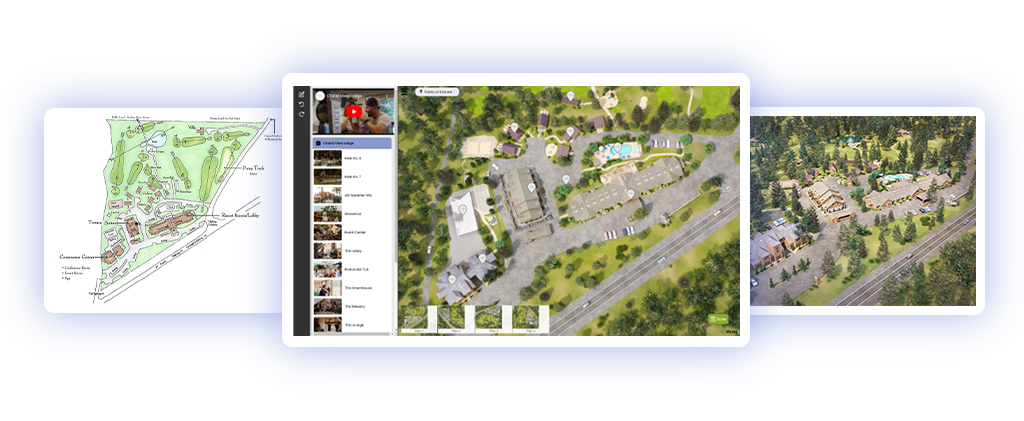
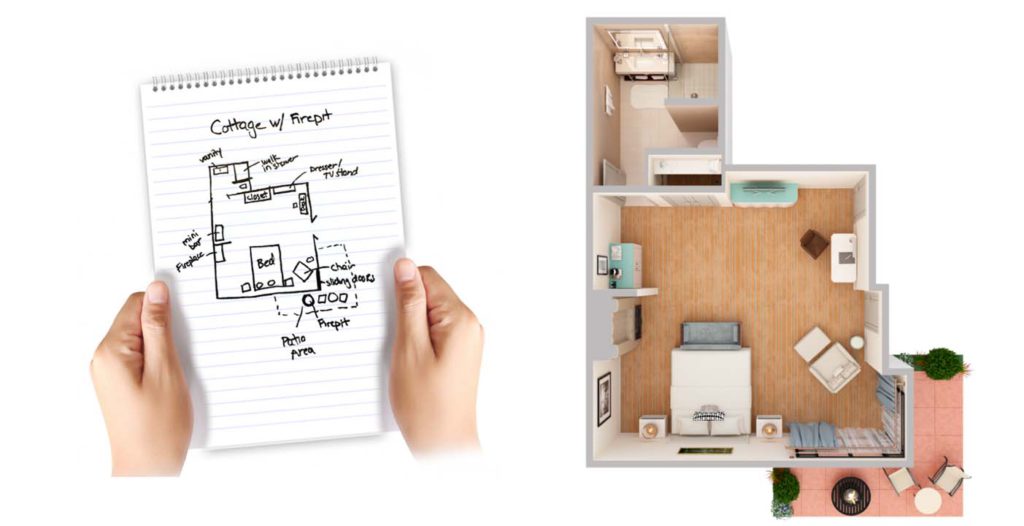
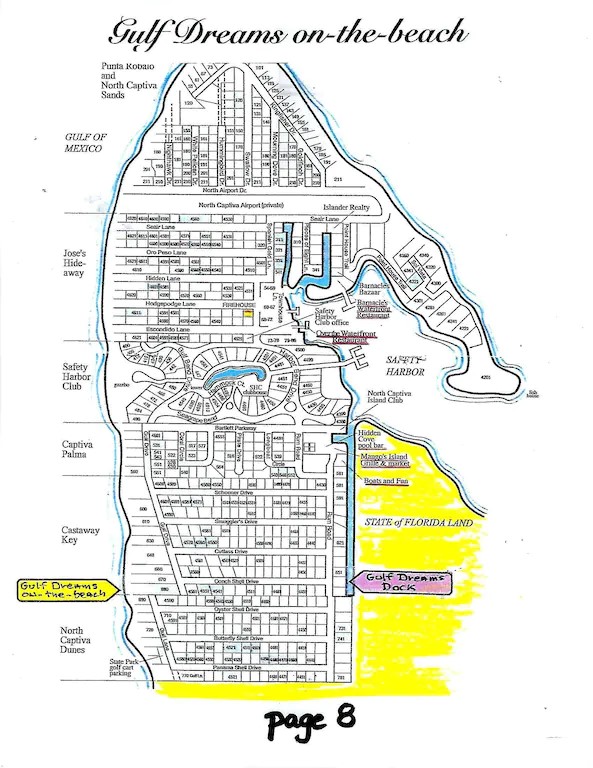
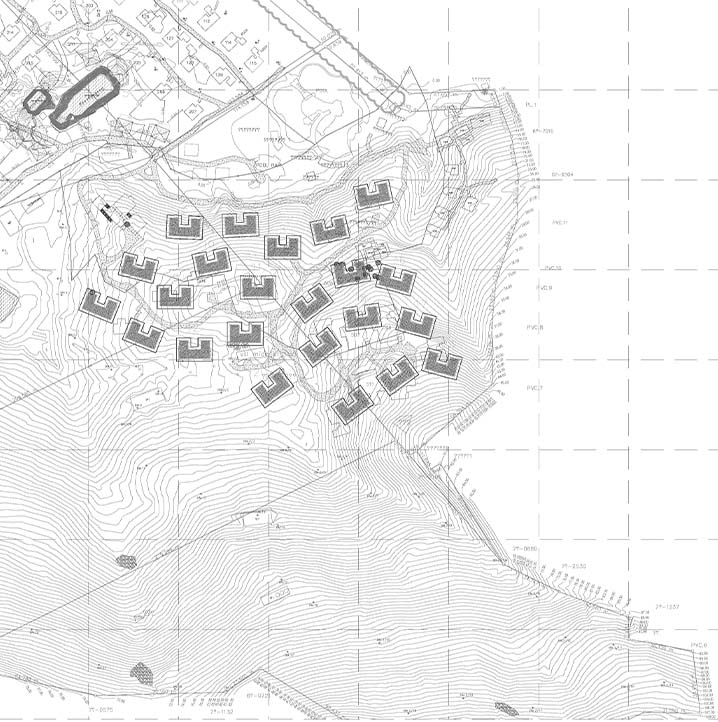
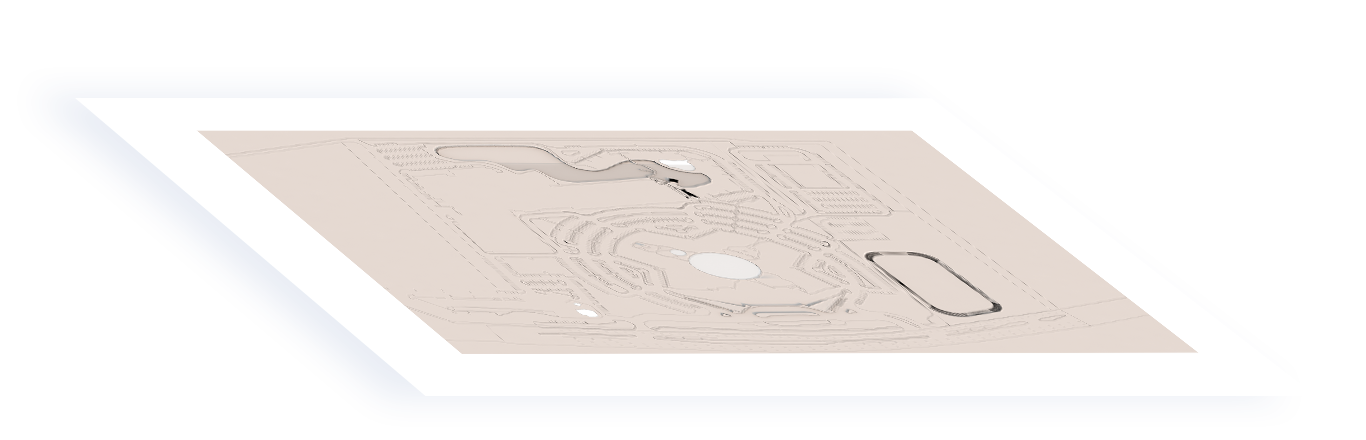
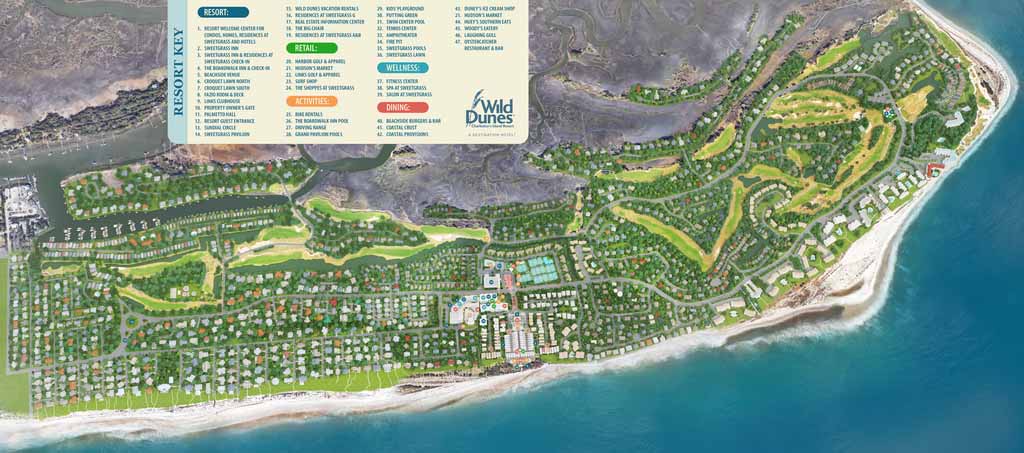
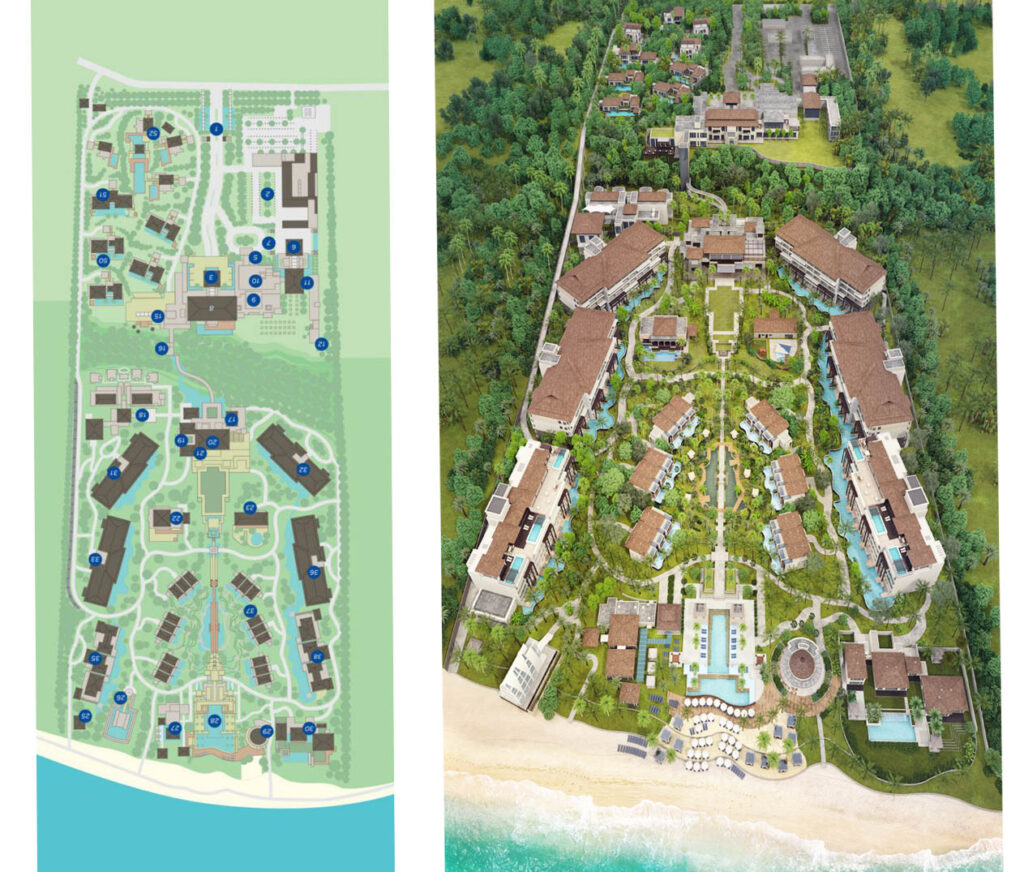
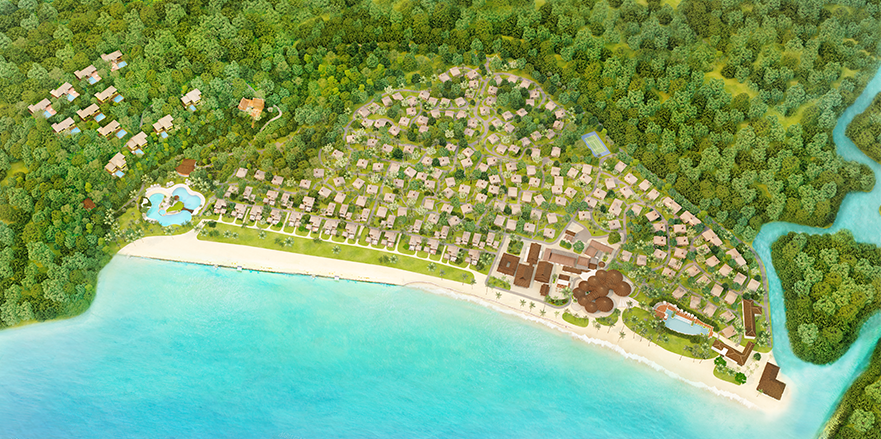
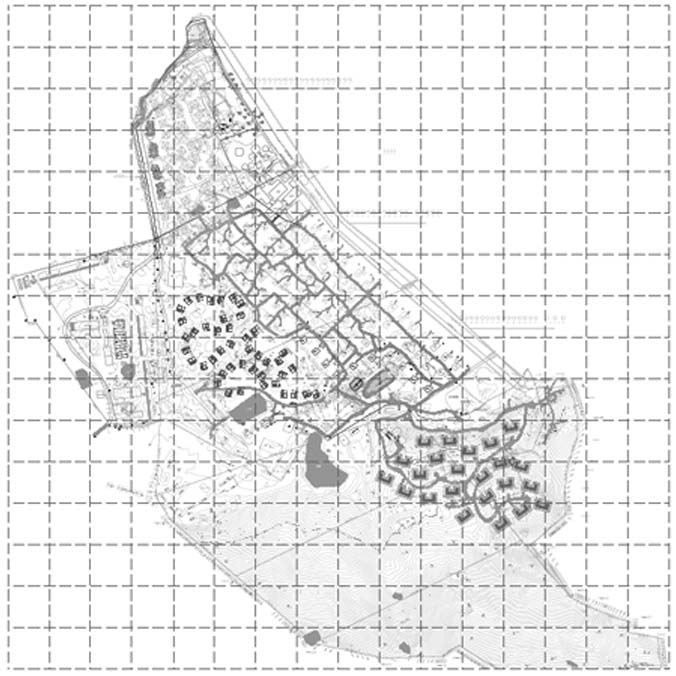
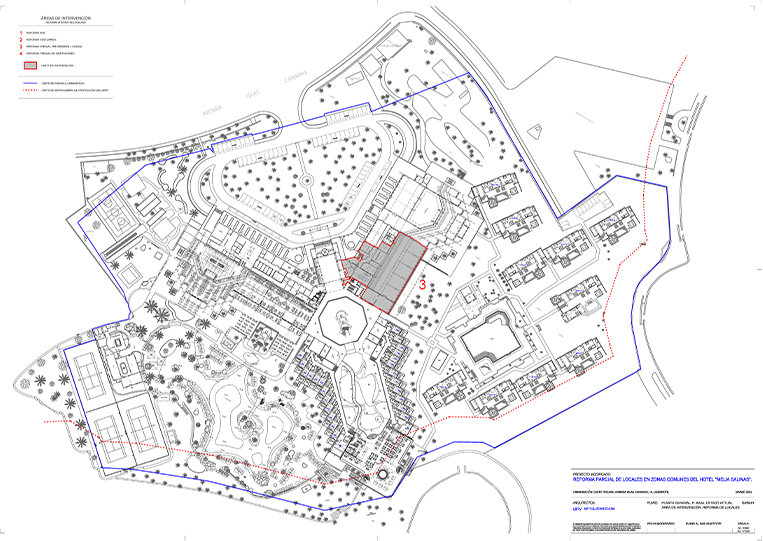
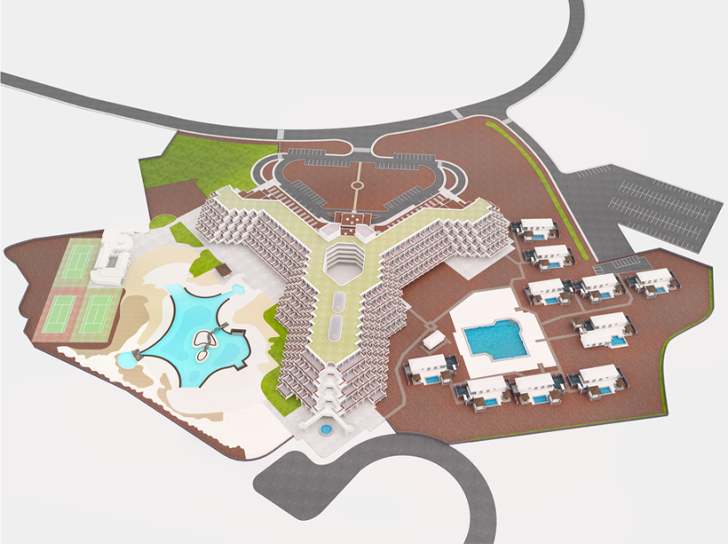
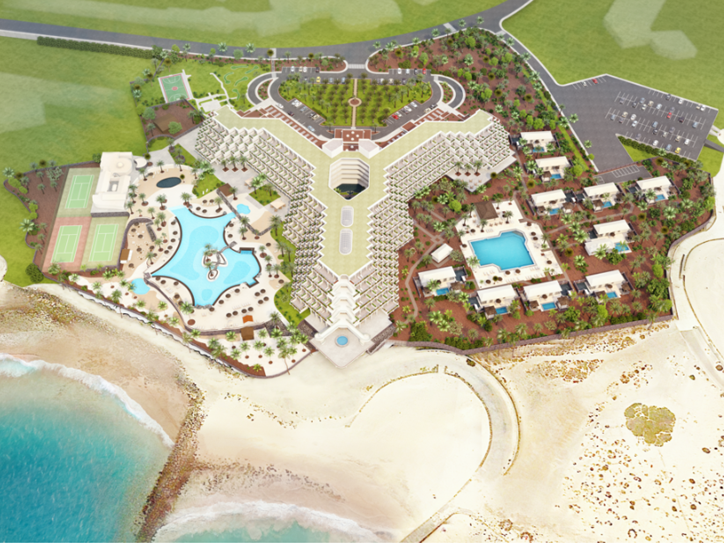
Visrez 3D resort maps are widely regarded as the the best in the business thanks to their photorealistic detail. A 3D interactive map is guaranteed to showcase any property superbly well. 3D Map production can take a few weeks and this guide explains the process in detail. Before our team can get started we need to understand the boundaries of the resort and become familiar with all buildings and amenities. A resort scheme or layout diagram is very helpful in this case. In the example, on the left we have the basic scheme diagram provided by the client and the completed 3D map on the right.
Pre-Openings & Renovations
Visrez has generated hundreds of resort maps for clients worldwide including projects at concept stage, pre-openings or renovations and upgrades. Once a set of models exist in Visrez they can be modified at any time. This is what makes Visrez such a smart choice for hotels, resorts and convention centers because your team will always have the most up to date visual assets to generate sales.
Map Creation & Revisions
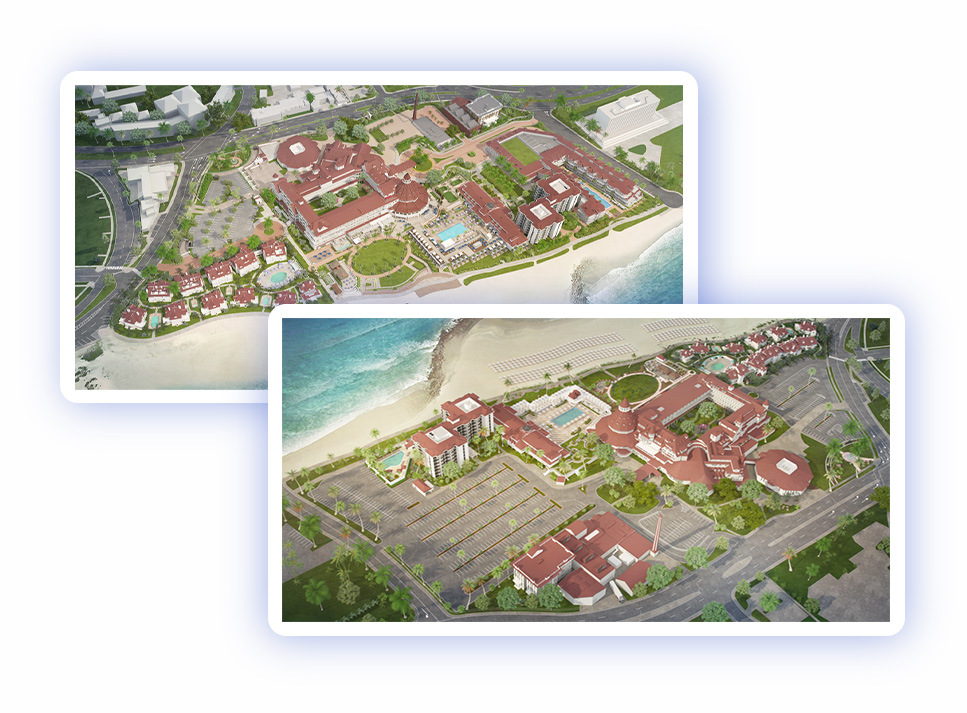
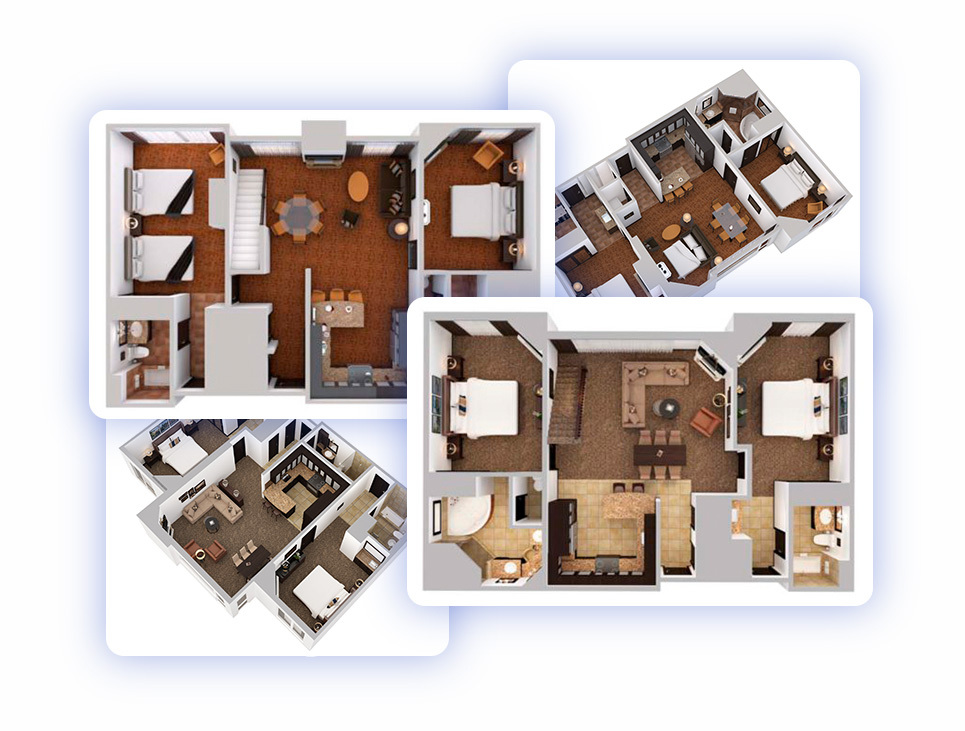
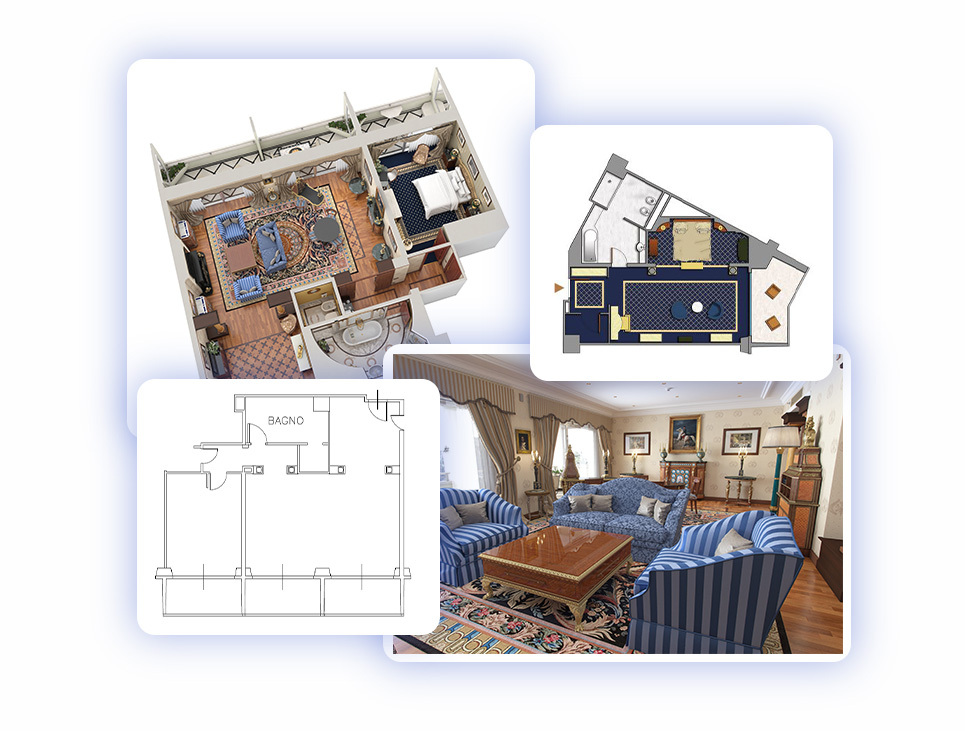
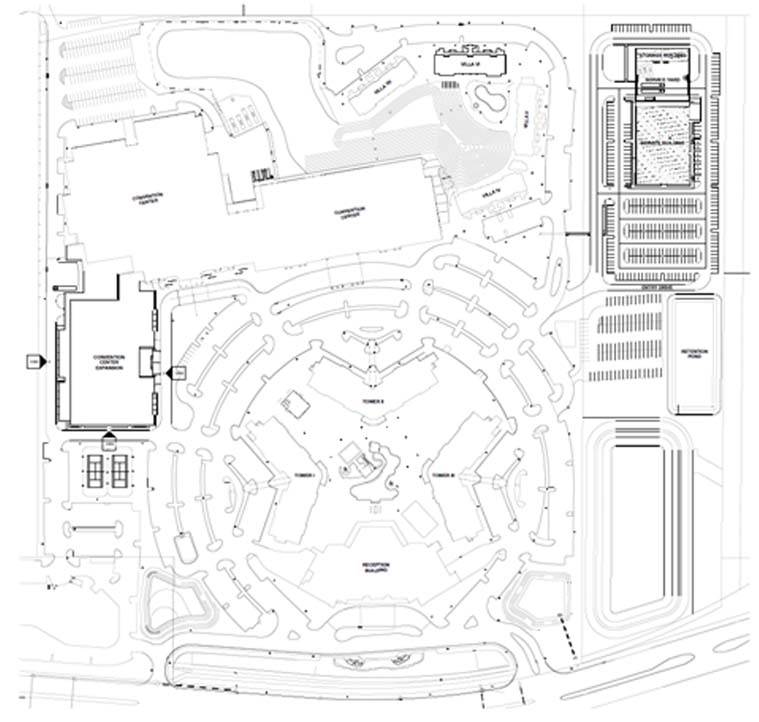
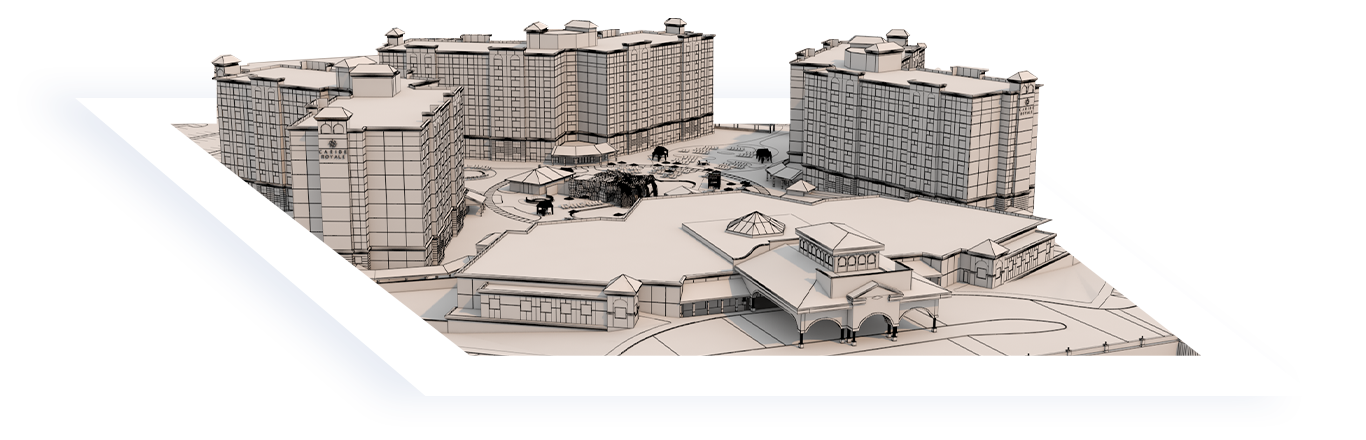
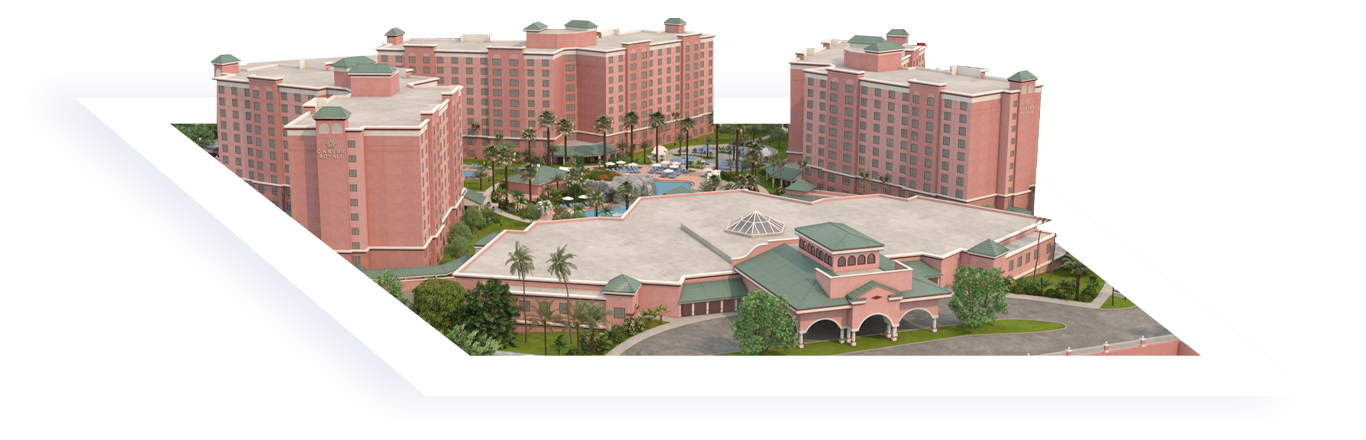
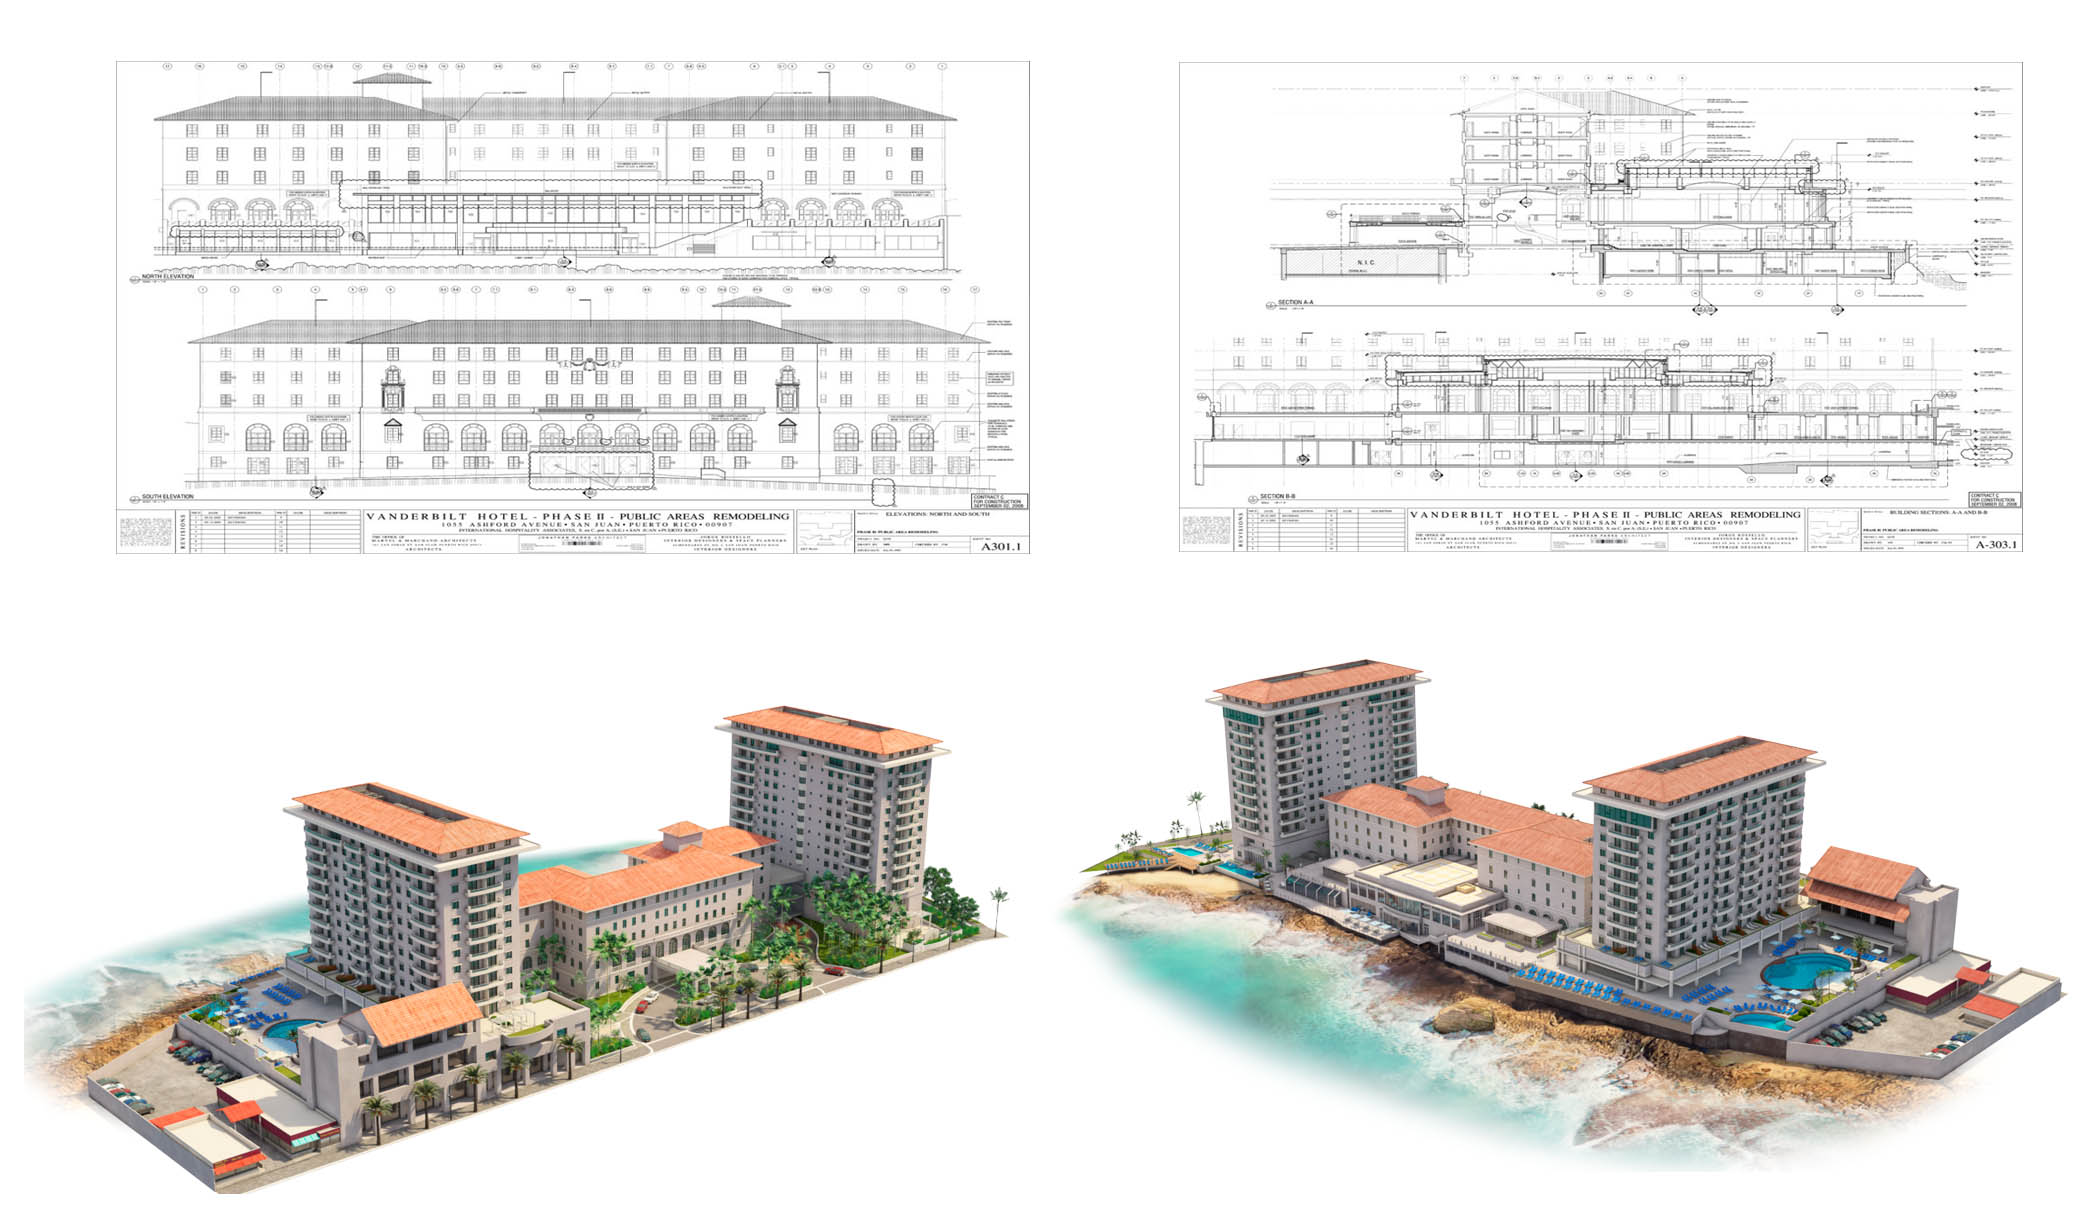
Any available blueprints, pdf,cad or revit file of the buildings is useful to correctly create the 3D models. Drawings (floor plans, section or elevations) give us clear information and help us complete the resort much faster. In these examples you can see how Visrez generates photorealistic 3D Resort Maps and building models using the technical drawings provided by clients for resorts of all sizes.
Renovations & Updates
Clients using Visrez Interactive Map Builder have expressed their satisfaction with its features and have given us valuable feedback to further improve it. We are constantly striving to improve our products based on user feedback. Our team publishes updates to the map builder in our monthly releases and as with all Visrez products there are no paid upgrades or additional fees as we maintain the same code across all clients.
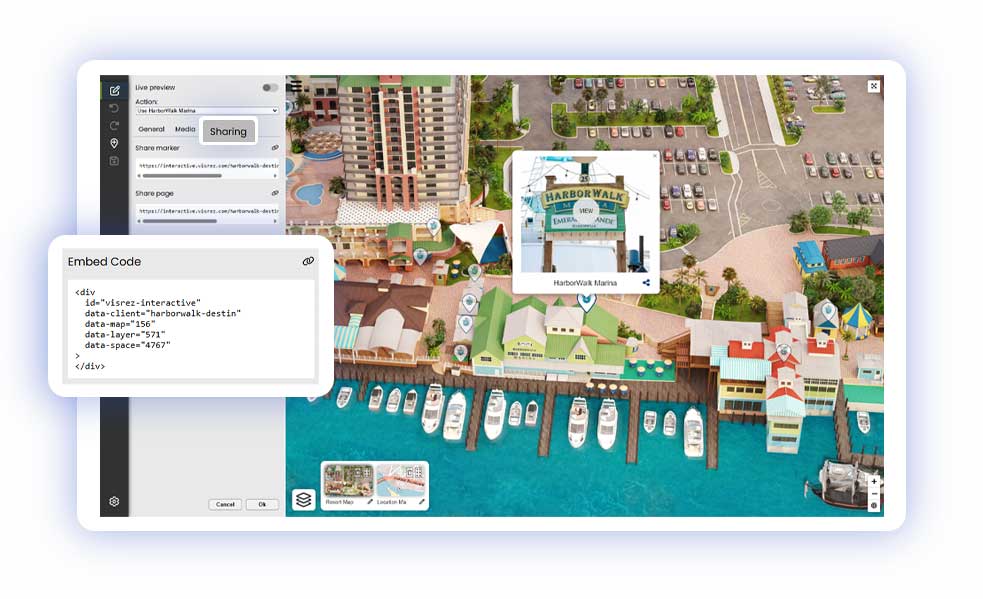
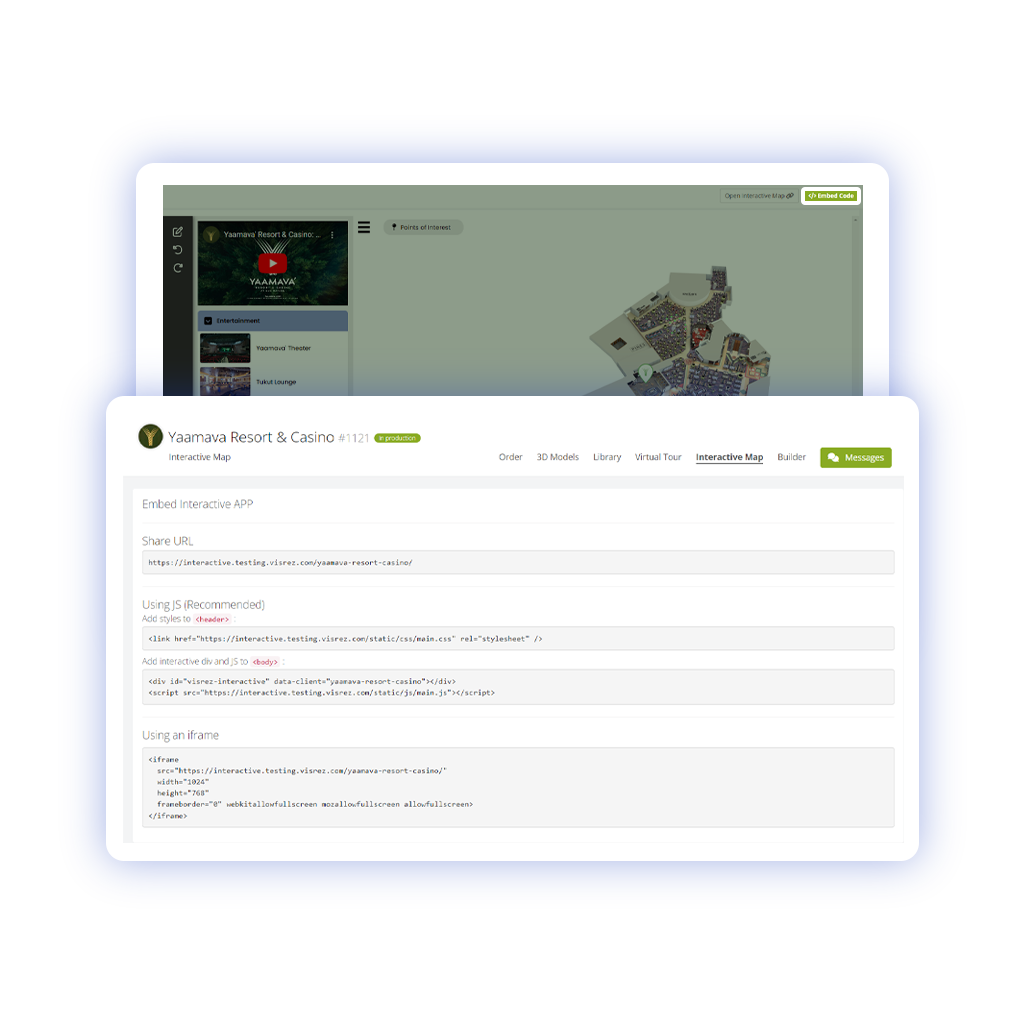
Adding an interactive map to a site is easily done by copying the embed code from Visrez and pasting it into the source code of your page. In your Map settings you can control whether the first menu section is opened or closed when the map loads.
Visrez Maps can also load with a single marker displaying if you want to highlight just one marker when the map loads, for example in a villa rental or property site where you may want the map across many different pages but showing just one marker per page upon loading.
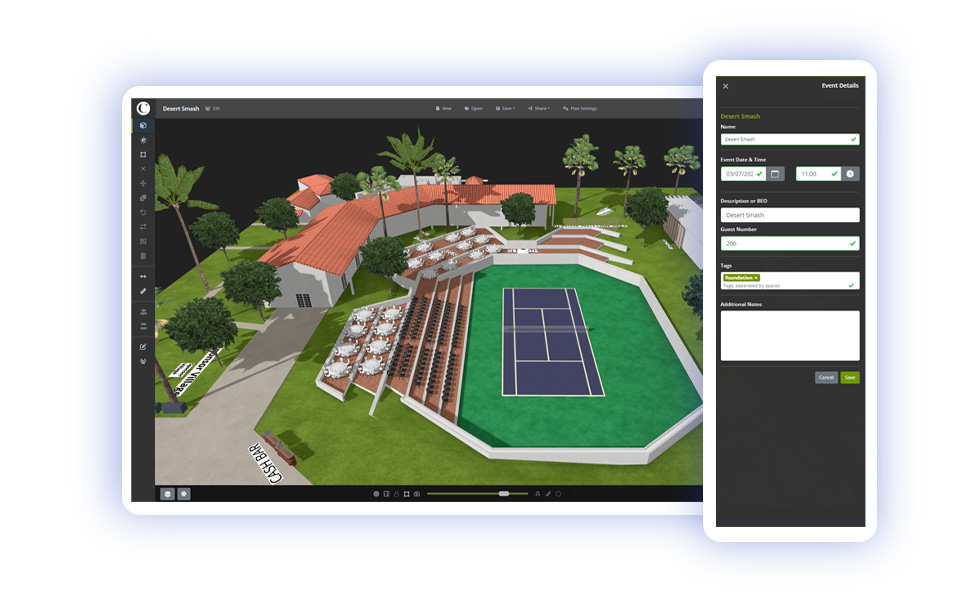
Visrez Interactive Maps can be duplicated to create versions for specific groups or events, without impacting your website map. Clients can build customised maps to support events and groups. For instance, a detailed daily schedule can be created for a large group event and shared directly with attendees.
The display font can be set to match any website so the interactive map blends perfectly with the site. This is done in the settings by entering in the website URL and Visrez identifies the default font in the site and allow you to match that font in the map. There is also a Google Font option which allows you to select the font from a dropdown list of Google Fonts. Matching the interactive map font to the website makes the map appear native to the site and when combined with the menu styling options users can quickly make their interactive map look like it is part of their website.
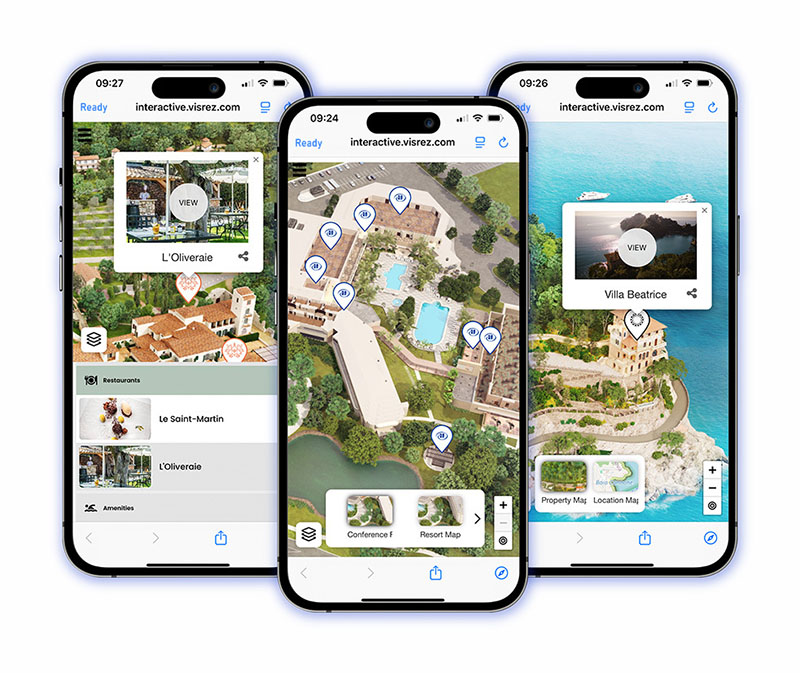
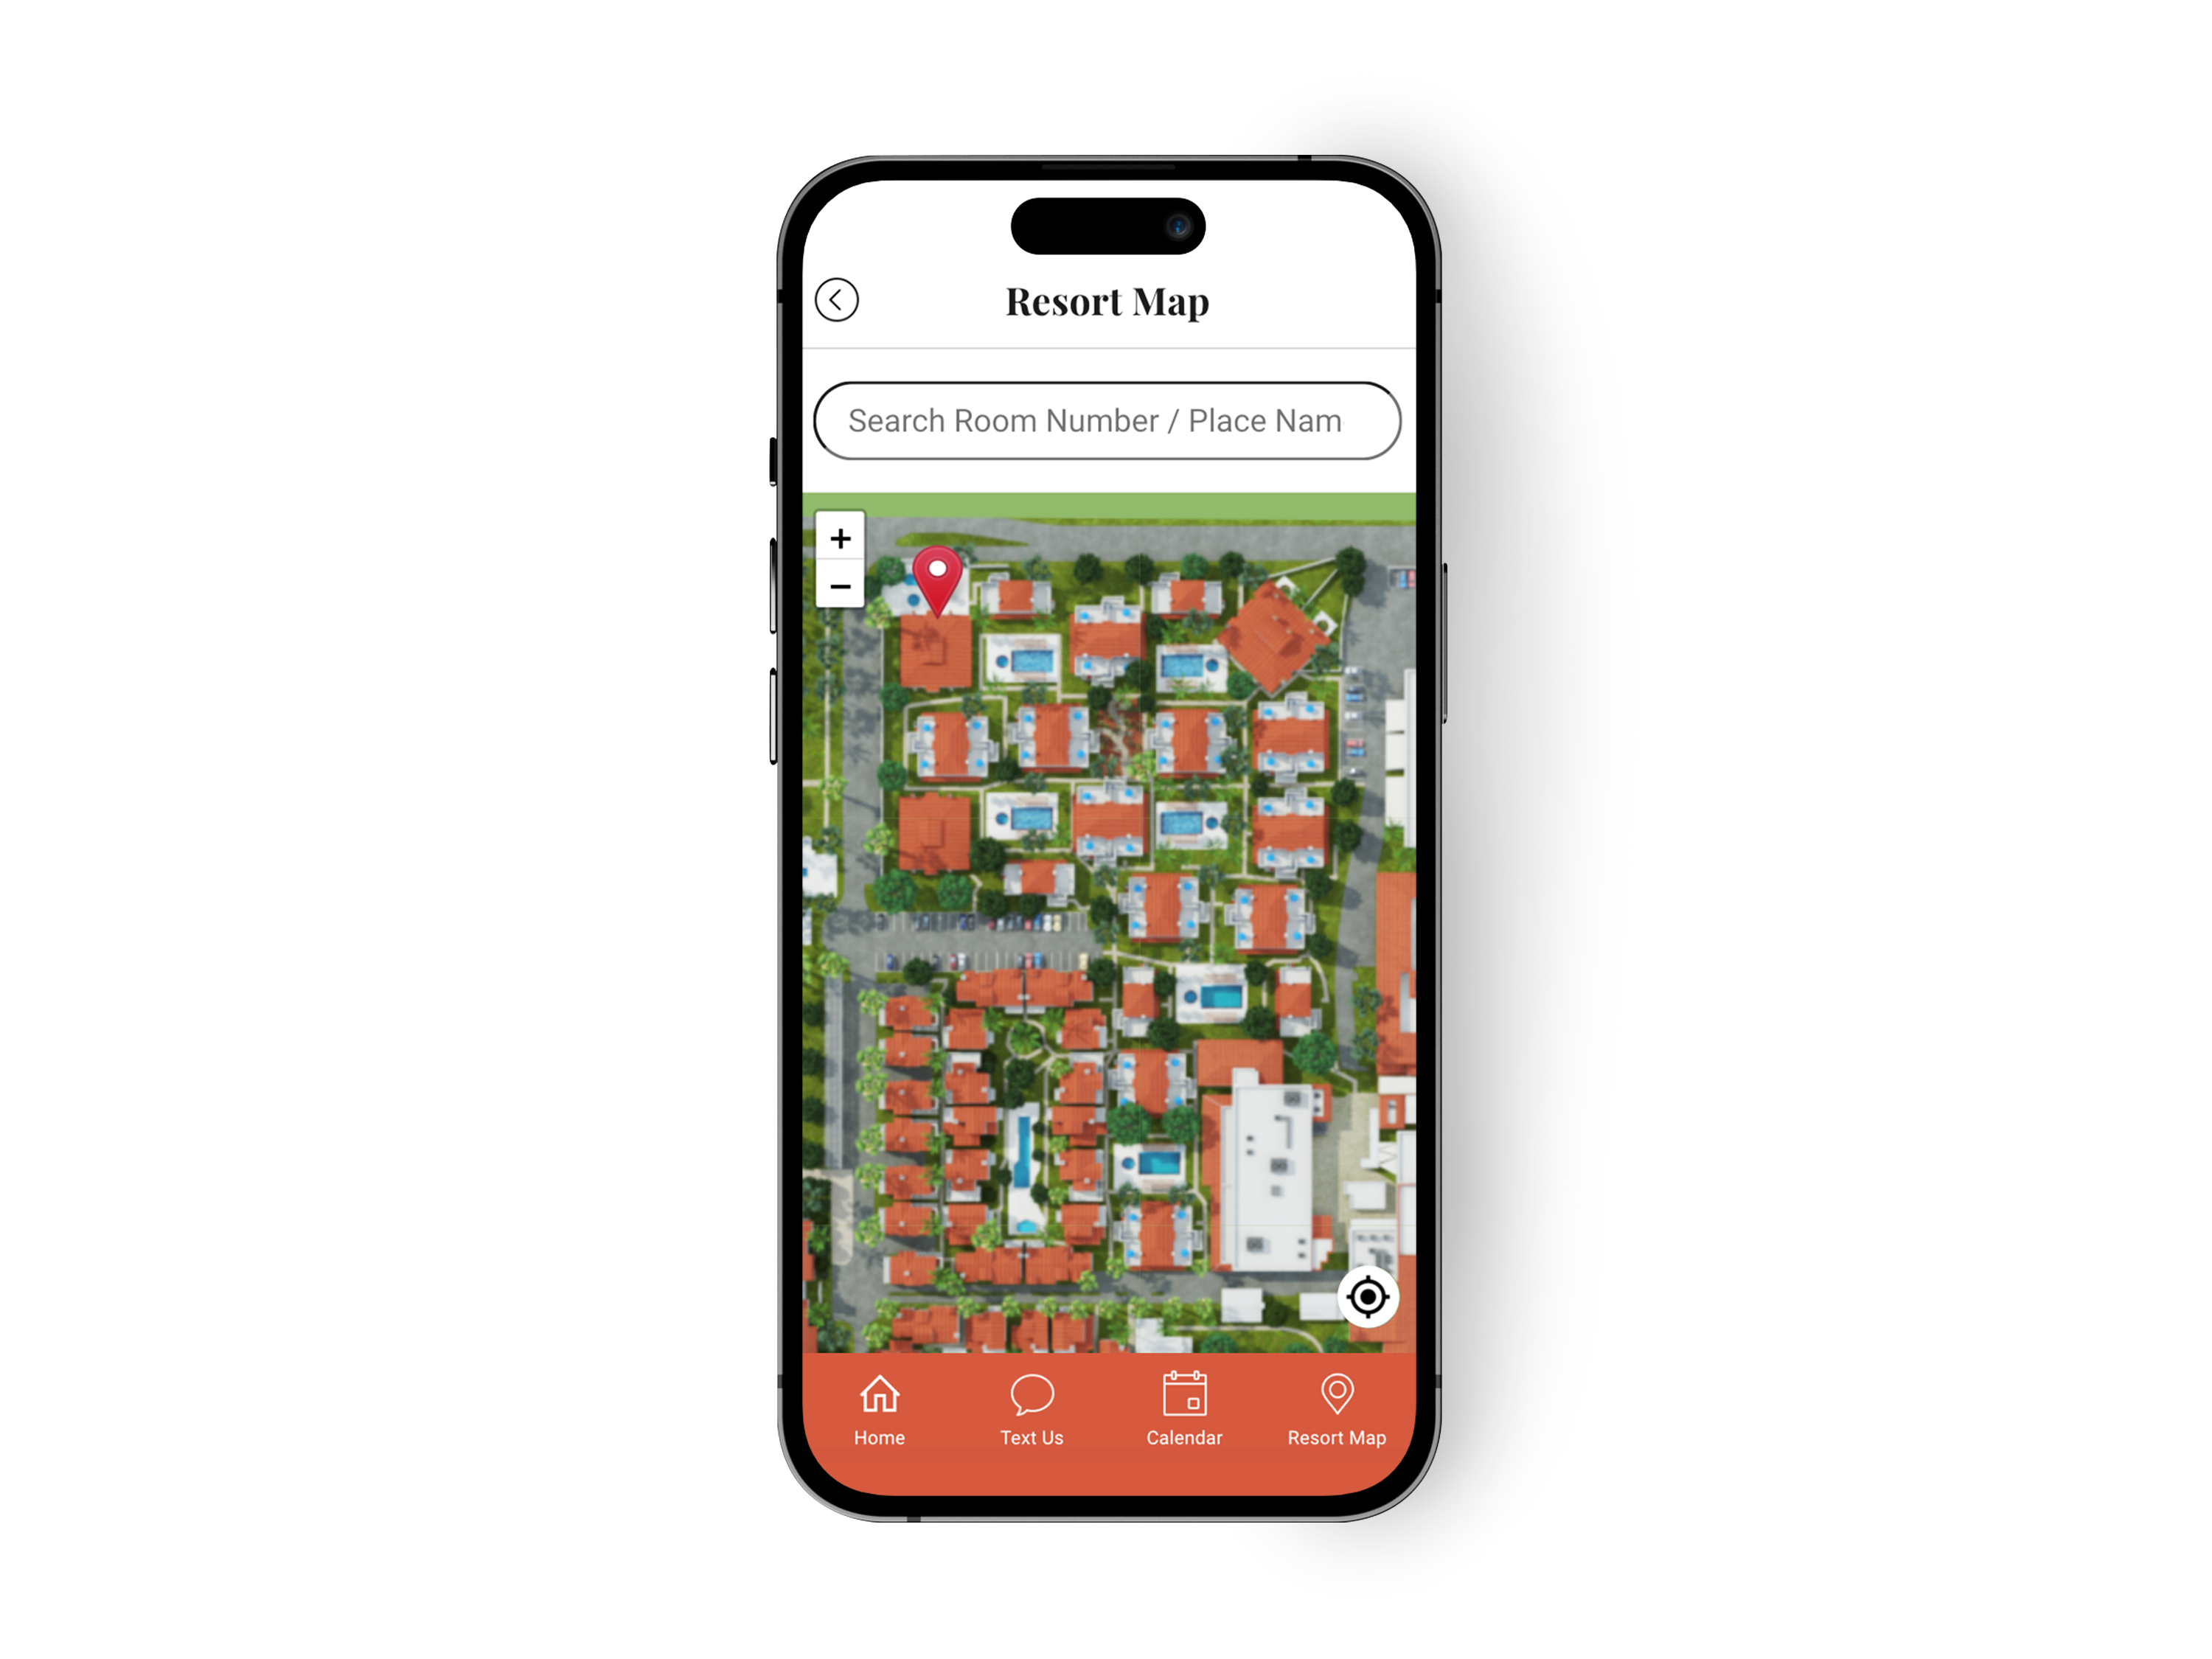
Visrez interactive maps are fully mobile-optimized and designed to elevate the guest experience by highlighting a resort’s key features and amenities using a visually appealing tool. Our maps can be seamlessly integrated into third-party guest experience applications with custom embed tools in Visrez.
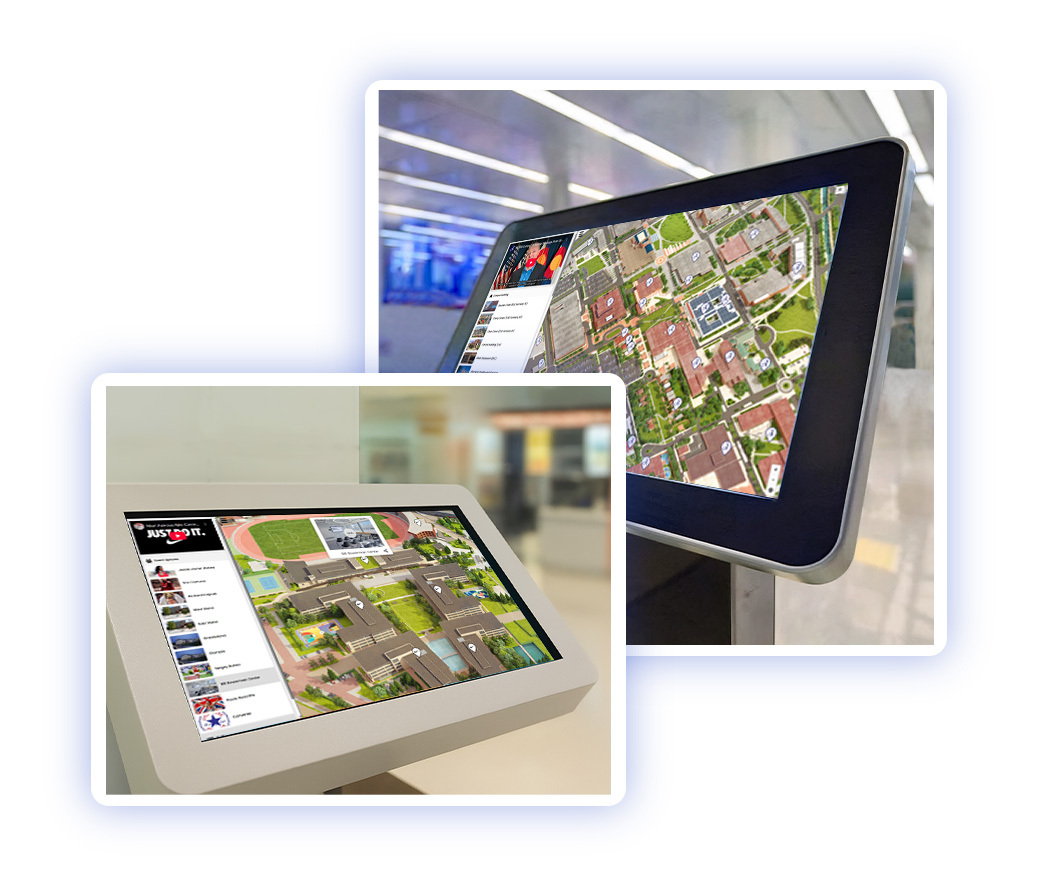
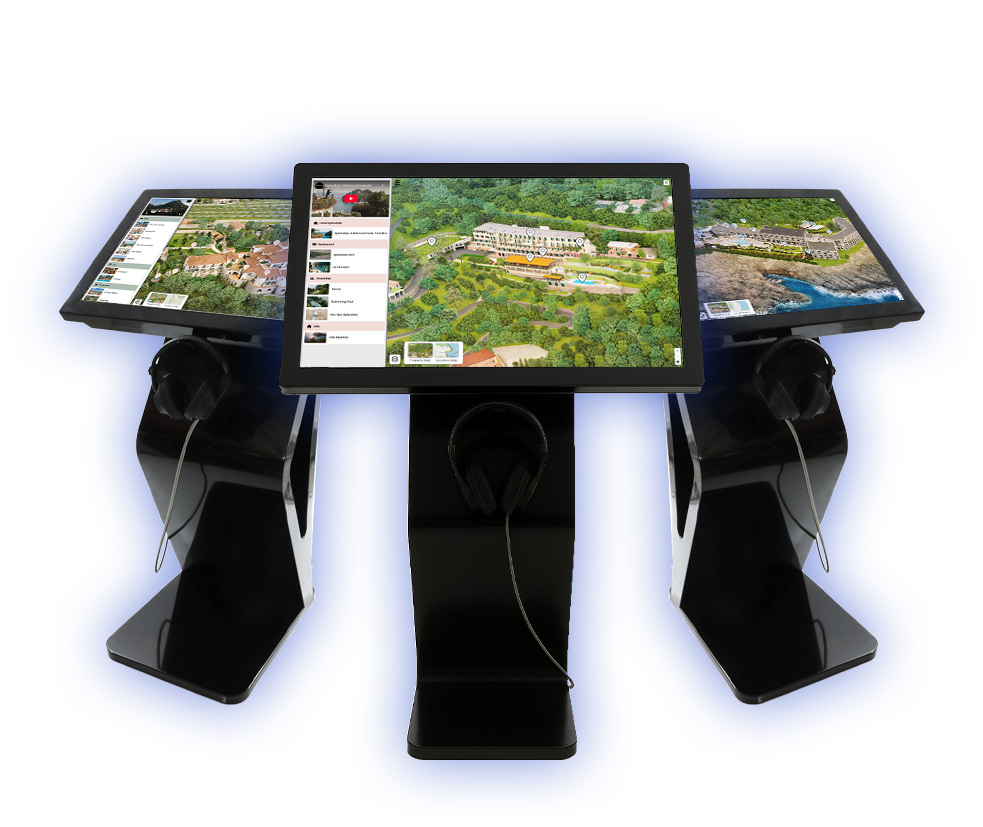
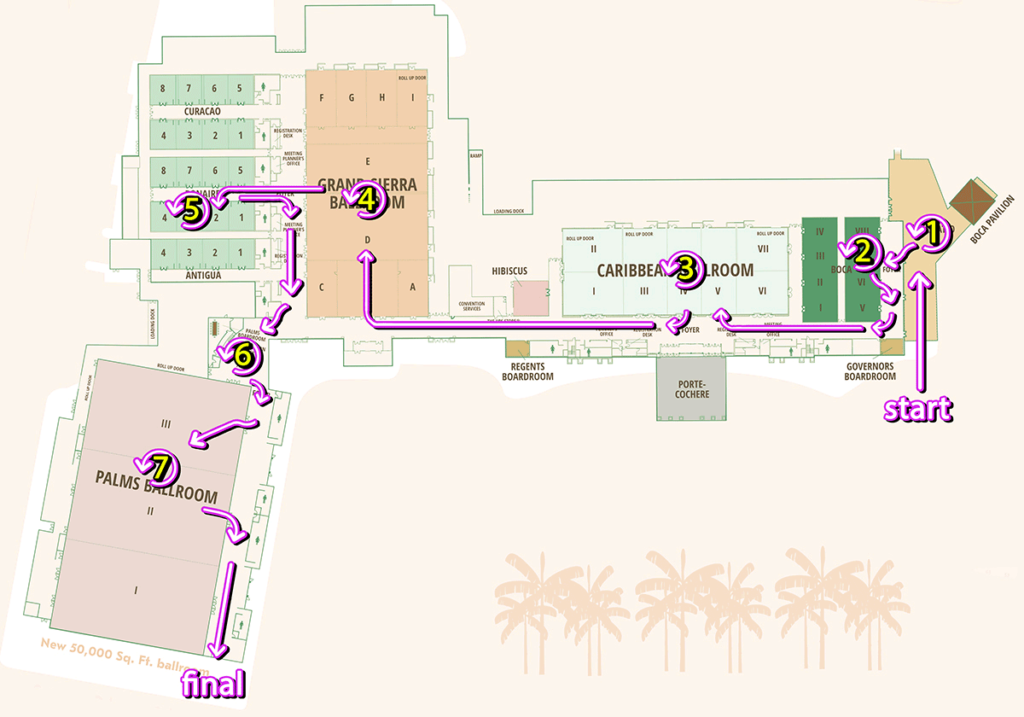
Visrez Interactive Maps can be used for wayfinding by providing an intuitive, visually rich navigation experience within complex indoor and outdoor venues. This allows users to to explore resorts or venues with a high level of detail and spatial accuracy. Users can search for specific locations such as meeting rooms, event spaces, or amenities and receive clear, step-by-step directions to each location. The maps support multi-floor navigation and can be accessed via kiosks, websites, or mobile devices, making them ideal for resorts, large venues, convention centers and third level campuses.
Visrez Interactive Maps can be displayed on touchscreens and kiosks to provide an intuitive, visually rich navigation experience for resorts, campuses or large scale venues. The same interactive map product used in your website can also be displayed on touchscreen devices at checkin or lobby or assembly points to help users find specific points of interest or to assist in wayfnding on site.
Each interactive map option includes a full build-out and training is provided on how to update the content. New feature releases are pushed automatically into every map account with no additional fees.
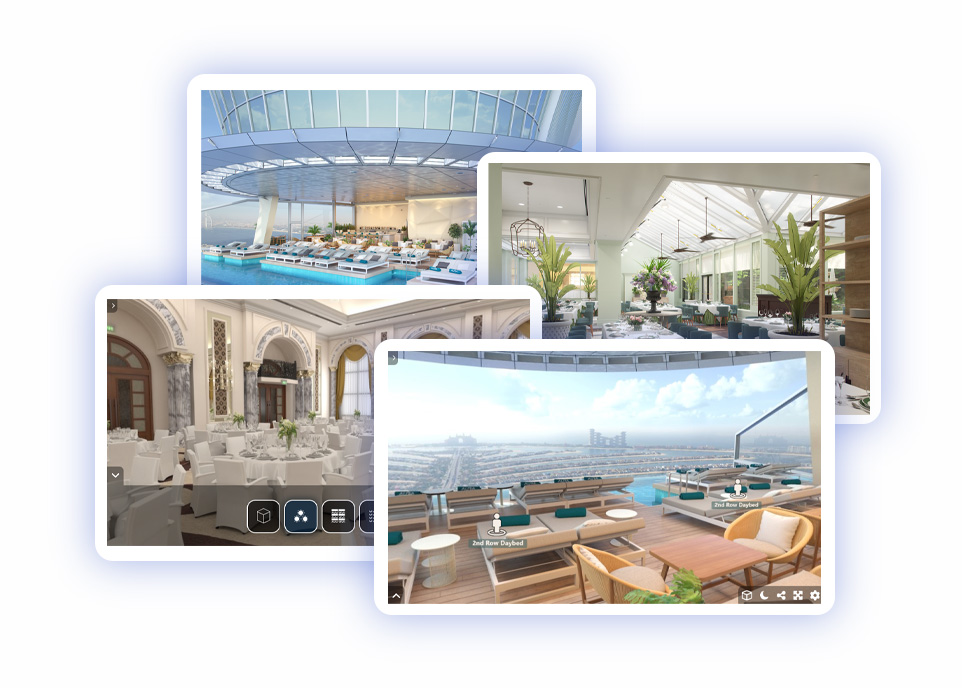
Visrez generates photorealistic virtual tours without any on-site visits or photoshoots and has recreated thousands of spaces worldwide. Visrez simplifies the creation of visual assets off-site and the platform breaks production into a step by step process so that each detail is recreated with photorealistic accuracy. Virtual Tours are superb sales tools which can be updated at any time to match future renovatoins on property.
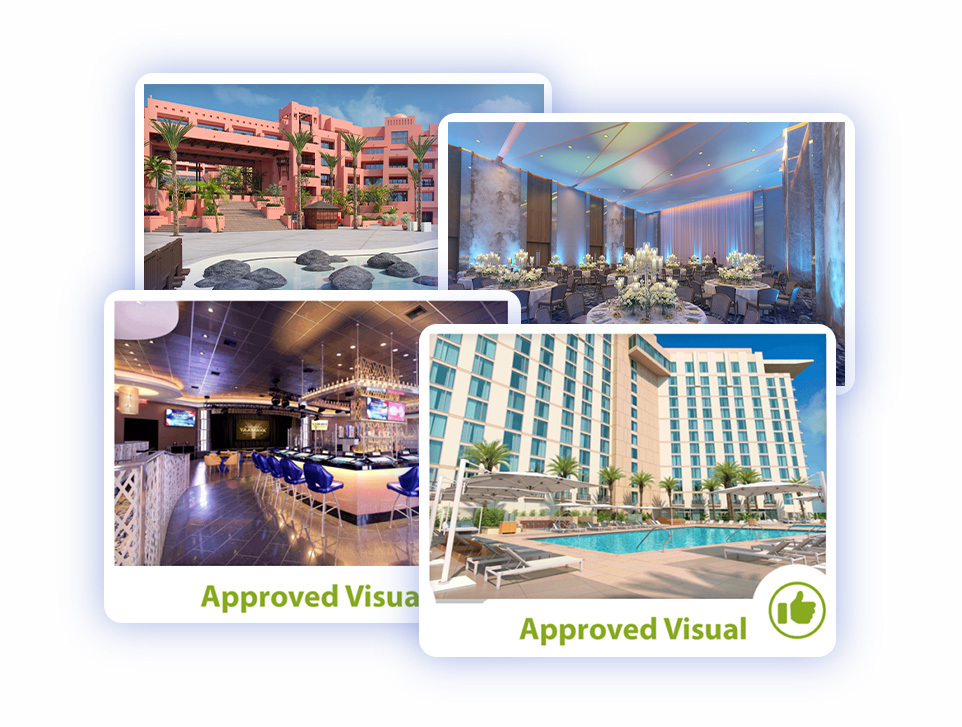
Visrez first generates a set of floor plans without the ceiling so clients can review the interiors. Clients can select a collection of furniture from the Visrez Library and our team generates et-ups using the builder. Then Visrez produces photorealistic interior renderings with ceiling and lighting detail. Once the interior renderings and builder plans are approved the final step is to combine all these elements together into the Virtual Tour.
Showcasing Spaces Virtually
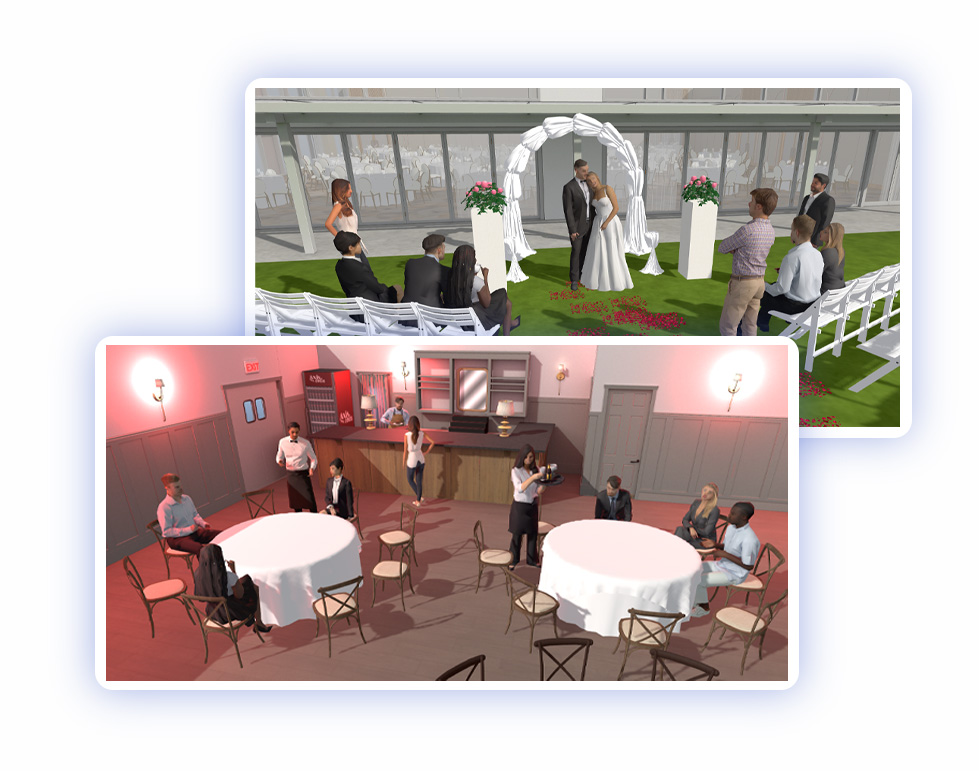
Anyone who works in events knows the time involved to prepare an outdoor venue so having the ability to demonstrate the space virtually is a real asset. Visrez helps venues to showcase their spaces in multiple set ups, lighting and capacity options without any on-site photoshoots required.
Outside views can be incorporated from reference shots provided by clients into their Virtual Tours.
Allowing the user to switch between day & night views is a superb feature because it give users the ability to demonstrate multiple settings. A conference can be switched out for a banquet with the touch of a button.
Mutiple Set-Ups & Capacities
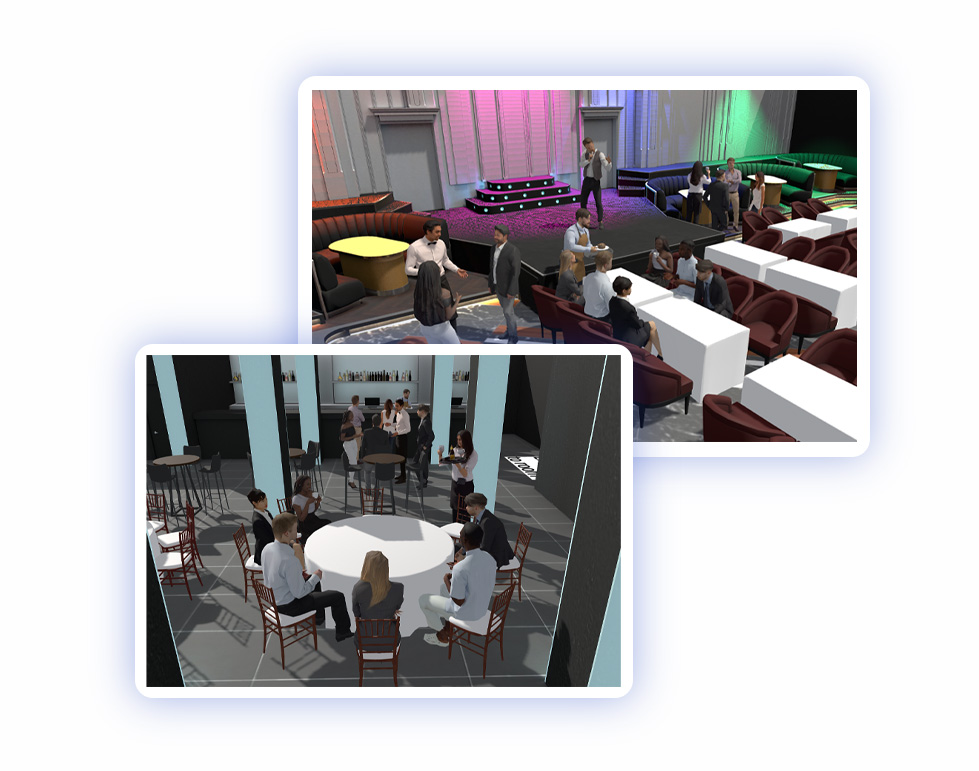
Virtual Tours allow clients to present any event space in multiple capacities and set-up options.
Lighting Options
Switch lights up or down to demonstrate the ambience and atmosphere of any event space using Visrez.
Following up on the great response from our July release we have added another lighting control for the house lights in any space. This is really cool and as it allows wall lights to be turned up or down for added atmosphere in your event plans. Please note for existing event spaces this requires a quick adjustment to the code so this feature is available on demand and can be requested through the support channel.
New Moveable Lighting Controls – July 2025
In response to popular demand, our team has created enhanced light controls in the Floor Plan Builder. These new tools include Bulb Lights and Spot Lights which bring a new level of realism to 3D event plans and are incredibly fun to use. Our new light tools will help sales team convert more group enquiries by adding atmosphere and ambience which is guaranteed engage clients during their venue selection.
New in the June 2025 Floor Plan Builder Release
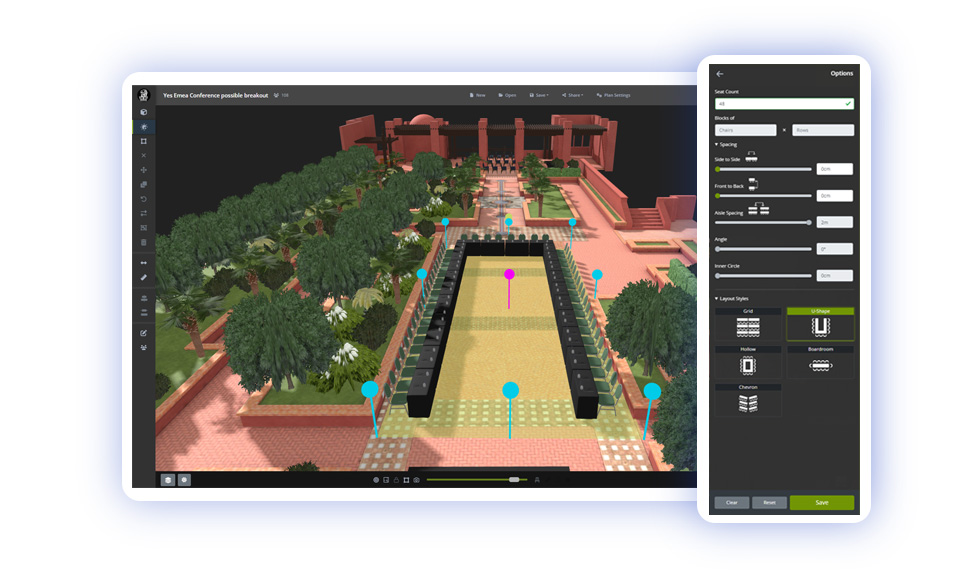
Our team has added a collection of more than two hundred event plan templates covering the most common event styles. Plan templates can be adjusted in size using a new feature located in the spacing tools menu. Event plans can be copied & pasted into custom spaces and provide a great source of inspiration to our users. The idea behind this update is to reduce the learning curve for new users in Visrez and to allow partners to create plans without needing to get custom spaces built out first. Our design team has done an incredible job in putting together over 200 event templates, packed with cool objects and layouts.
The release also includes the new ‘skybox‘ which brings plans to life with a bluesky background with the option to toggle between different times of the day and add enhanced shadows to the plans. Feedback so far has been really positive and users love the new bluesky background canvas whilst working in the builder.
The February 2025 release includes an enhanced ‘spotlight tool‘, advanced ‘select, move and rotate‘ tools and a new ‘elevation tool’ which allows objects to be suspended at any height in the event plan. These are great updates to the builder which are demonstrated in the video below.
Thousands of Event Professionals, Sales and Operations teams use Visrez to create professional 3D Plans. Visrez has grown by word of mouth with no outside investment thanks to the quality of our products and customer support. Our team constantly improves the platform based on user feedback, releasing new features monthly with no upgrades fees. Every account gets the same software regardless of the number of spaces activated and clients can manage their own teams without limits on user numbers.
Drag & Drop
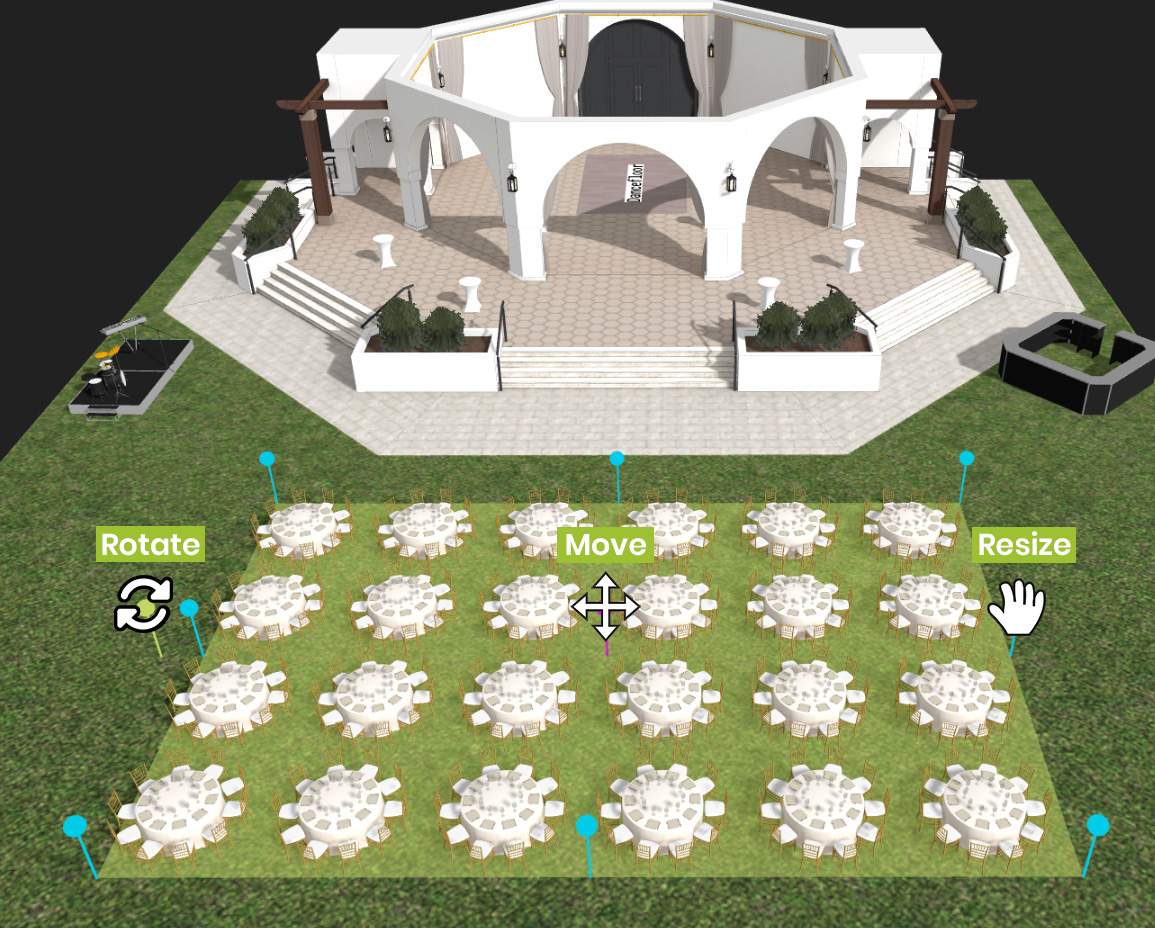
Super Easy Controls – ‘Expand, Reduce, Move, Space, Rotate’
The latest release combines the blue expand circles with the move and rotate tools. Now by clicking on any single object or block of objects in your plan you can increase that block using the blue expand circles.
Draw Styles
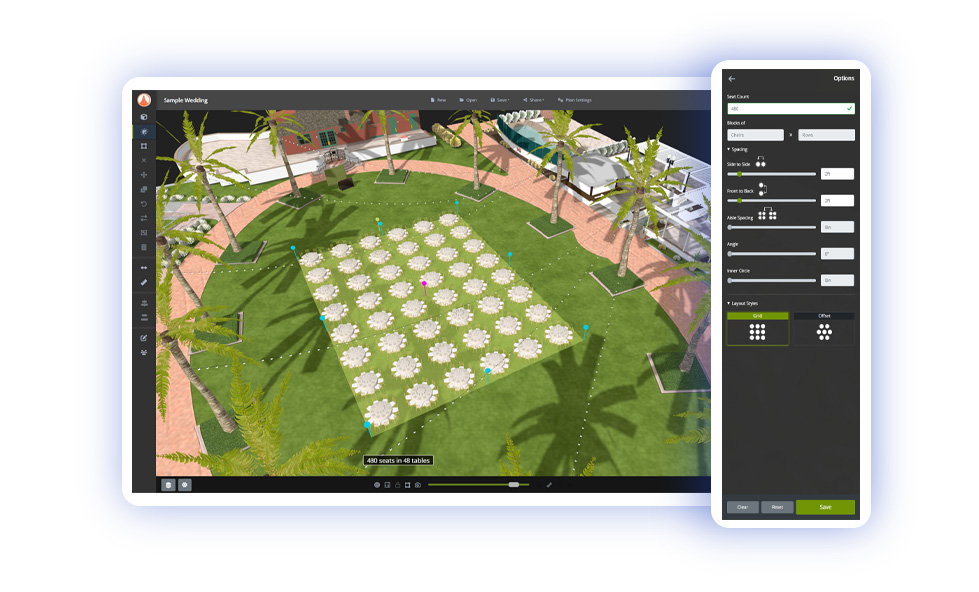
The Build Tool allows users to create plans in many different ways and is fun to work with. Users can specify the exact number of objects or draw with the mouse to fill the space. Sliders adjust the front to back or side to side spacing and you can also set the Aisle spacing or inner diameter for circle or semi-circle layouts.
Leaving the number field empty allows you to draw a set-up by clicking and dragging the mouse inside the spаce. You can increase or decrease the selected area using the blue markers to add more objects.
All styles can be adjusted using the layout style buttons and the object spacing allows you to increase or decrease the amount of spacing between furniture. Once the set looks good, click Save or Clear to start over.
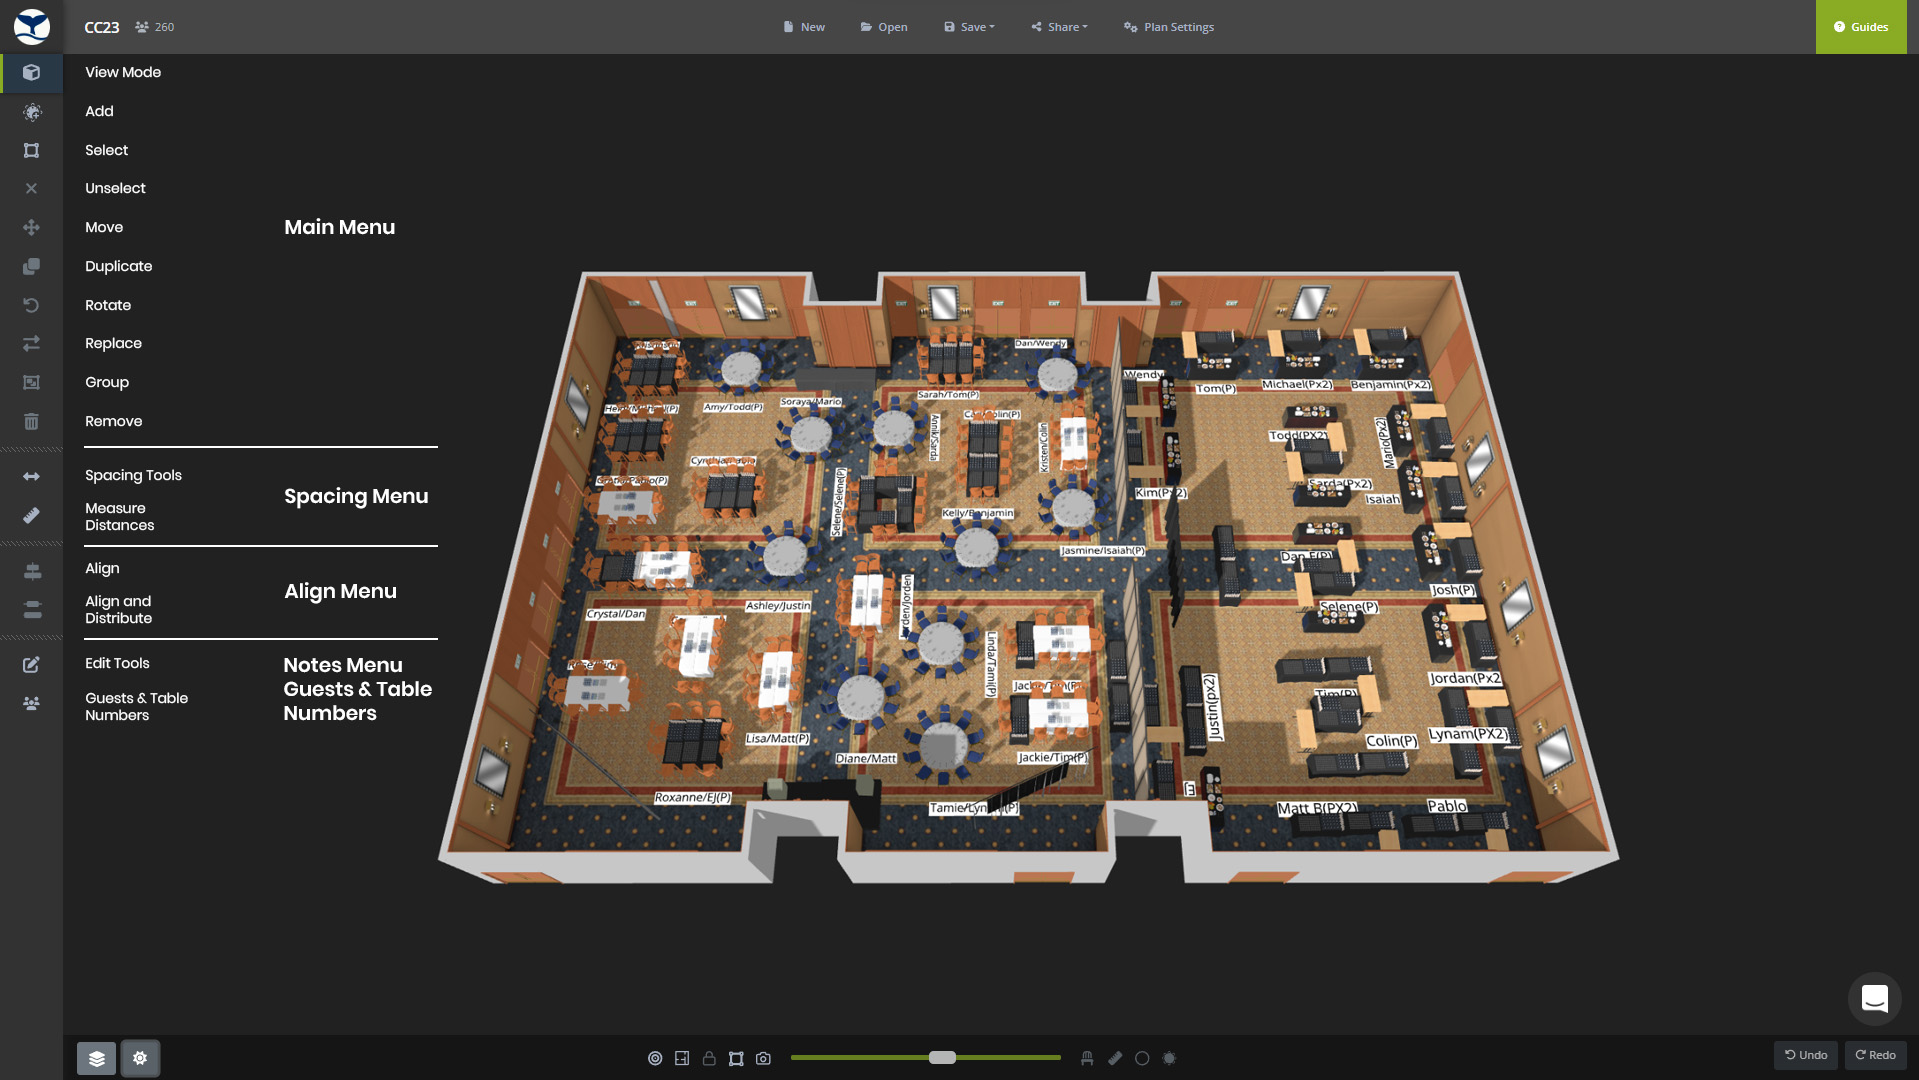
Main Menu Controls
Upper & Lower Menus
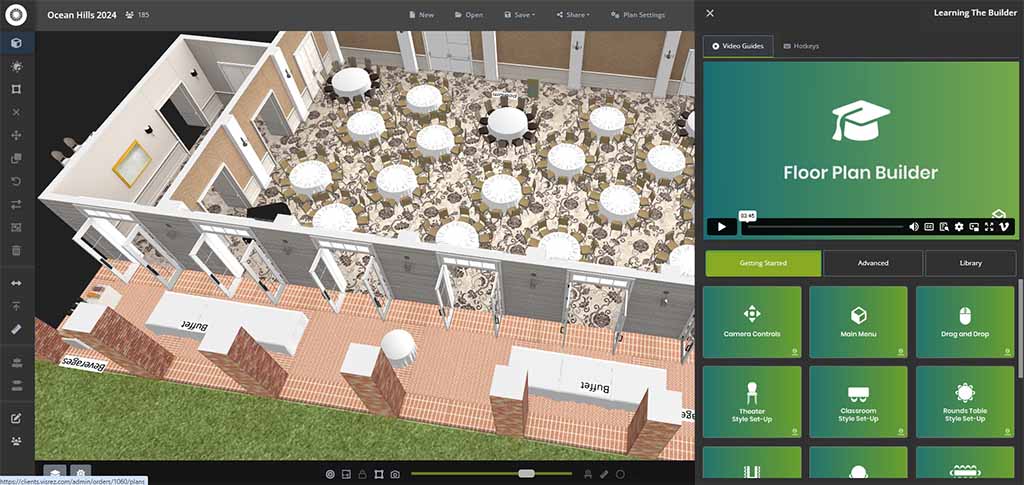
Video Tutorials
In the top right corner you will see the User Guides which explains everything about the builder.
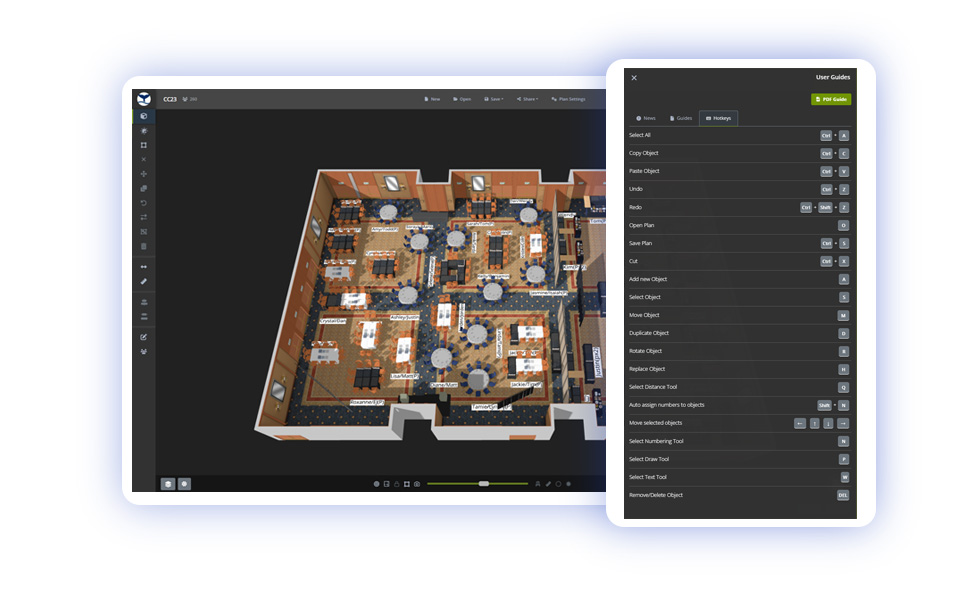
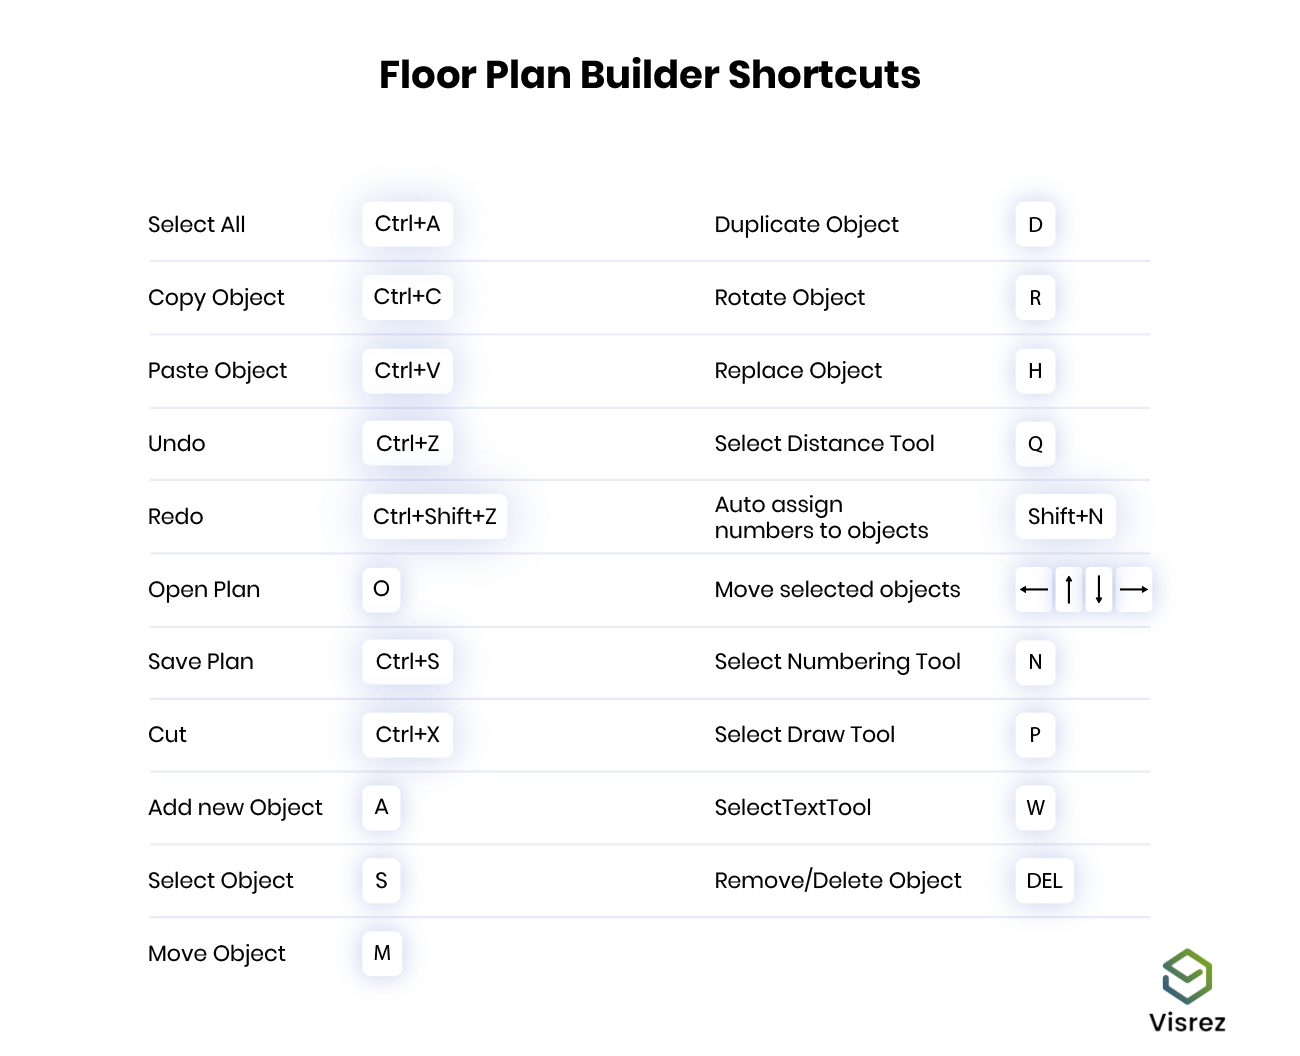
A list of shortcut keys is in the top right corner of your builder, we recommend learning these keys.
Lock Camera
The lock function allows you to stop the room from rotating and is an ideal way for users to work in 2D format by first clicking on the Top-Down button in the lower menu and then clicking on lock the camera. This holds the space in a 2D top down position allowing ubjects can be selected, moved, duplicated or rotated without the space moving. Users can zoom in / out of the space without moving it sideways which allows you to create perfect 2D plans.
Align Selection to View
Selecting objects with the mouse in a standard shaped space is simple but as we all know spaces can come in all shapes and size. If you need to diagram in an unusual shaped space the select tool can drag against the way you actually need it to go. For example in a diagonal or non-standard shaped space you may want the select tool to go in line with the room or furniture but it doesn’t. To solve this problem our team developed a feature to allow users to toggle the direction of the select tool in line with the direction of the space.
Layers & Airwalls
In the bottom left corner of the menu you will find the layers tool. This tool opens up a right side panel which contains a list of the elements within your space which can be turned on-off. Airwalls can be represented by a number or letter which allows them to be opened or closed. They can either be fully opened or closed. To partially divide a space it is recommended to use a room divider object from the Visrez library.
The carpets and flooring elements in a space can also be deactivated using the layers tool as quite often the design pattern on carpets can be quite busy and make it difficult to view the furniture in the plan.
In some event spaces there can be fixed seating elements which can be removed as a block to allow different furniture to be set-up in those areas.
In outdoor event spaces layers can be used to switch off elements such as trees, string lights or fixed objects such as tents, gazebos or catering trucks to allow you to build the plan without the distraction.
Theme Settings
In the bottom horizontal menu there is a settings icon which does a couple of things. You can switch the builder background from black to white and adjust the level of sunlight in the plans based on the time of day. This is a great way to bring outdoor event plans to life by showing where the sun will be throughout the event.
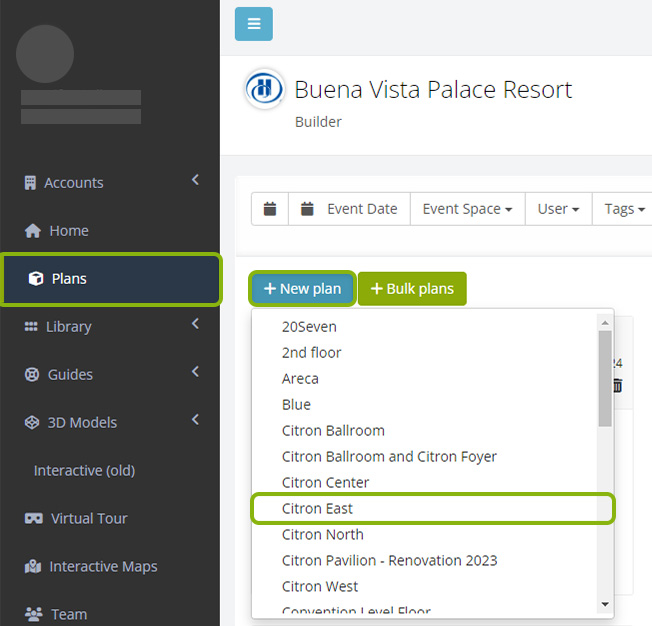
To start a new event plan go to the Plans page, and select Space from the dropdown menu. This will open up a blank builder of that space to allow you to create a plan using an empty space. Inside your builder you can also find all the plans created by all team members by clicking on the Open button in the top menu.
The Visrez Library is built into every user account and shared with all team members. Any object from the Visrez library can be used in event plans. Objects added to the client collection are available to all team members. New objects are added weekly by the Visrez team based on client requests.
Clicking the + beside the object in the Visrez Library will add it to your collection. To remove an object from the collection or archived if already used in a plan you simple do the opposite and un-check the object. Clicking the + beside the object in the Visrez Library will add it to your collection. To remove an object from the collection or archived if already used in a plan you simple do the opposite and un-check the object.
Client Collections inside the Builder
In the Main Menu the Add button (A) opens categories with objects which have been added in the client collection. The objects with different size and seating are selected from the dropdown menu and color options from the carousel slider.
How to Add People to Event Plans
Adding human models to plans has been something our team have wanted to do for a long time but we couldn’t find a way to create realistic human models without dramatically increasing the file size of event plans. We now have a library of super realistic human characters which can be added just like furniture without slowing down the loading speed of a plan. This makes Visrez more fun than ever as users have a cast of characters to choose from depending on the type of event plan you are creating. Human models can be added individually or in groups to understand room capacities and occupancy dynamics and can help to show your clients how many people could fit inside any space.
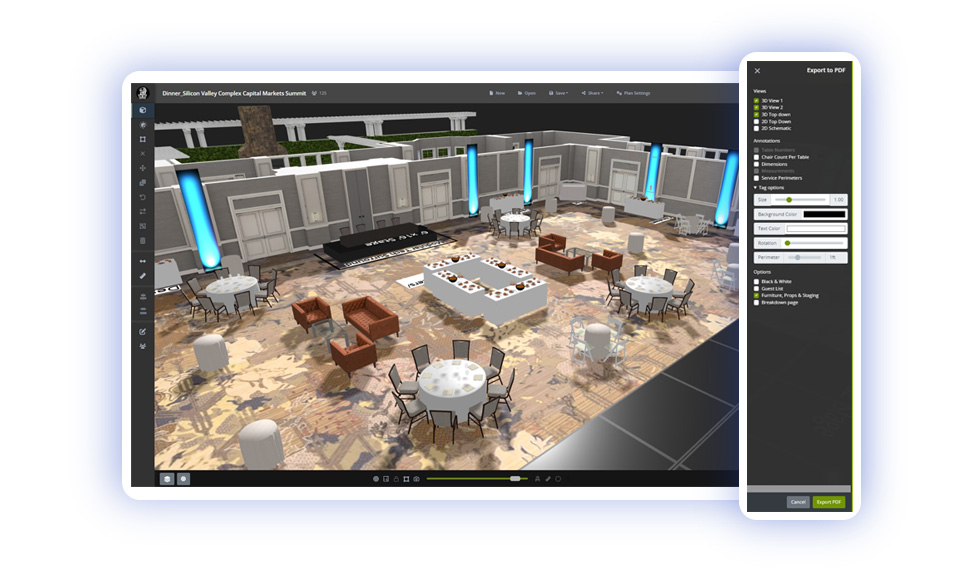
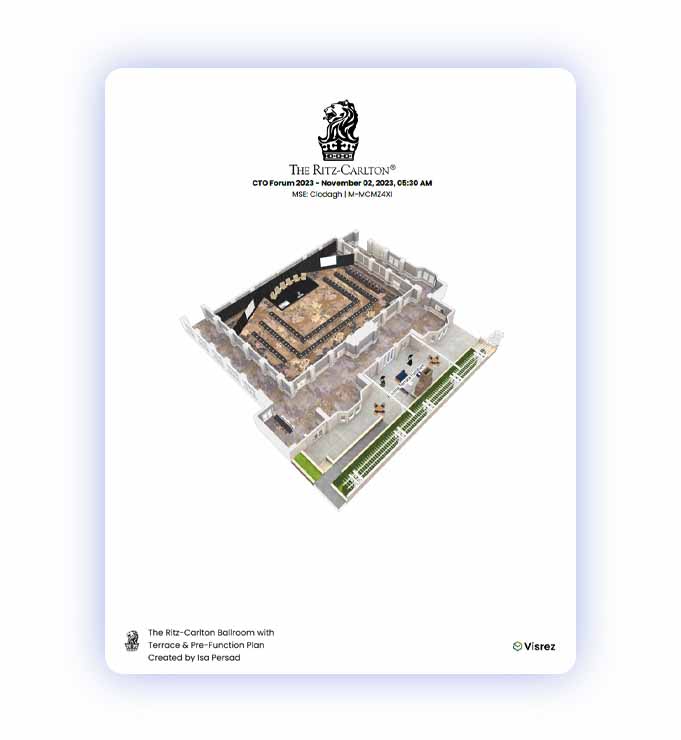
Visrez allows users to export plans in multiple formats including Interactive Shared Links, PDFs and PNG images. Plans can be exported in 3D with multiple views, 2D or black and white schematic format. You can include notes, equipment , table numbers, dimensions and other information. PDFs have a range of views and elements which can be added to all PDF exports. Floor Plan Builder exports all come with a built in link to the shared plan so all your client needs to do is click to load the interactive version. Any changes made in the editor appear immediately in the shared version so if you update the plan you don’t need to share a new link, the client just refreshes to see the latest version.
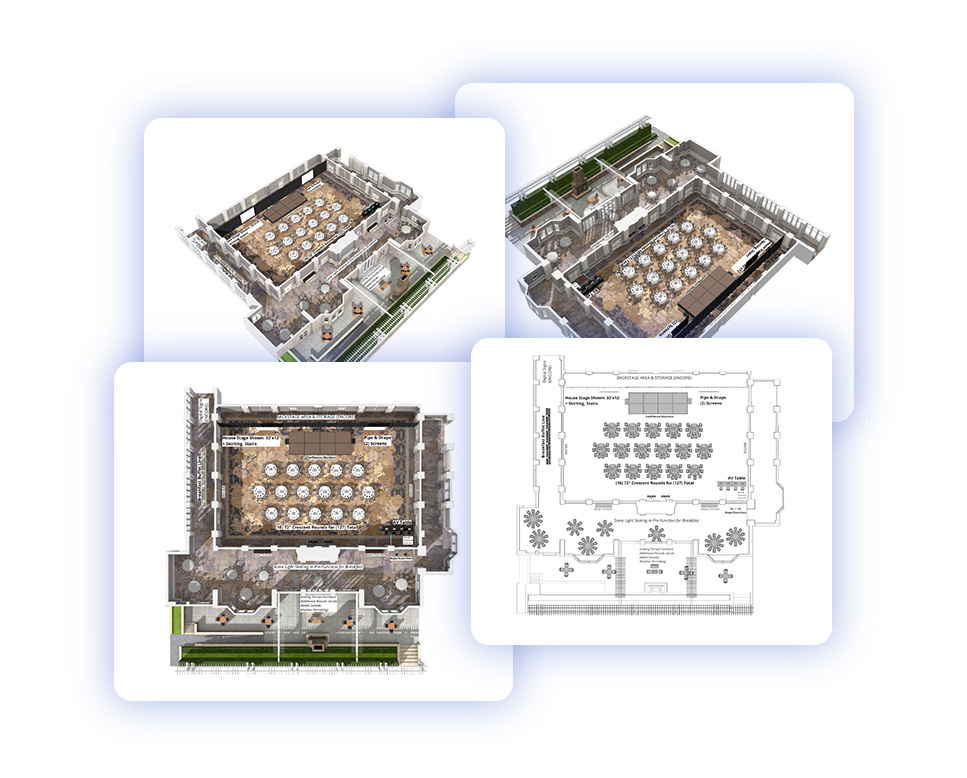
3D, 2D, Colour and Black & White
Visrez gives you the formats you need to communicate effectively to all stakeholders. Plans can be exported in full color 3D or 2D Black and White in the same PDF. From a sales perspective the 3D version is more impressive but many operations teams prefer to work from black and white format. All view types exported in a PDF will link to the interactive plan by clicking on the diagram.
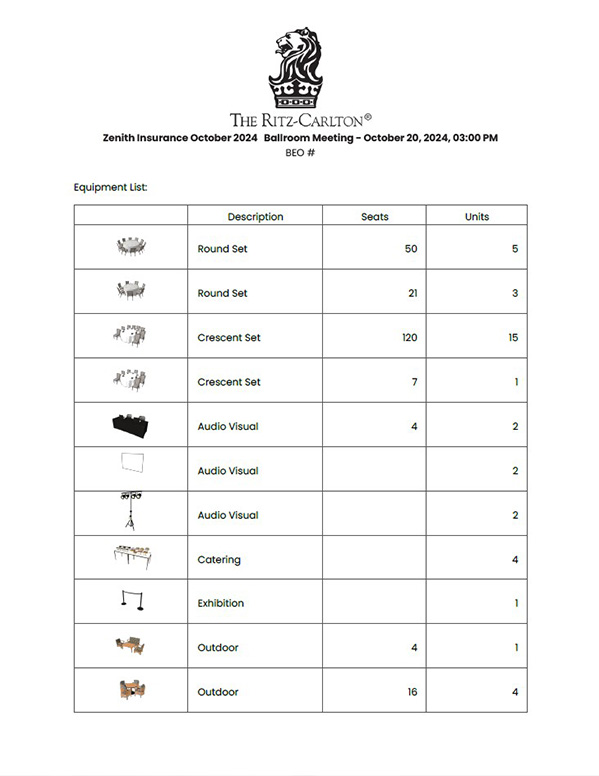
Equipment Breakdown Page
Users can export a breakdown of all the furniture used in the event set up along with a thumbnail image in a separate table. This breakdown can be included in your PDF export or on its own as a separate PDF. This is a really useful way to provide both the client and the operations team with a summary of all the furniture and staging props required in any event plan. This information can be used like a checklist for the set-up team to make sure they have all the necessary elements in place for the event.
Plan Settings Information
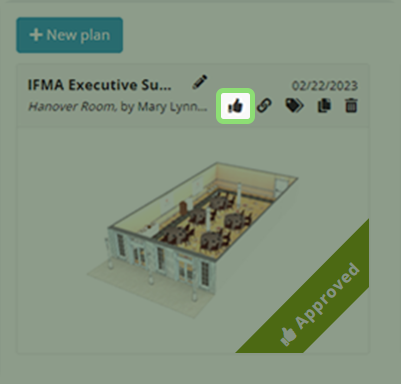
Additional event information such as Date, Time, BEO , Notes can be added to the PDF under the plan settings. This is displayed below the client logo at the top of the PDF exports providing a reference to the BEO or Client details in the PDF distributed to the team. The Plan settings also marks if a plan has been client approved.
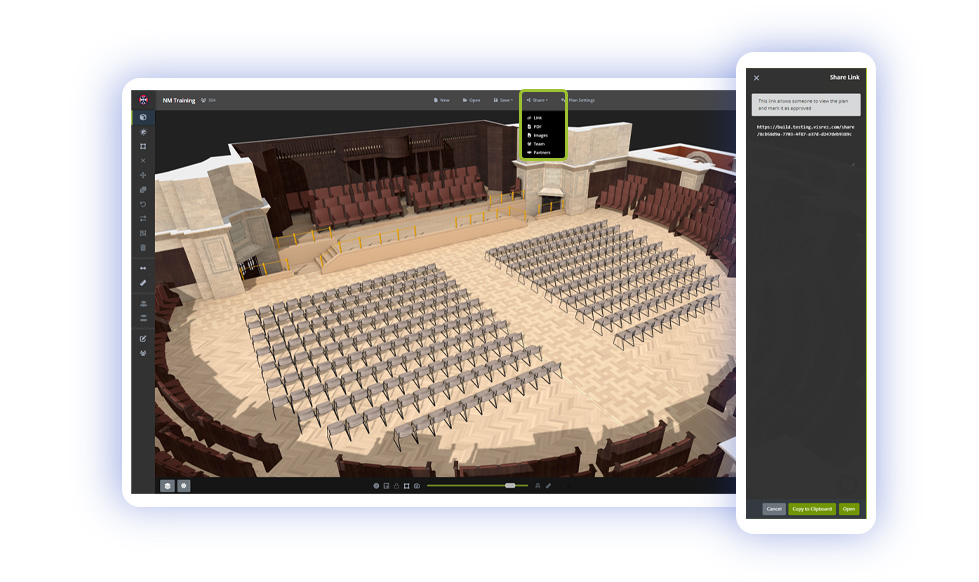
Shared Links
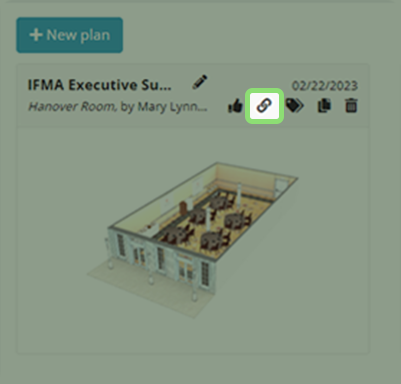
The Shared Link allows your client to view, approve or request edit access to any builder plan. This is the fastest way to share an event plan with a client or partner. Shared links update in real time so if you make a change to your plan all your client has to do is refresh to get the most up to date version. You do not need to resend a new link any changes to the plans update in real time.
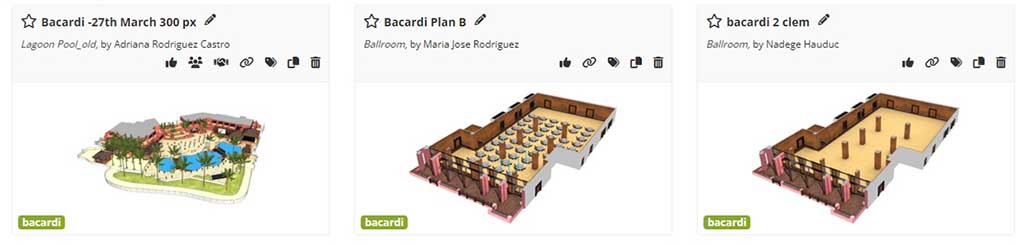
Sharing With Tags
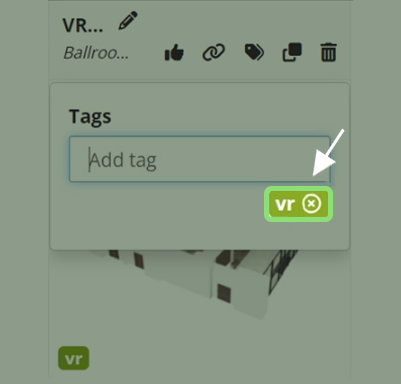
Tags are displayed on the plans page and you can filter all tags in the dropdown controls at the top of the page. Tags are a great way to organize plans by respective client names rather than creating sub-folders within your account you simply tag the plan with the client name and then you can filter plans by that tag.
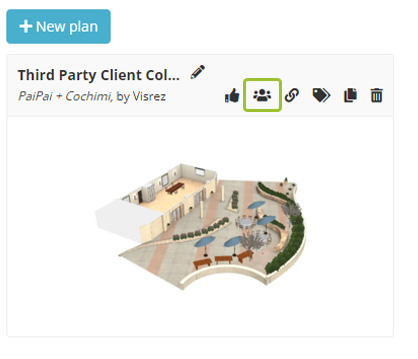
Users can invite other team members to collaborate on the same plan within their accounts by using the Share > Team option. This allows multiple users in the same team to work together on any event plan once they are invited by the plan creator. Users can still copy another user’s event plan but if you need to work with colleagues on the same event plan its best to share to other members the plan. To do this click on Share > Team and select the users from the right sidebar to invite them to the plan. When a plan is shared amongst team members an icon is displayed on the /plans page to indicate it is shared amongst team members.
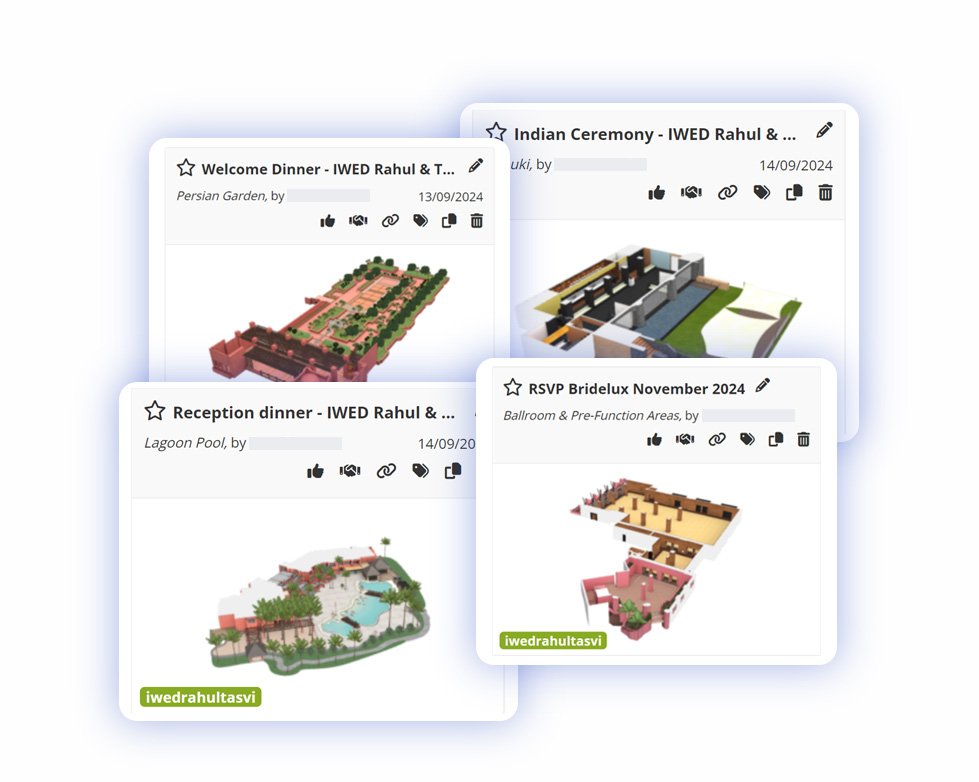
Sharing Multiple Plans Outside Visrez
Visrez generates a URL for the tag so you can send a link to your client which displays all the plans tagged for their event. Plans can be shared outside Visrez without the user needing to have an account. So if a client is considering multiple spaces you can share a page outside your account with all the plans in all spaces.
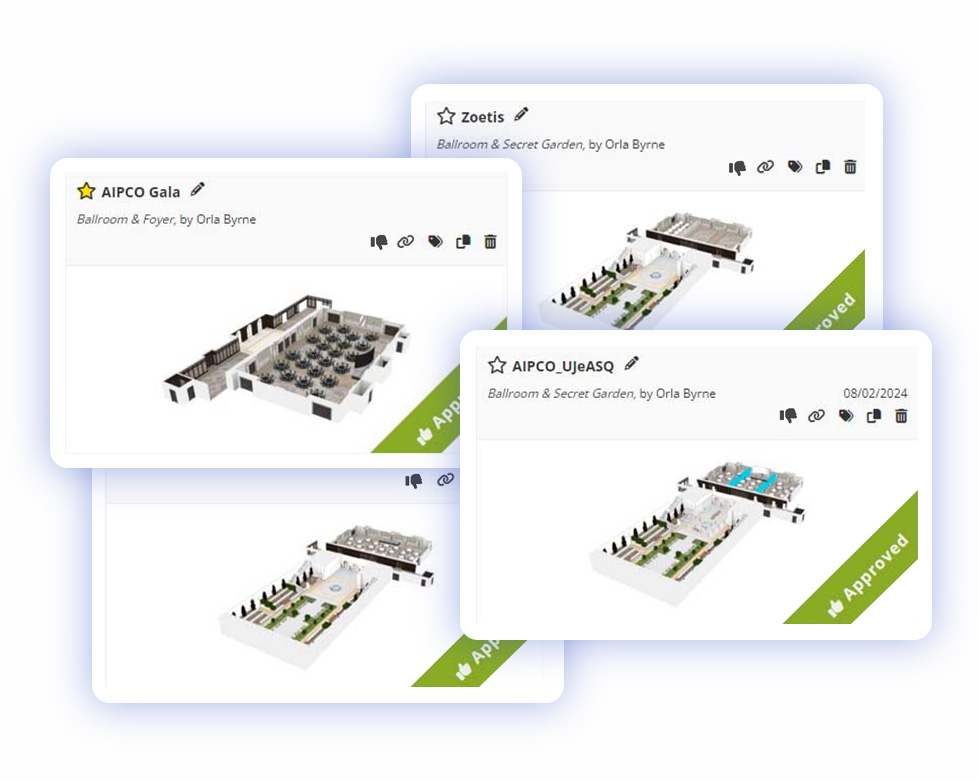
Event Plan Approvals
Getting client approval is vital to ensure the smooth set-up of an event and Visrez comes with a built-in approval feature where clients can formally accept their event plan on the shared link. Once a plan has been approved, both owner of the plan and client are notified by email and the plan is marked in your account.
Revoke approval Approvals can be revoked from the plan controls.
Inviting Event Planners and Outside Partners
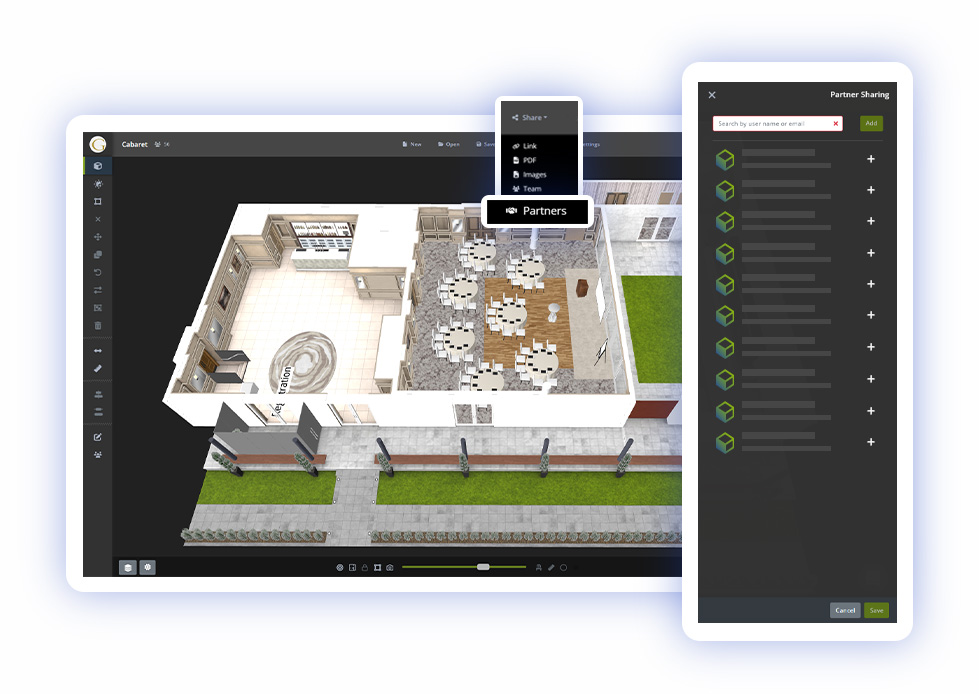
Event planners and outside partners can be invited to your team’s Visrez account to edit plans which have been shared with them. This allows your team to collaborate with outside event planners and third party suppliers on any Floor Plan Builder diagram. Partners can be invited to plans by any team member and once the partner has registered their account they have access only to the plans shared with them.
Partners do not have access to the Visrez library or any other areas of your team account. Planners & Partners cannot select furniture or objects from the Visrez library but can use the client collection.
To invite an event planner or third partner to your plan select the Share > Partner option from the Share menu in the top of your builder.
Clicking on the Share > Partner option will display a list of the registered partners who can be invite to collaborate on the event plan.
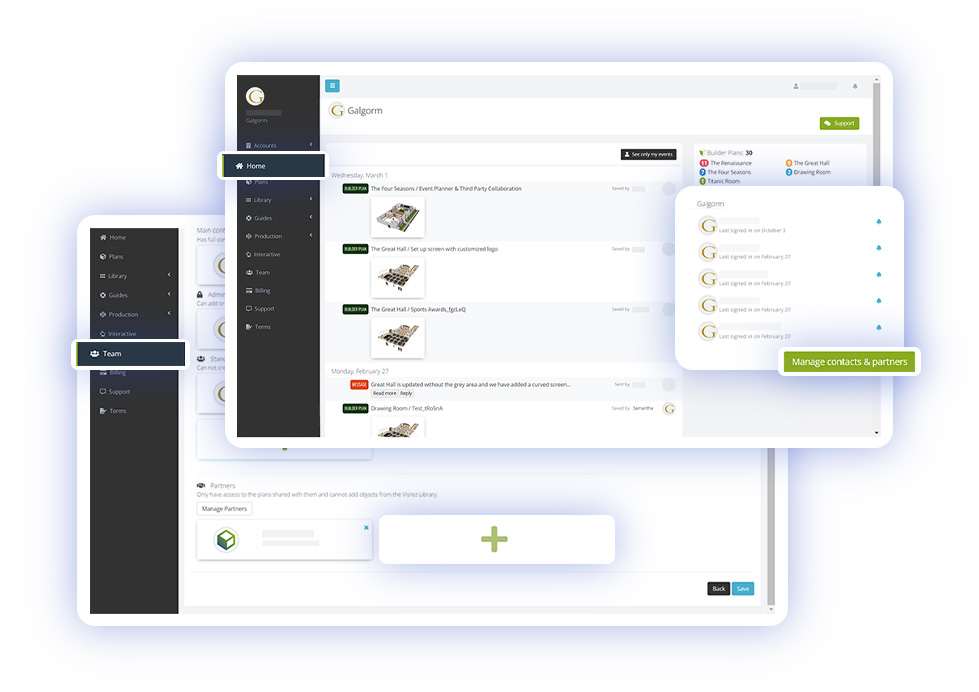
Invite and Add Partners
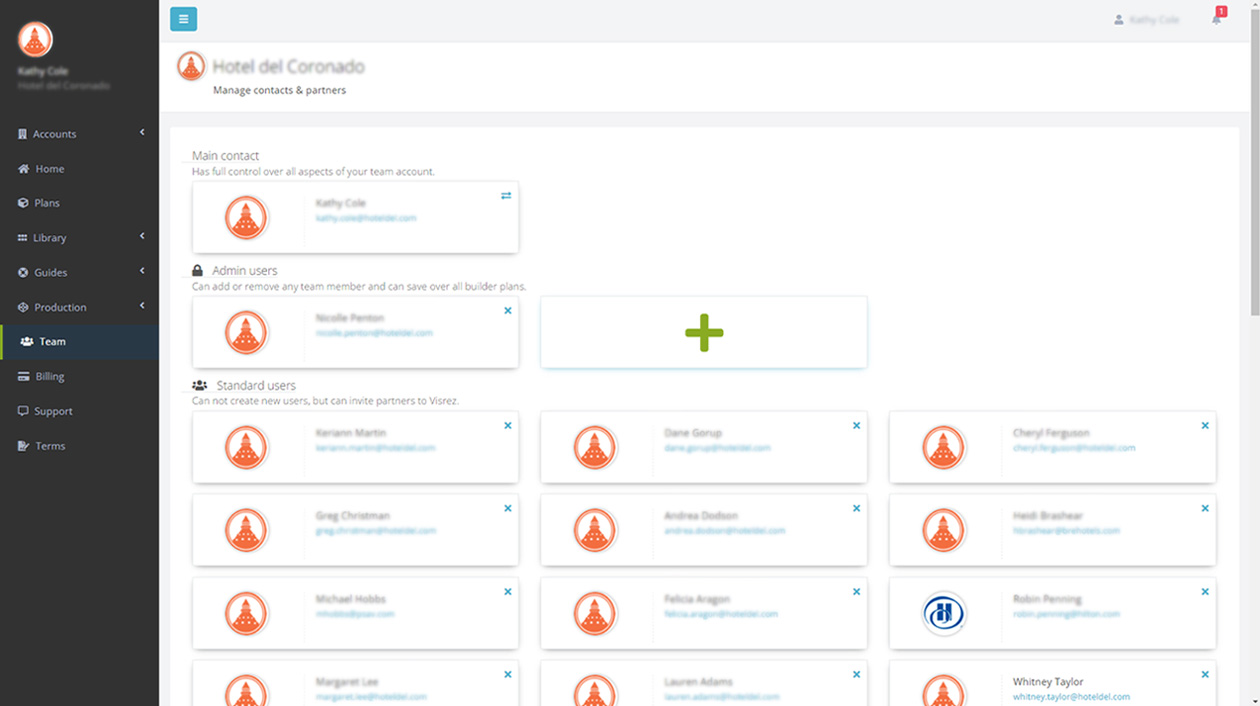
Partners have to be registered on your Team account before they can be invited to collaborate on any builder plans. All users can invite partners to event plans by clicking on the Manage contacts & partners in lower right hand side of the homepage. To add a partner to your Team’s Visrez account just Click on the Plus + and enter in the Partner’s email address and save.
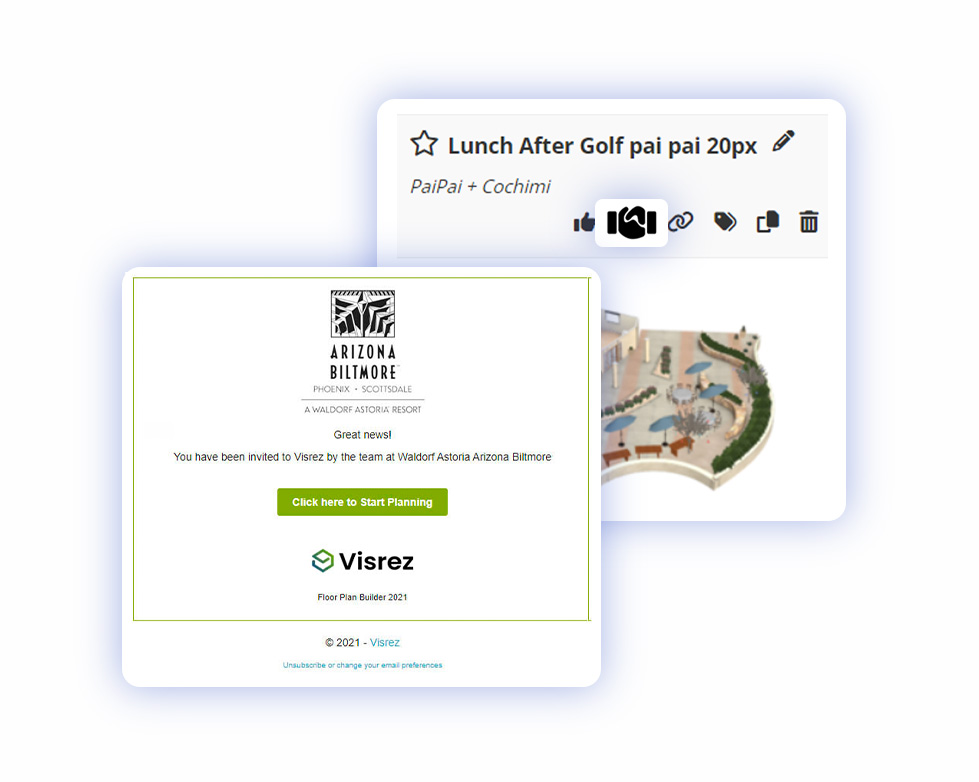
What Partners See
Partners receive an email notification displaying the branding of the property they have been invited to. Once they have registered on Visrez they see a /plans page displaying all the diagrams shared with them by the on-property contact. Planner accounts can include event plans across more than one property if they work with other venues which use Visrez and have been invited to those accounts. When an event plan is shared with a partner a new icon is displayed on the /plans page so you can tell it is shared outside the team.
There are many ways to add stages to your event floor plans in the Builder. You can drop in a specific stage size from the Visrez library or create custom stages to any size using the Builder tools. It is fun to watch a stage being created to scale inside your 3D event plan. Select the stage object from the Library and choose between adding a specific number or Build Stages & Platforms options.
Dancefloors
There are a few ways to add dancefloors to your event floor plans in the Builder. You can drop in a specific dancefloor straight from the Visrez library or create a custom size using the Builder. The build option allows you to drag your mouse to the size you need and the dancefloor gets built automatically. Both options are shown in the animation and you can see how easy it is to create dancefloors of any size.
Rigging a Truss
To drop screens into the space from the ceiling you can use the Truss Rigging feature which allows you to hang horizontal trusses at variable heights over your space and hang screens (or lights) from those. This is done using the suspend to ceiling feature and the Move tool when active with + / – Hotkeys to increase or decrease the height. The initial height is parallel to the top of the walls for an indoor space or at the height of the tallest object in outdoor spaces.
Text Notes in Plans
The text tool is located at the bottom of the main menu which allows you to add notes onto your plans. This is a great way to mark up plans before sharing with clients for feedback and approval. To add notes write the notes in the text box and click on any point or object on the floor plan. Font, color and size can be adjusted in the sidebar along with the text box background to ensure it clearly stands out against the floor texture. Text can be placed on top of objects such as tables, stages and dancefloors.
Graphics Tool
Just click on the model and drag the arrow or Circles & Square options to save it onto the floor plan. This is a great way to indicate large event spaces and the drawings are displayed in PDF exports. Directional arrows allow you to indicate the flow of traffic in an event diagram to differentiate between entry and exits.
Client Logos in Plans
Sharing a 3D event plan featuring their logo on screen guarantees a great first impression and will help your venue stand head and shoulders above the competition. In the Audio Visual category of the Visrez library, you will notice the screens display an icon beside the + or check mark. This icon indicates that this object allows users to upload a logo for your plans. Once the editable object has been added to your collection you will see that the image icon is blue to indicate that you can upload a logo to your library and then select that logo from inside your builder.
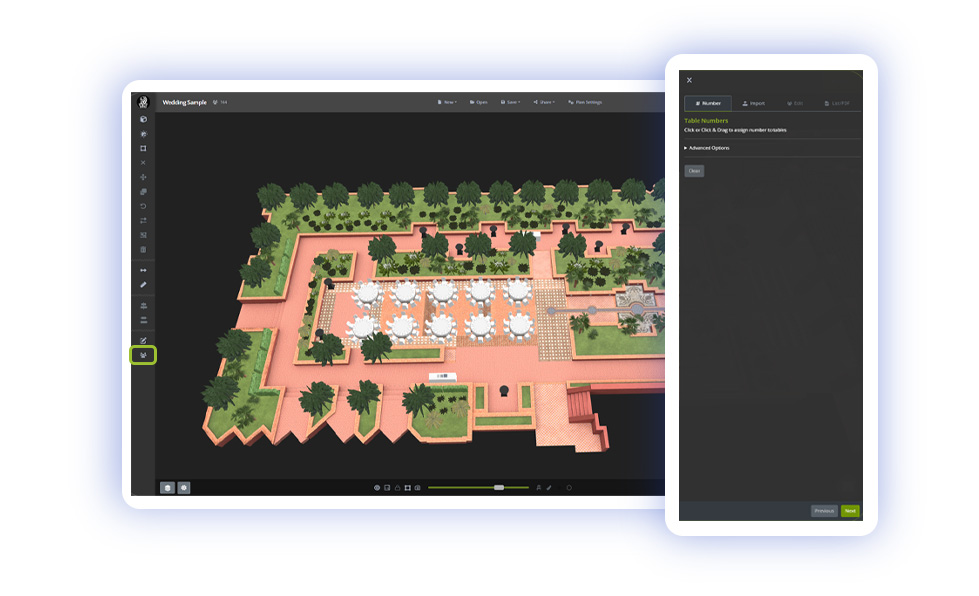
Table Numbers
The first step is to draw on table numbers and save them in your plan. This can be done by either clicking on the tables one at a time or by clicking the left mouse button and drawing a path over the tables. Numbers must be saved before you can upload your list so once you are happy with the order click save.
Table Numbers can be rotated or styled to fit any room orientation.
Share > PDF Export Settings > Show Table Numbers > Tag Options.
Importing Guest Lists
Guest Lists can be added by either uploading a CSV file or by entering guests manually on a table-per-table basis. Importing a CSV file is a lot faster than entering the names one by one so we recommend this option. The guest list tool is only activated when tables have been saved to your event plan.
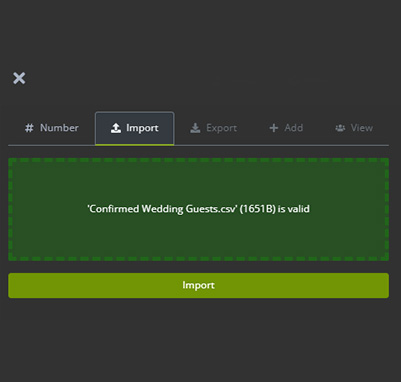
Importing Guest Lists from CSV
The quickest way to populate a guest list is to import from a CSV file. After table numbers have been saved you can then import a CSV file by dragging it from your computer or by clicking within the import area.
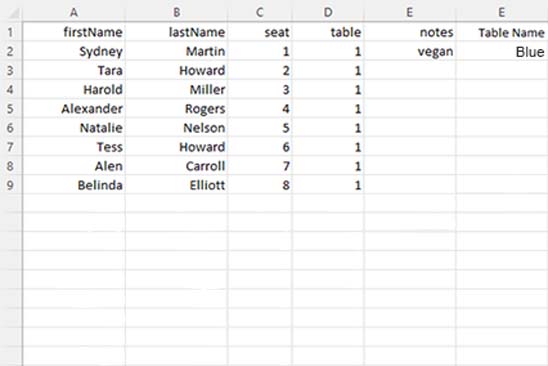
CSV files should be formatted as follows
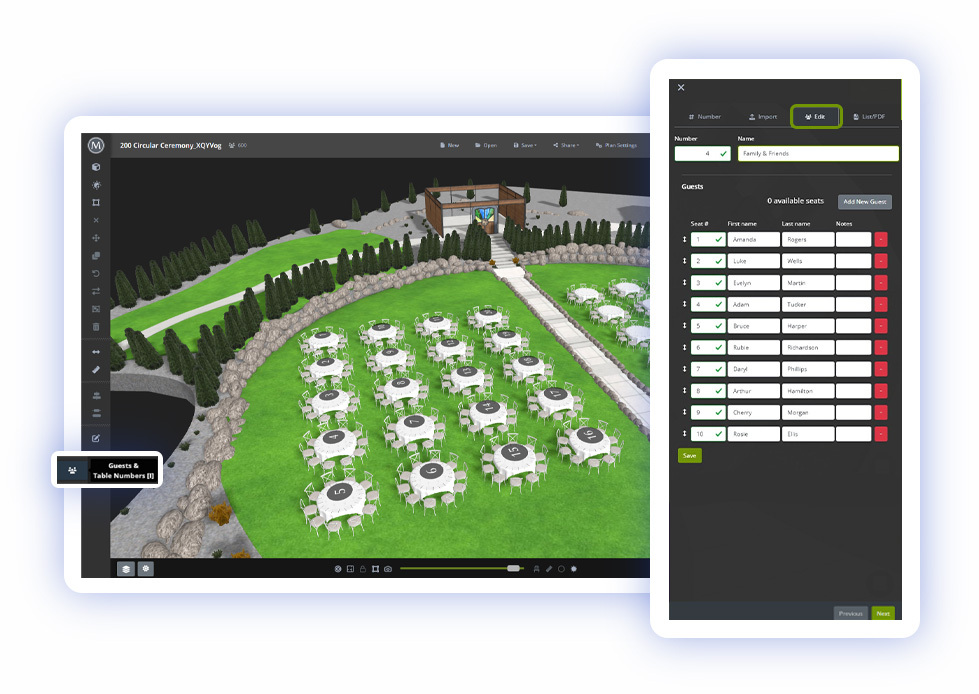
Adding or Editing Guests without Import
Guests can also be added on a per-table basis by clicking the table and selecting the guests’ tool in the left side menu. Using the Add tool you can then manually enter guest names, and table names for each table in your plan. Once guests have been imported, all names in the plan are listed under the View tab.
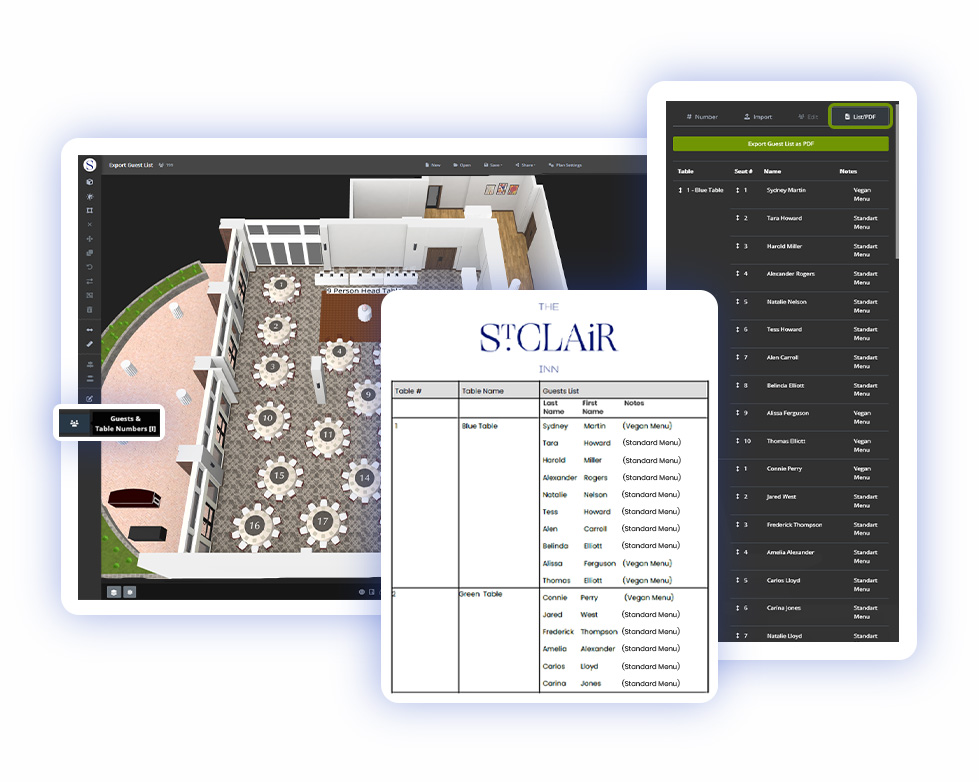
Guest lists can be exported as a PDF under the Share > Export option
Exporting Guest Lists
Guest lists can be exported with the event plans or as a PDF from the share settings.
Copy & Paste Plans from One Space to Another
If you have created a plan in one space and would like to see how it looks in another space you do not need to remake the plan as you can copy and paste from one space to another.
In your Event Plan – CTRL & A (to select everything) and CTRL & C (to copy)
Open the new event space from the Plans Page (An empty space) CTRL & V to paste into that space.
All spaces have different dimensions so will need to adjust to fit using the Move and Rotate Tools.
Creating 3D Plans from CSV Files
Capacity charts can now be converted into 3D Event plans with one go. Users can generate 3D event plans for every space and set-up style just by uploading a CSV file to their account or by entering in the desired setups and capacities. Automating the creation of 3D Event plans is a massive timesaver for sales, catering and operations teams as they now have the ability to quickly generate an unlimited number of 3D Plans from a single CSV upload for each space.
How to Rig Lights
Not an everyday feature but a very nice option to impress your client by adding coloured lights onto screens, backdrops or walls to create some genuine atmosphere in your event plans. It is easy to do once you have selected the right objects from the library and these can be placed on the ground to hung from a truss depending on the plan.
Atmospheric Lights
With Atmospheric Lights, your plans become even more realistic, bringing them to life and creating a genuine atmosphere for your event.
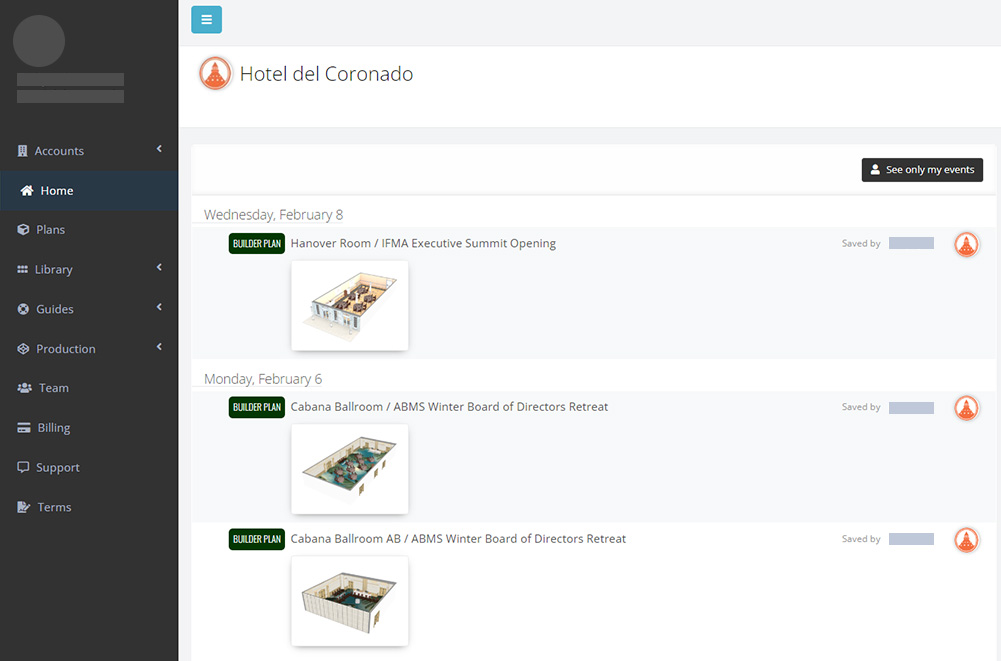
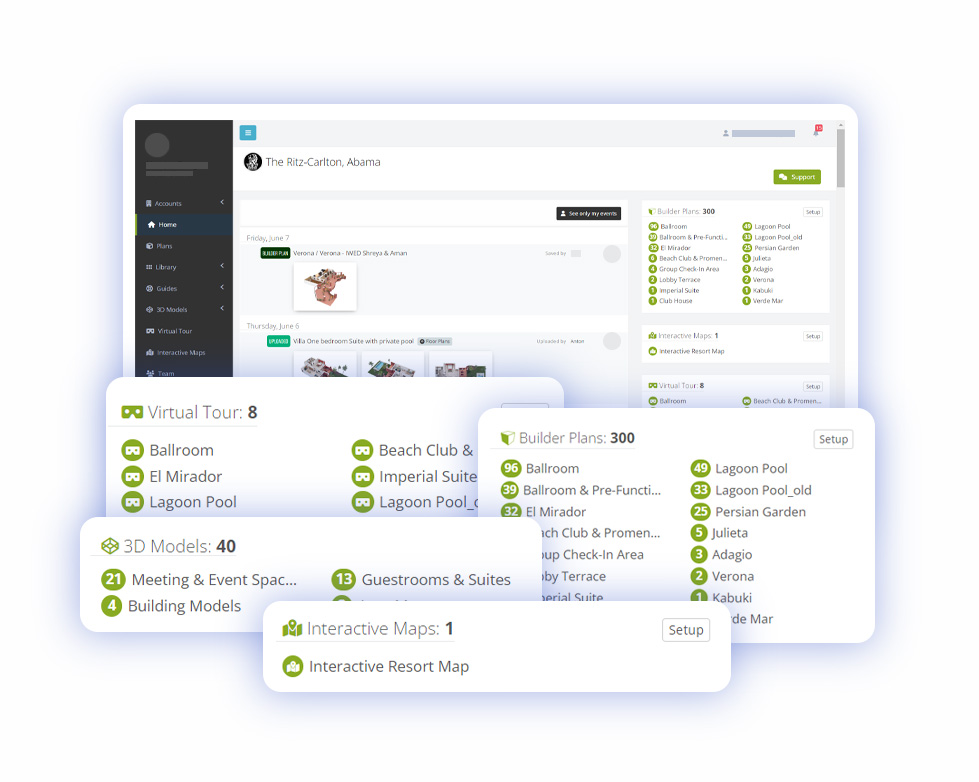
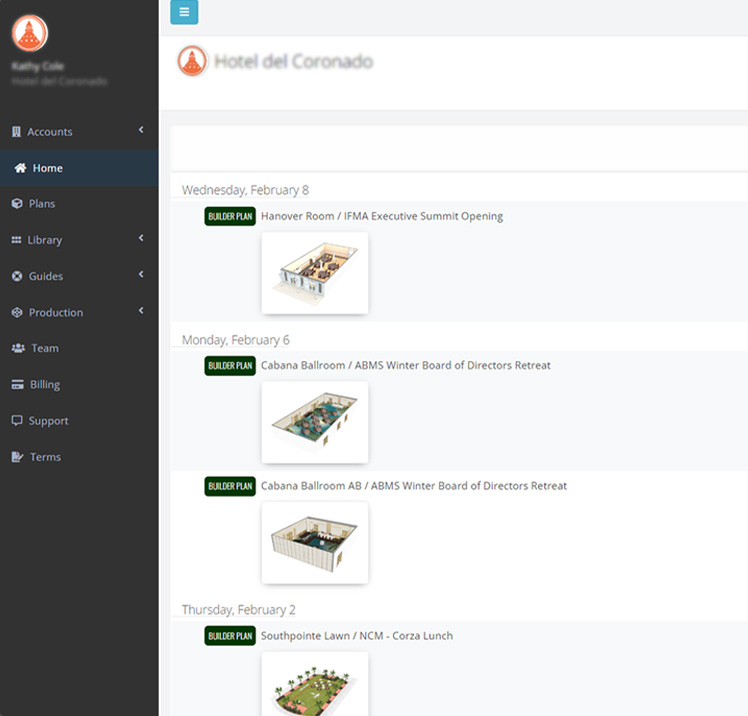
On the dashboard you will see a chronological history of all the activity in your Visrez account from the beginning. As plans are saved they appear in the timeline and can be opened directly from there. From here you can access all the products which are activated in your account using the menu on the left hand side.
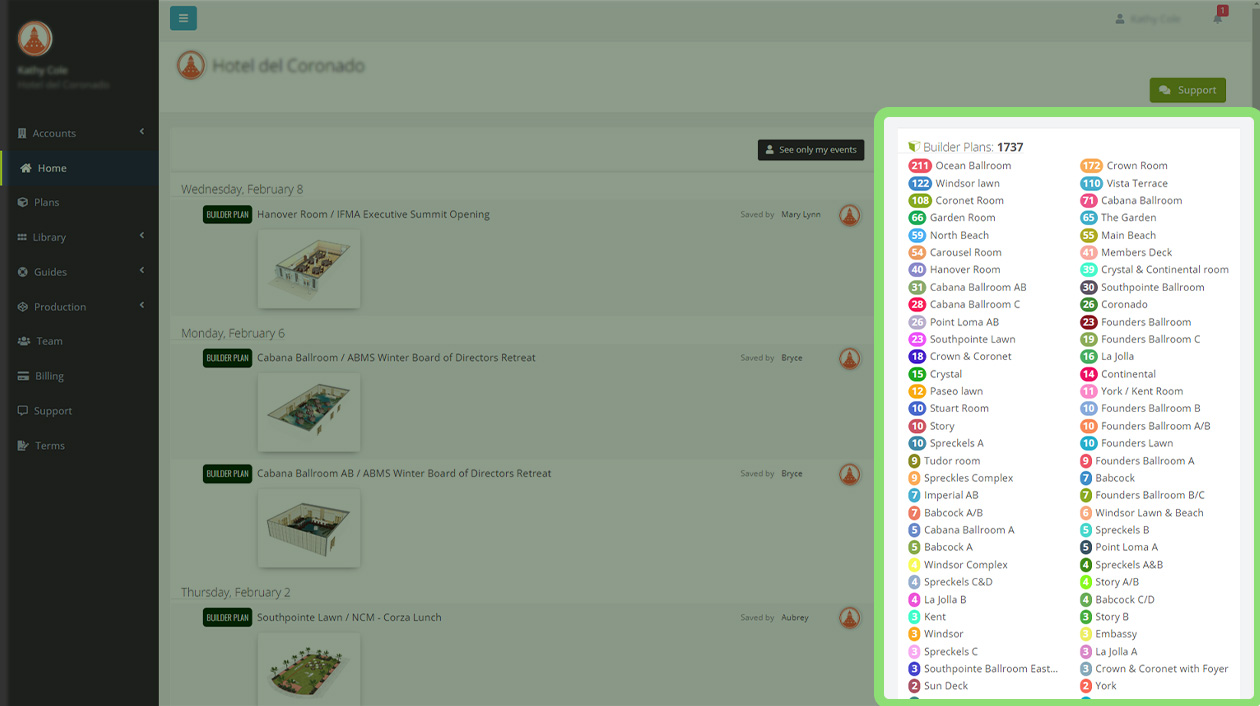
Plans Box
The plans box displays a breakdown of the plans per event space. The top bar displays the total number of plans created across all spaces. Clicking on any space loads the plans page.
Plan Icon Guide
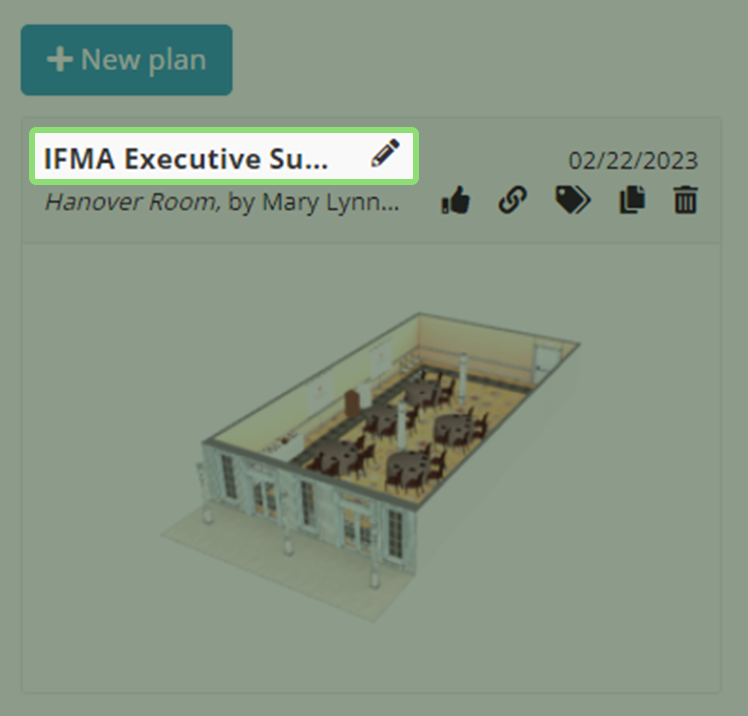
On the plans page have a number of controls available before you open an event plan in the builder
Edit Plan Name: The owner of a plan can rename it by clicking the pencil and then hitting enter.
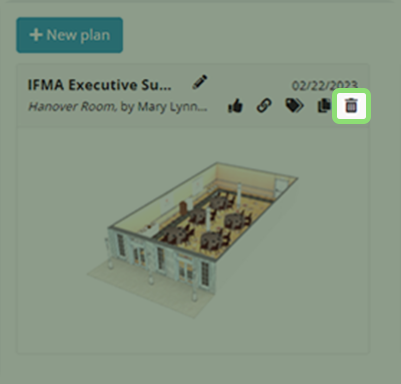
Delete Plan The Admin Contact on each Visrez account can delete or rename plans created by all other users.
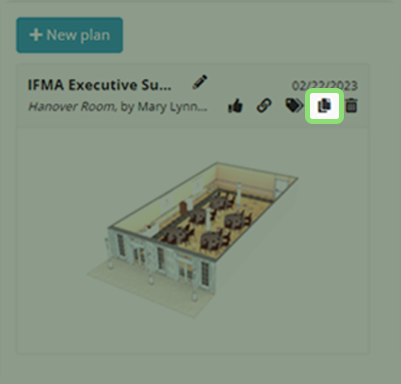
Create a Copy You can create a copy of any other user’s plan by clicking on the duplicate button below the event date. Users can copy plans created by other team members and can rename or delete only their own plans.
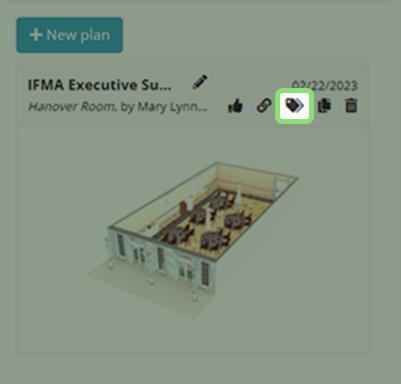
Edit Tags With tags, you can share a unique URL with your client showing all the plans across multiple spaces. So if a group is using multiple spaces you can create a tag for that group and share a page featuring all their plans outside of your Visrez account. The remove tag option is located next to the tag name.
Share Link From the shared page the user can open any of the event plans and if they have been set up as a partner they are able to edit any of their plans. Remember anyone with access to the Shared Page Shortcut will be able to view the plans but only partners can edit plans.
Approve Event Plans Once a plan has been approved it is marked with a green icon on the /plans page so it is clear to the team.
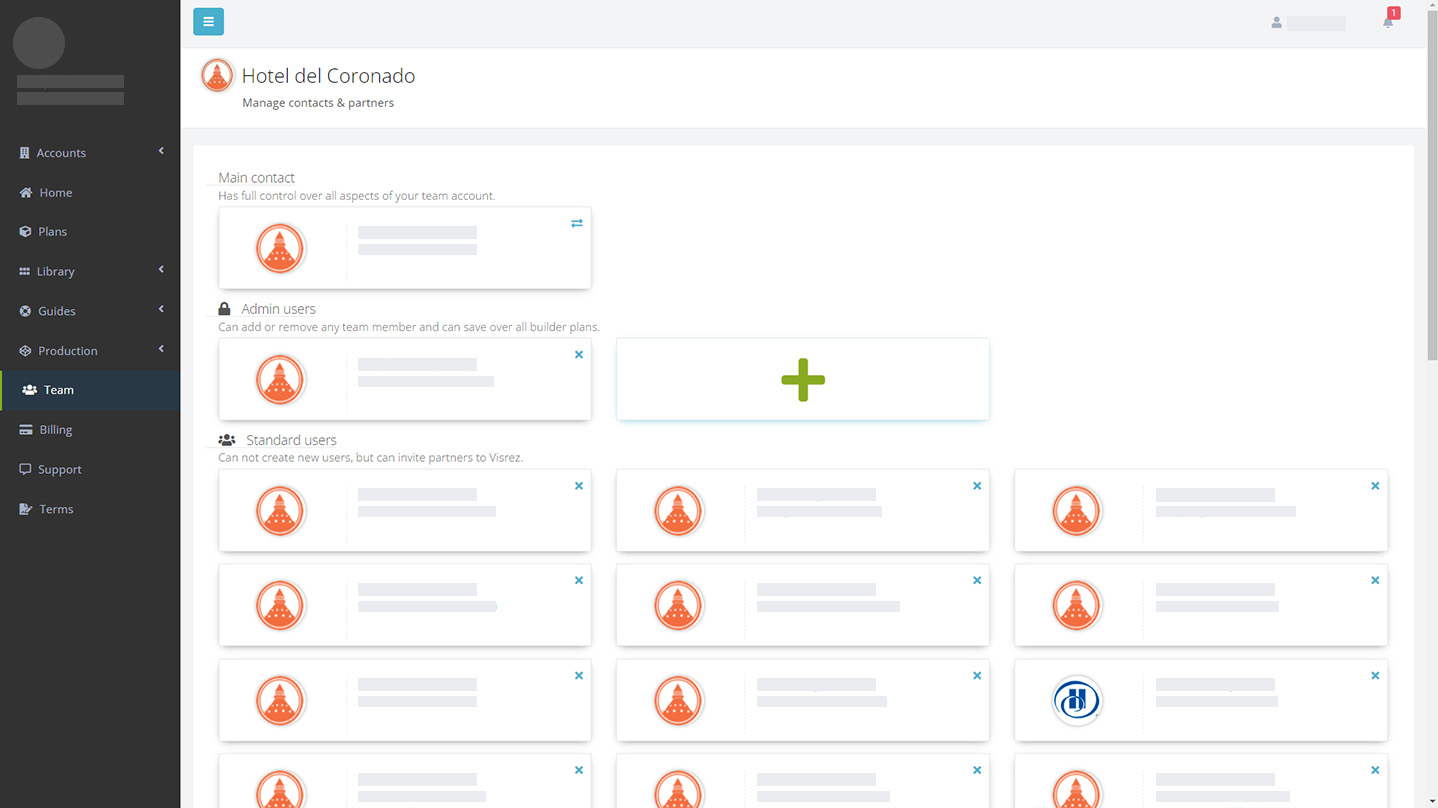
Visrez Account Administrators
The admin users on your team can manage all aspects of the Visrez account. There are no restrictions to the number of users you can have in your team account but only admins can delete users from Visrez. Visrez accounts can have multiple admin level users. To add a new user to your account just enter their email address and they will receive an email signup immediately.
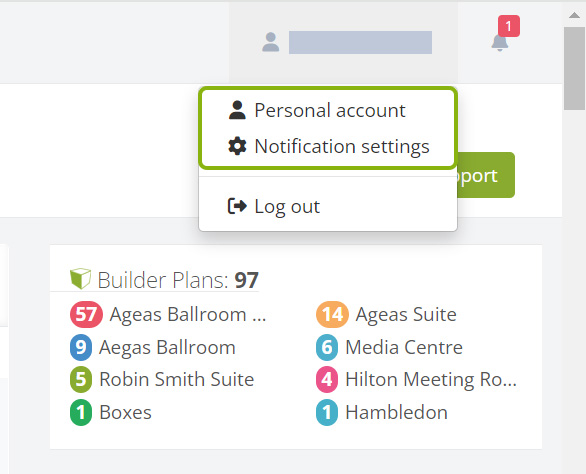
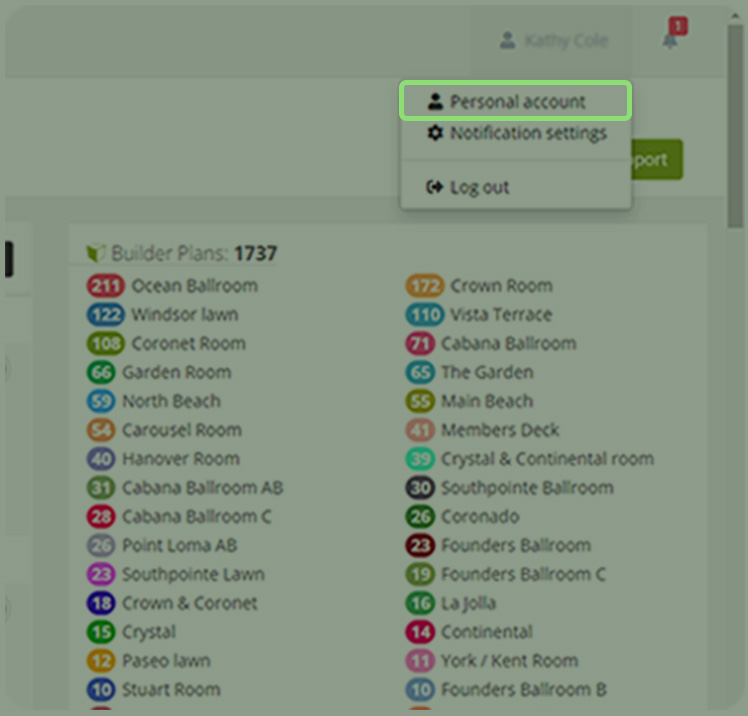
Personal Account & Managing Notifications
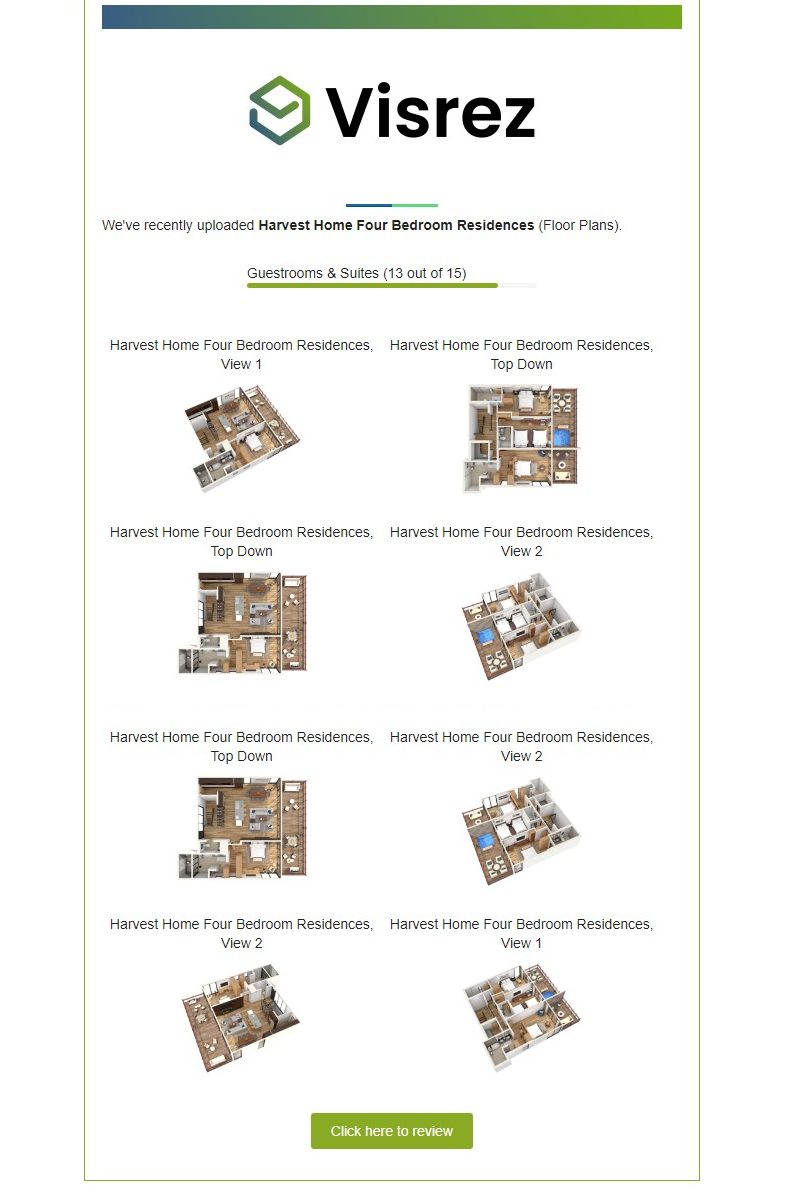
Users can update their profile in the top right-hand corner and disable system notifications. This includes the weekly asset reminder emails which are automatically sent during production when assets are outstanding. It also includes the weekly usage reports for embedded files which are displayed in client sites. If you no longer wish to receive these emails you can disable them in your account here.
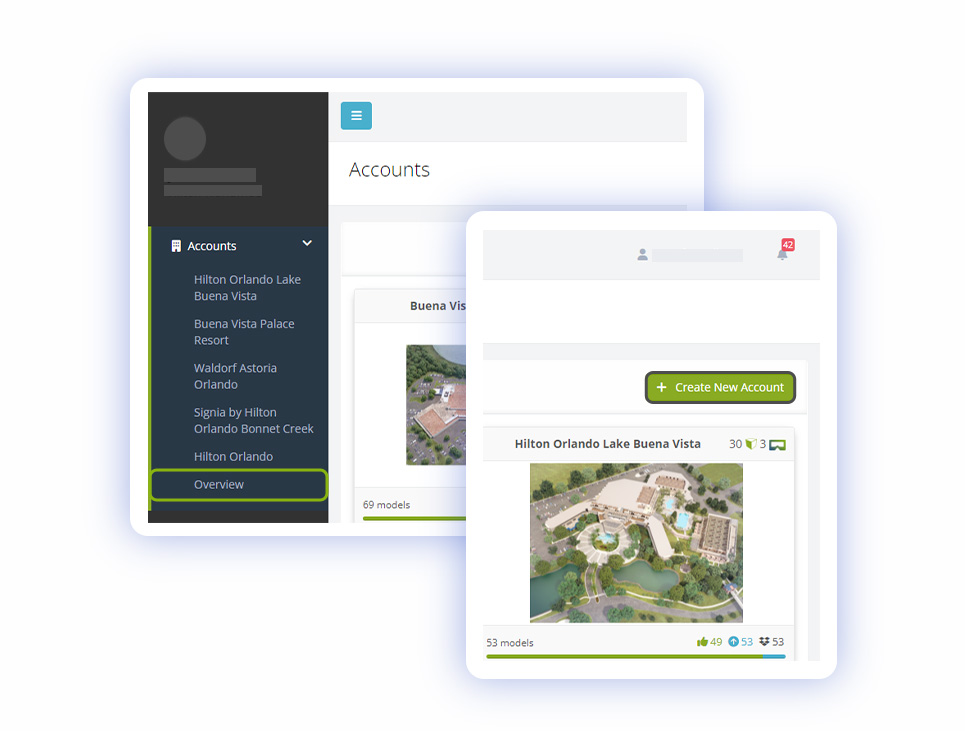
Creating Accounts & Adding Spaces
The Overview menu shows list of all accounts. To add a new account use the Create New Account button. Details for the account can be entered – Description, Permalink, Brand and Country.
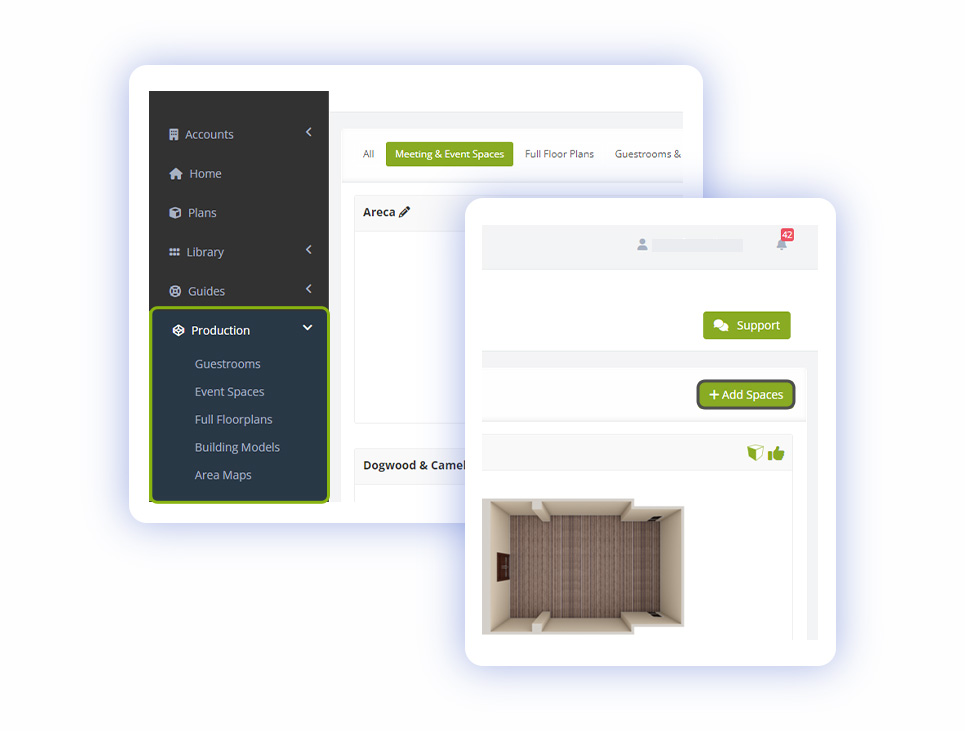
Creating Spaces
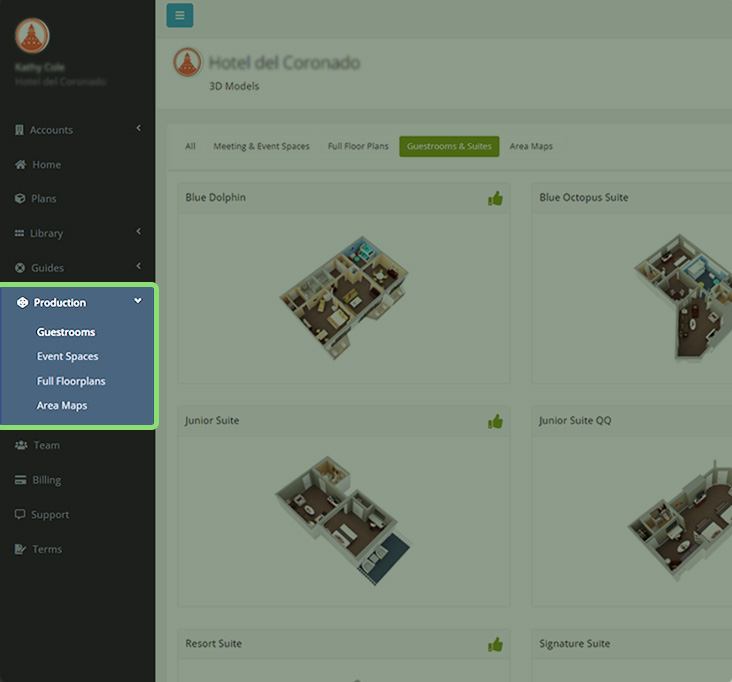
All categories can be listed from the Production menu. Spaces can be added from the Add Spaces button.
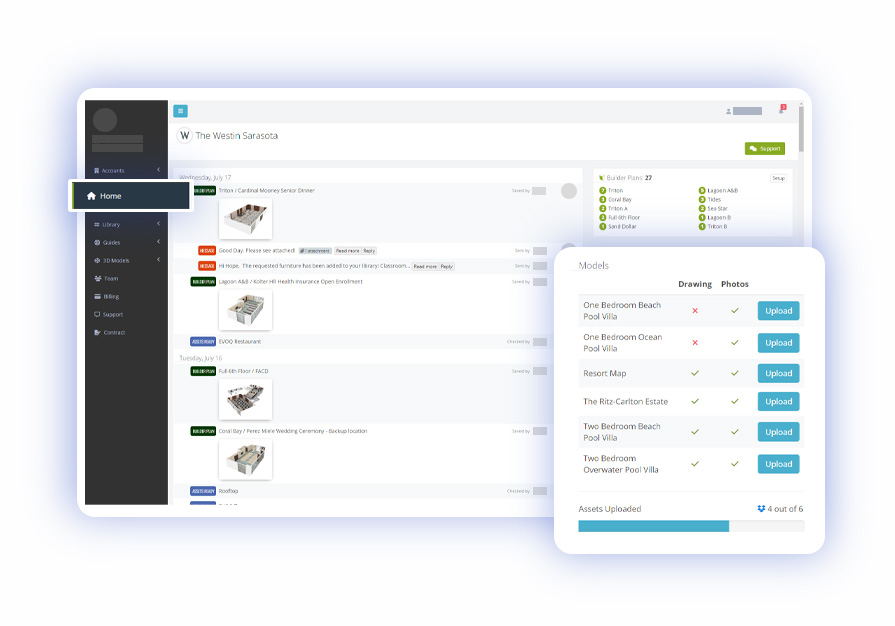
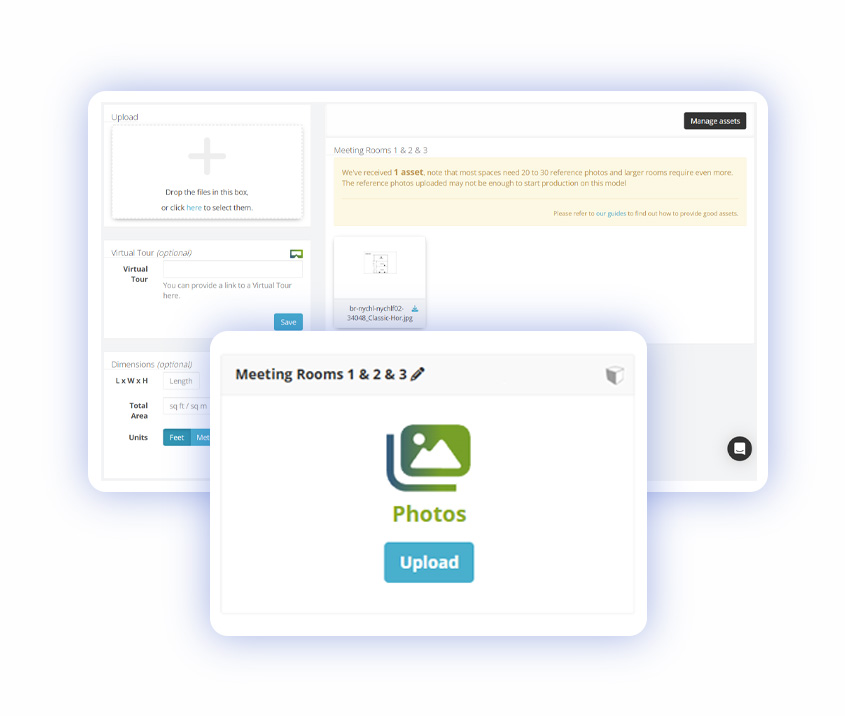
Uploading Assets
All assets can be uploaded from the Home menu in your account. Choose the Upload button then drag and drop or select photos to upload. Virtual links and dimensions will help to create a more realistic space.
If there are missing Photos or Diagrams in the 3D Models menu will be displayed what exactly is needed and an email will be send. Click on the Upload button to add more assets.
Once everything is uploaded production process will start.
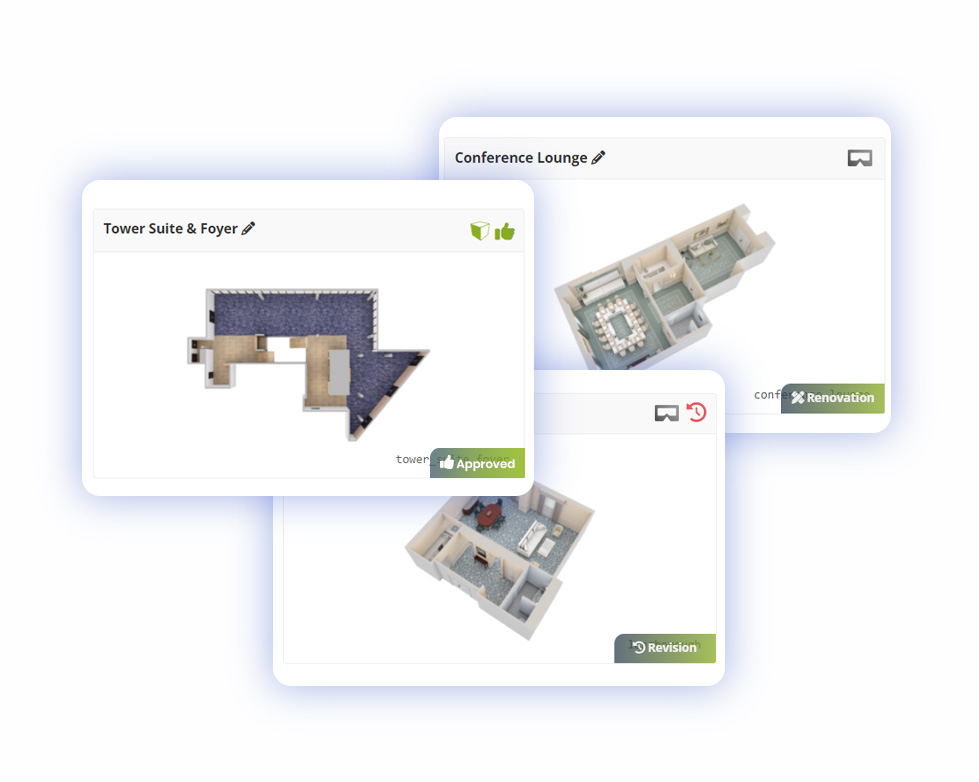
When a model is ready you can approve or send it for revision and renovation.
Working with Visrez means no site-visits or photoshoots are required and the tours can be updated at any time, making them a futureproof investment. All of the samples displayed in this gallery have been created digitally by our team based on assets uploaded by the clients. Whether the venue is operational or in preopening, Visrez can generate a photorealistic virtual tour without setting foot on site.
Visrez requires a blueprint or dimensions along with reference photos in order to recreate spaces. Professional photographs are not necessary and spaces do not need to be set-up, cleaned or empty. For venues in pre-opening or under renovation Visrez requires an interiors guide or FF&E to create a Virtual Tour. Preopening tours can be updated when construction is completed so that all final details are a photorealistic match.
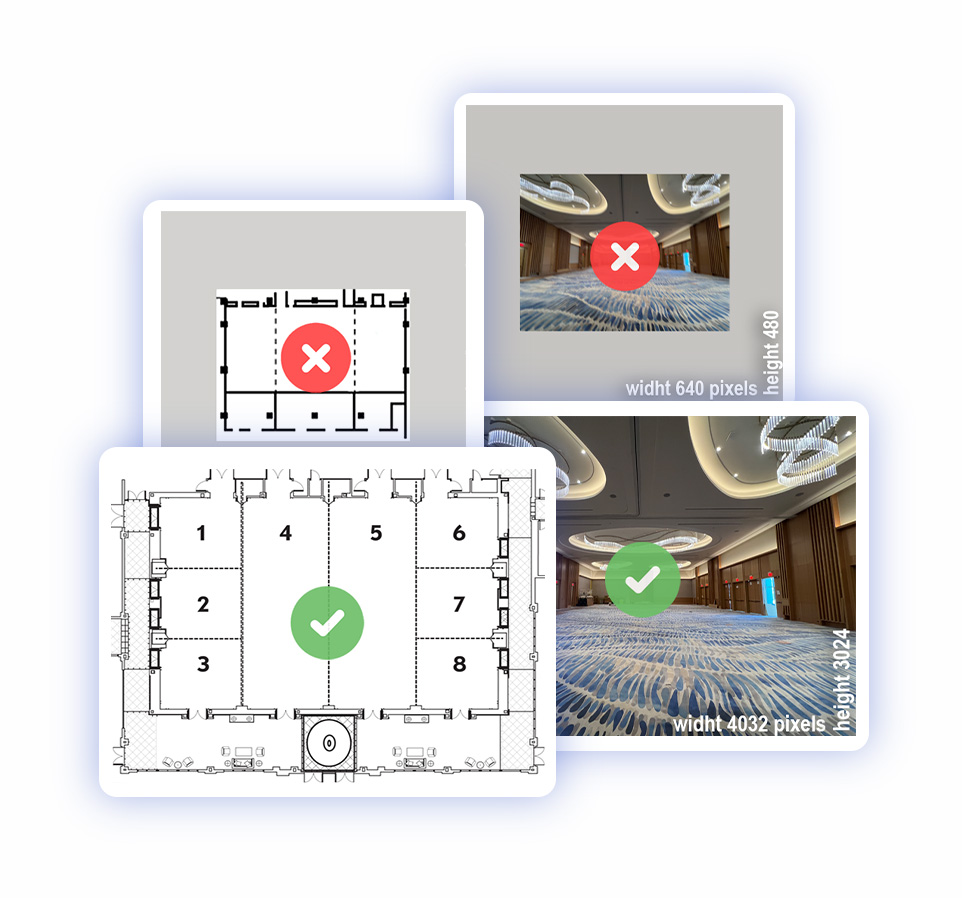
Visrez requires clear shots of carpets in order to recreate the design accurately in the Virtual Tour.
Photos & Diagrams provided should be in a large format so our team can understand the spaces.
Smooth Production Process
Once the 3D Visuals have been approved Visrez generates the Virtual Tours or Walkthrough Video of the spaces. Clients decide when a space is accurate and Visrez undertakes as many rounds of revisions necessary to get it right.
For Walkthrough videos we first clarify the camera path prior to generating a tour to ensure the correct flow. Walkthrough tours can switch the set-up styles and lighting to give a complete tour of any venue.
Alternatively clients can film a walk-through on a phone which Visrez uses as a reference for the tour.
For outside areas, blueprints or floorplans and panorama photos of the area are required.
Choosing a second dim lighting option in the Ballrooms makes the video more interesting.
Set-Up Styles using the Floor Plan Builder are crucial for creating a Virtual Tour.
If a space can be subdivided multiple times using airwalls these are not counted as new spaces. It doesn't matter how many dividing walls in the space, you pay for just one space regardless of the dimensions or details. Visrez has generated photorealistic 3D Models of thousands of events spaces worldwide, so no interior is a problem for our team to recreate.
We includes lobbies, foyers, terraces, patios, lawns and connected spaces as part of the model however full floors are not considered single spaces. Whilst it is not an exact science, we are reasonable and do our best to provide great value for money as our clients will attest.
Yes, we provide the subdivided spaces within the same fee so if you want to create plans in Section A, B, C or D individually you can do so at no additional cost as you will have the separate builder models.
Absolutely, you can add new spaces at any time. Many of our clients started with a single space and added more as they saw the results of sharing Visrez plans with their clients.
If the exact furniture does not exist in the Visrez library our team will create the furniture and add to the library at no additional charge. As the library is shared with all our users it makes it valuable if everyone has access to an extensive library of furniture.
Yes, clients can collaborate on event plans in Visrez once they have been added as 'Partners' in your account. This is explained in detail in the Visrez user guide under Collaboration & Sharing.
Event Space renovations and redesigns are included in the annual fee so if you update your spaces we match the new interiors. This can be done before construction is completed if interior design guides are provided.
Visrez can create event space models during preopening if enough details can be provided from the architects or interior designers. This will give your team a headstart with preopening sales and the spaces can be updated to match the finished interiors when those are ready.
There is no restriction to the number of users you can have in Visrez. Admin users on each account can add or remove team members without contacting Visrez support. As far as we are concerned the more users you have on your team the better which is why we don't charge per user account.
Yes, if you have a virtual just post the link in your account and this will be sufficient for our team to recreate the space exactly to scale and detail.
Live training sessions are arranged for your team once the spaces are activated and ready to use. These usually take 30 minutes to one hour and cover all aspects of using Visrez.
No, there is no charge for live training sessions. We enjoy connecting with users and find training sessions are a valuable way to learn how they interact with the tools.
Once good quality reference assets are provided our team will generate a draft 3D Model of your space within a few days which is uploaded to your account. All members of your team will be notified once the event space is ready for review.
Once your team has approved the space the Floor Plan Builder will be activated in your account within 1-2 working days so your team can start making and sharing diagrams quickly.
Absolutely yes, and this happens a lot. Once we have created the event space models you can order a photorealistic virtual tour of that space without an on-site photoshoot required.
A copy of your agreement is available inside your account under the contract section. Spaces are activated on an annual basis and new spaces can be added at any time. Visrez does not impose multi-year agreements or built-in annual price increases. With Visrez, what you see is what you get and this is what our users love about the platform.
Sales&Catering.com serves over 10,000 users in the hospitality sales community with a strong reputation for building products that just work. The partnership between Visrez and SalesAndCatering.com has had a meaningful impact on the industry standards informing the event and meeting planning process.
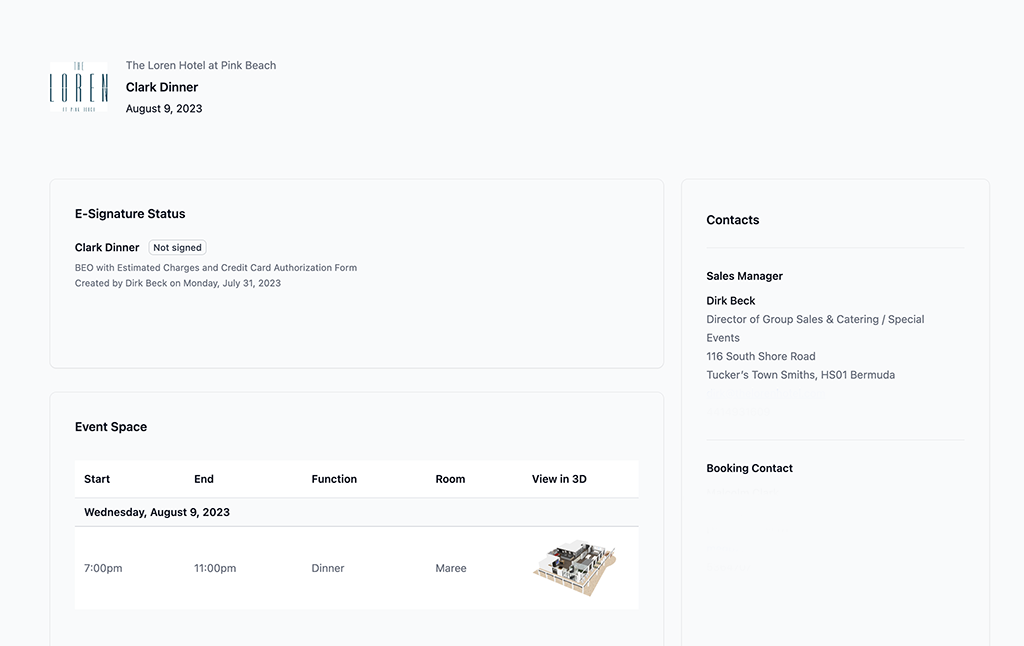
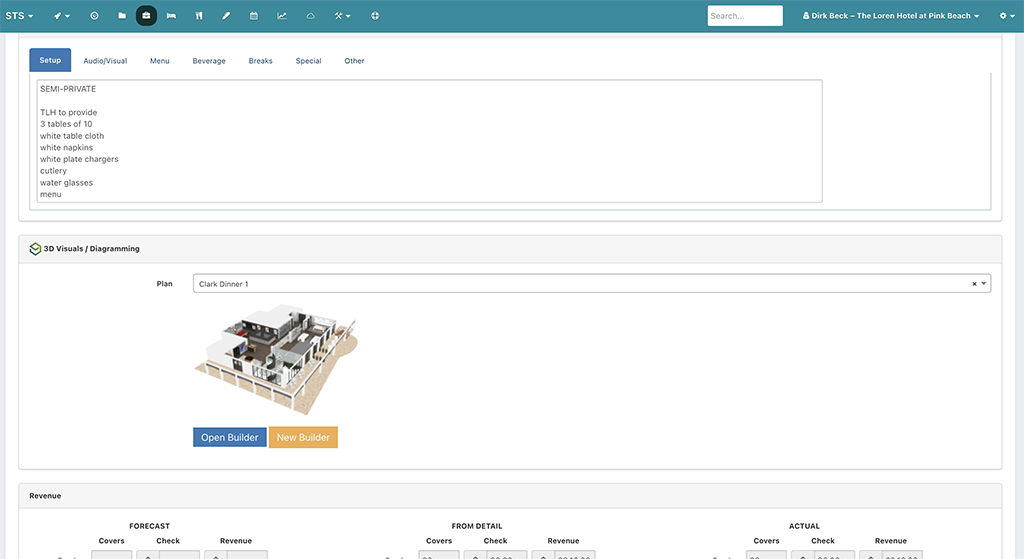
This integration allows users to automatically generate a 3D Event Plan in Visrez whenever they create a BEO in STS Cloud, with updates automatically reflected to ensure continuity and streamline the process. Planners and sales teams can easily toggle between proposals, contracts, menus, venue maps, and any other element of an upcoming event via a singular dashboard.
“The integration between Visrez and STS Cloud has been a game-changer for our properties. Offering guests a truly luxurious, memorable, and immersive experience is a core part of our offering and brand promise. With that in mind, having a sales tool that can seamlessly create immersive, photorealistic event plans has helped us ‘wow’ prospective clients and win more business”.
Dirk Beck, Director of Group Sales & Catering at The Loren Hotels
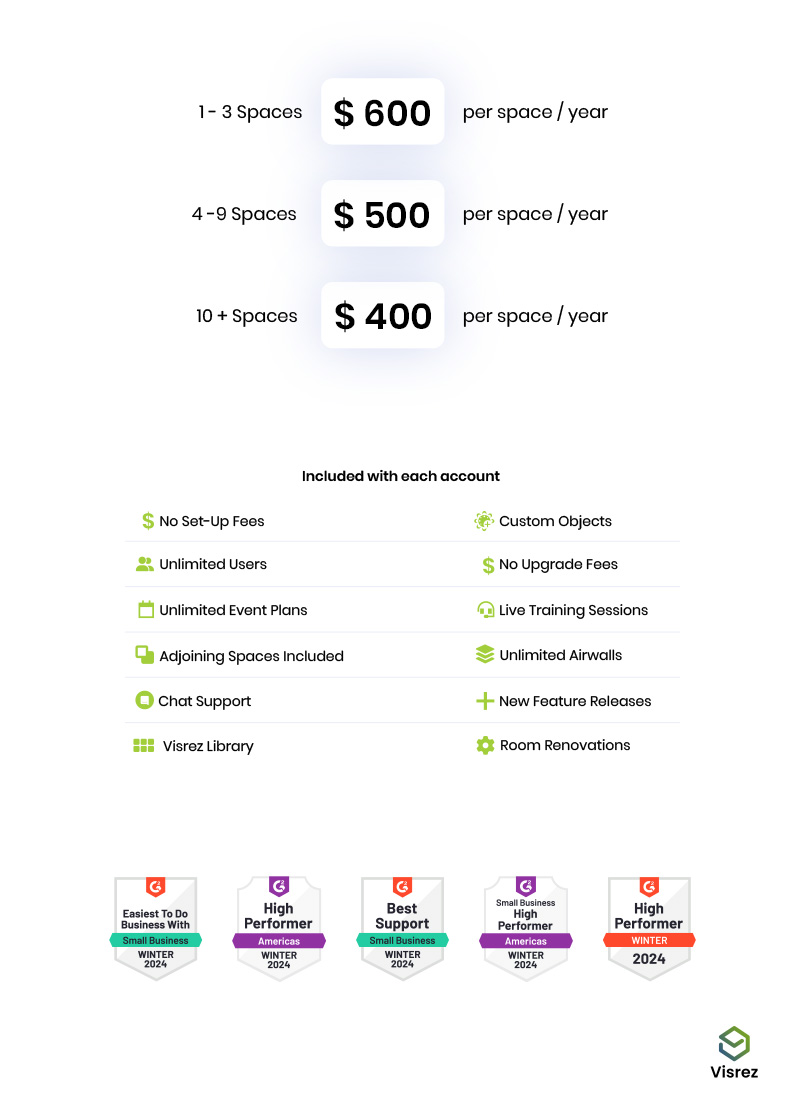
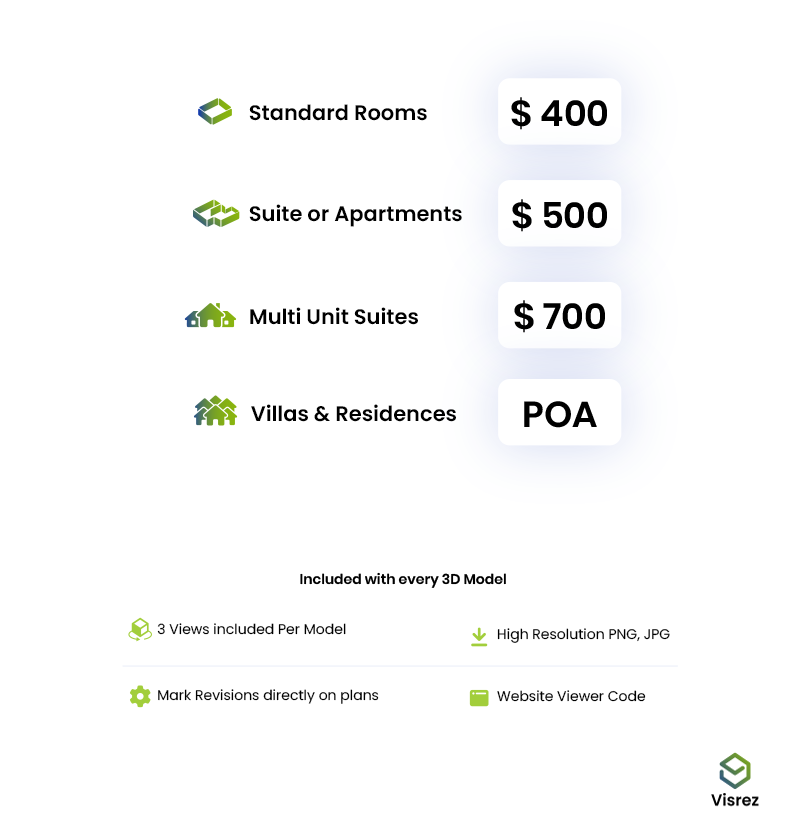
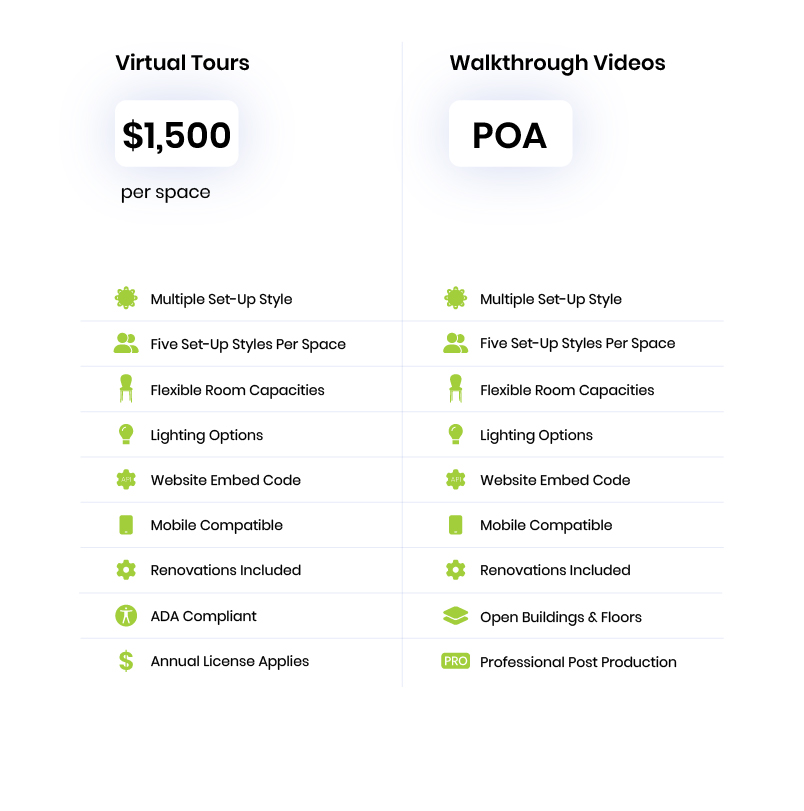
Floor Plan Builder is priced on a per-space / year basis and includes unlimited users, partners and the Visrez library of over ten thousand 3D furniture objects which comes built into every client account.
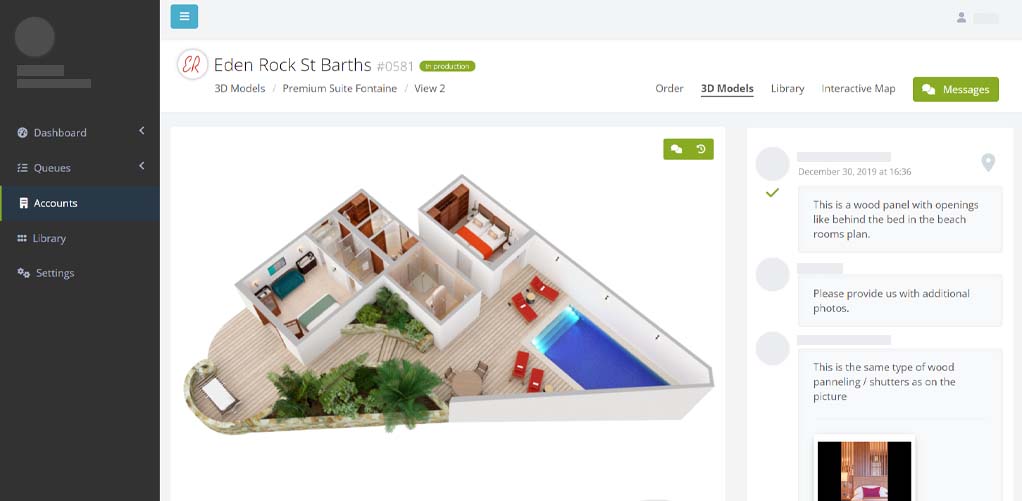
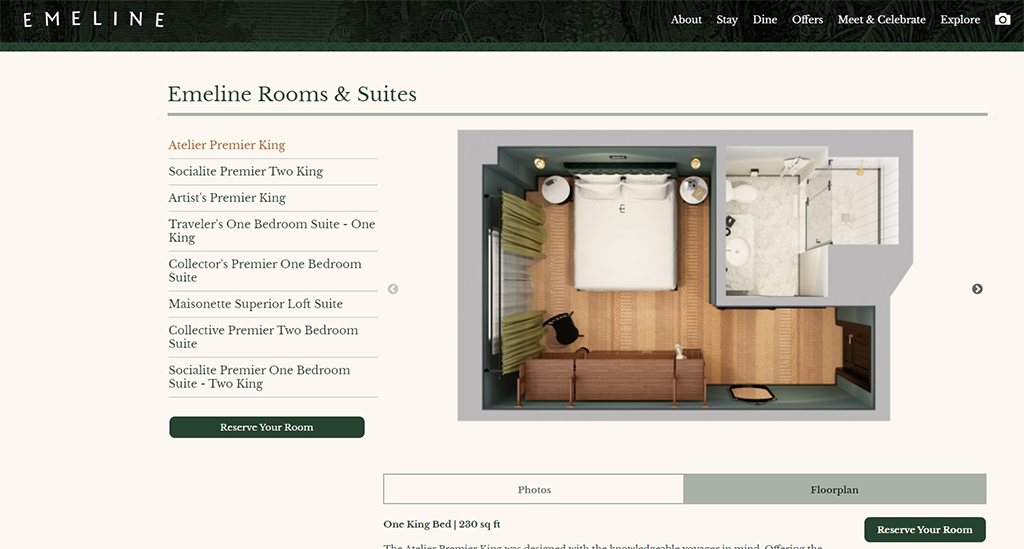
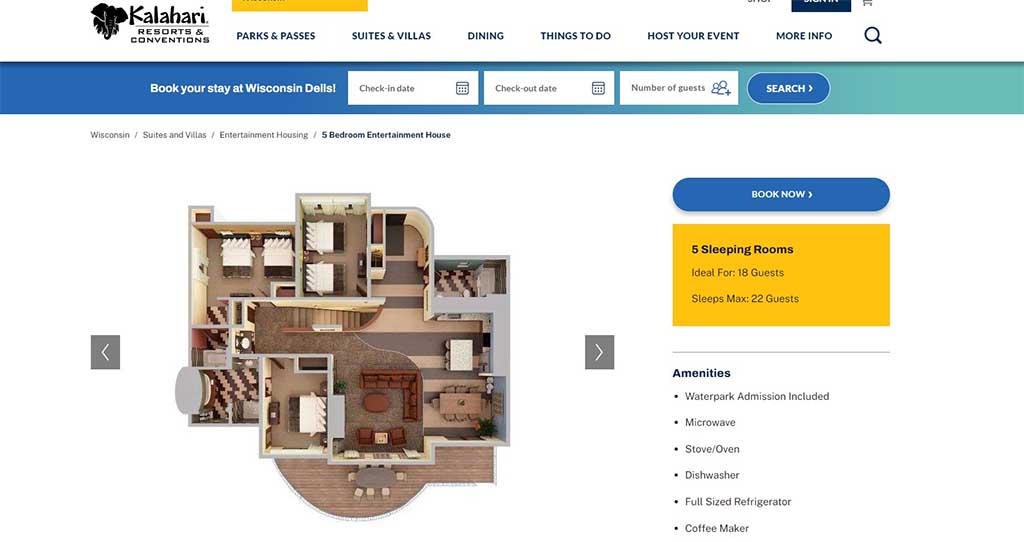
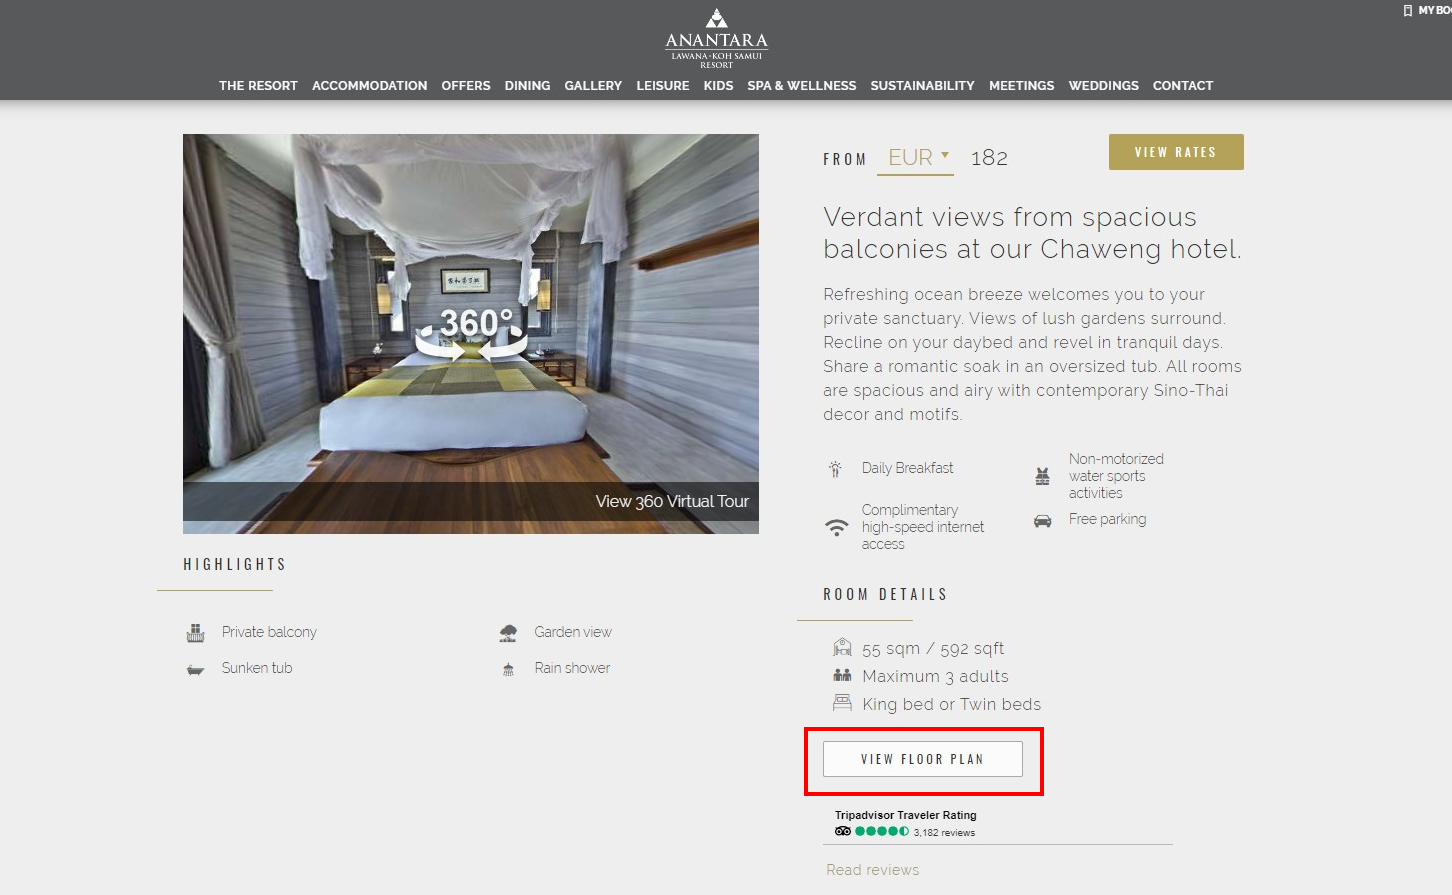
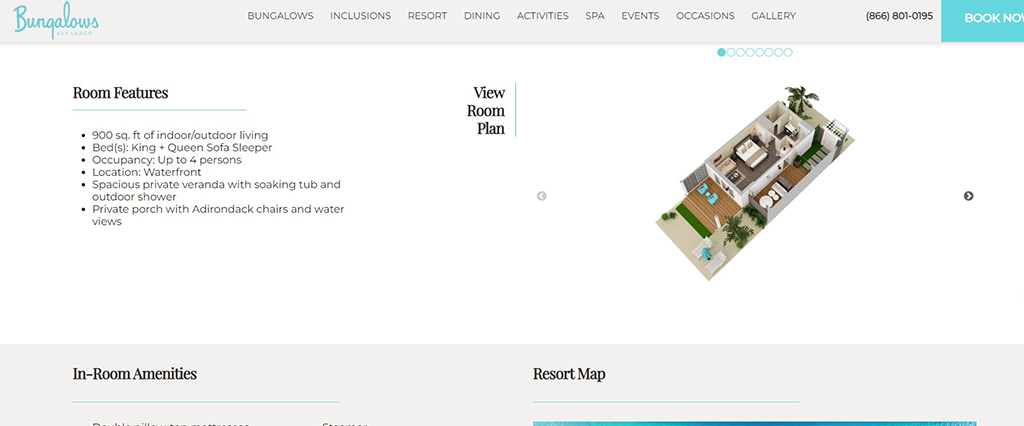
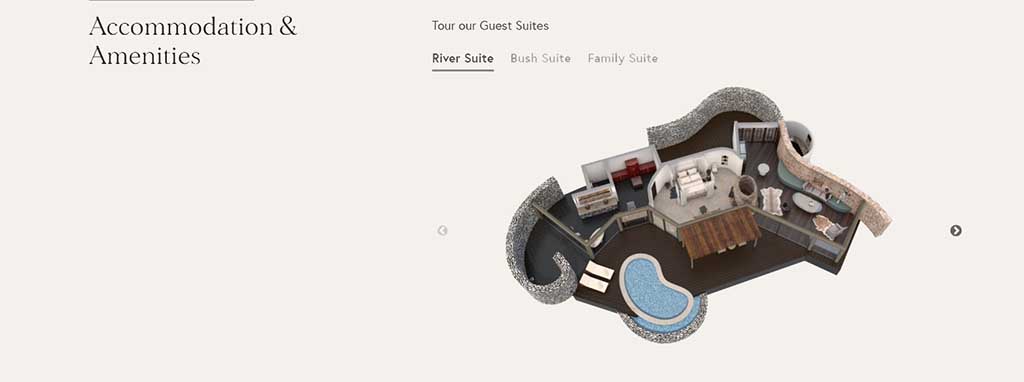
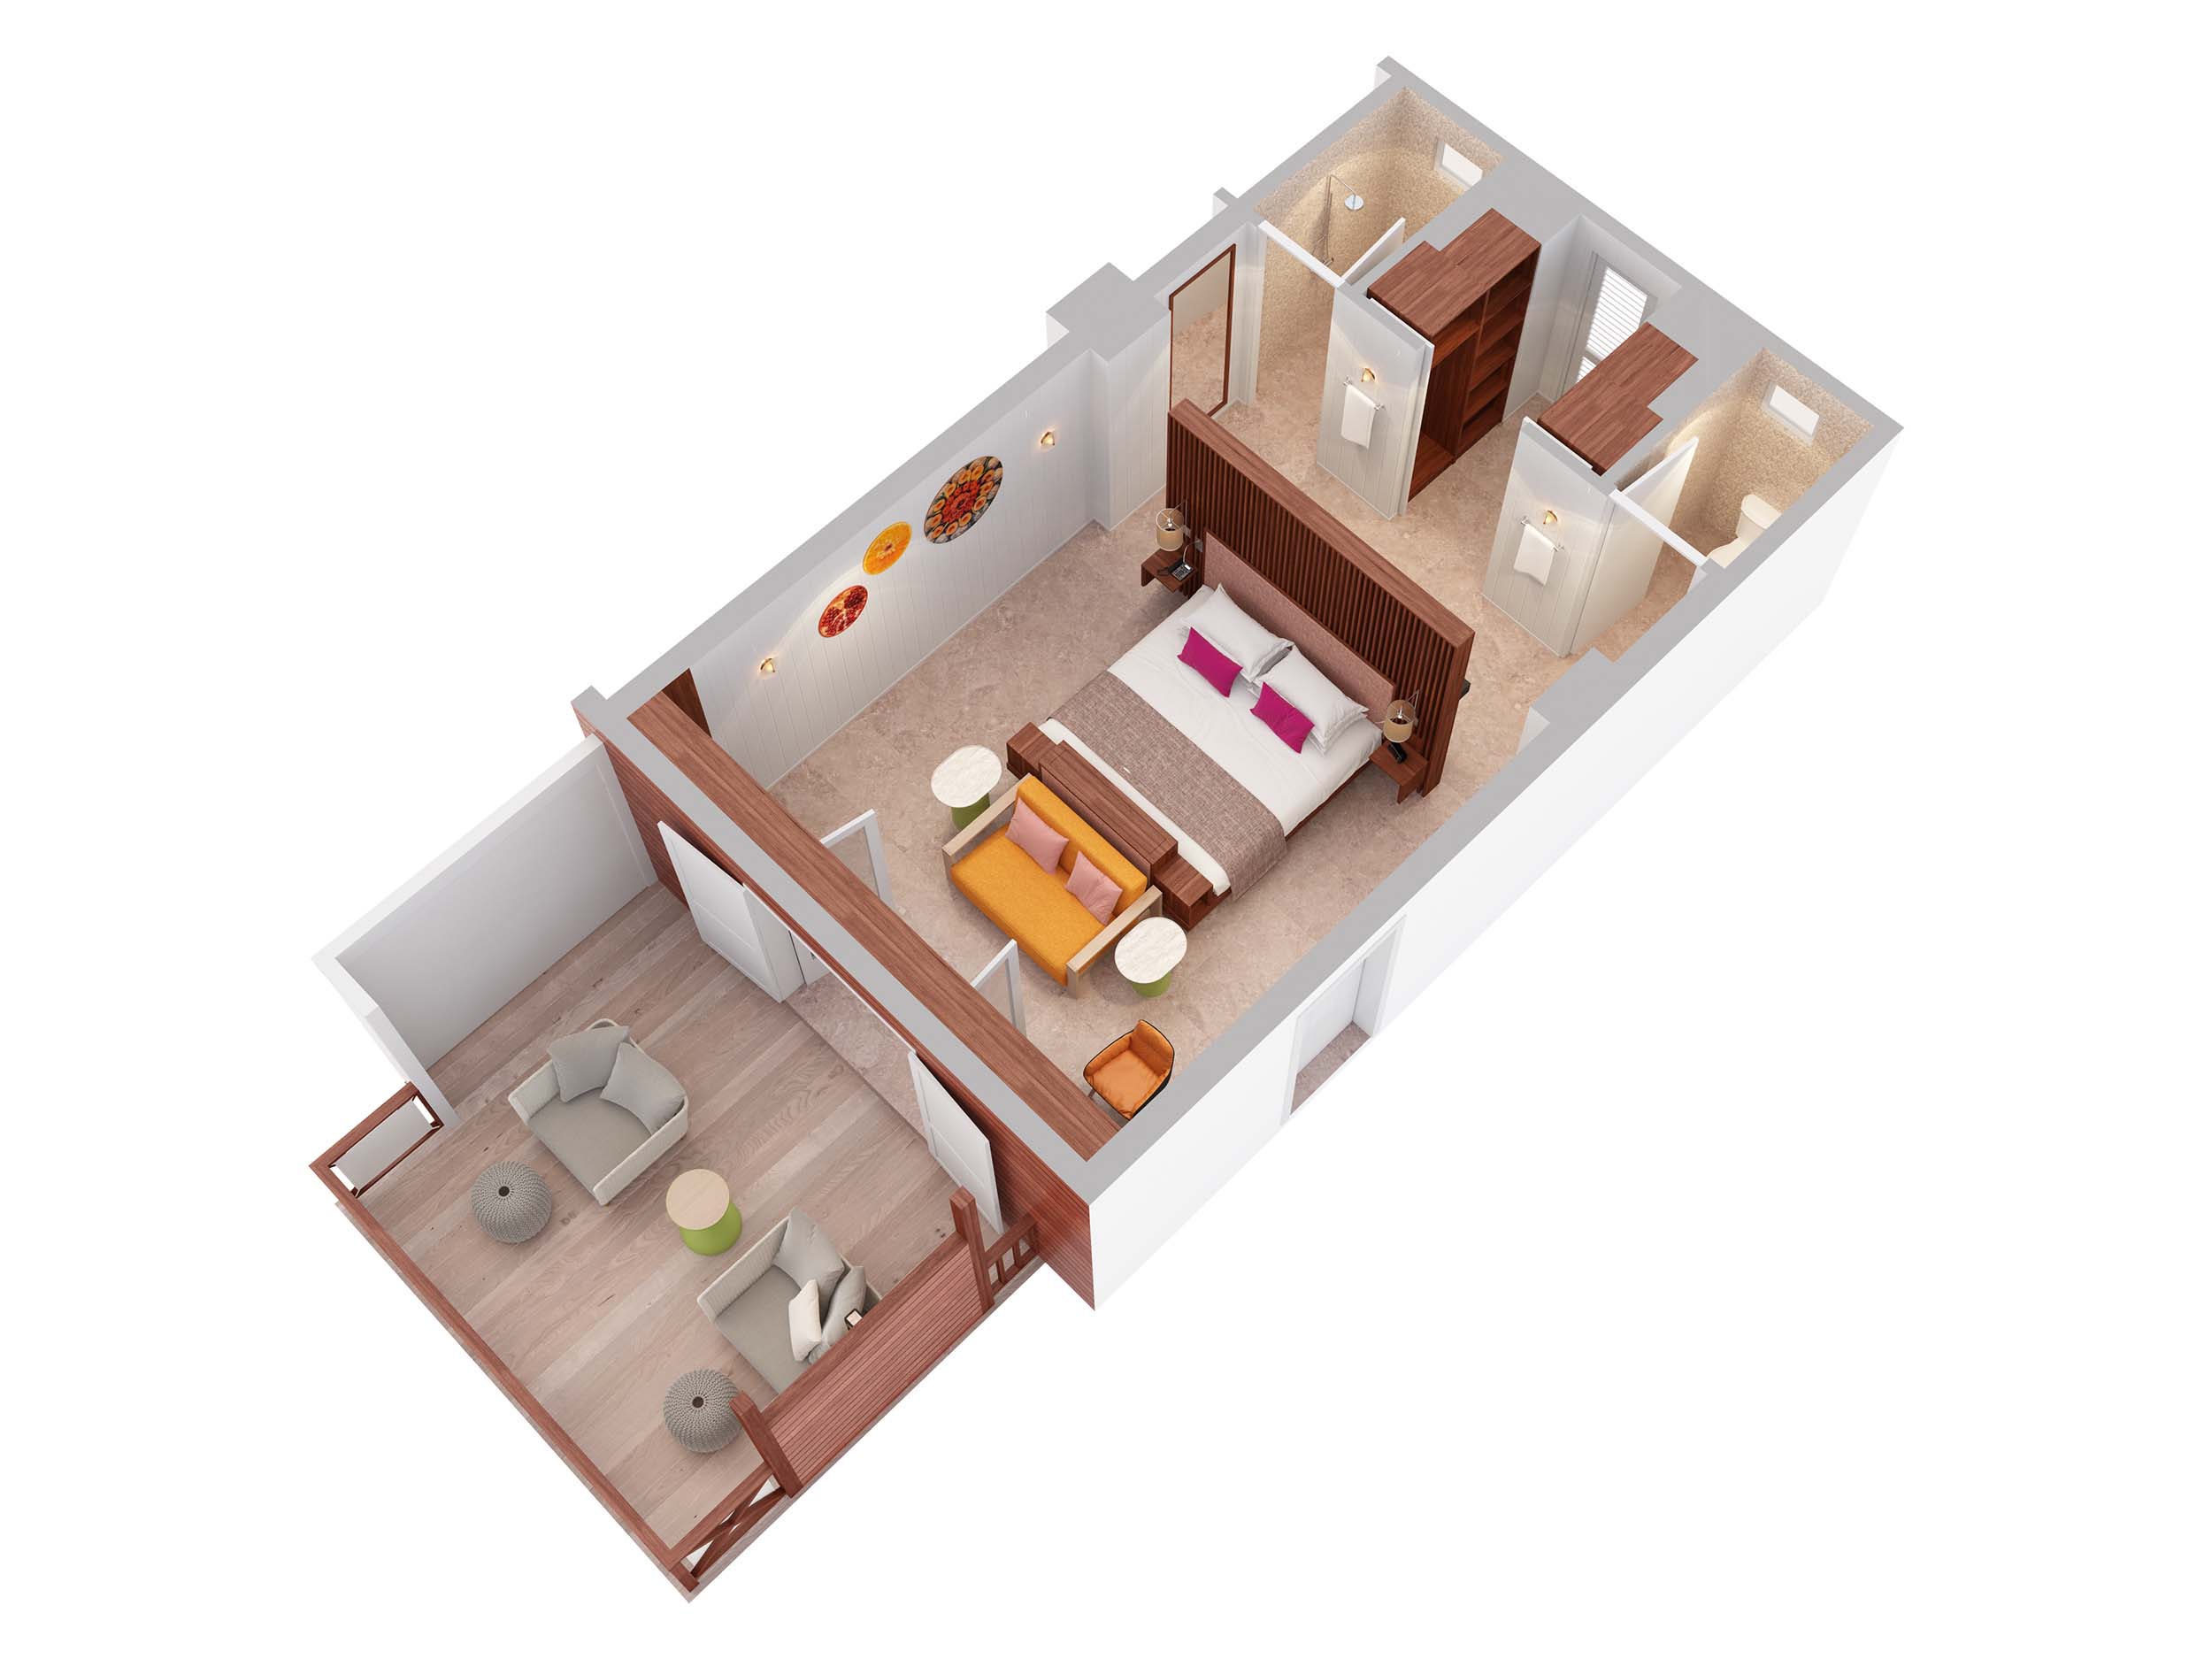
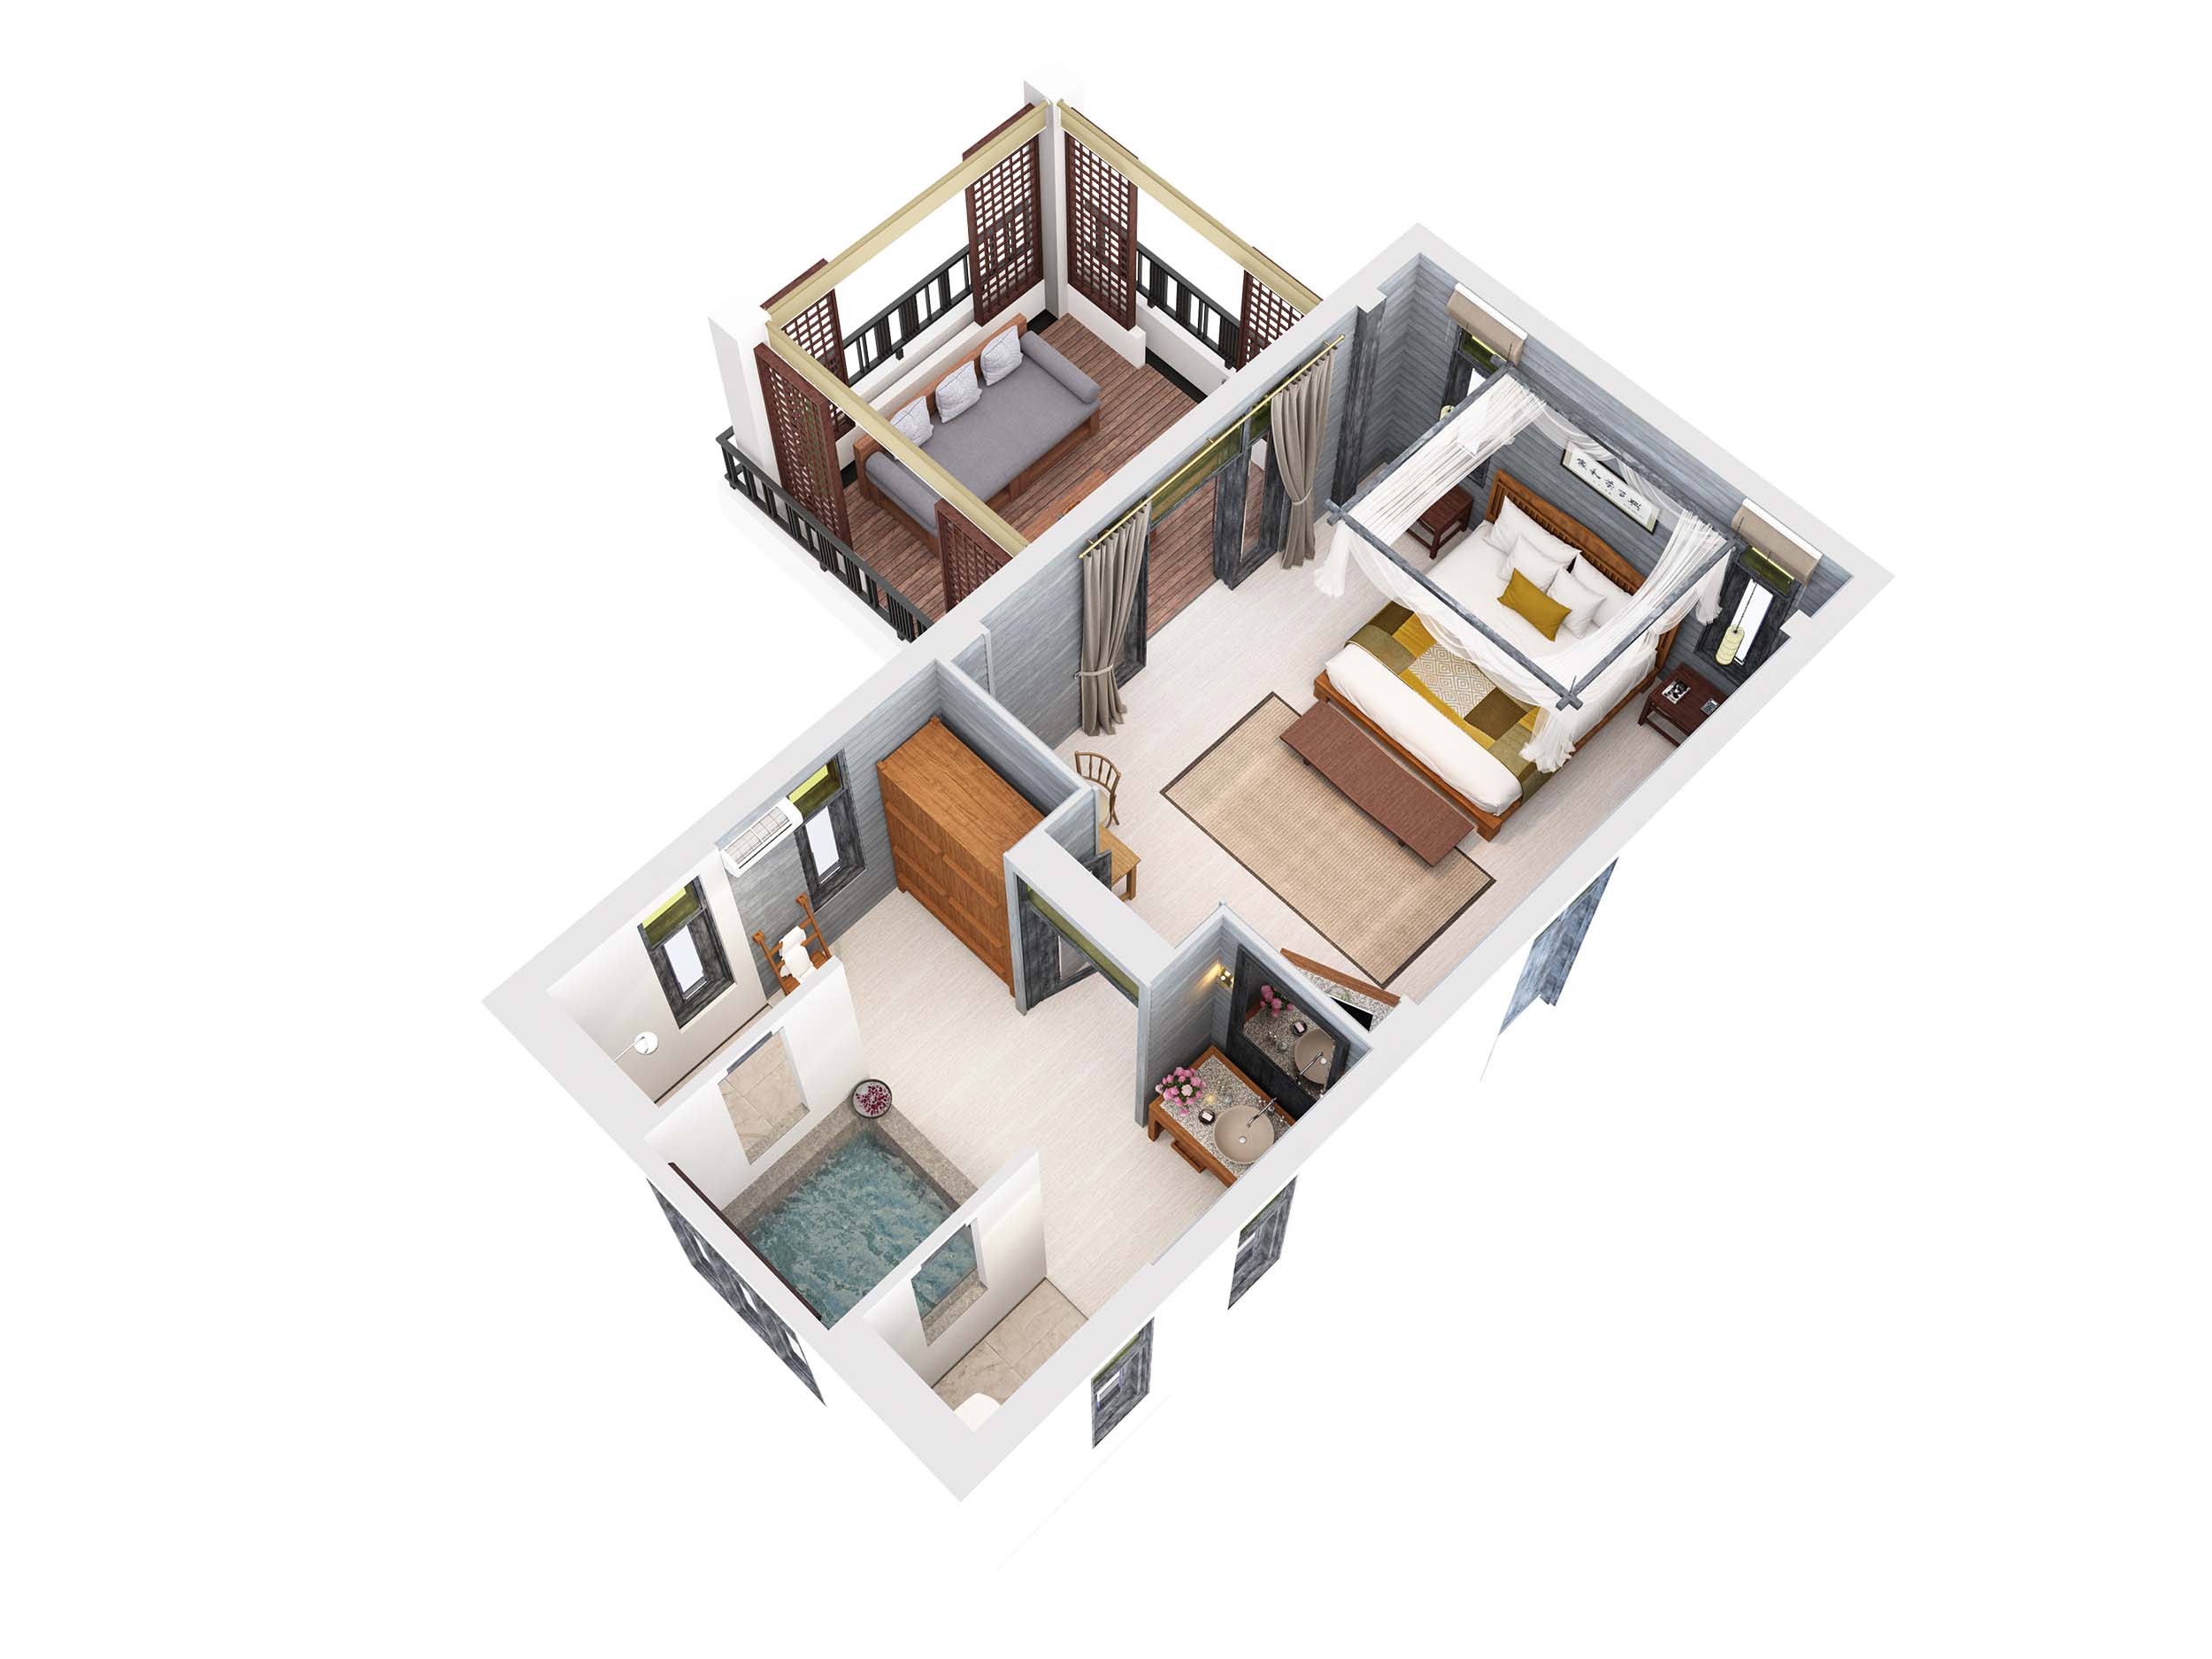
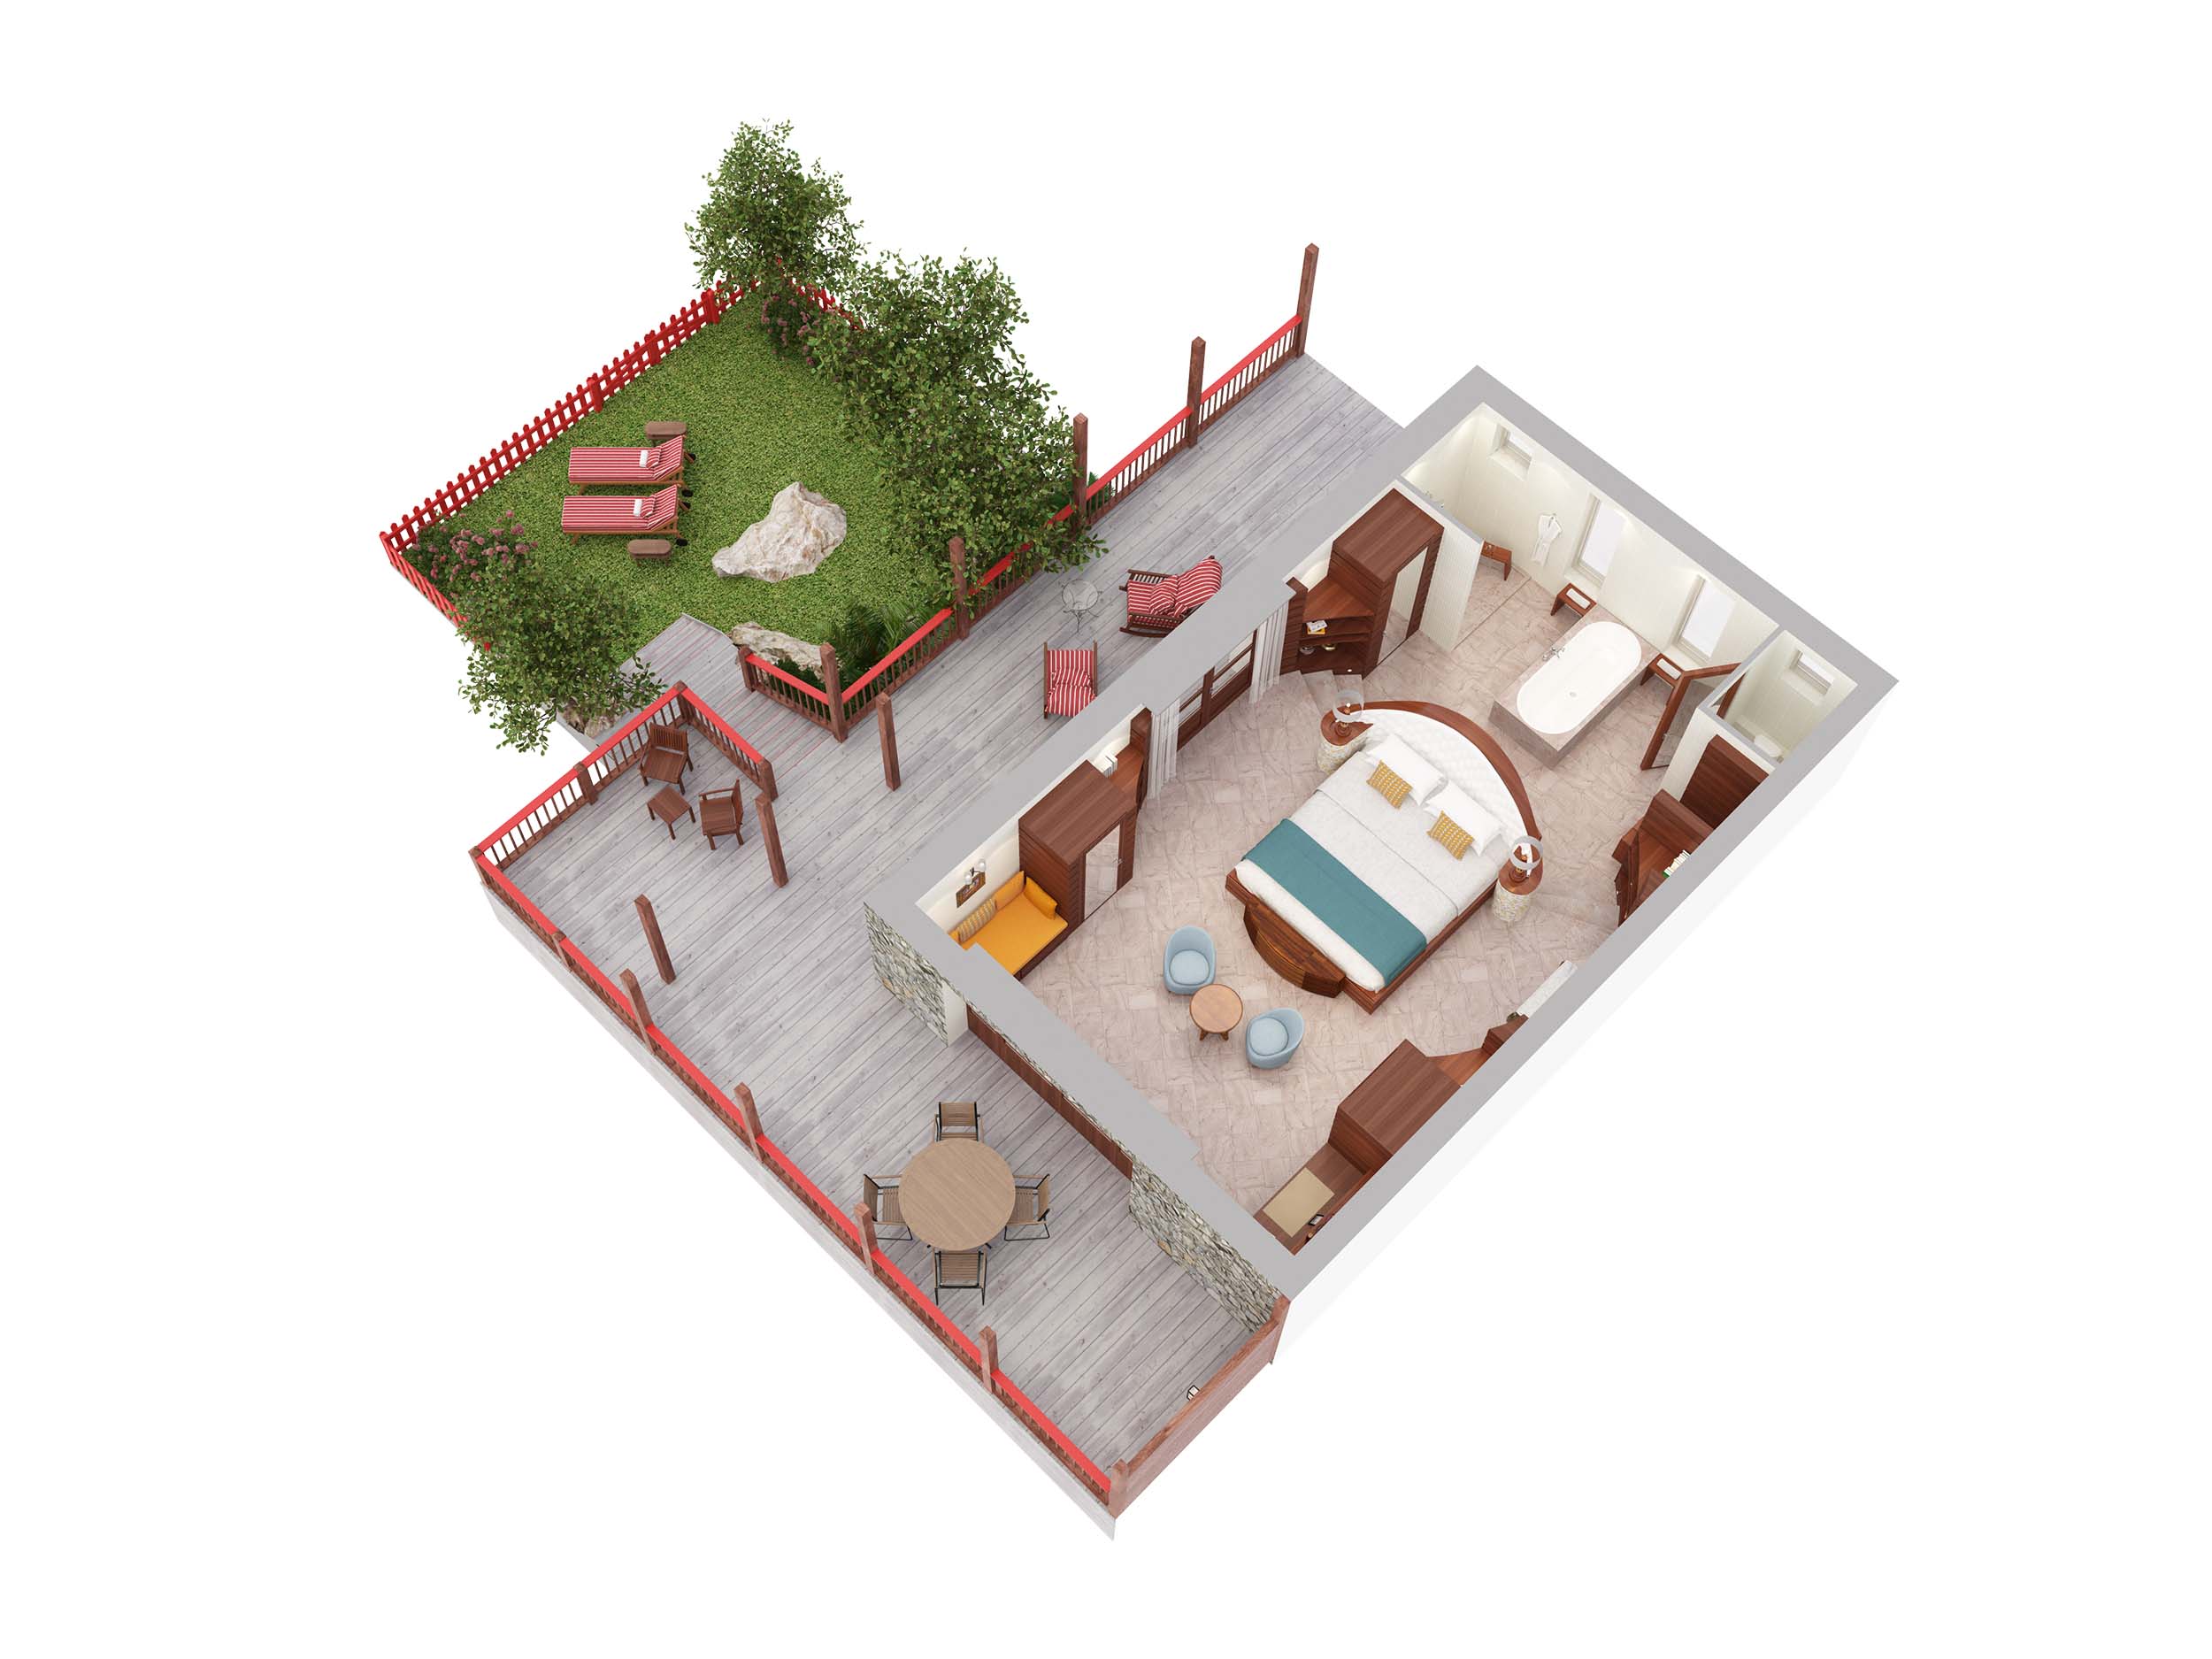
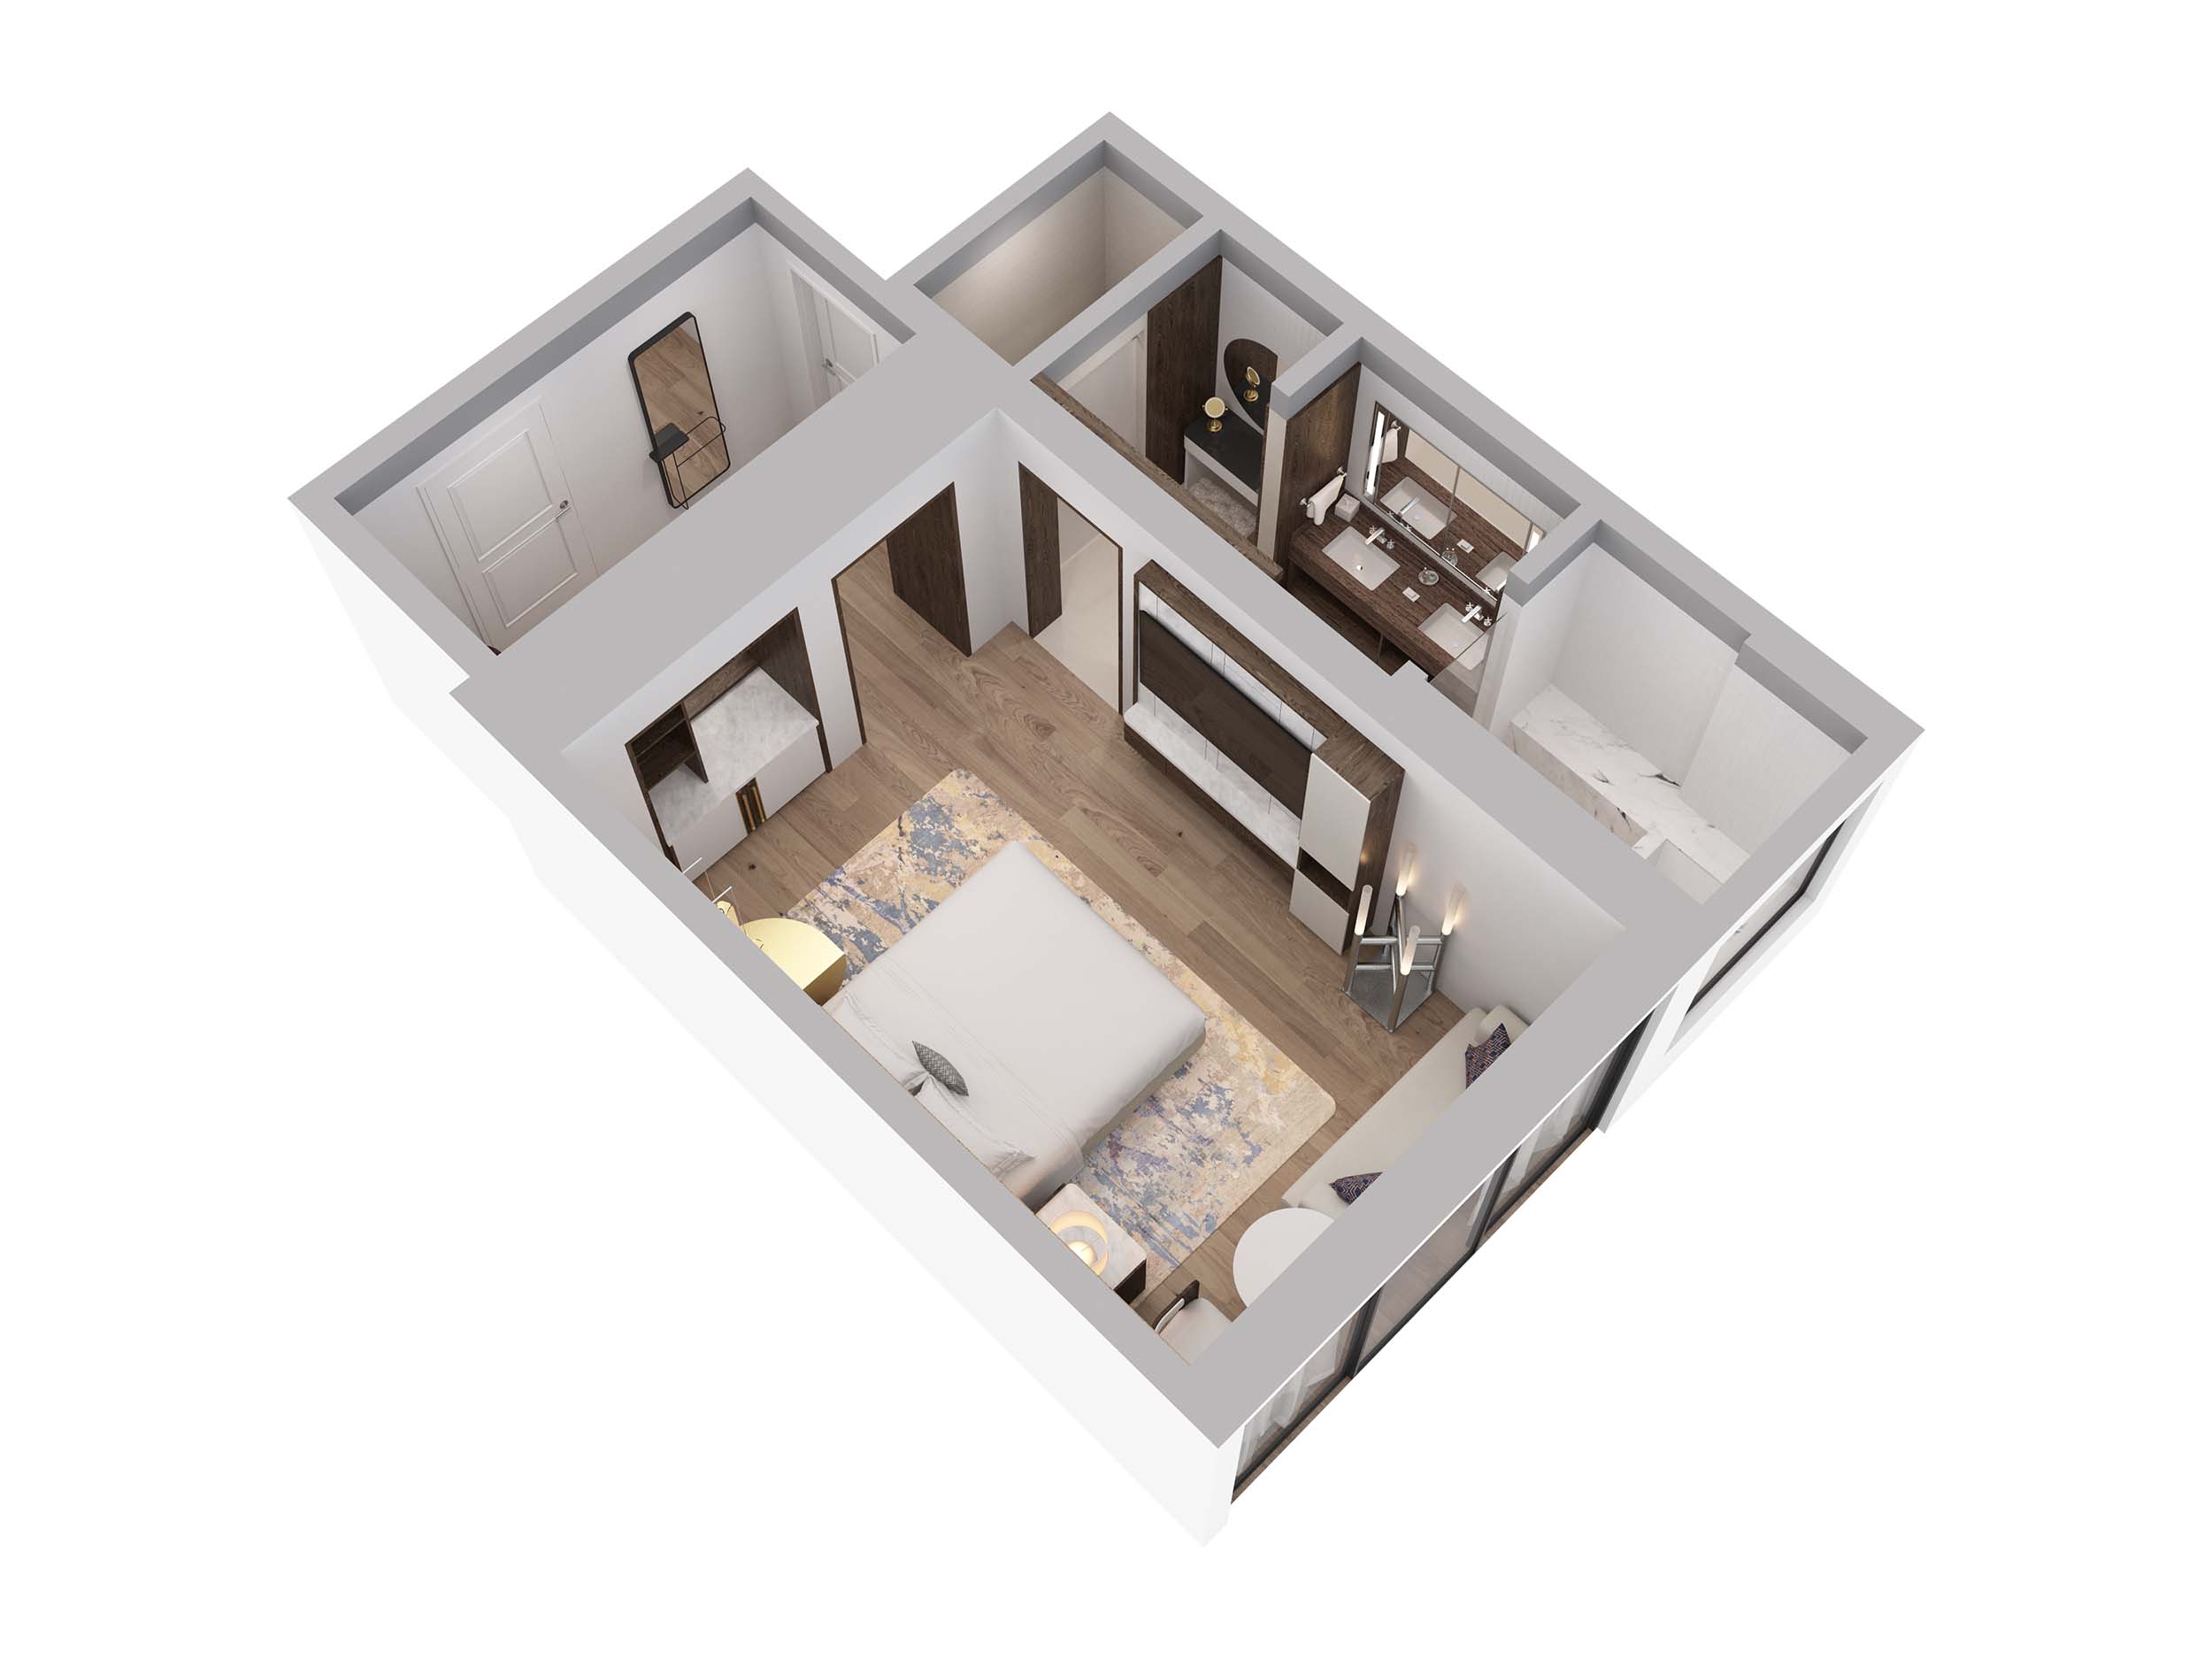
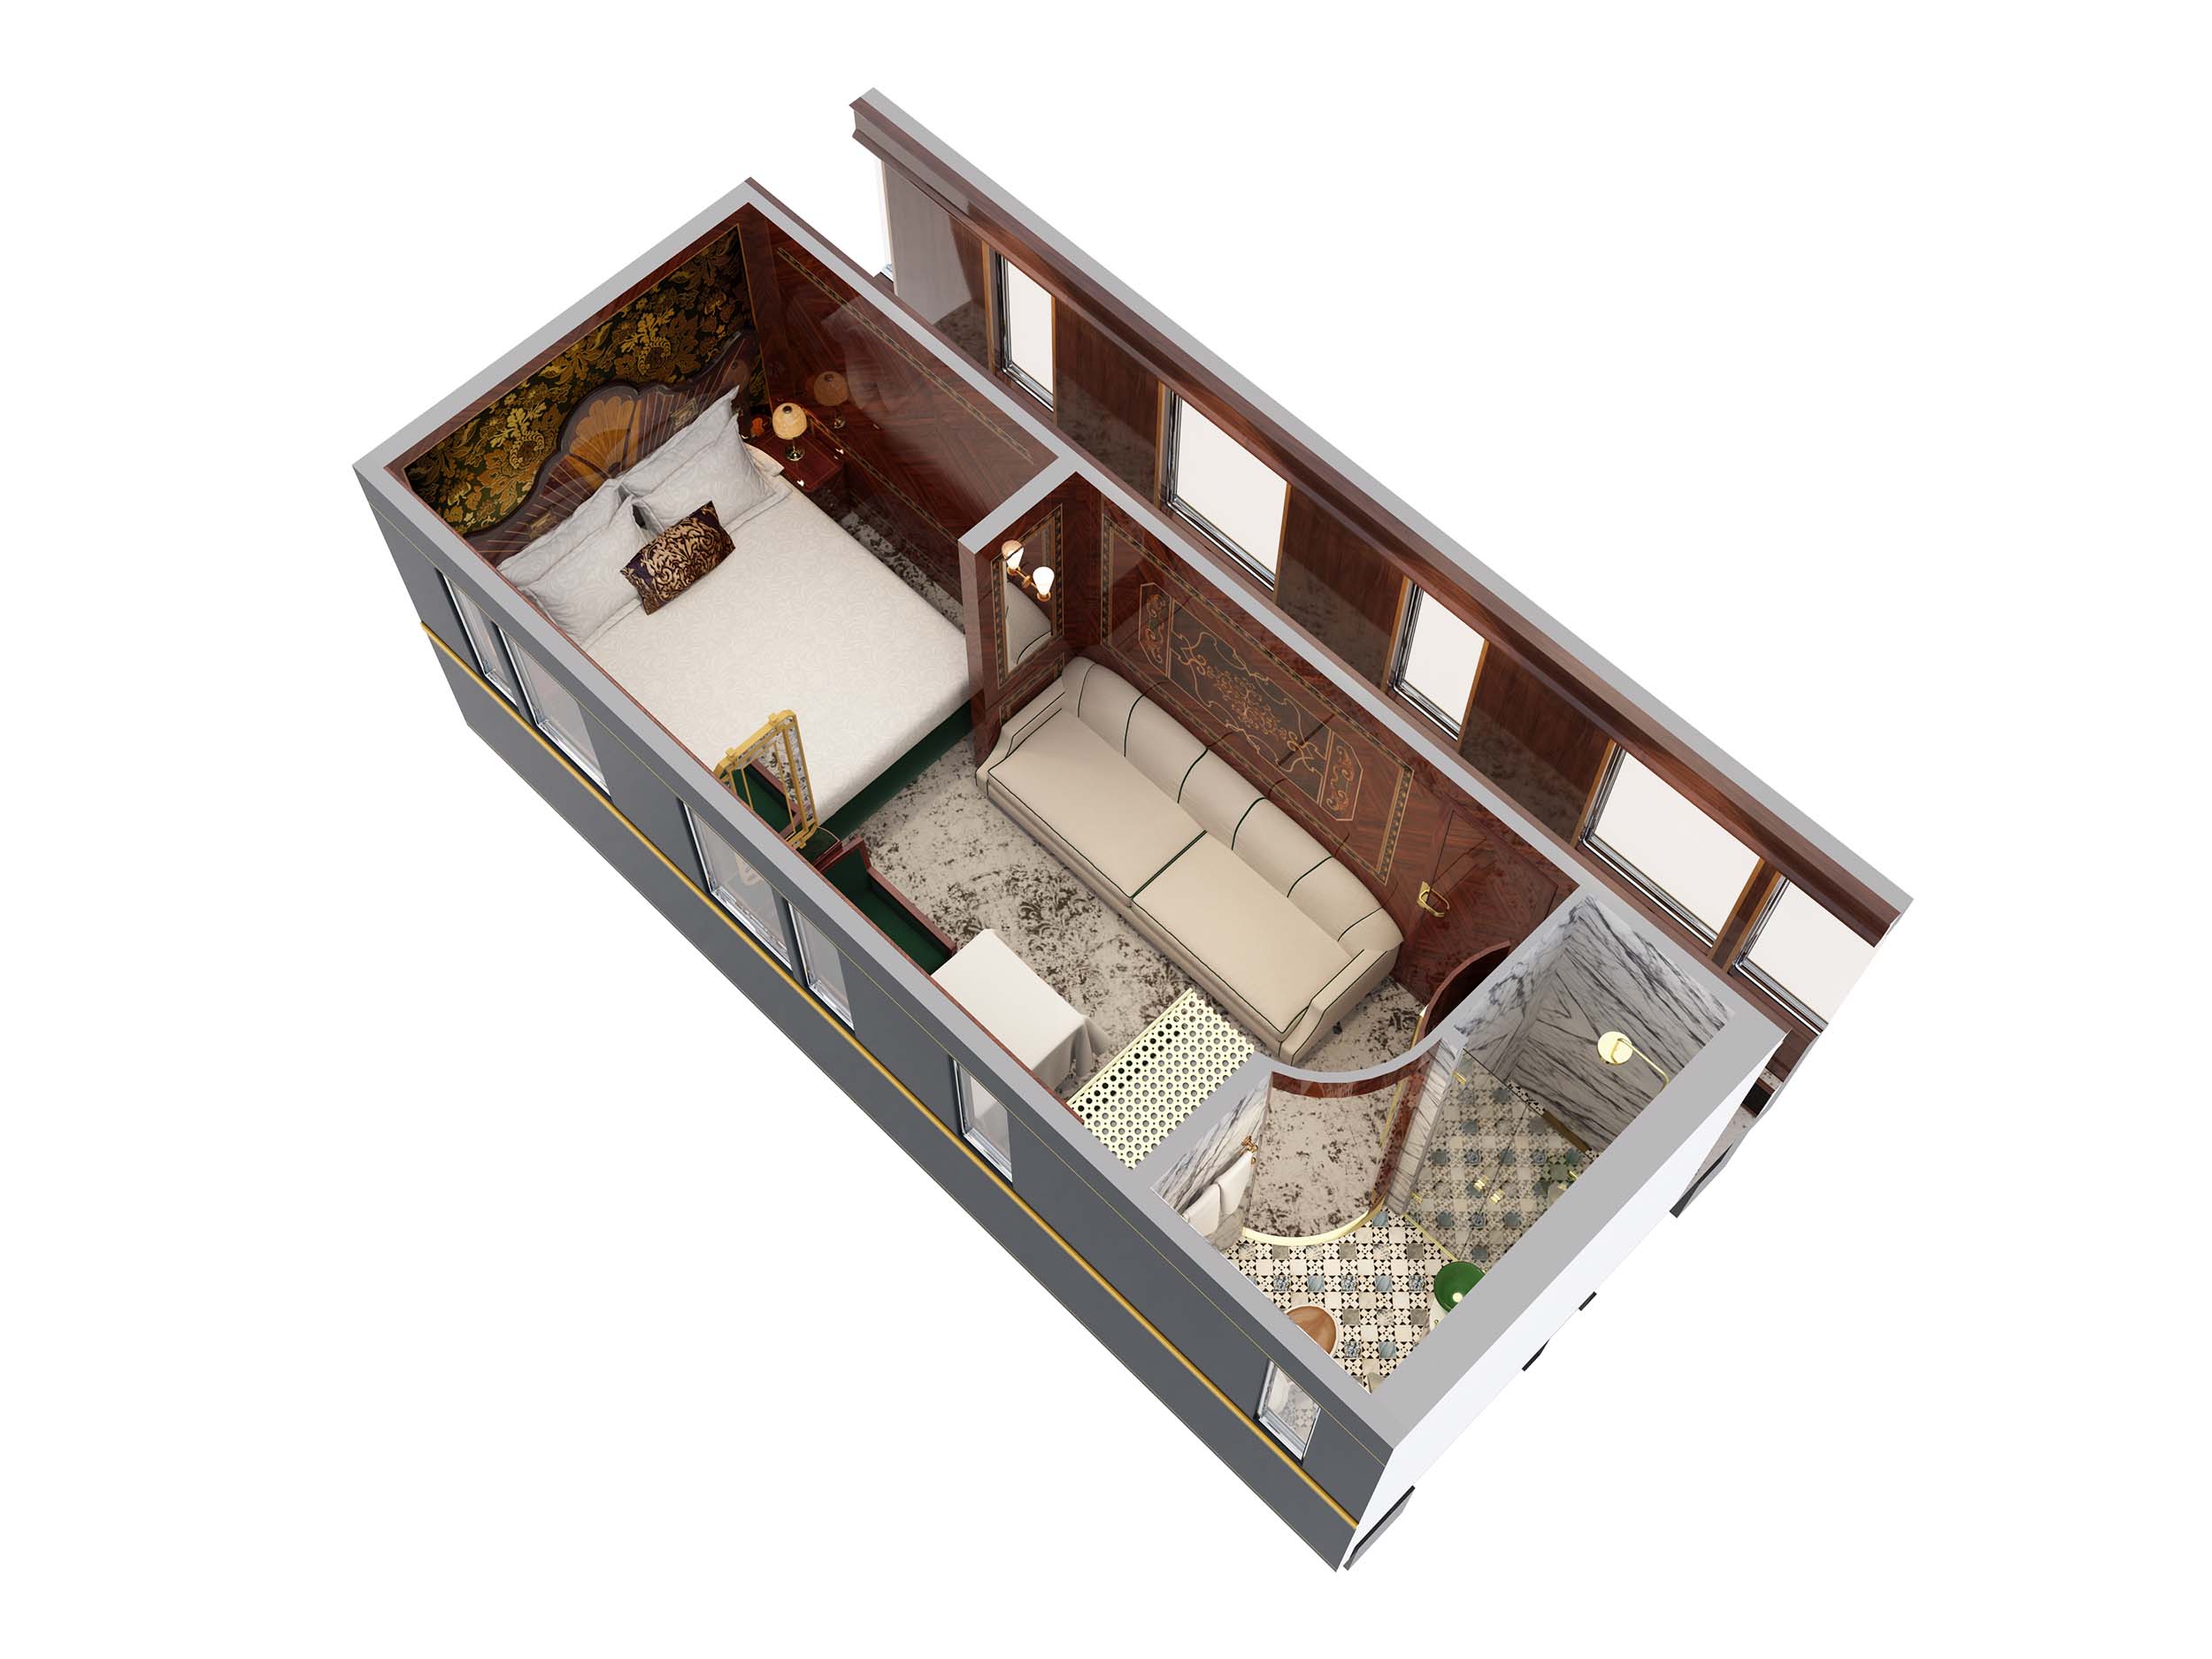
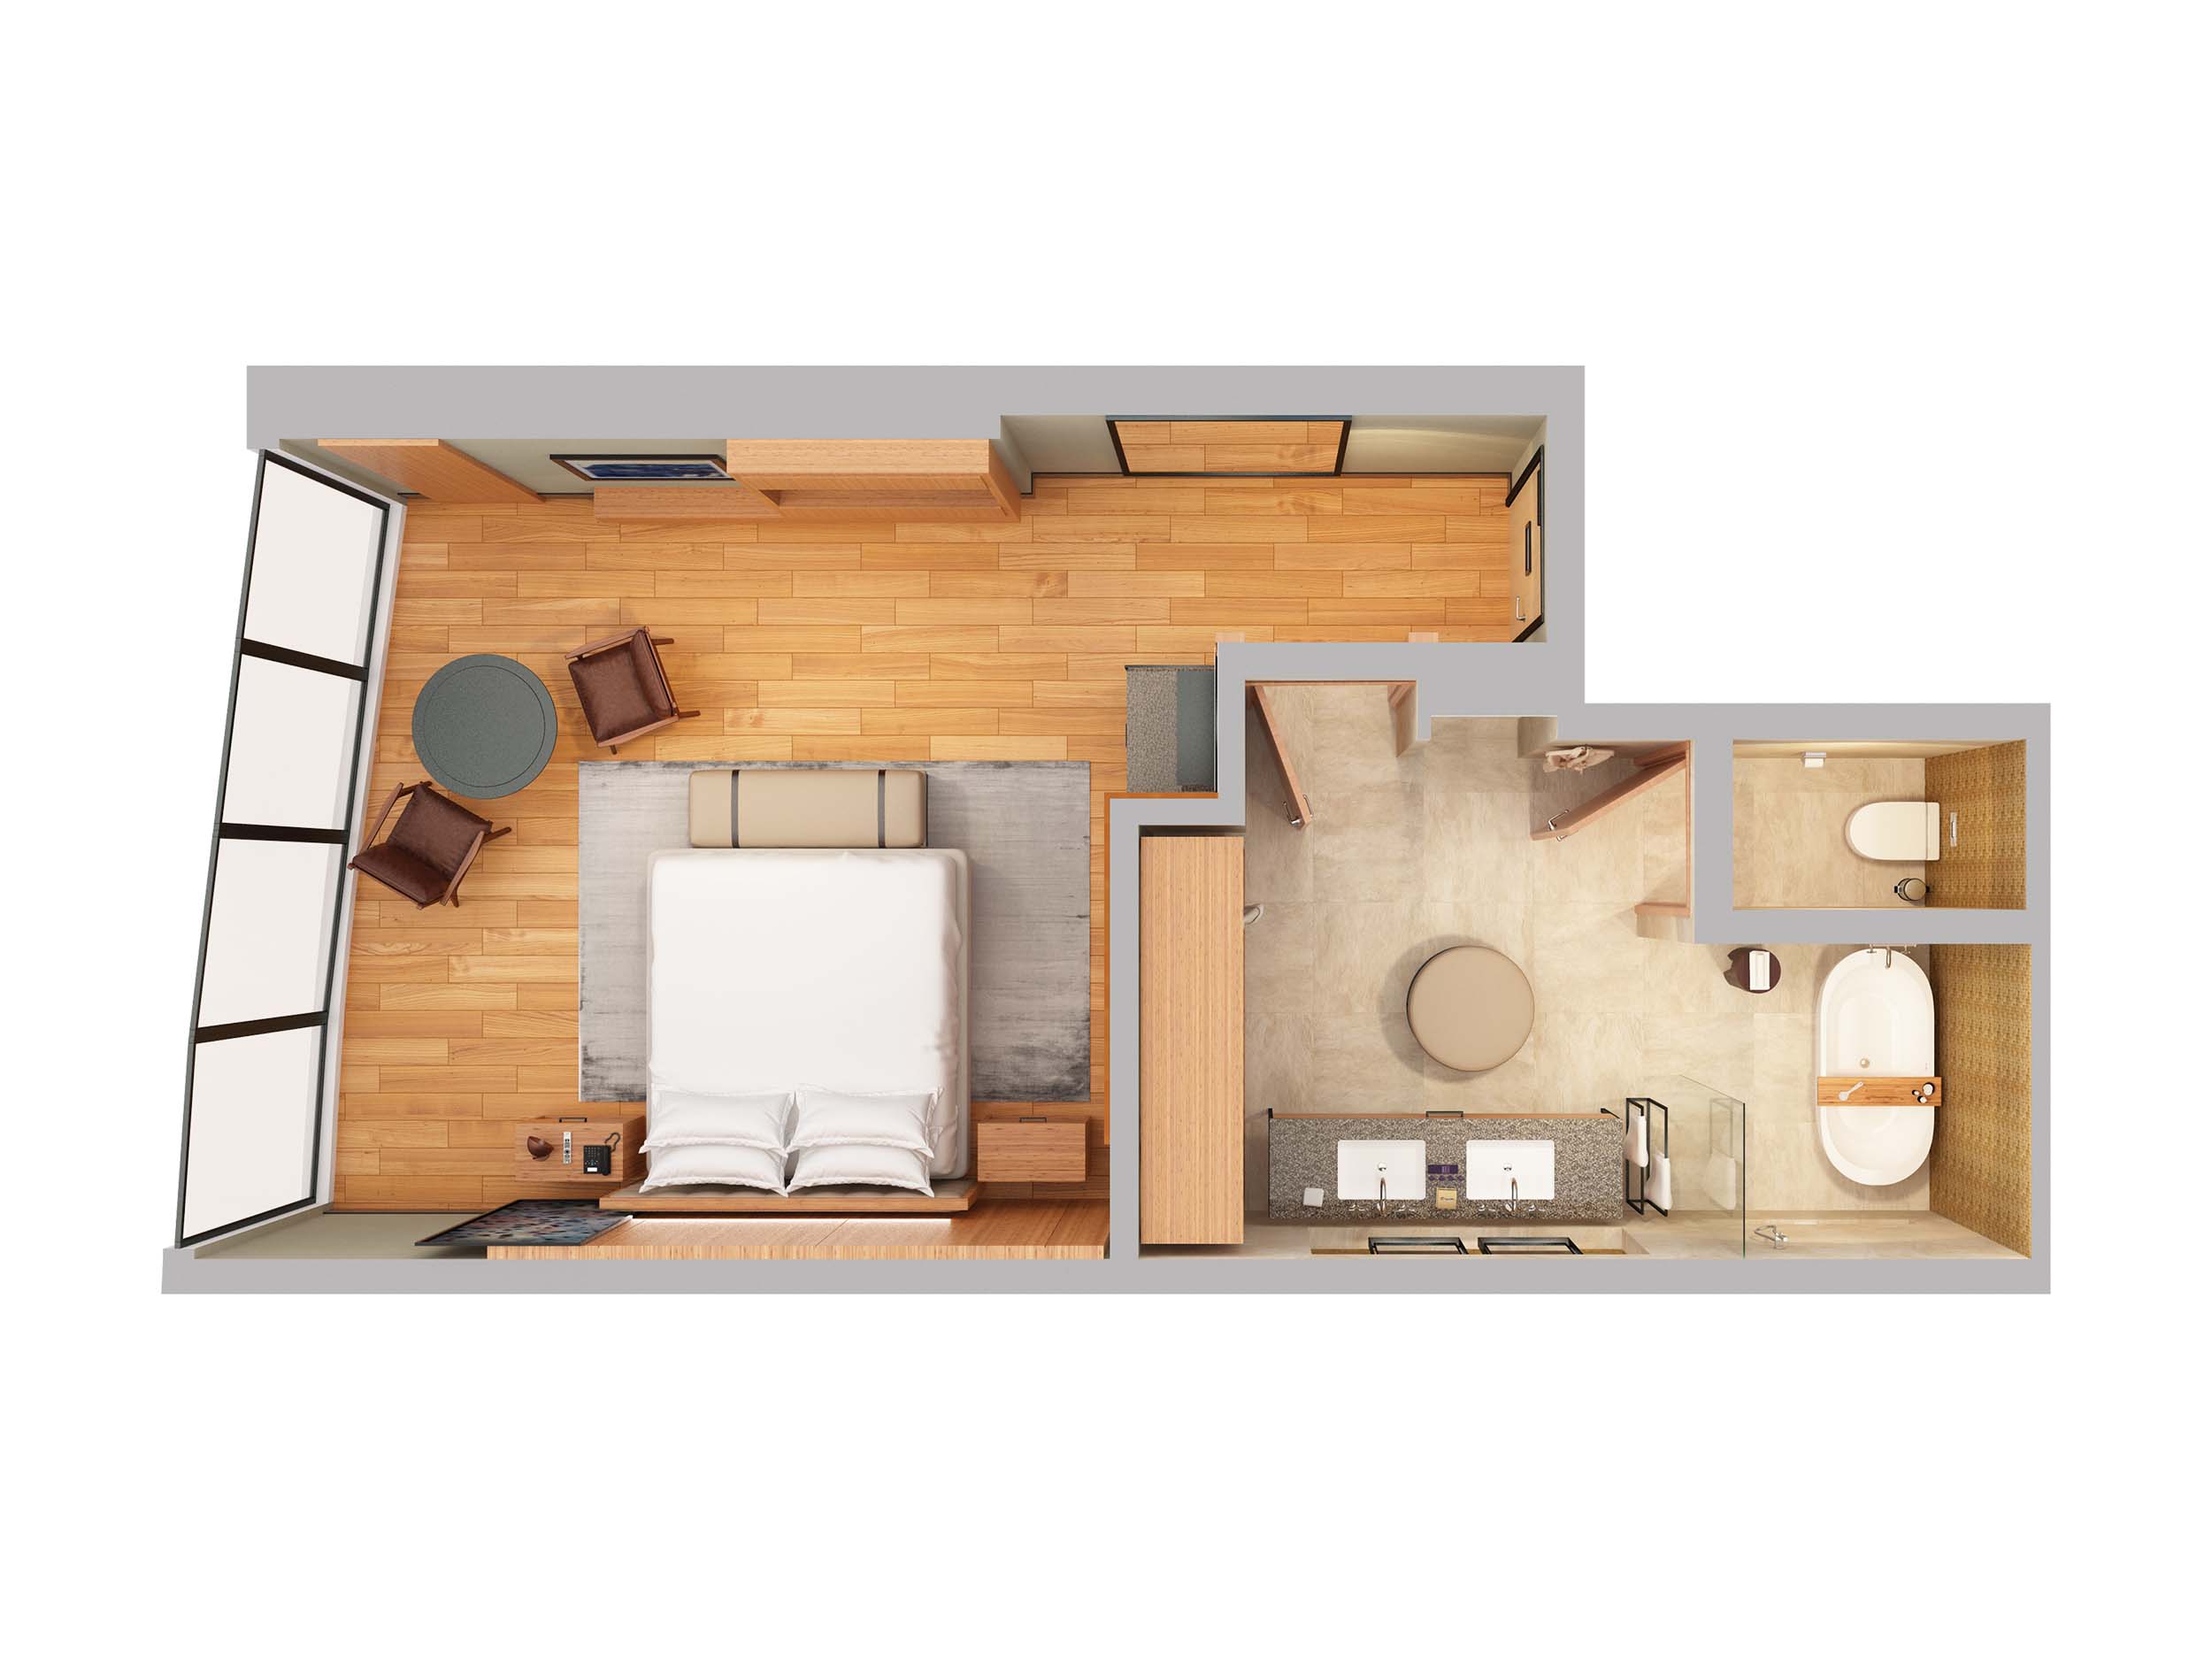
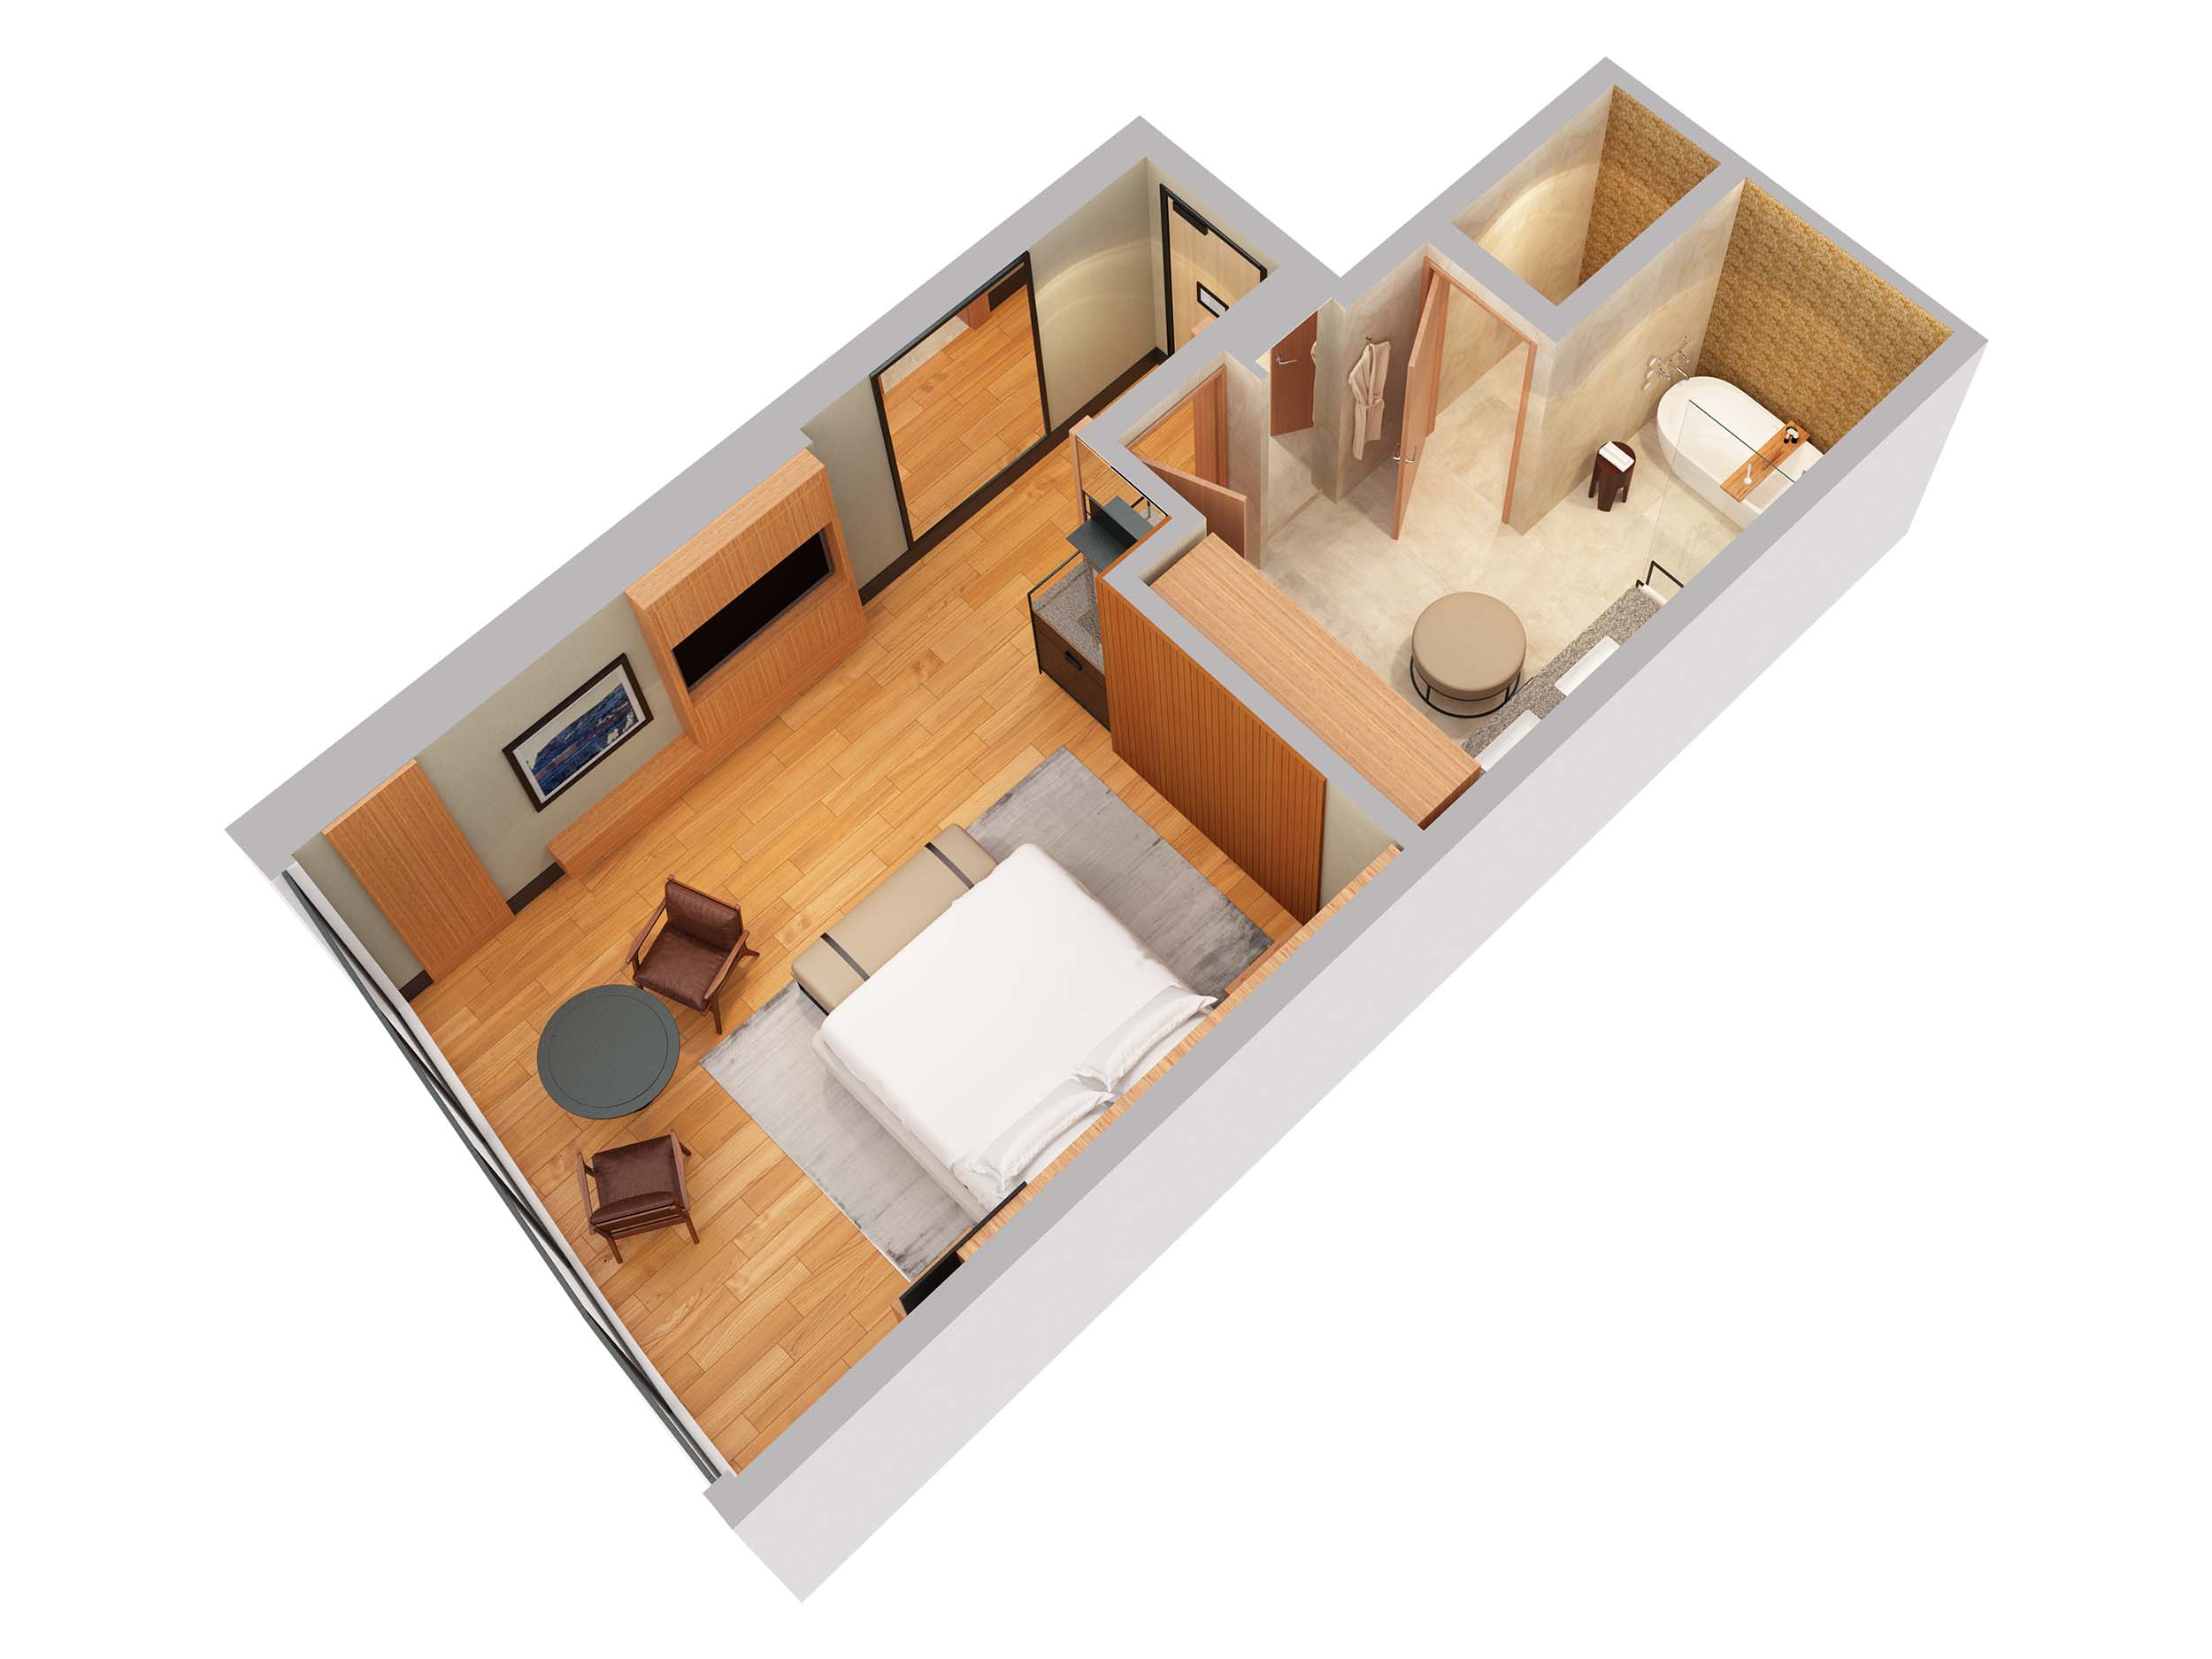
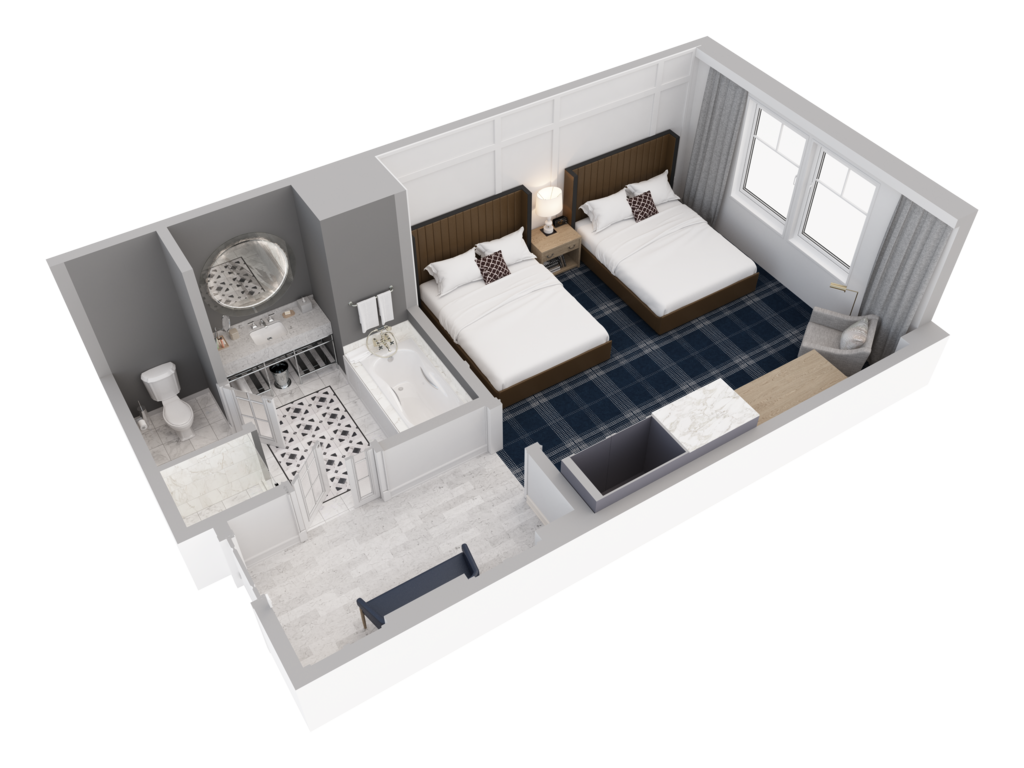
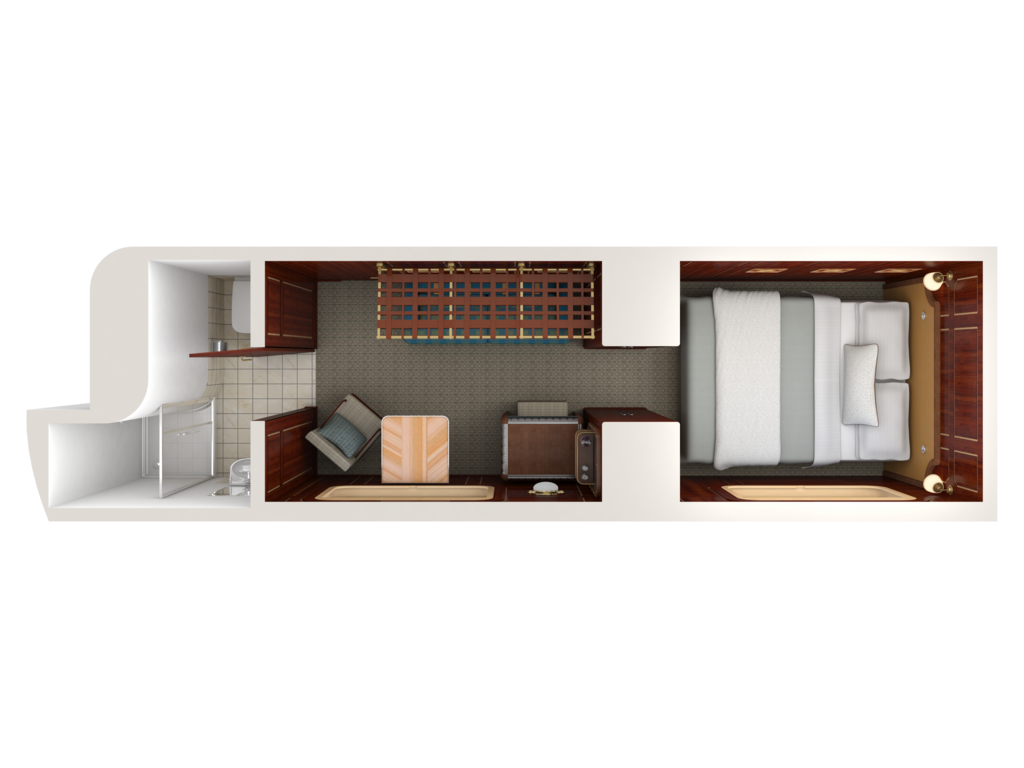
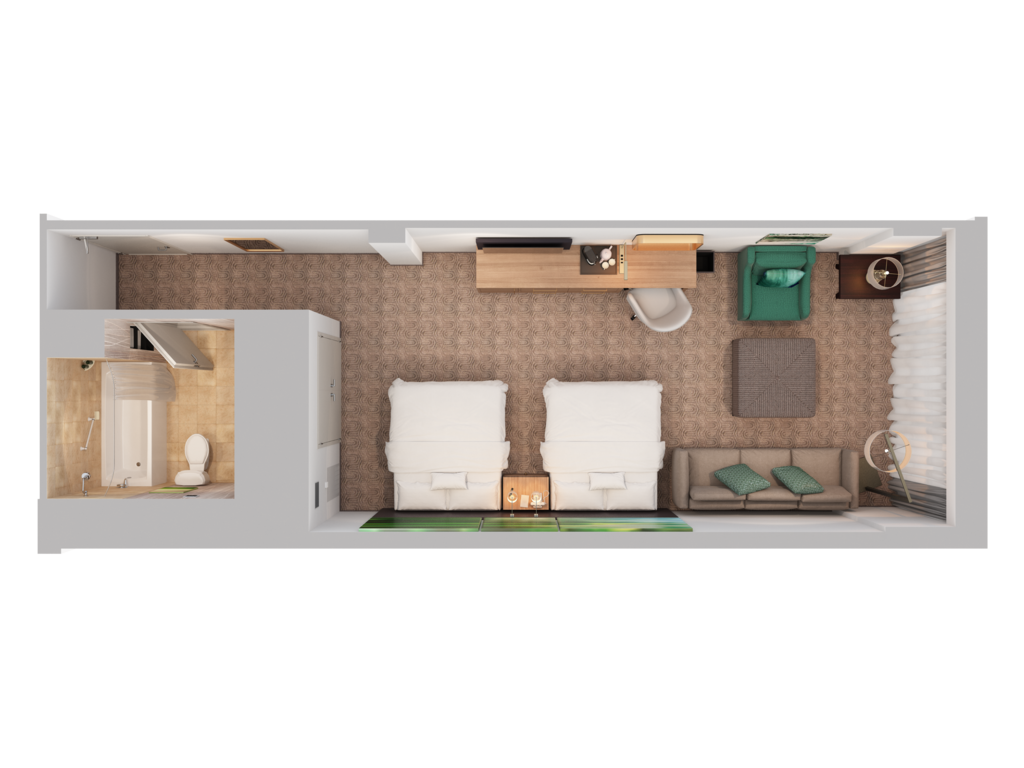
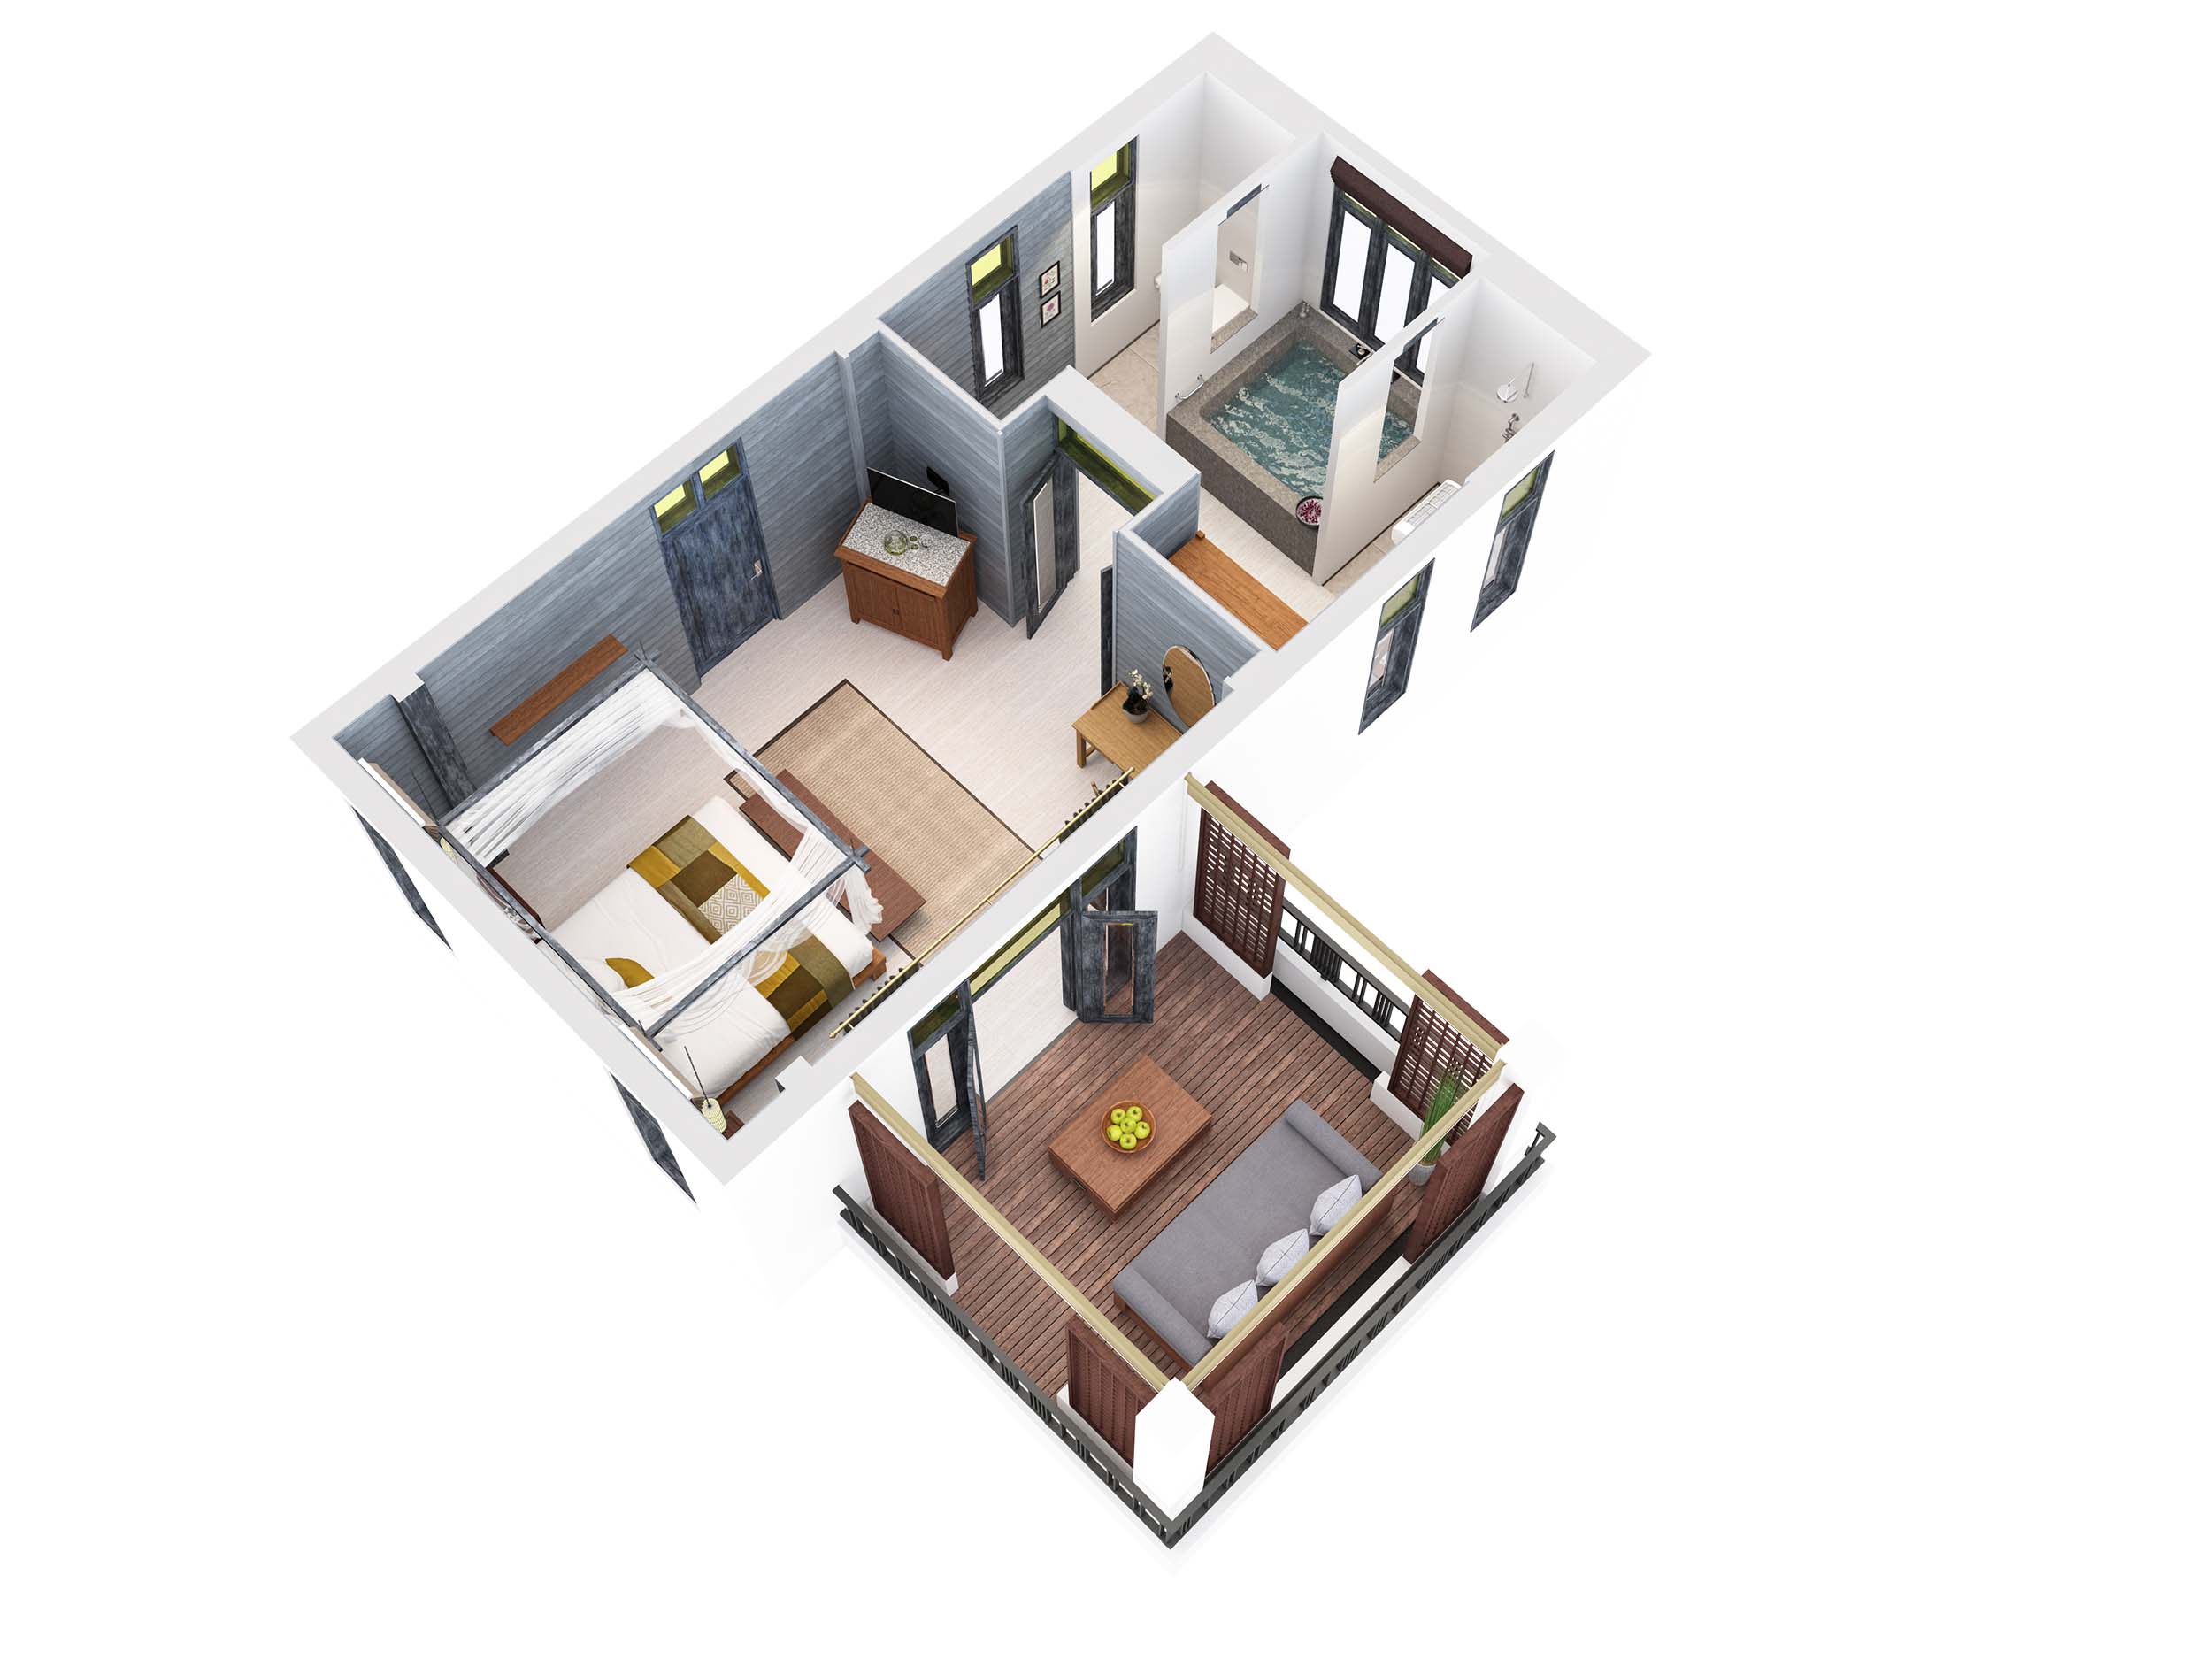
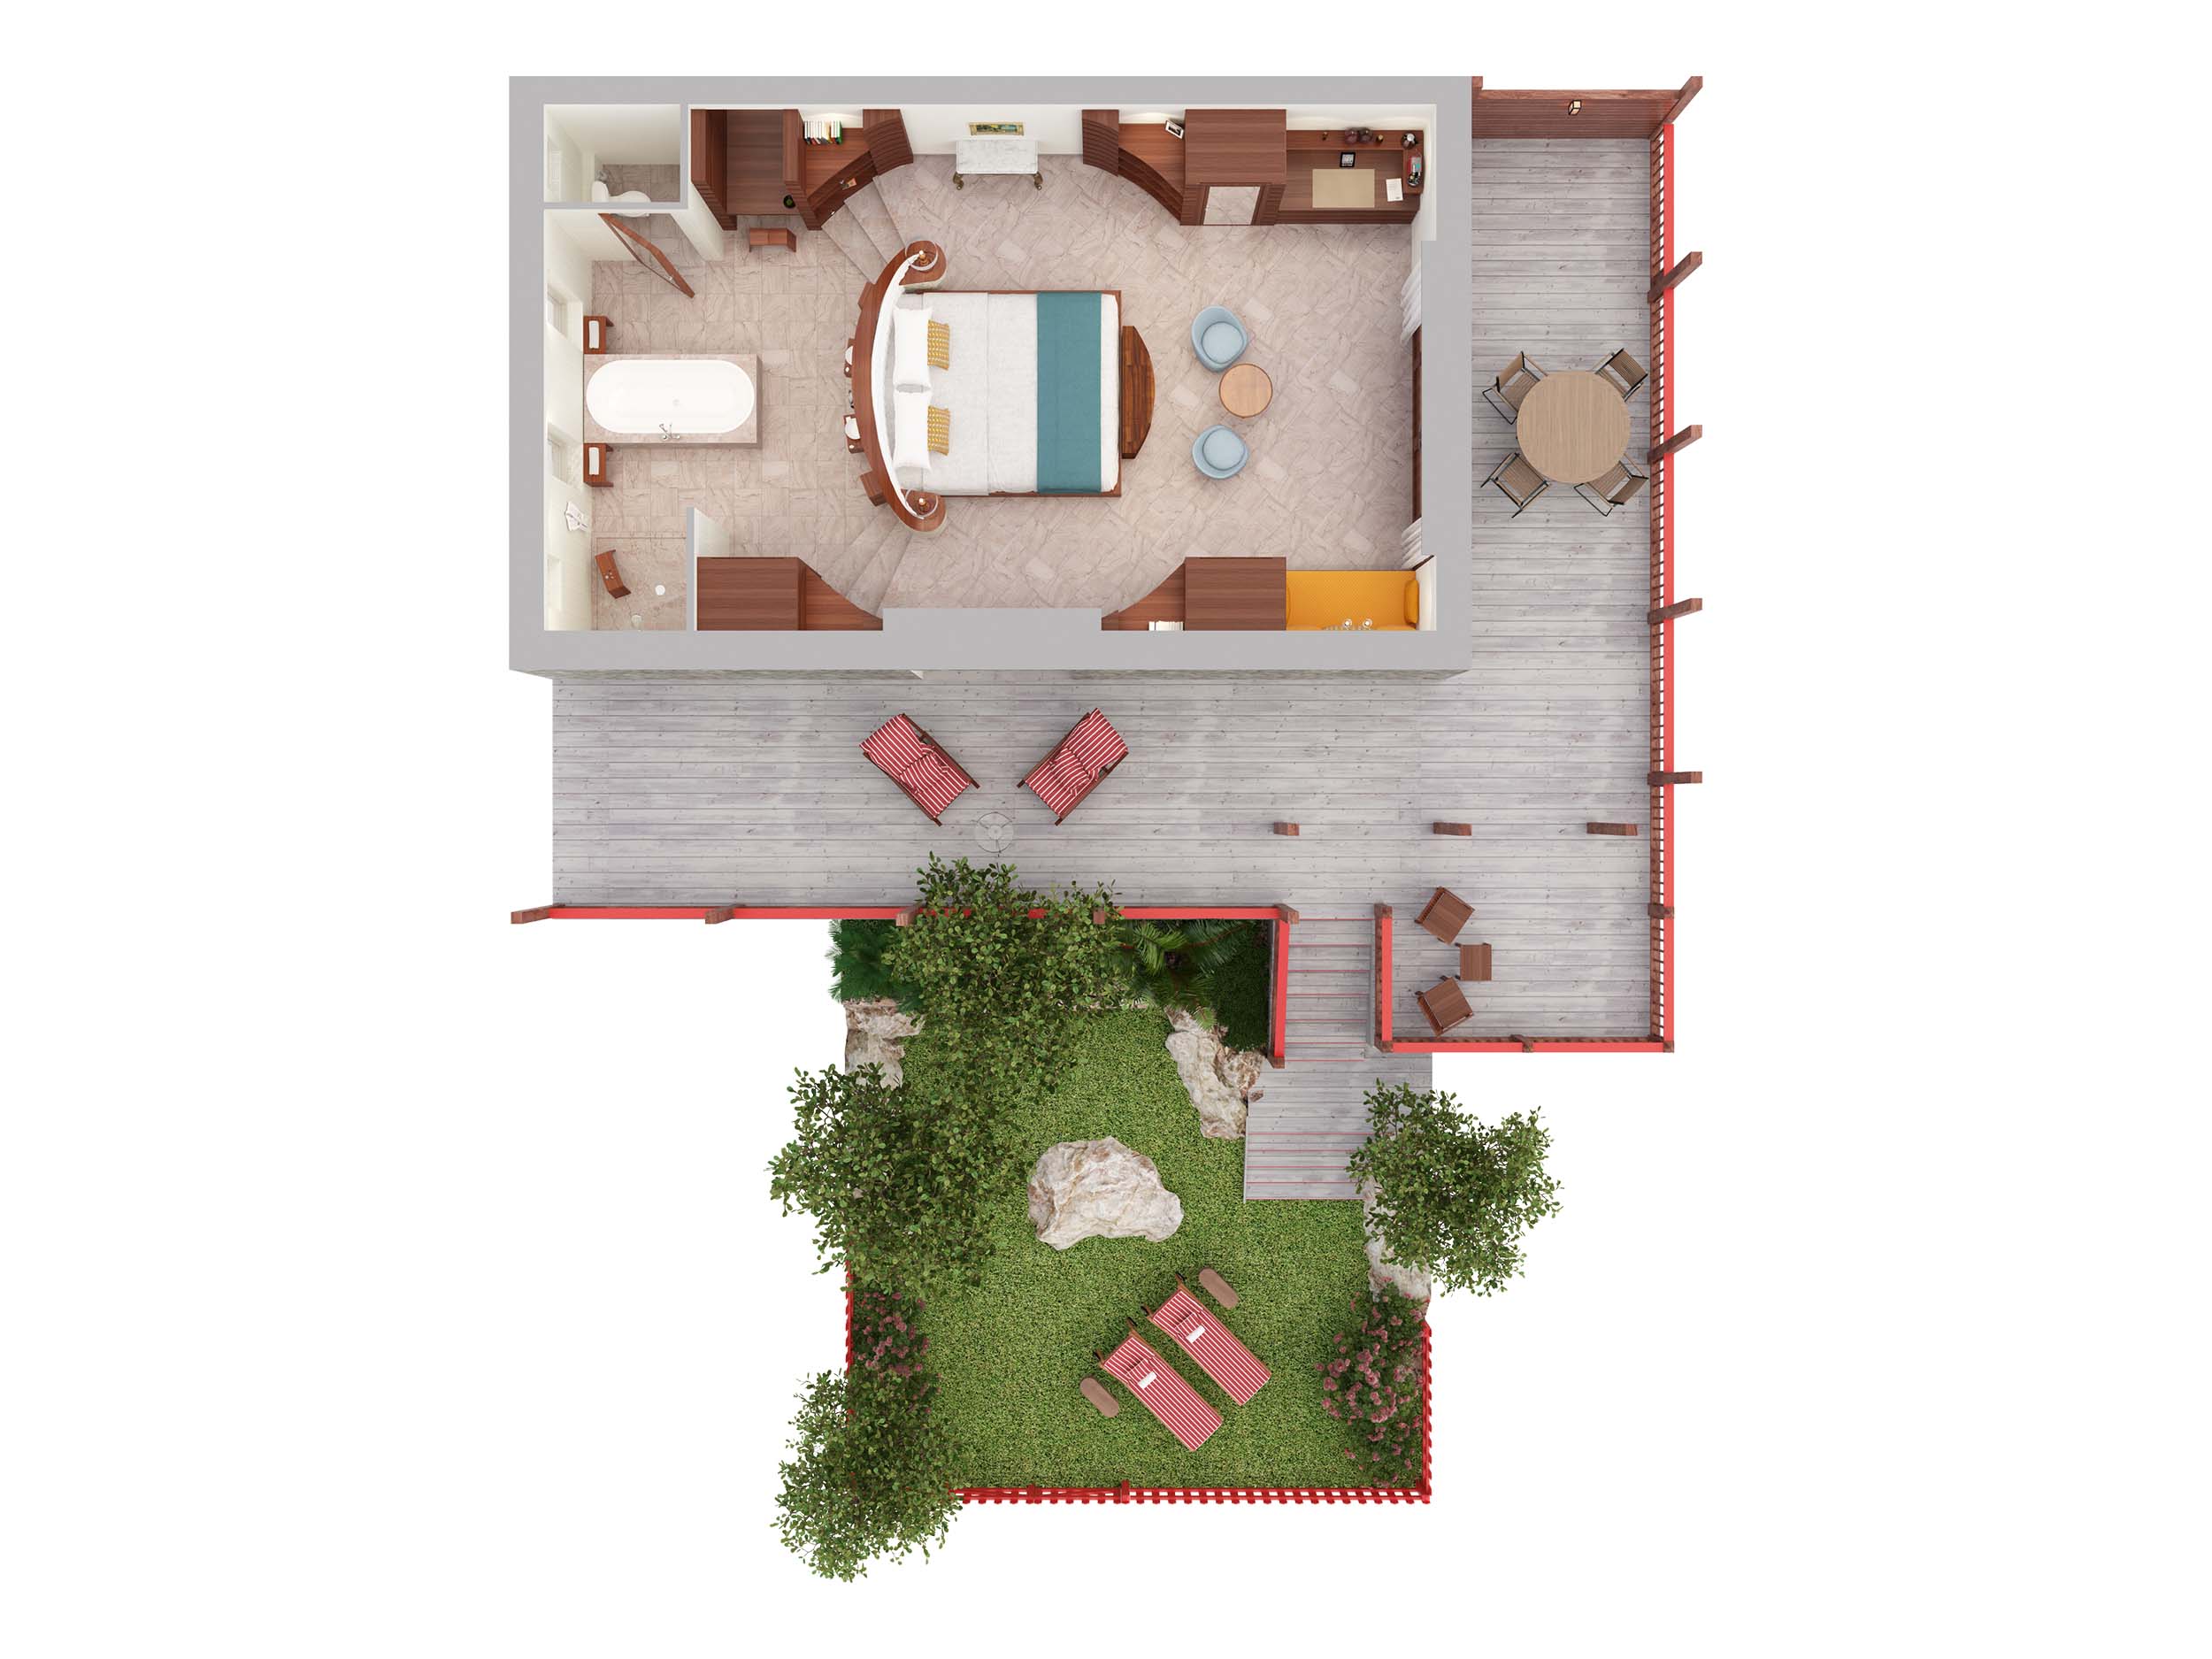
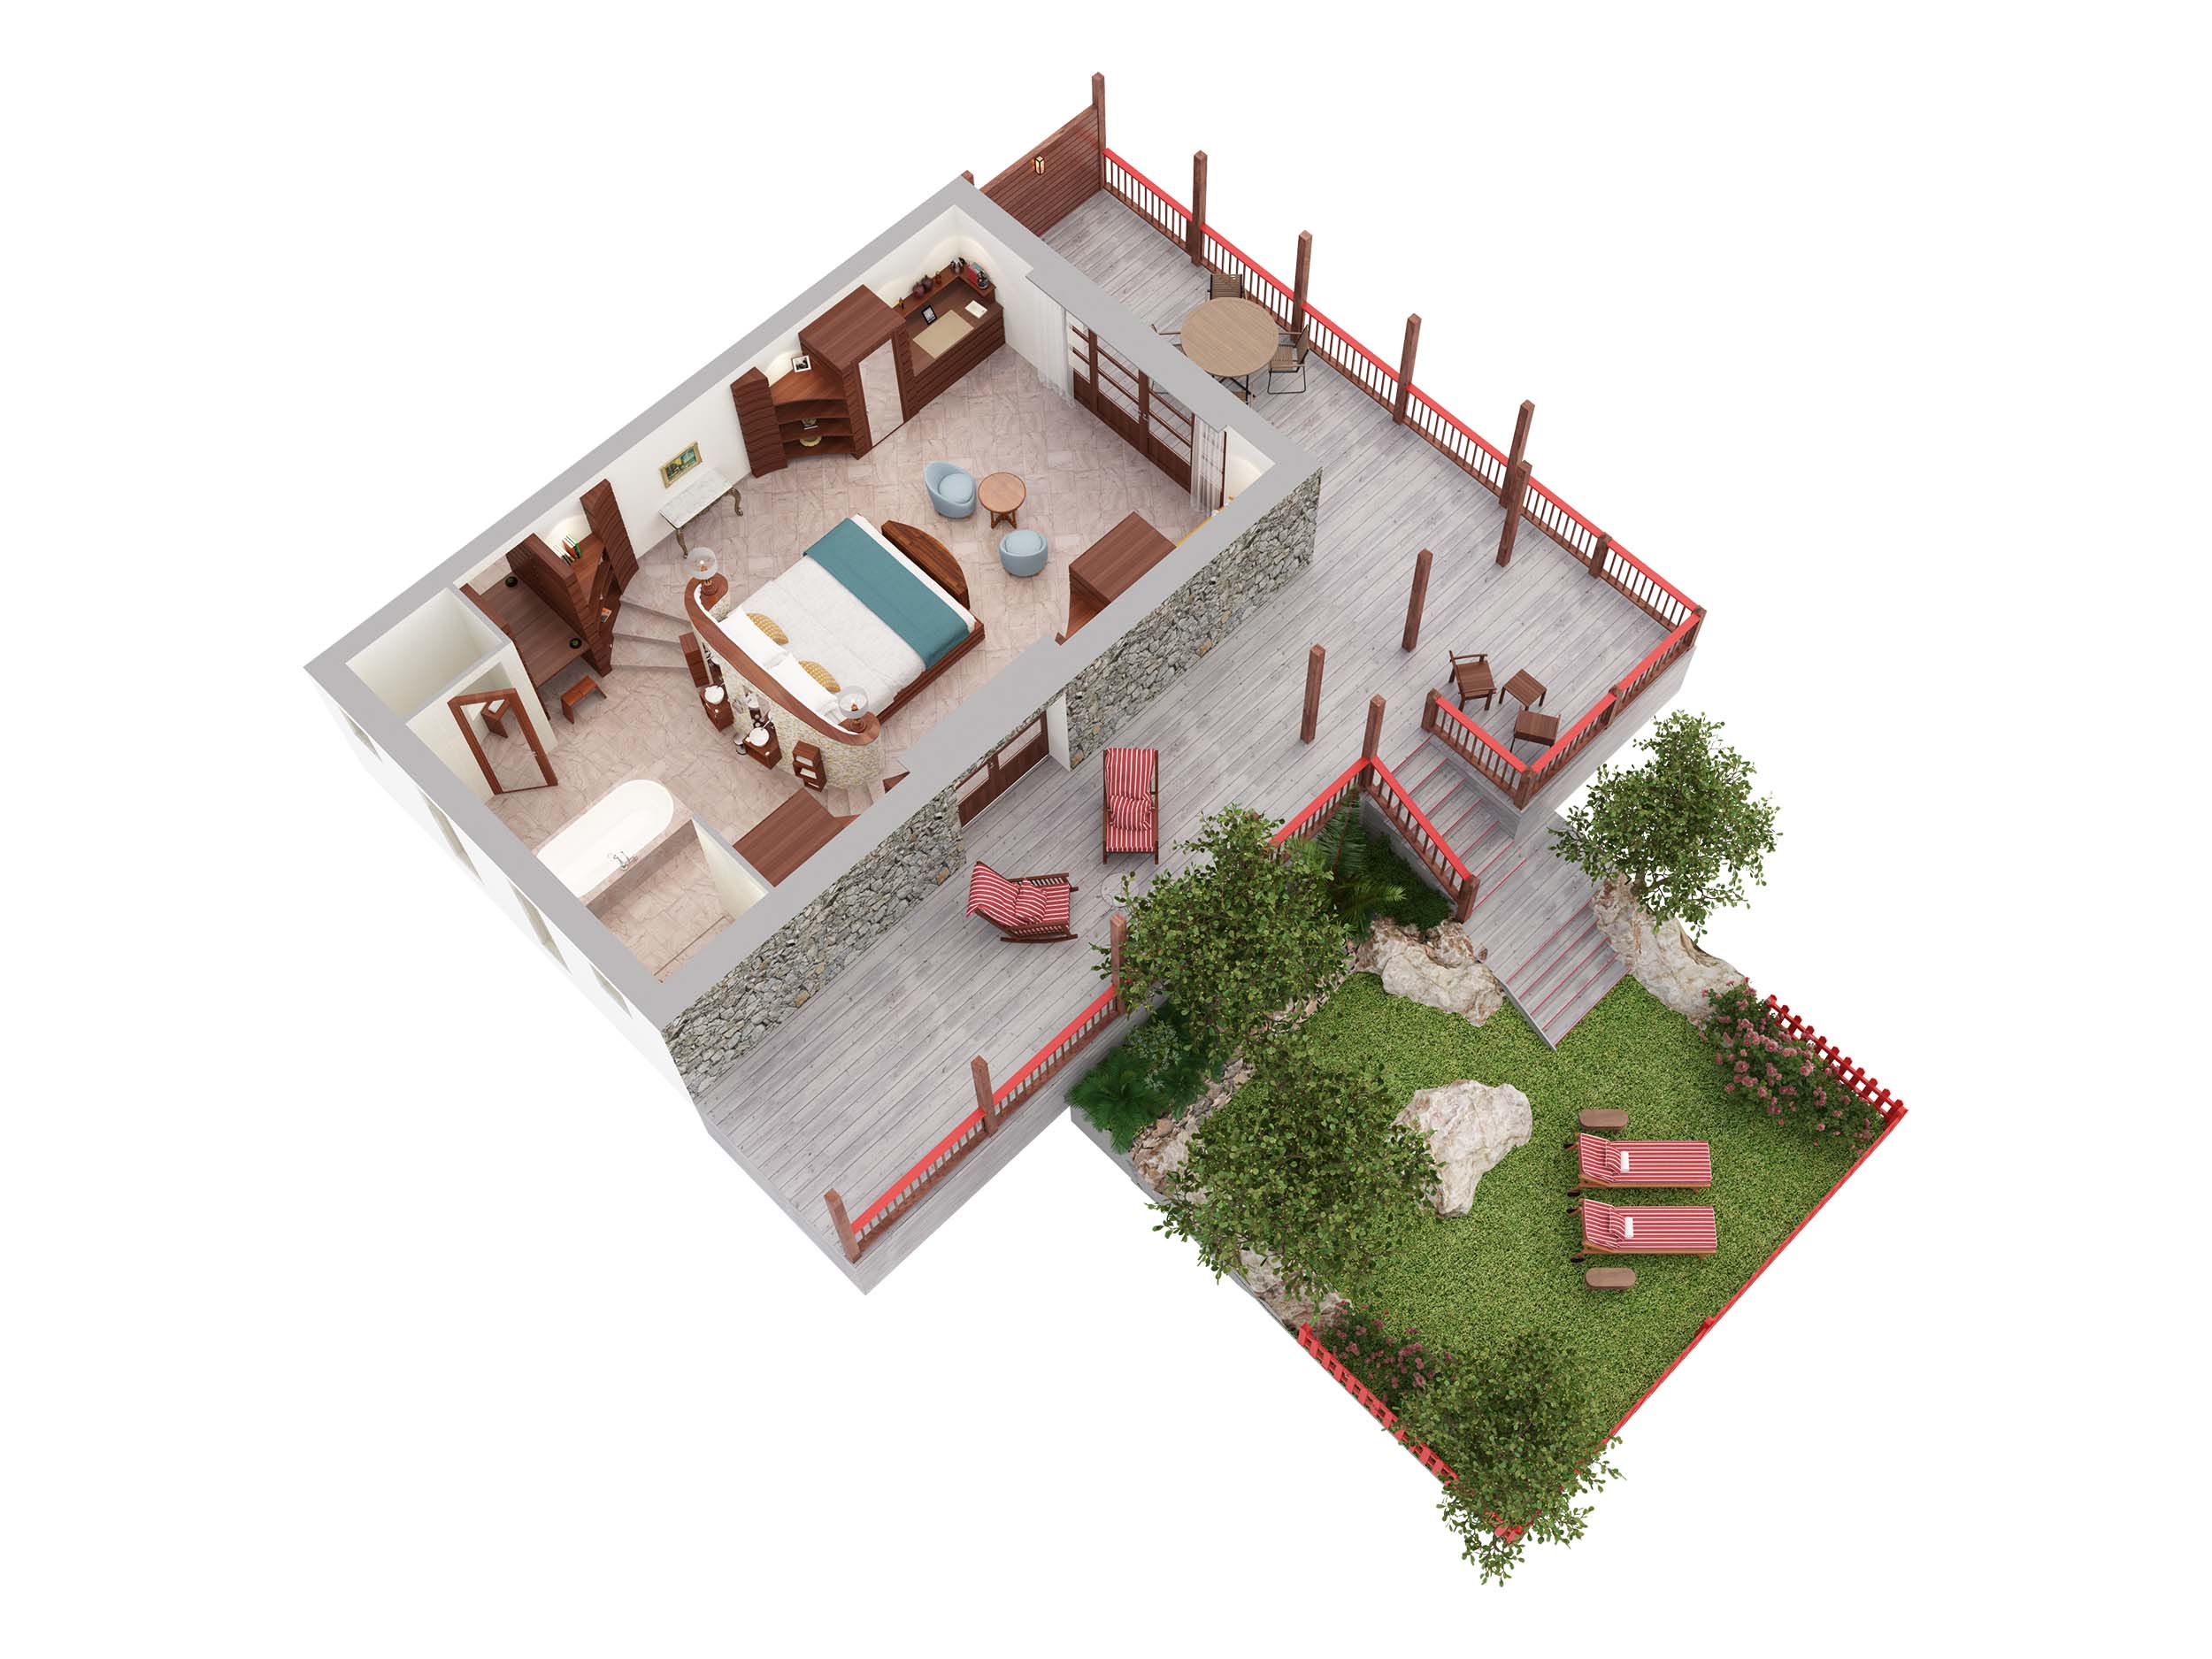
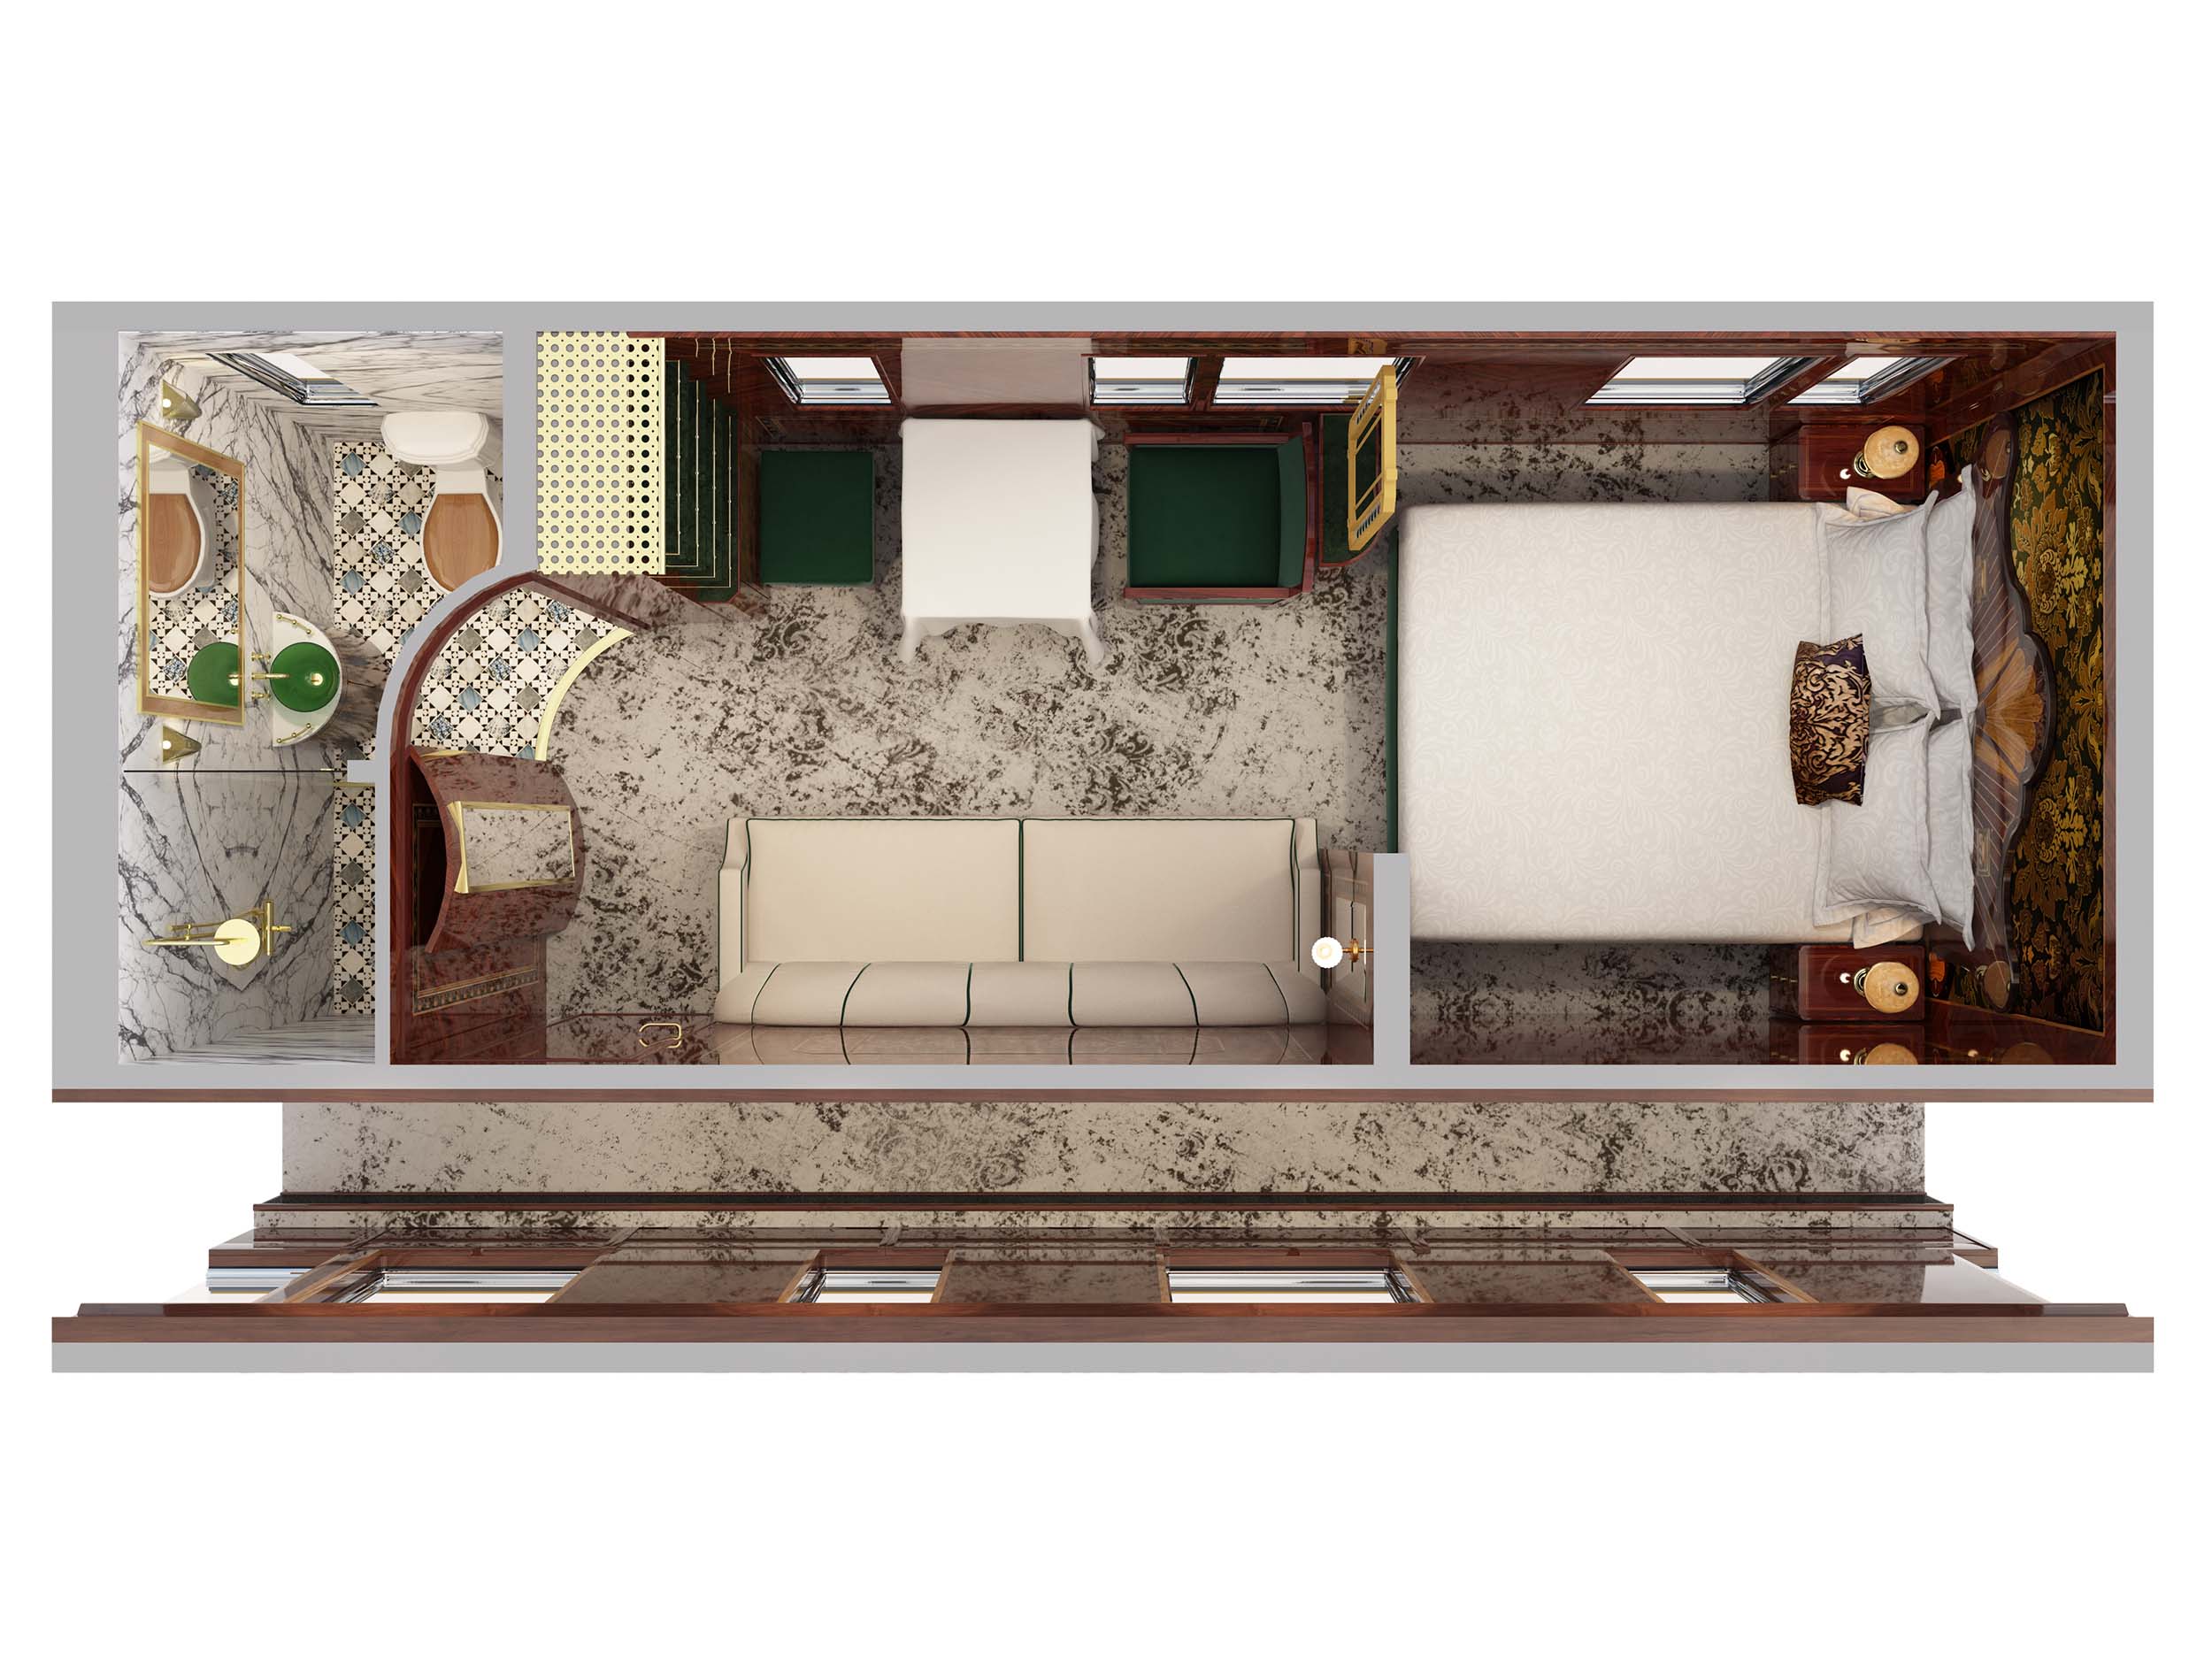
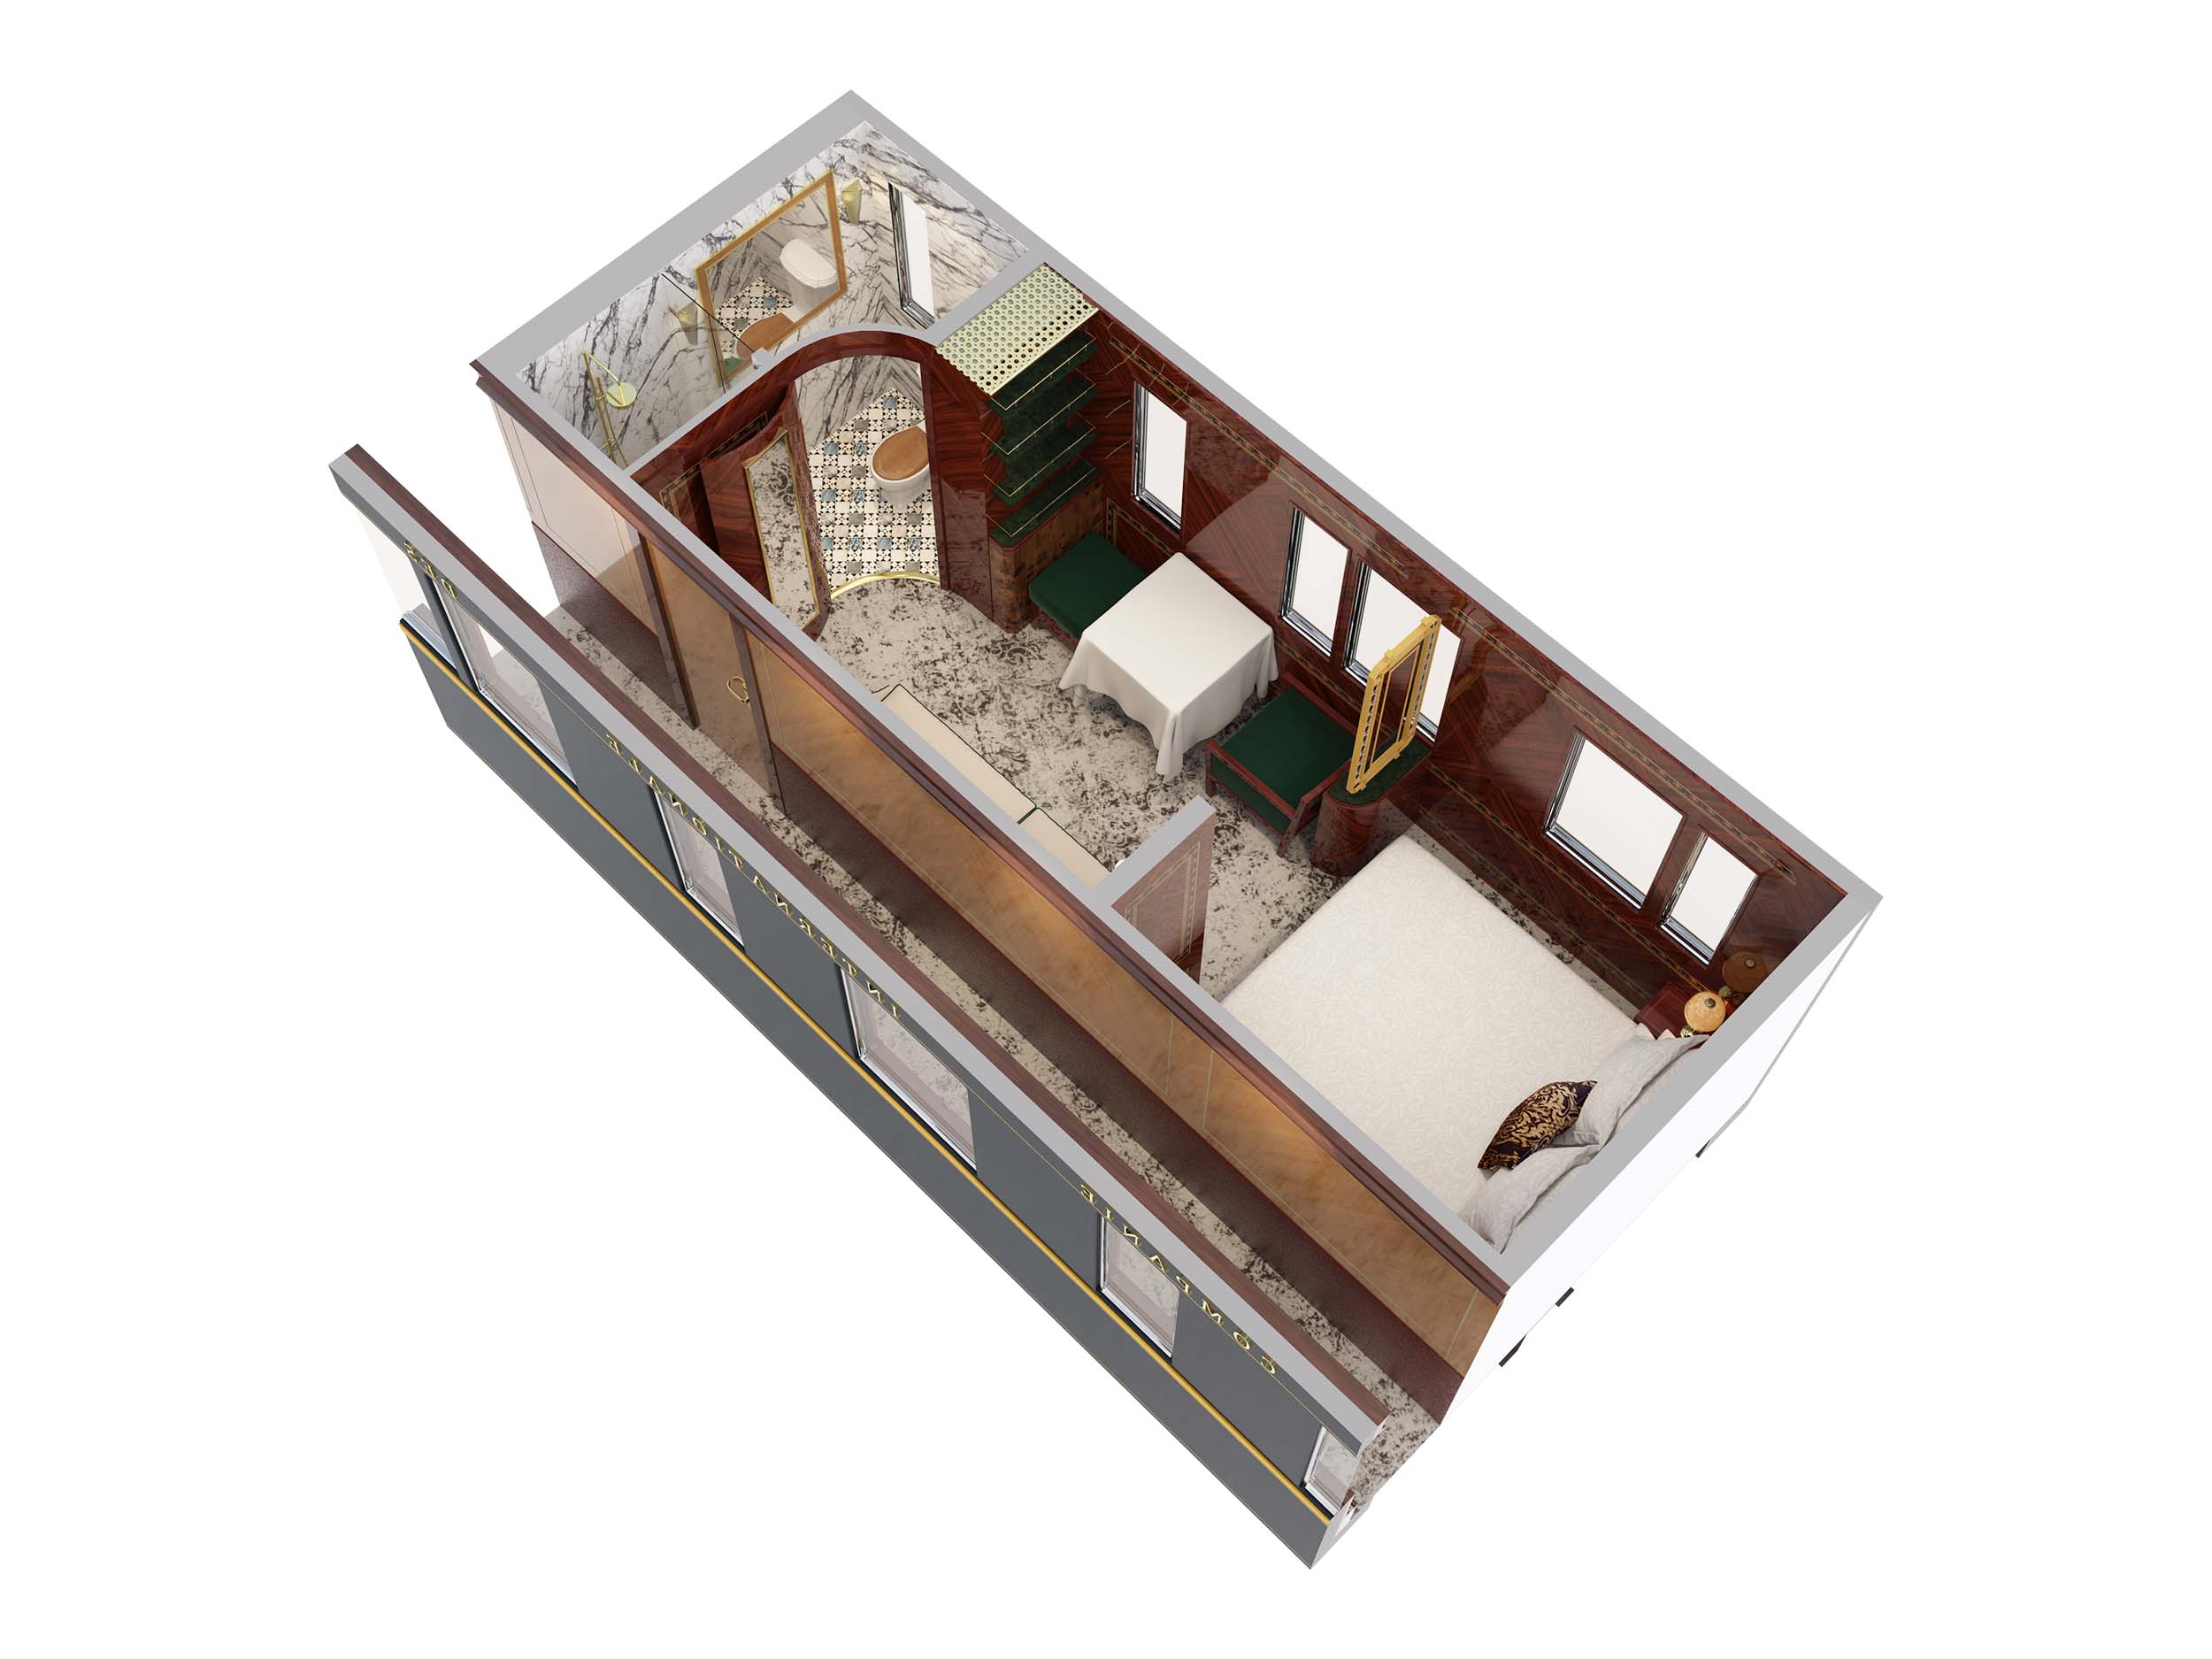
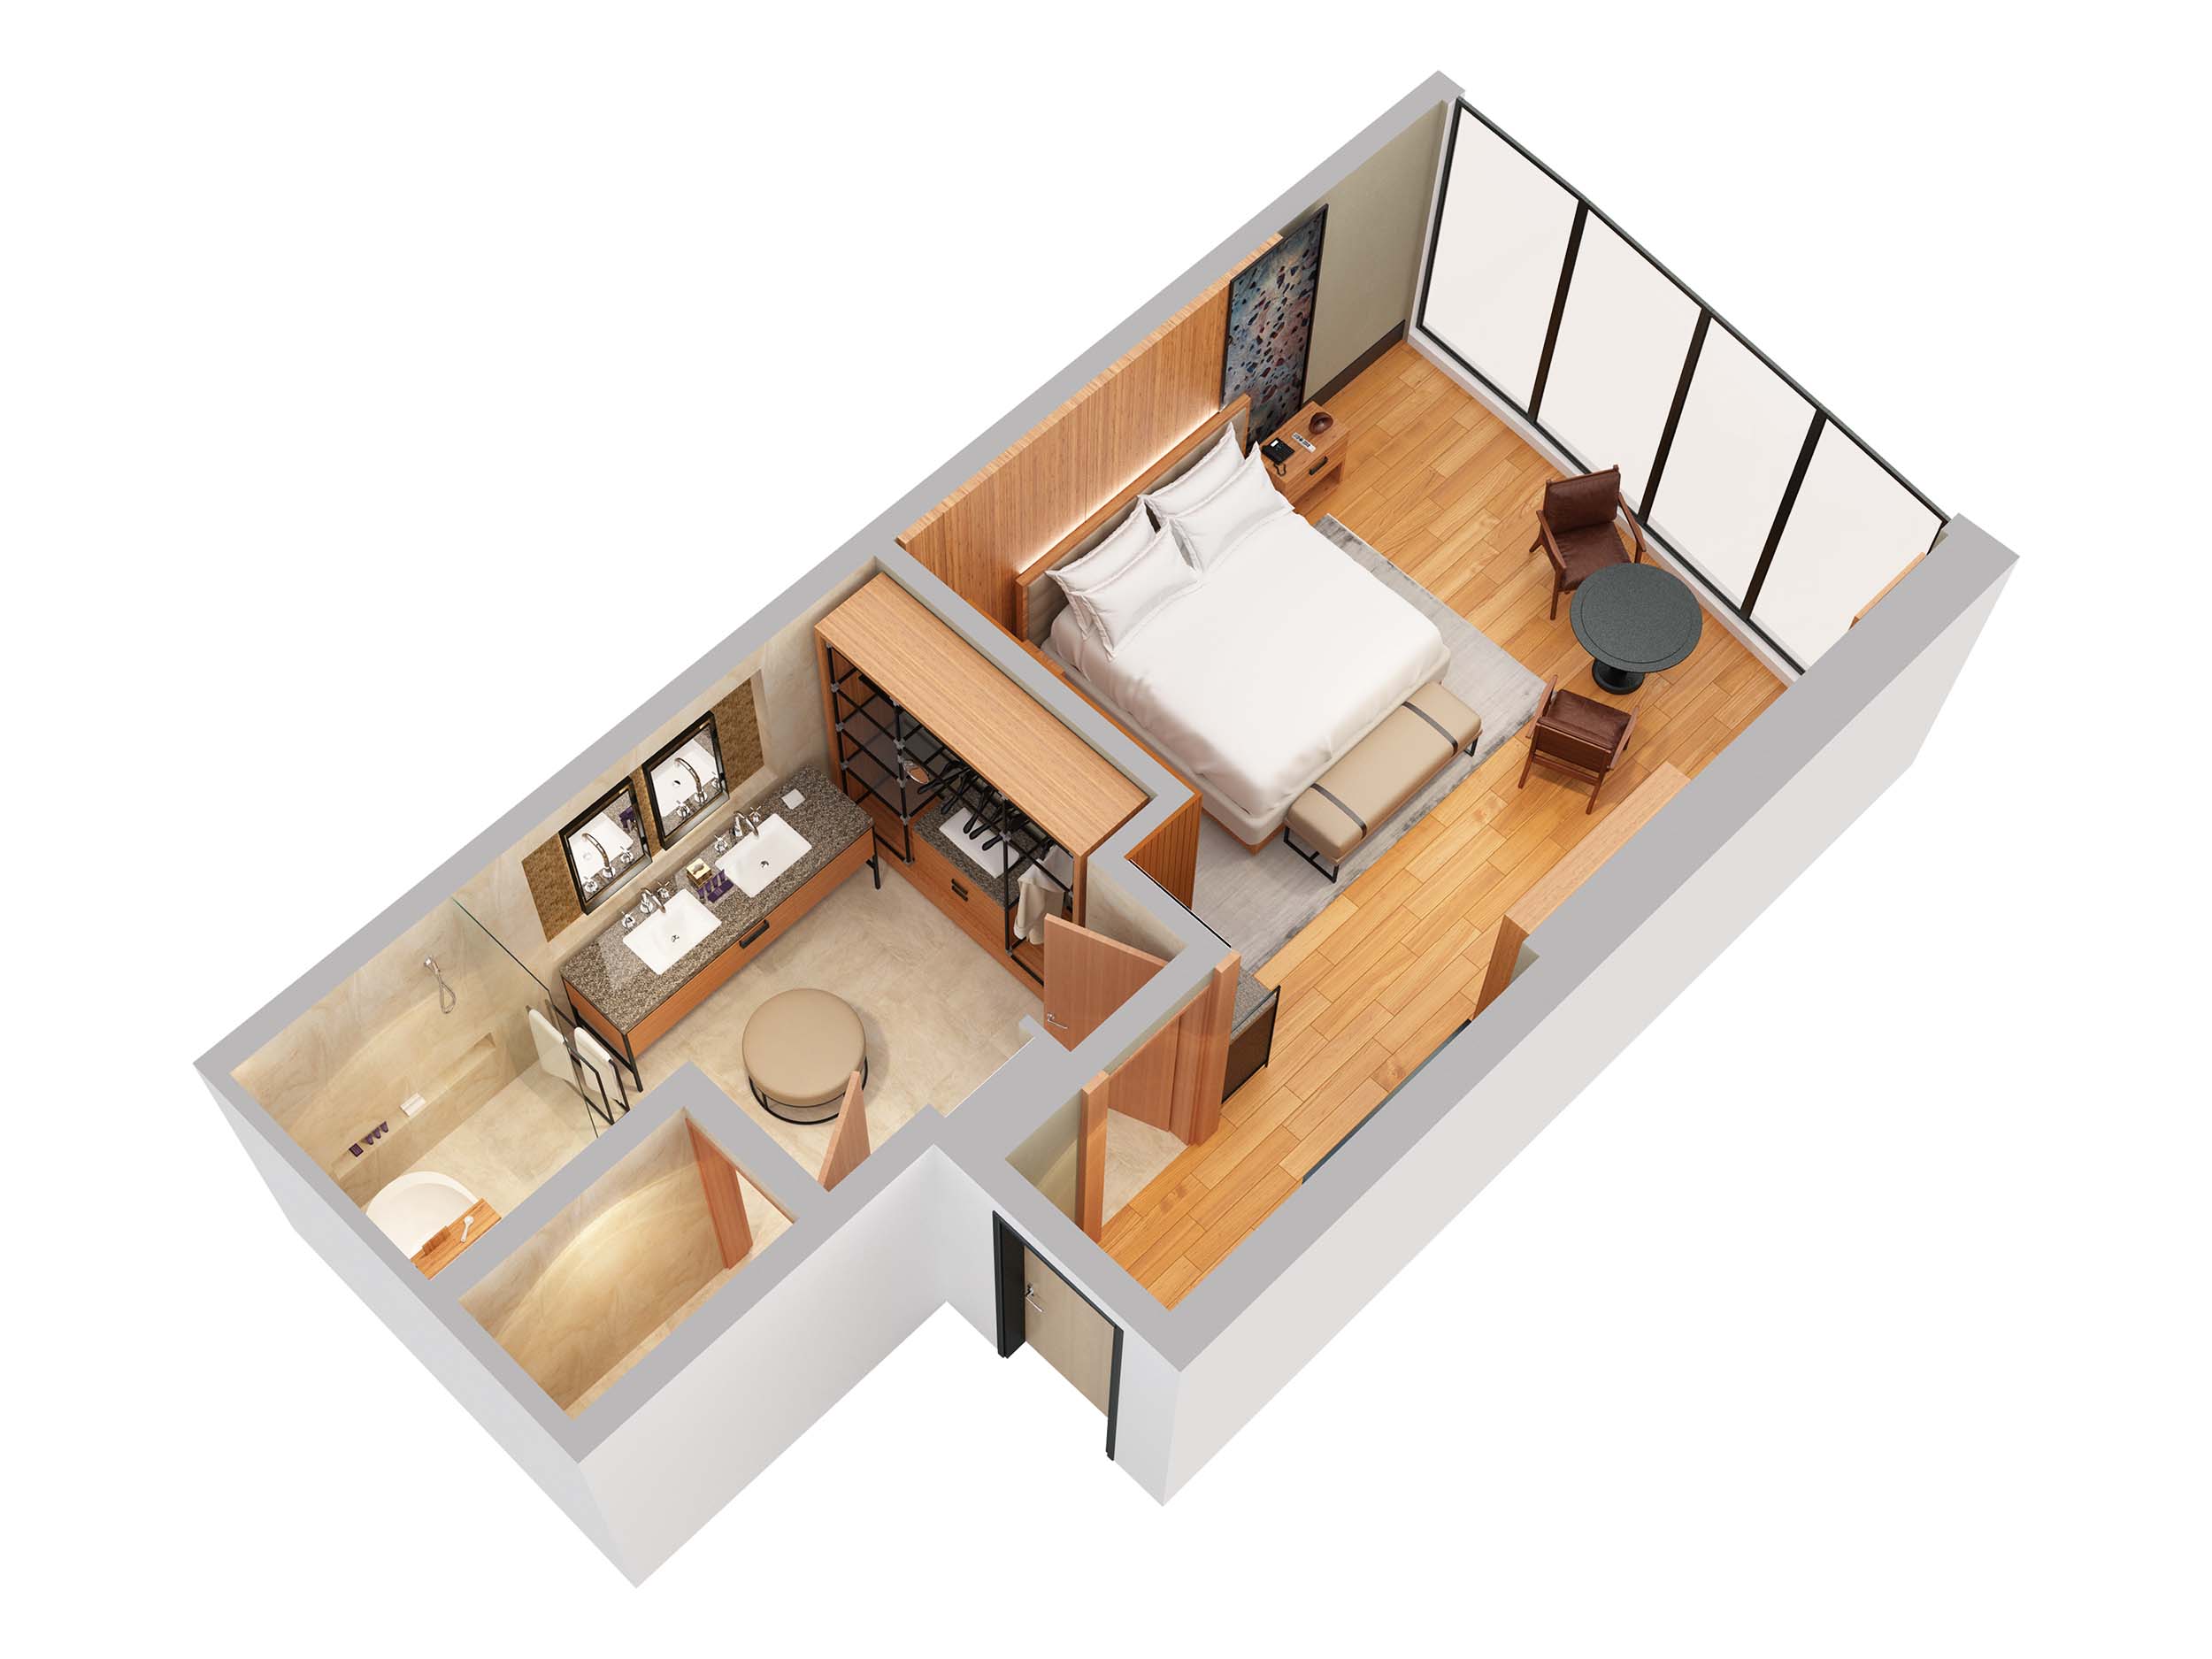
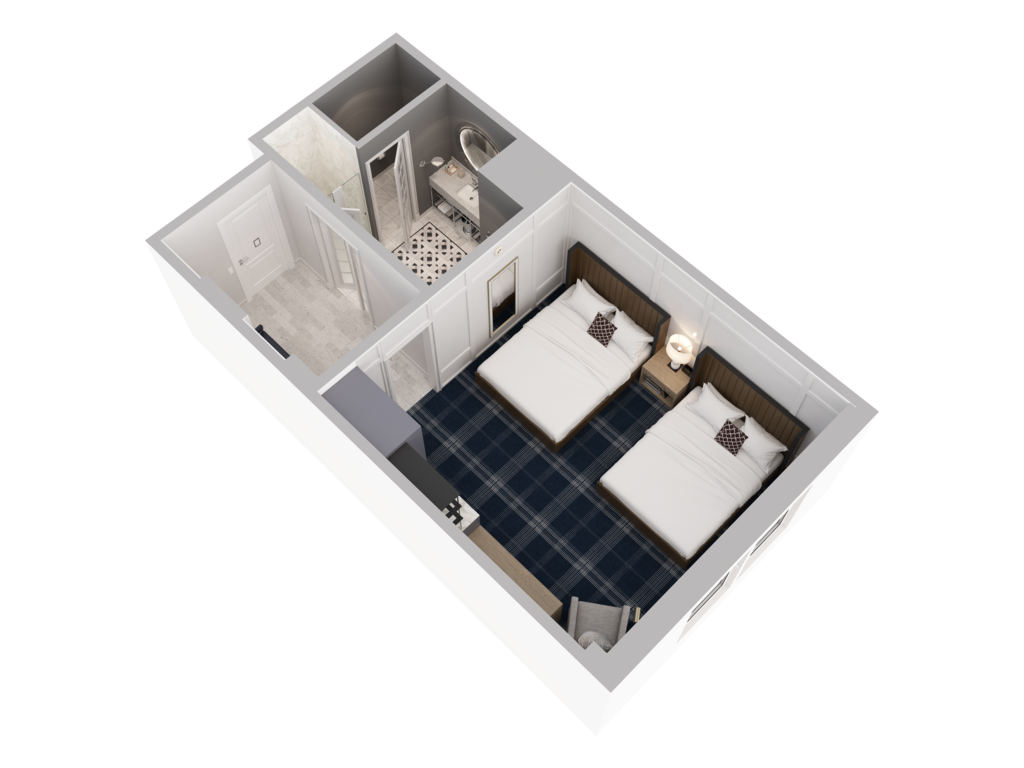
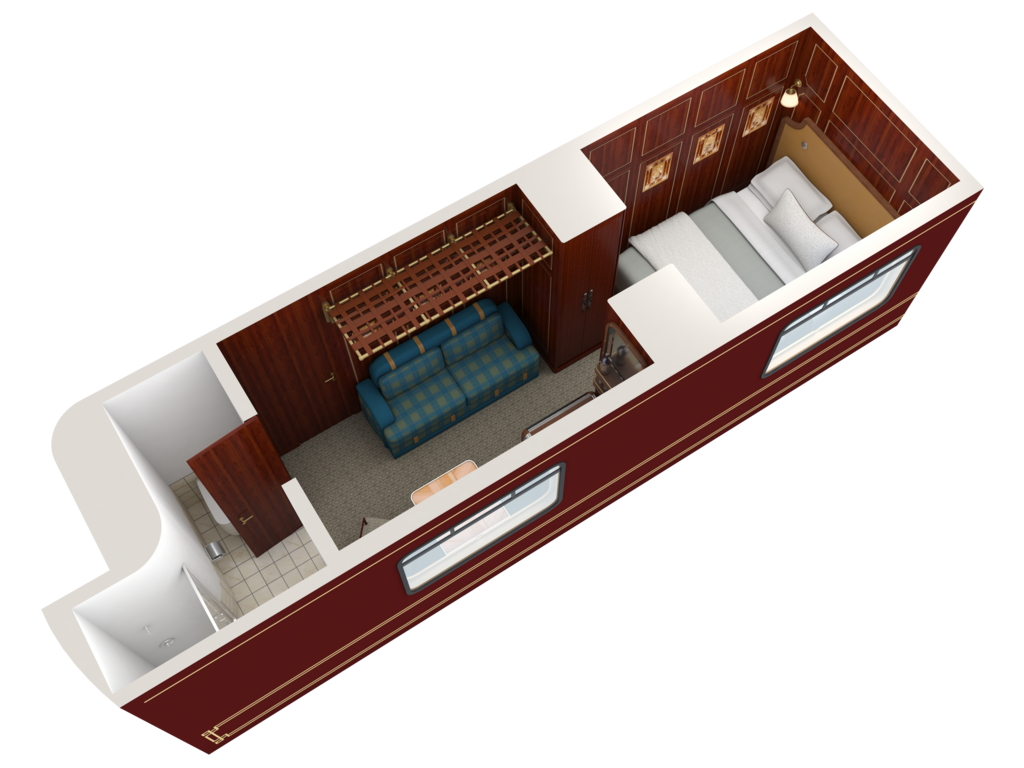
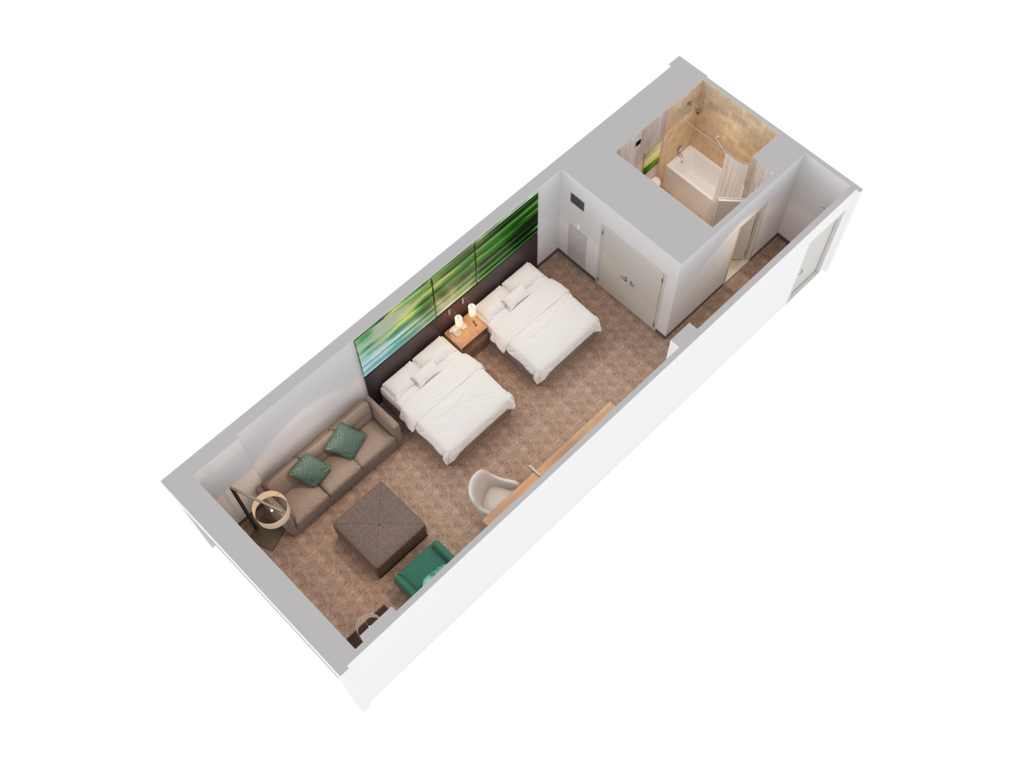
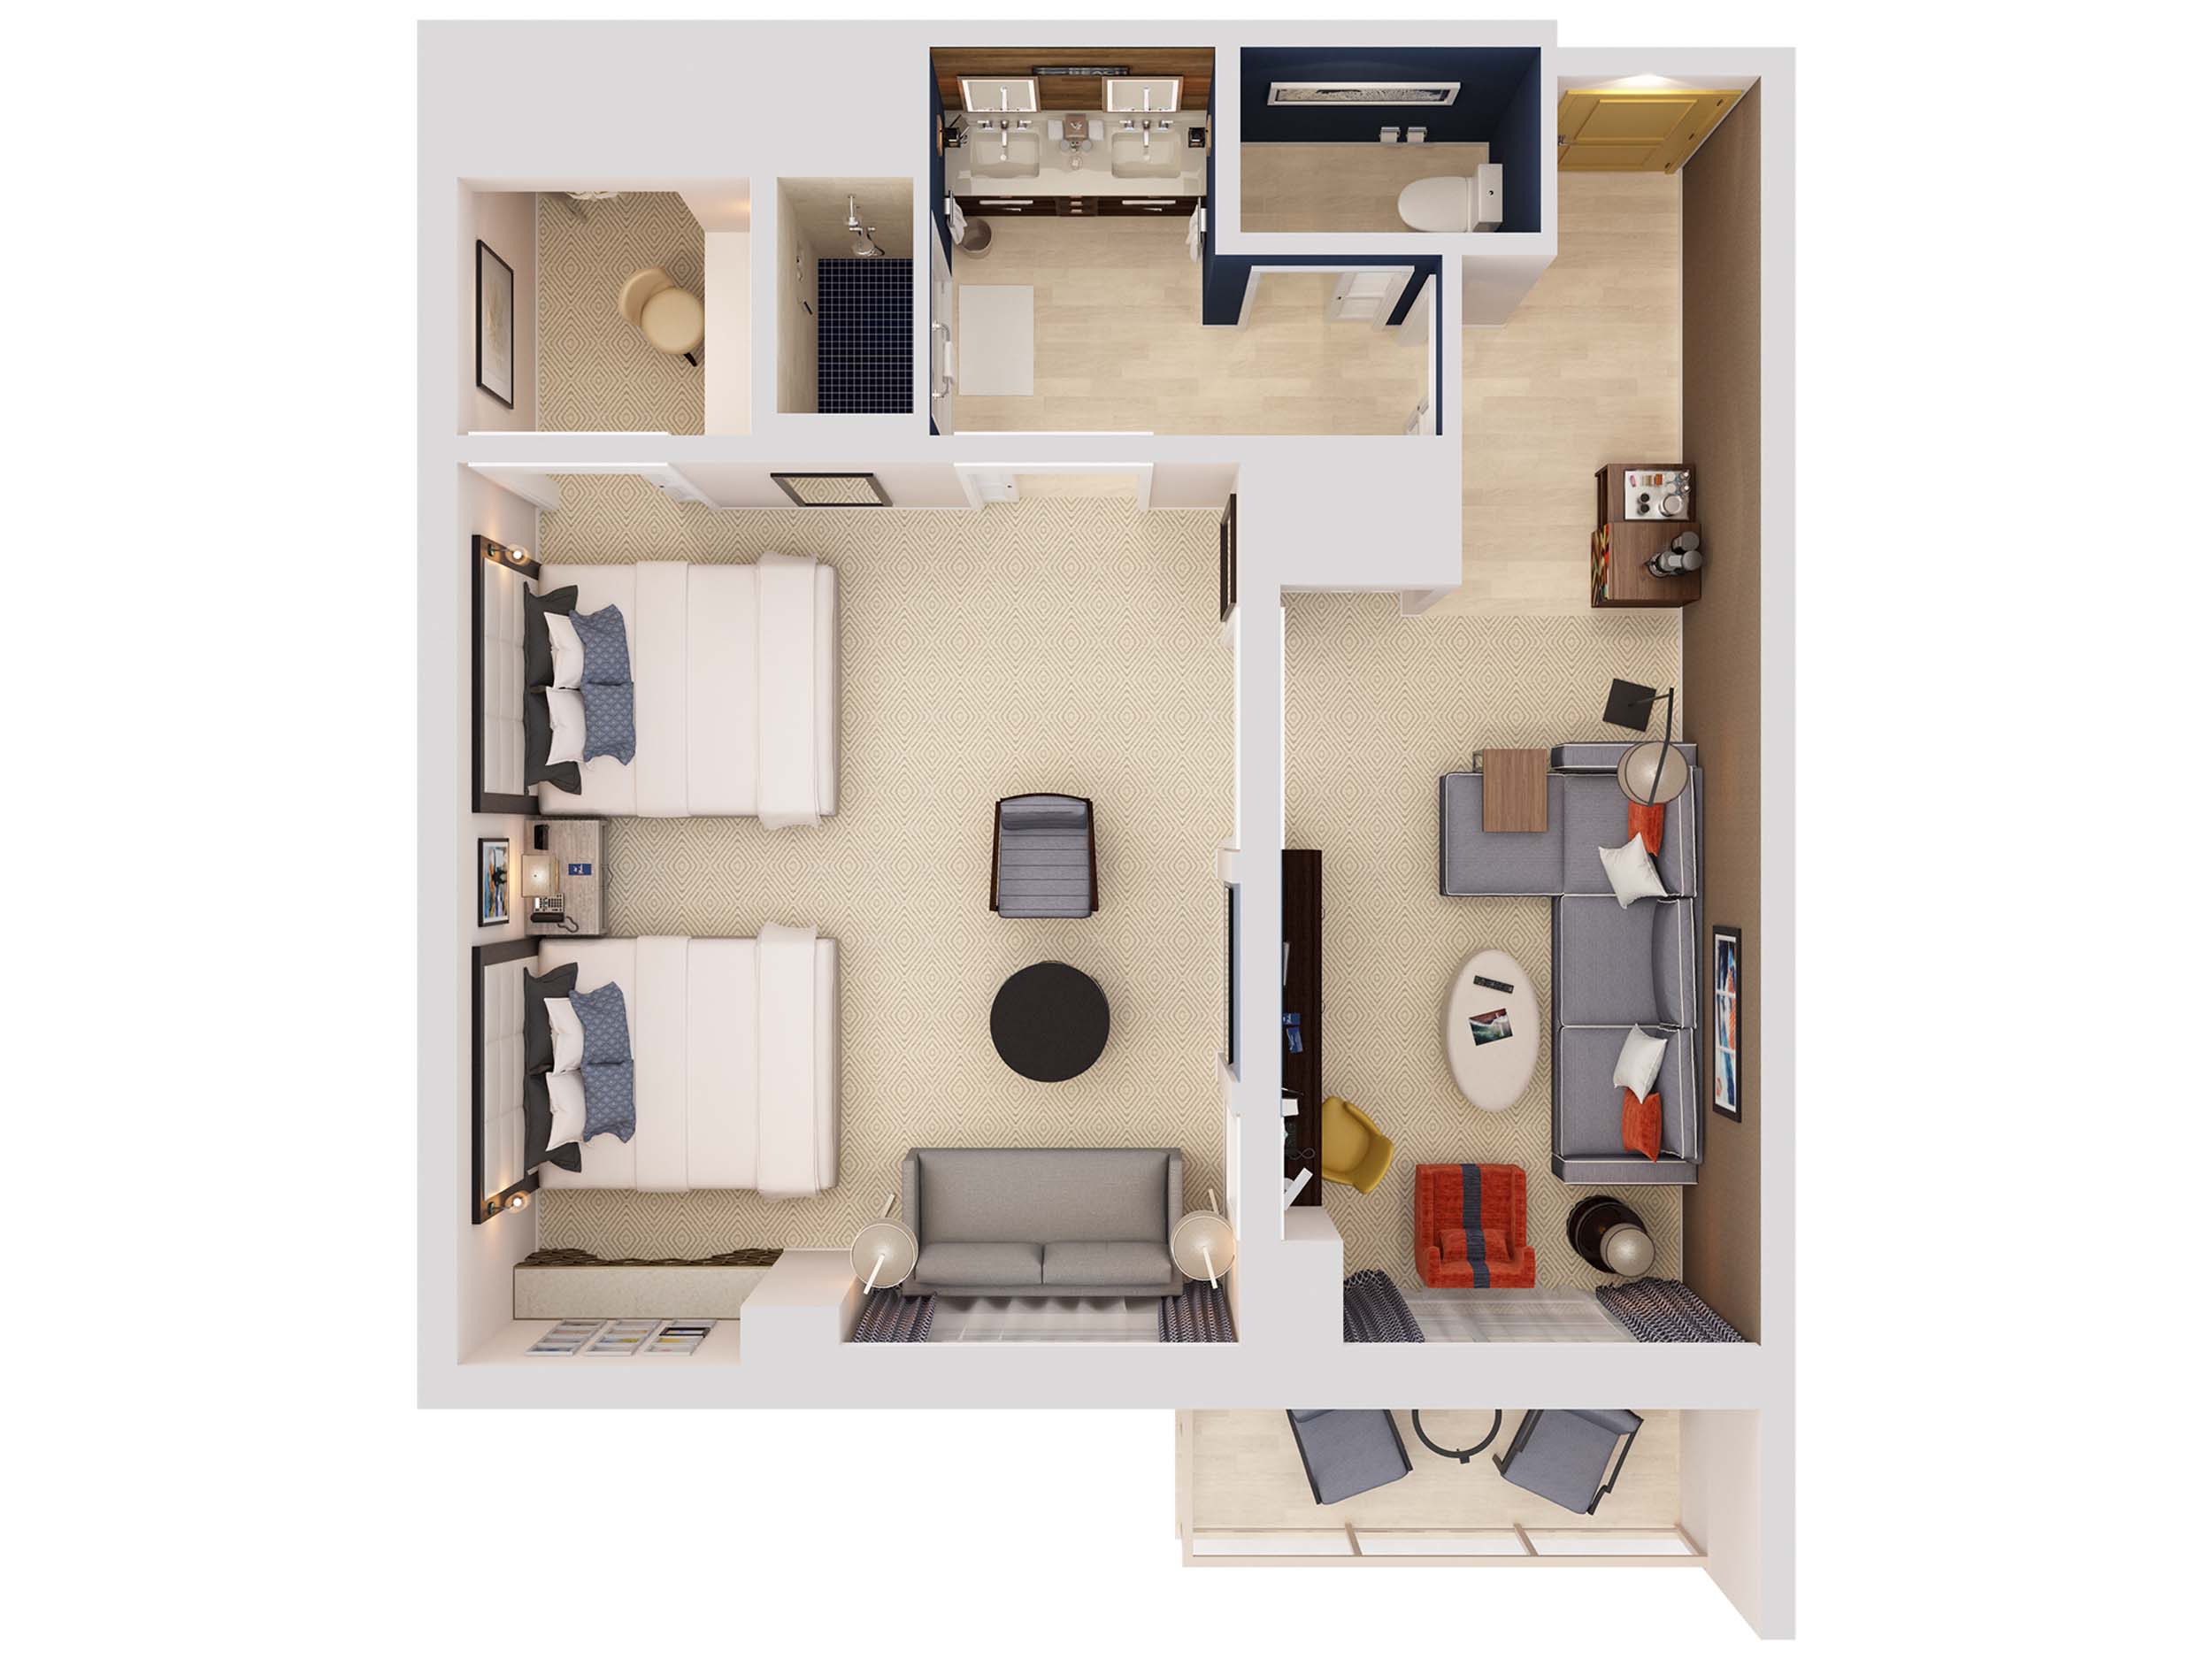
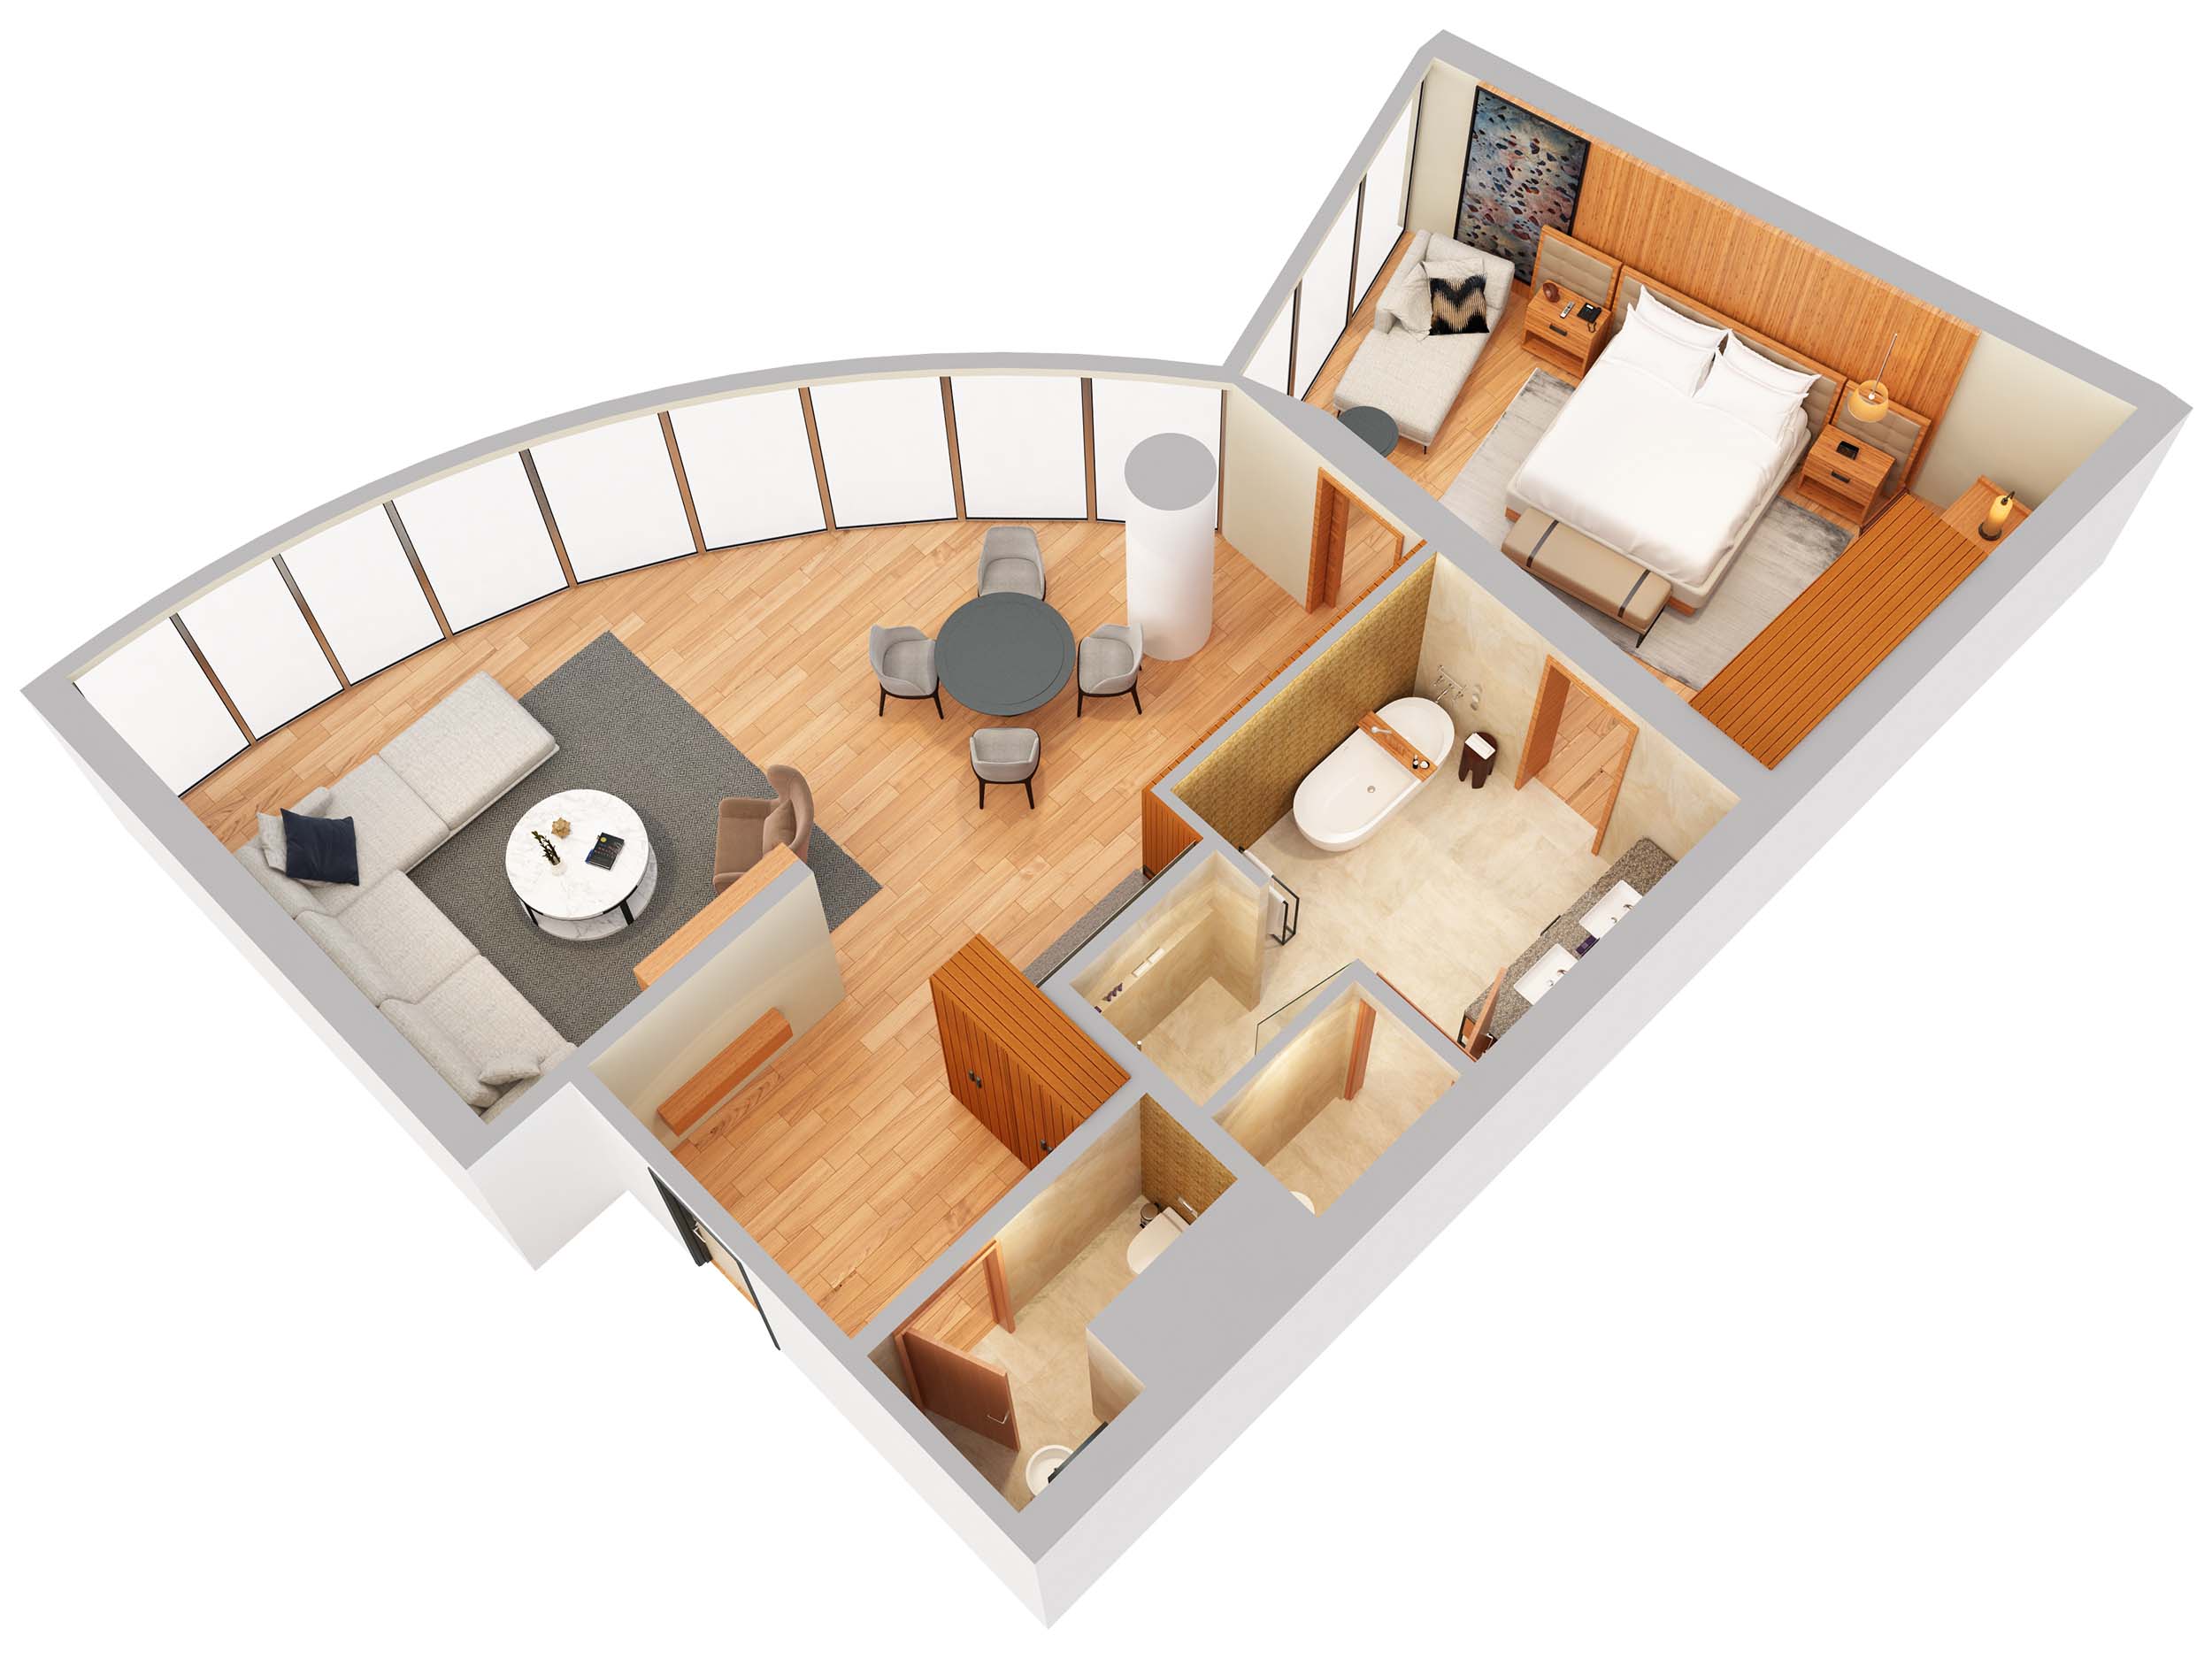
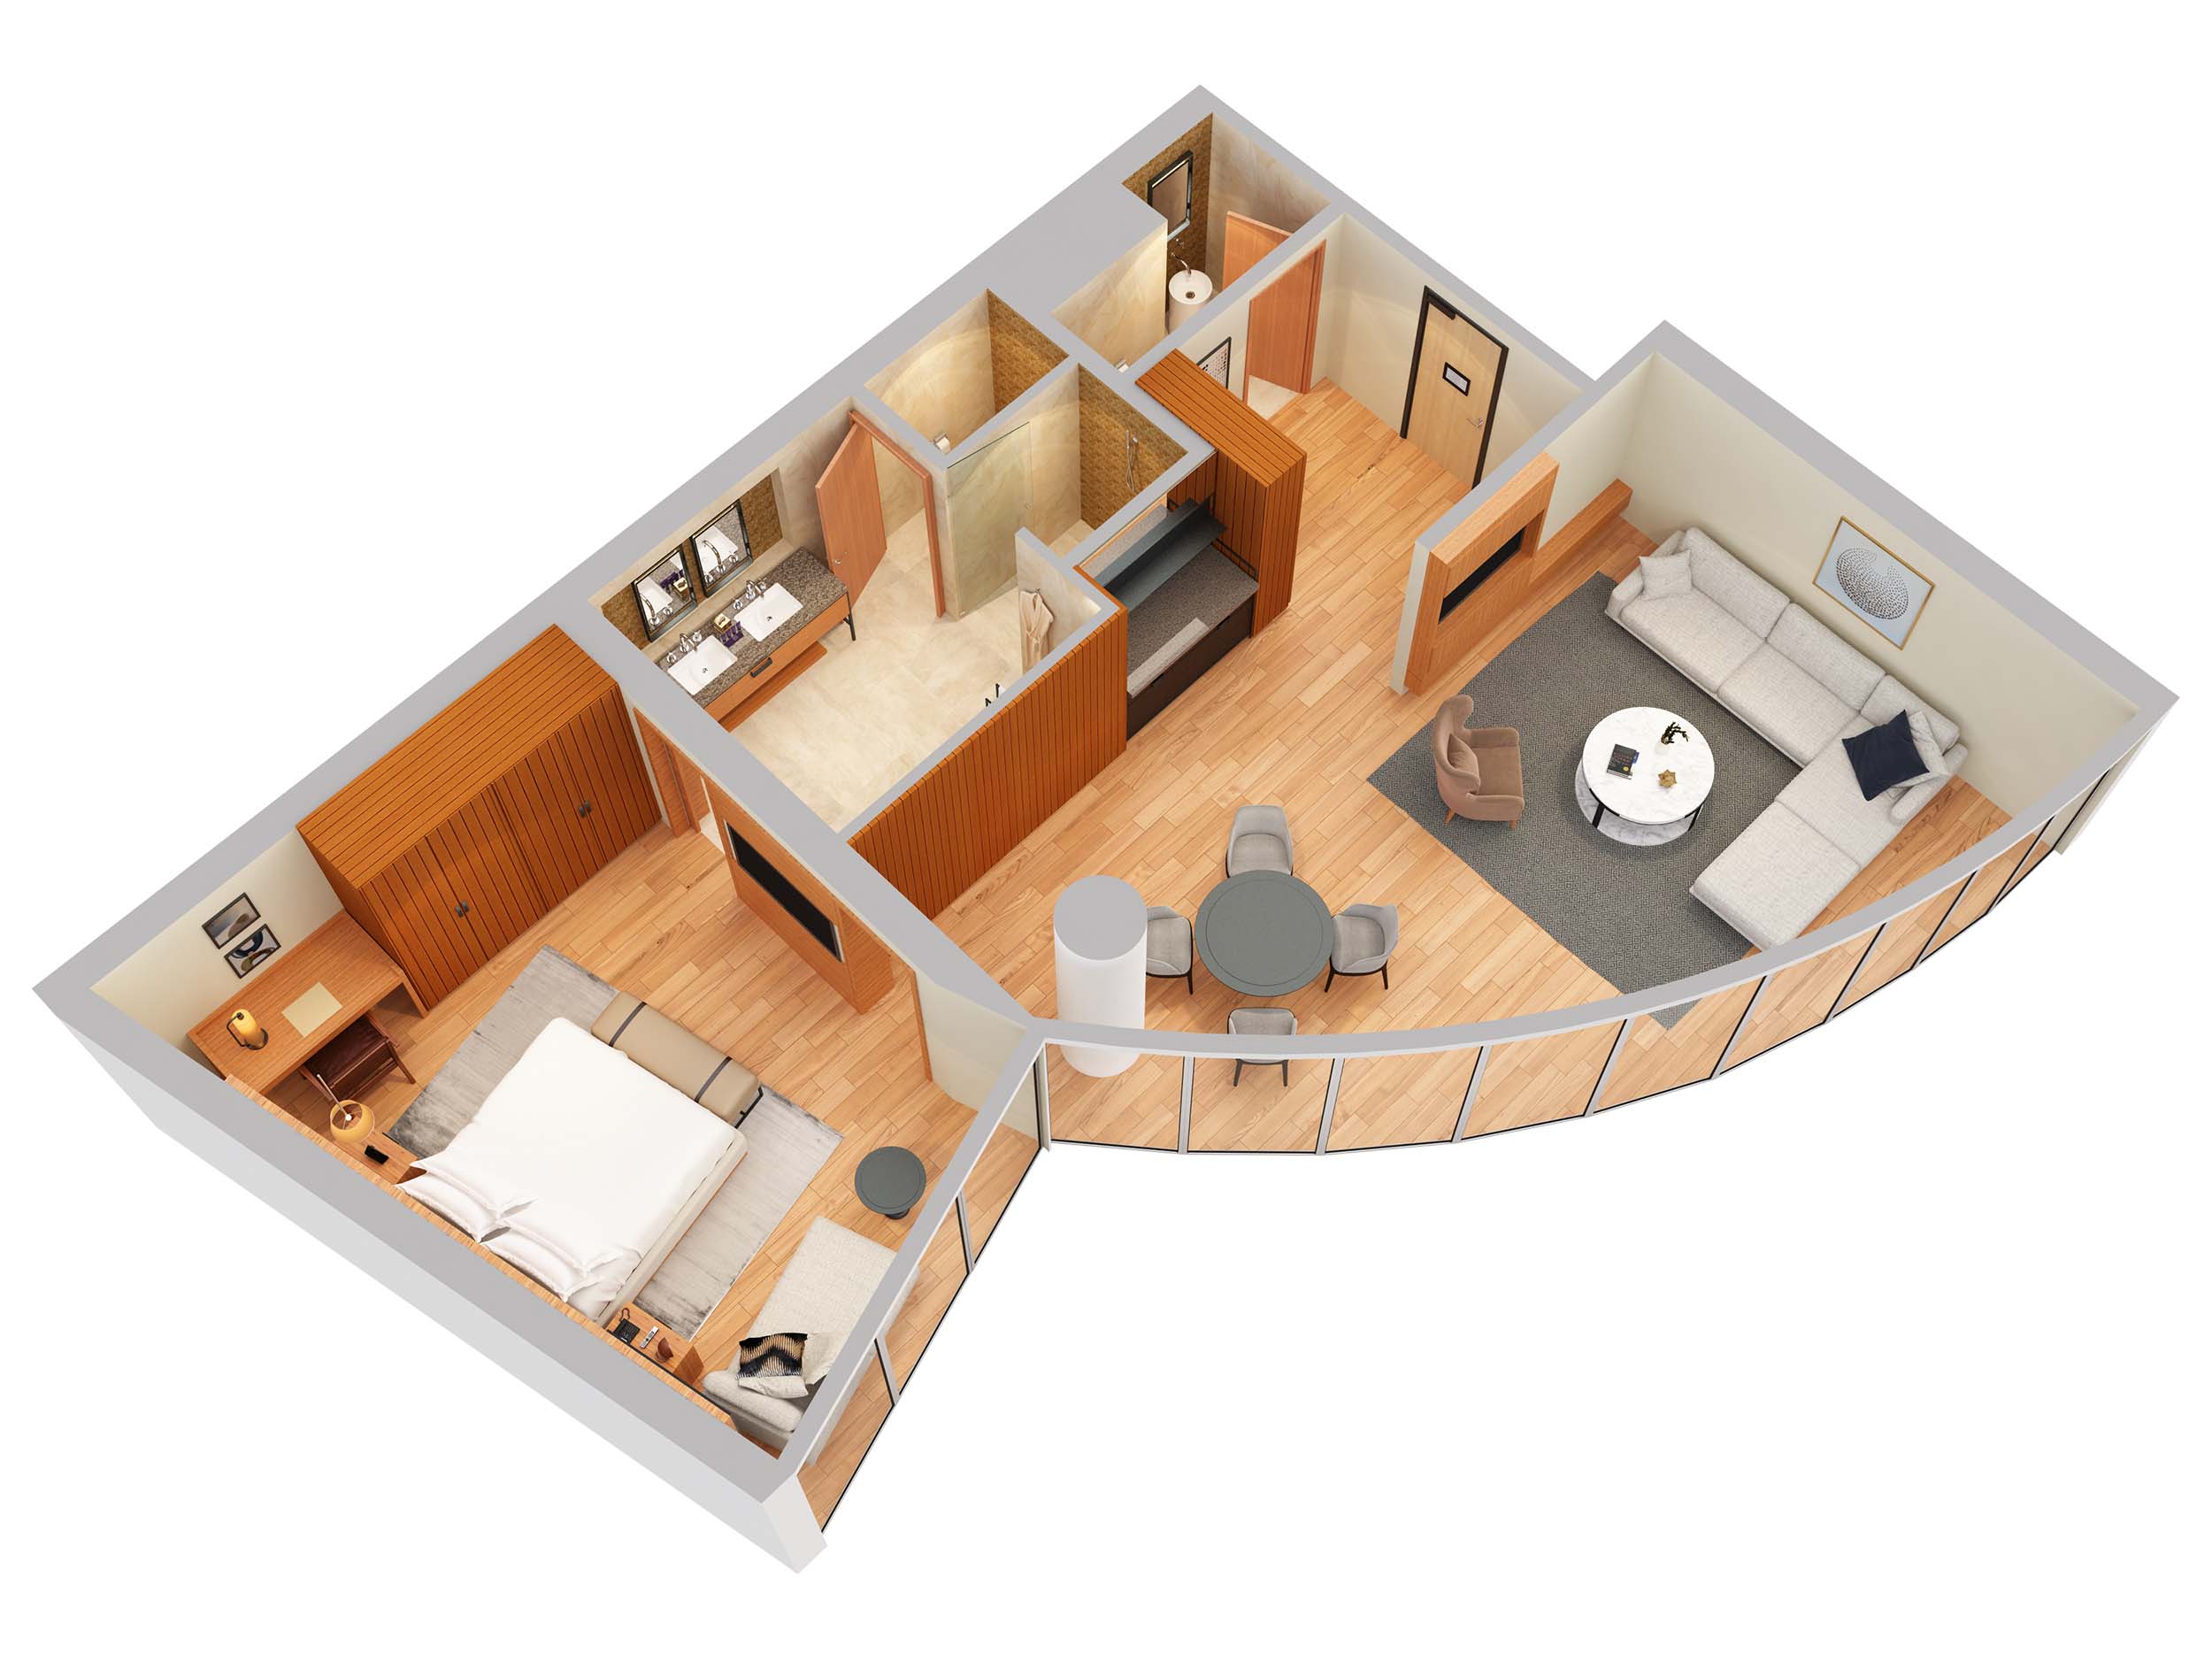
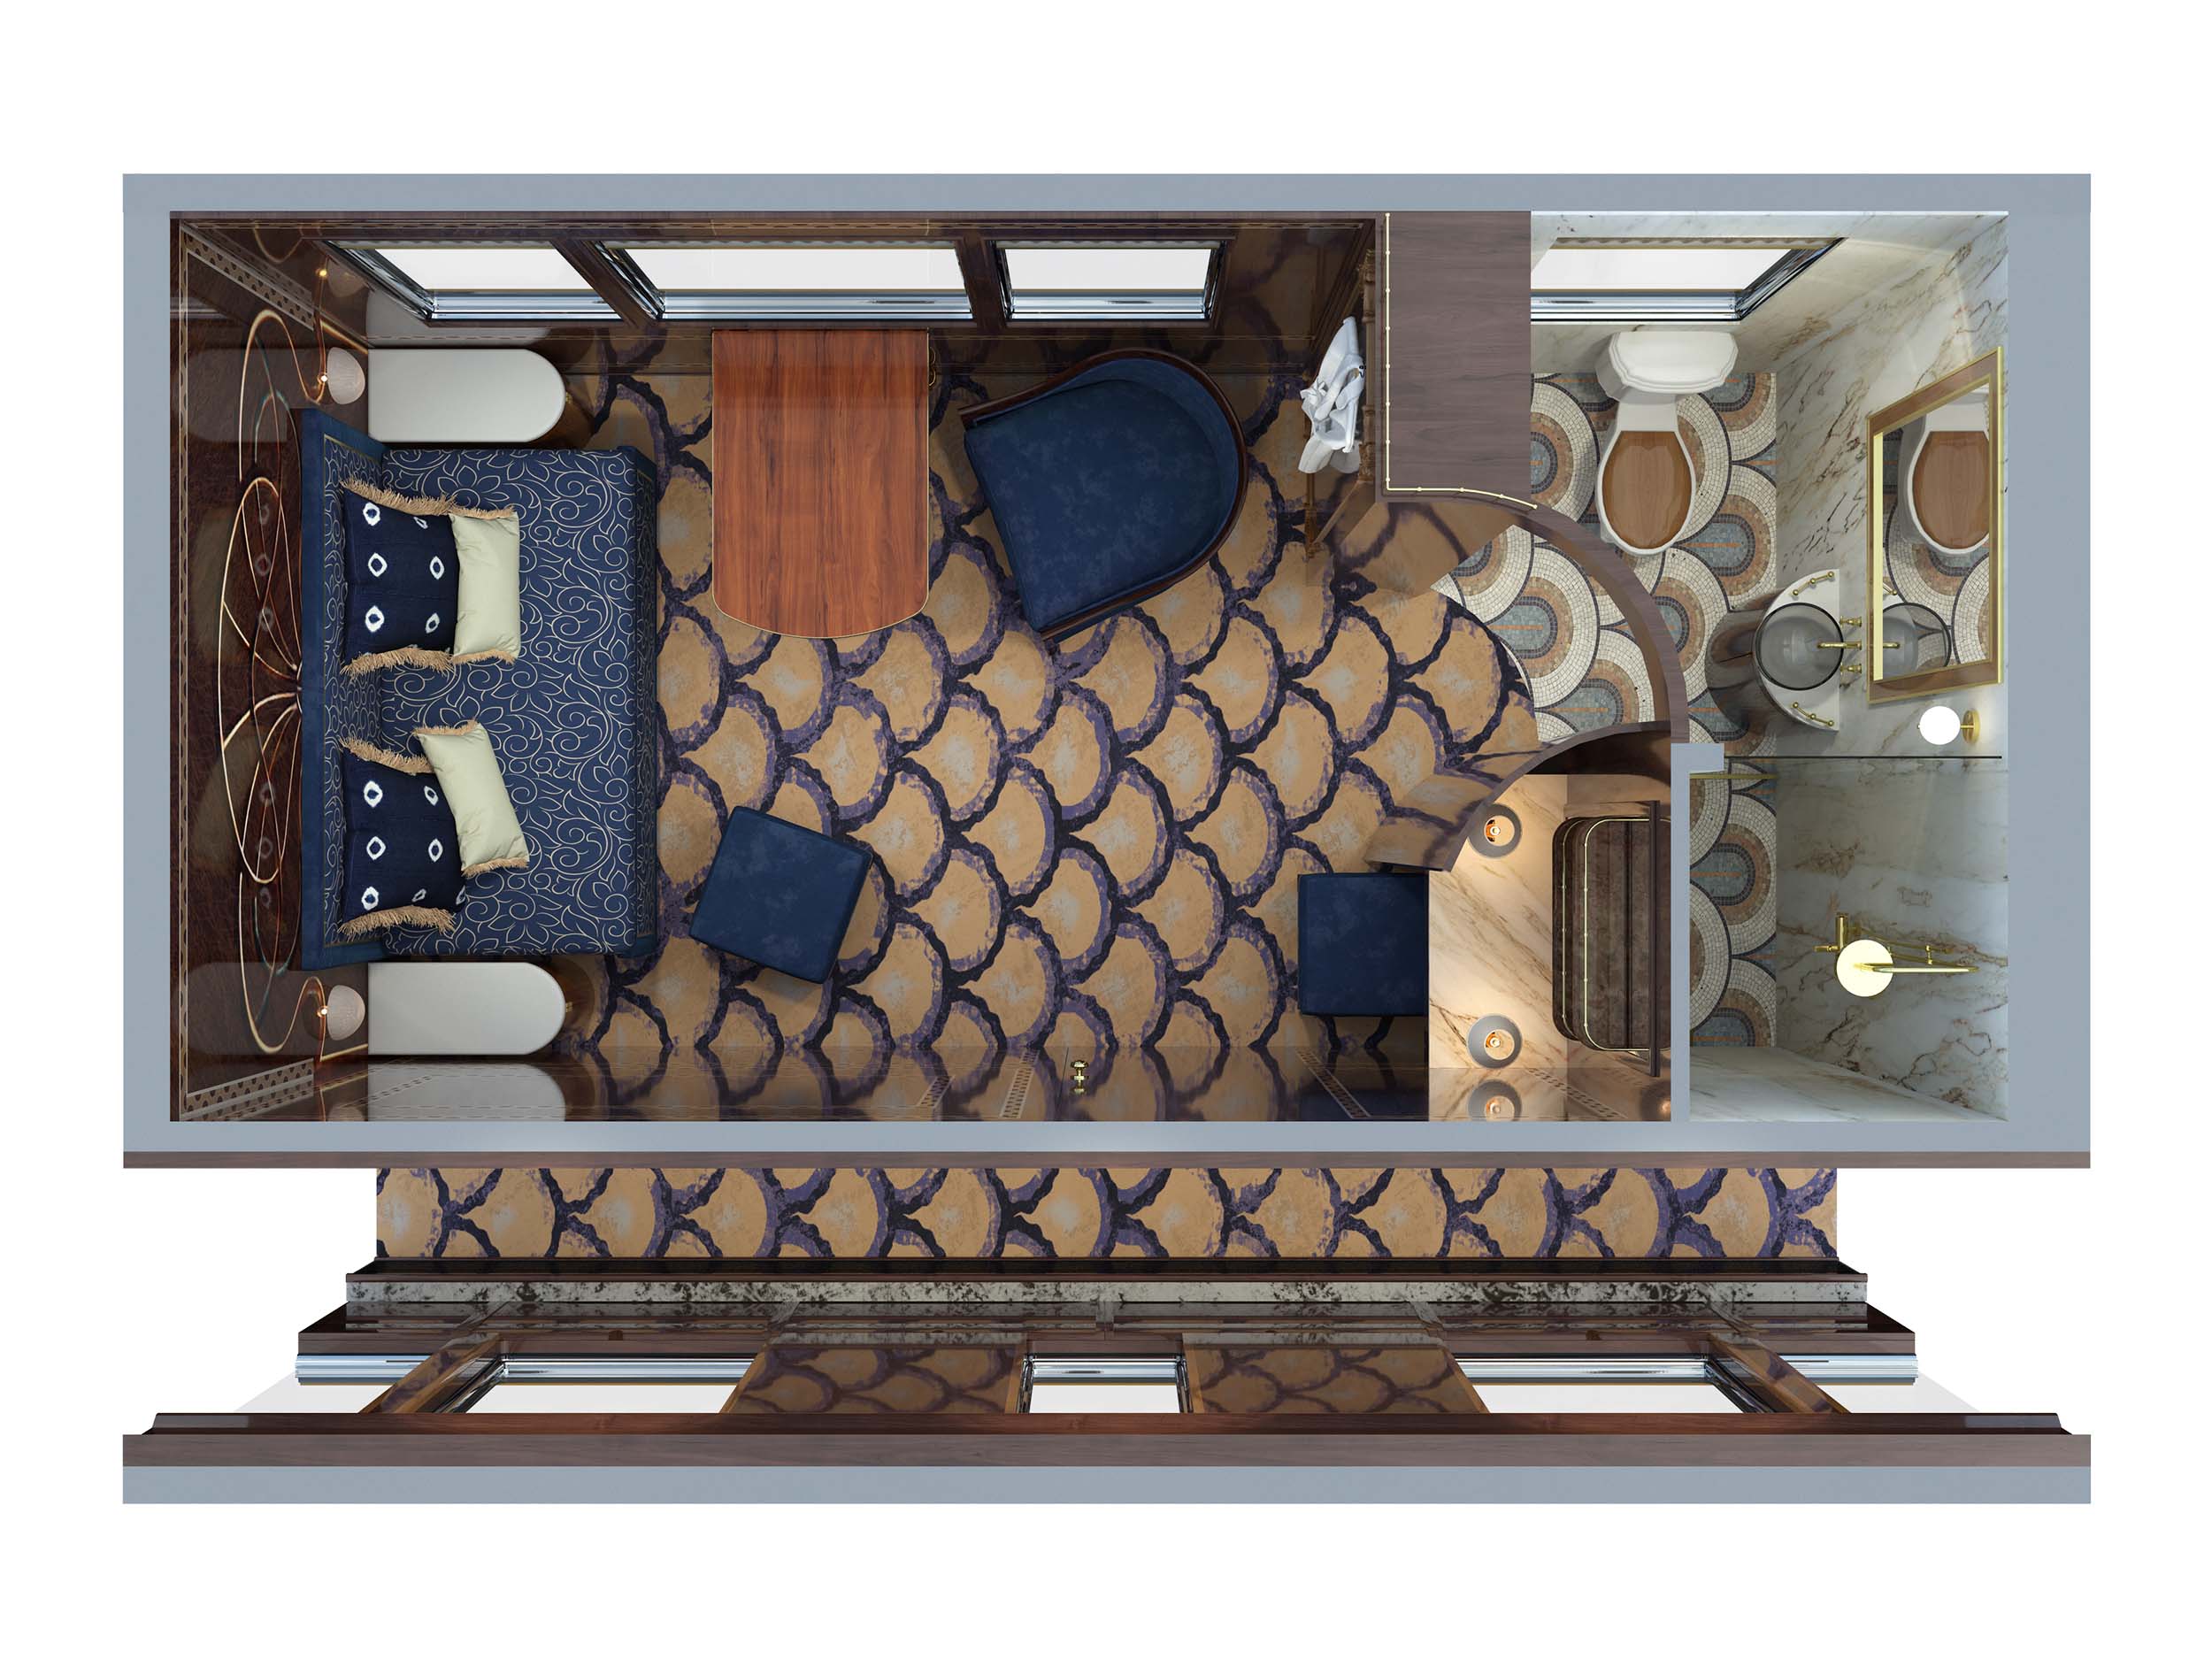
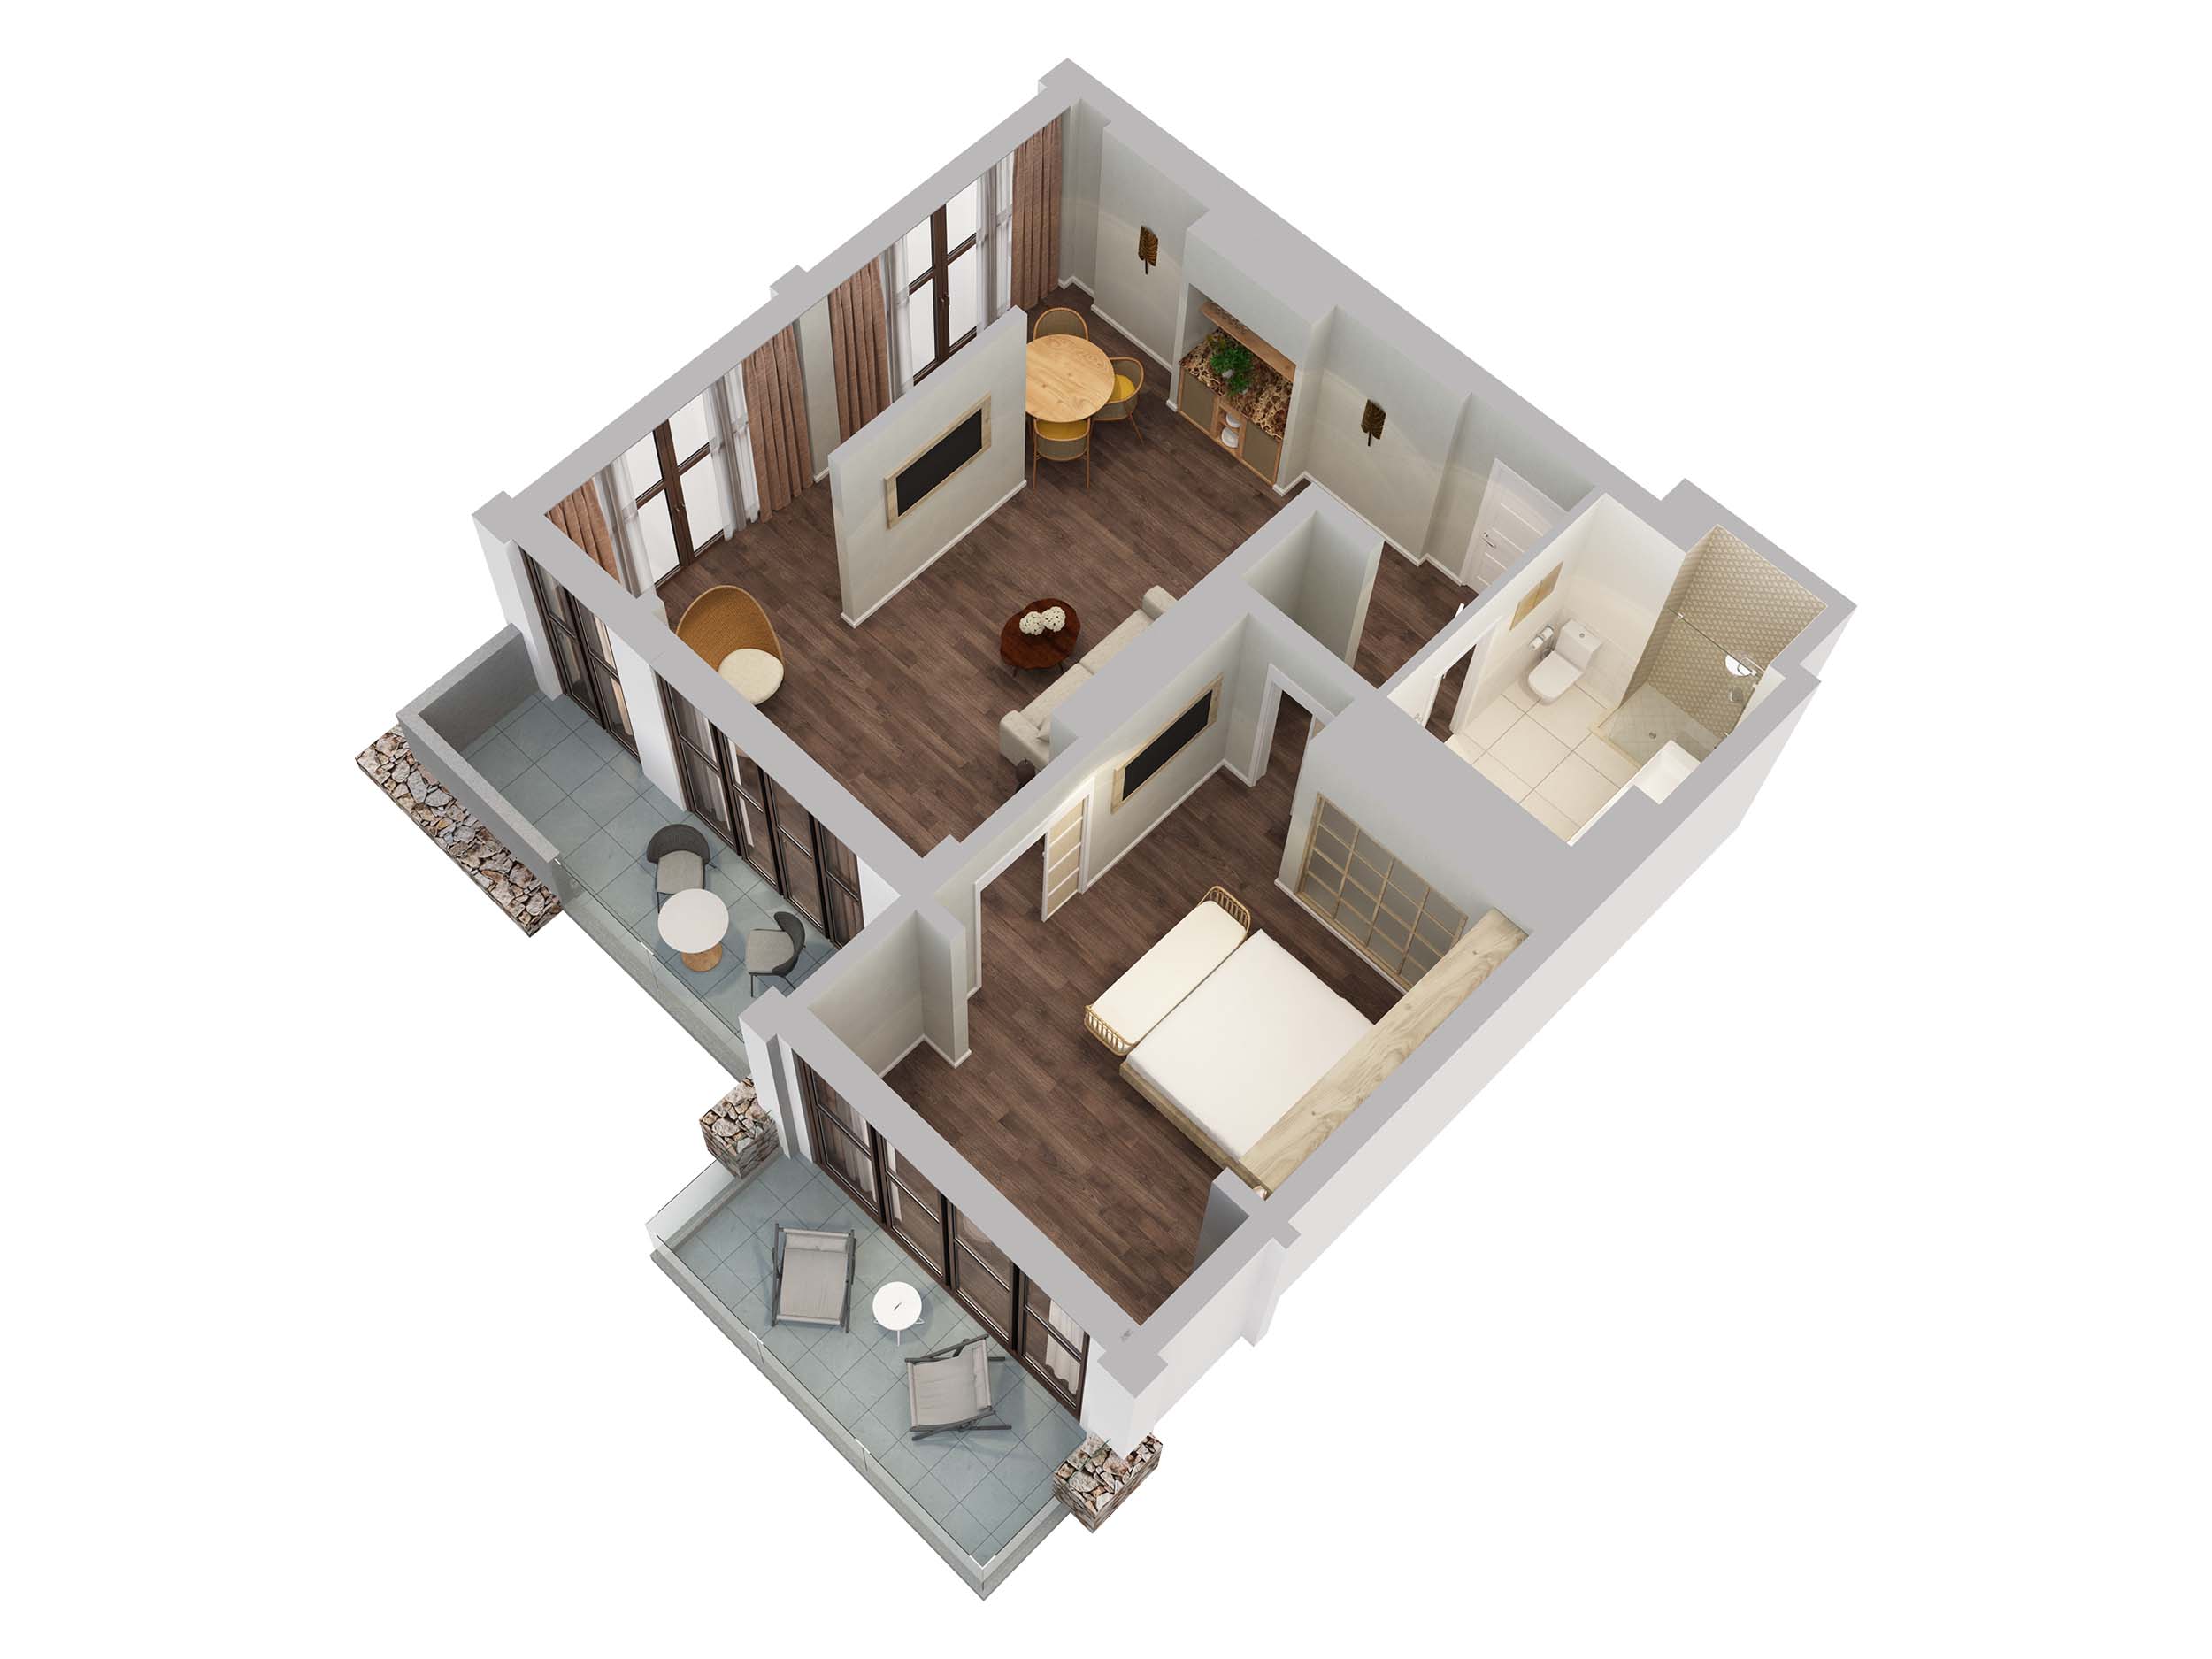
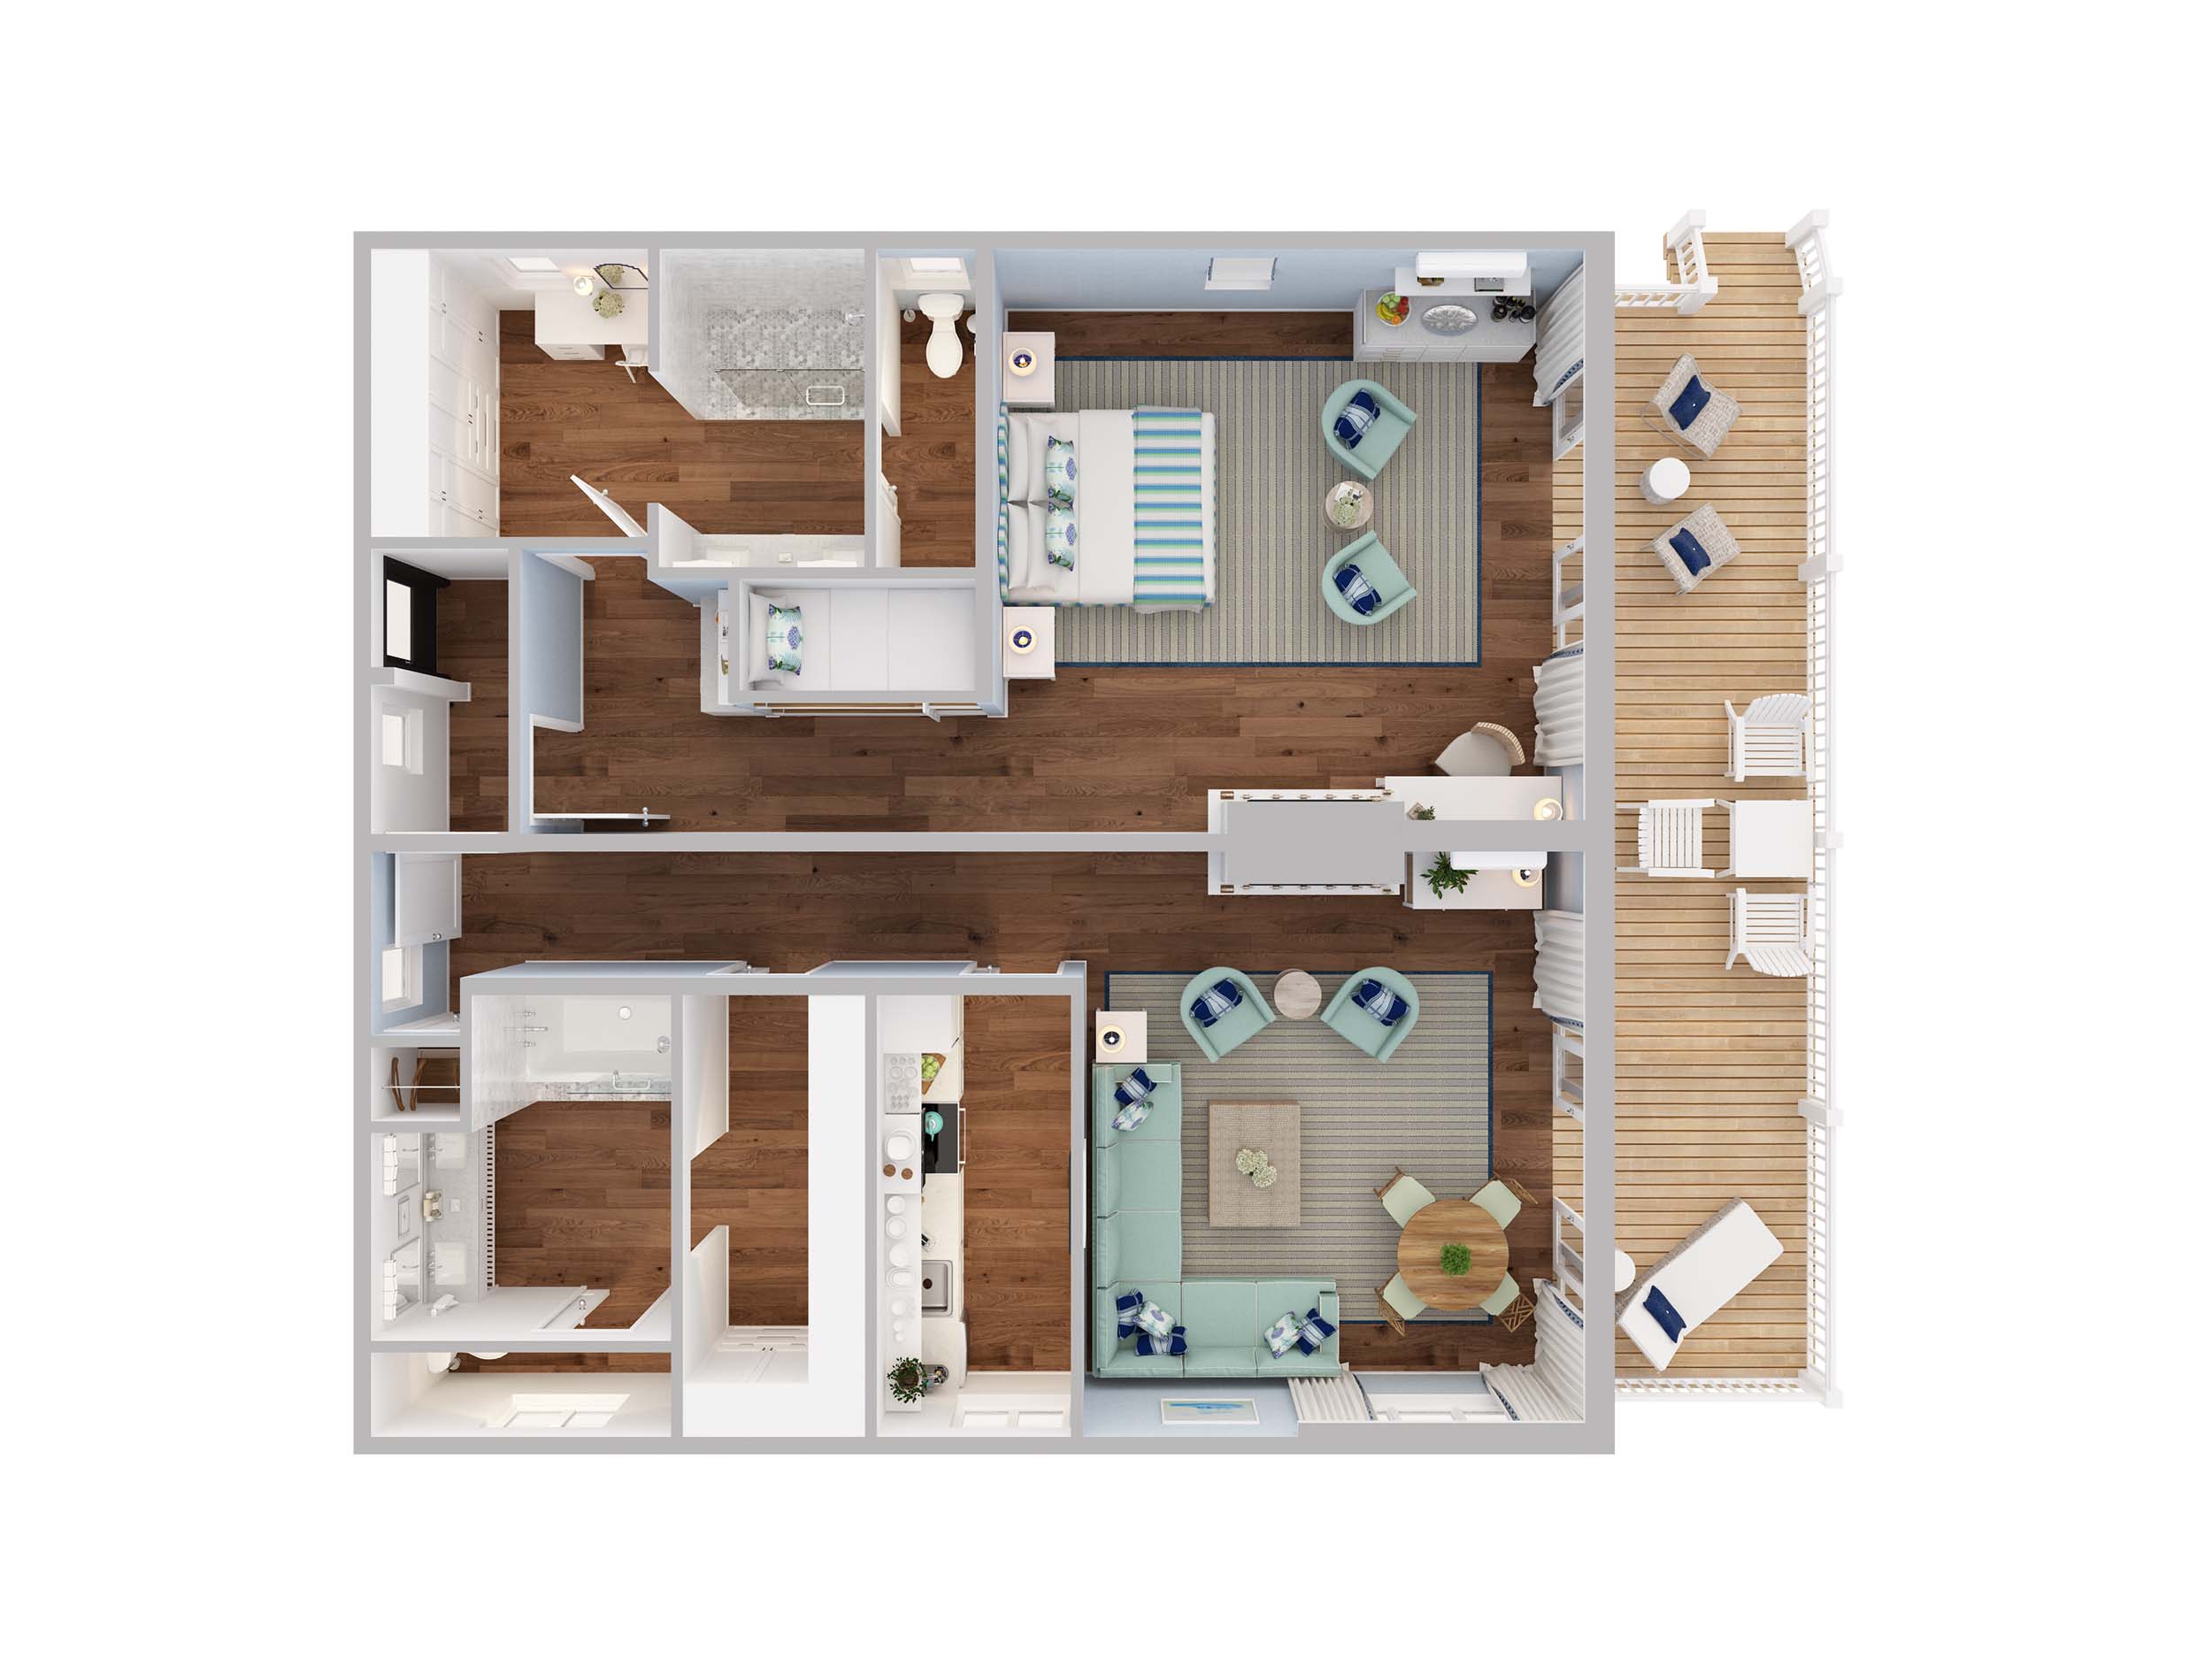
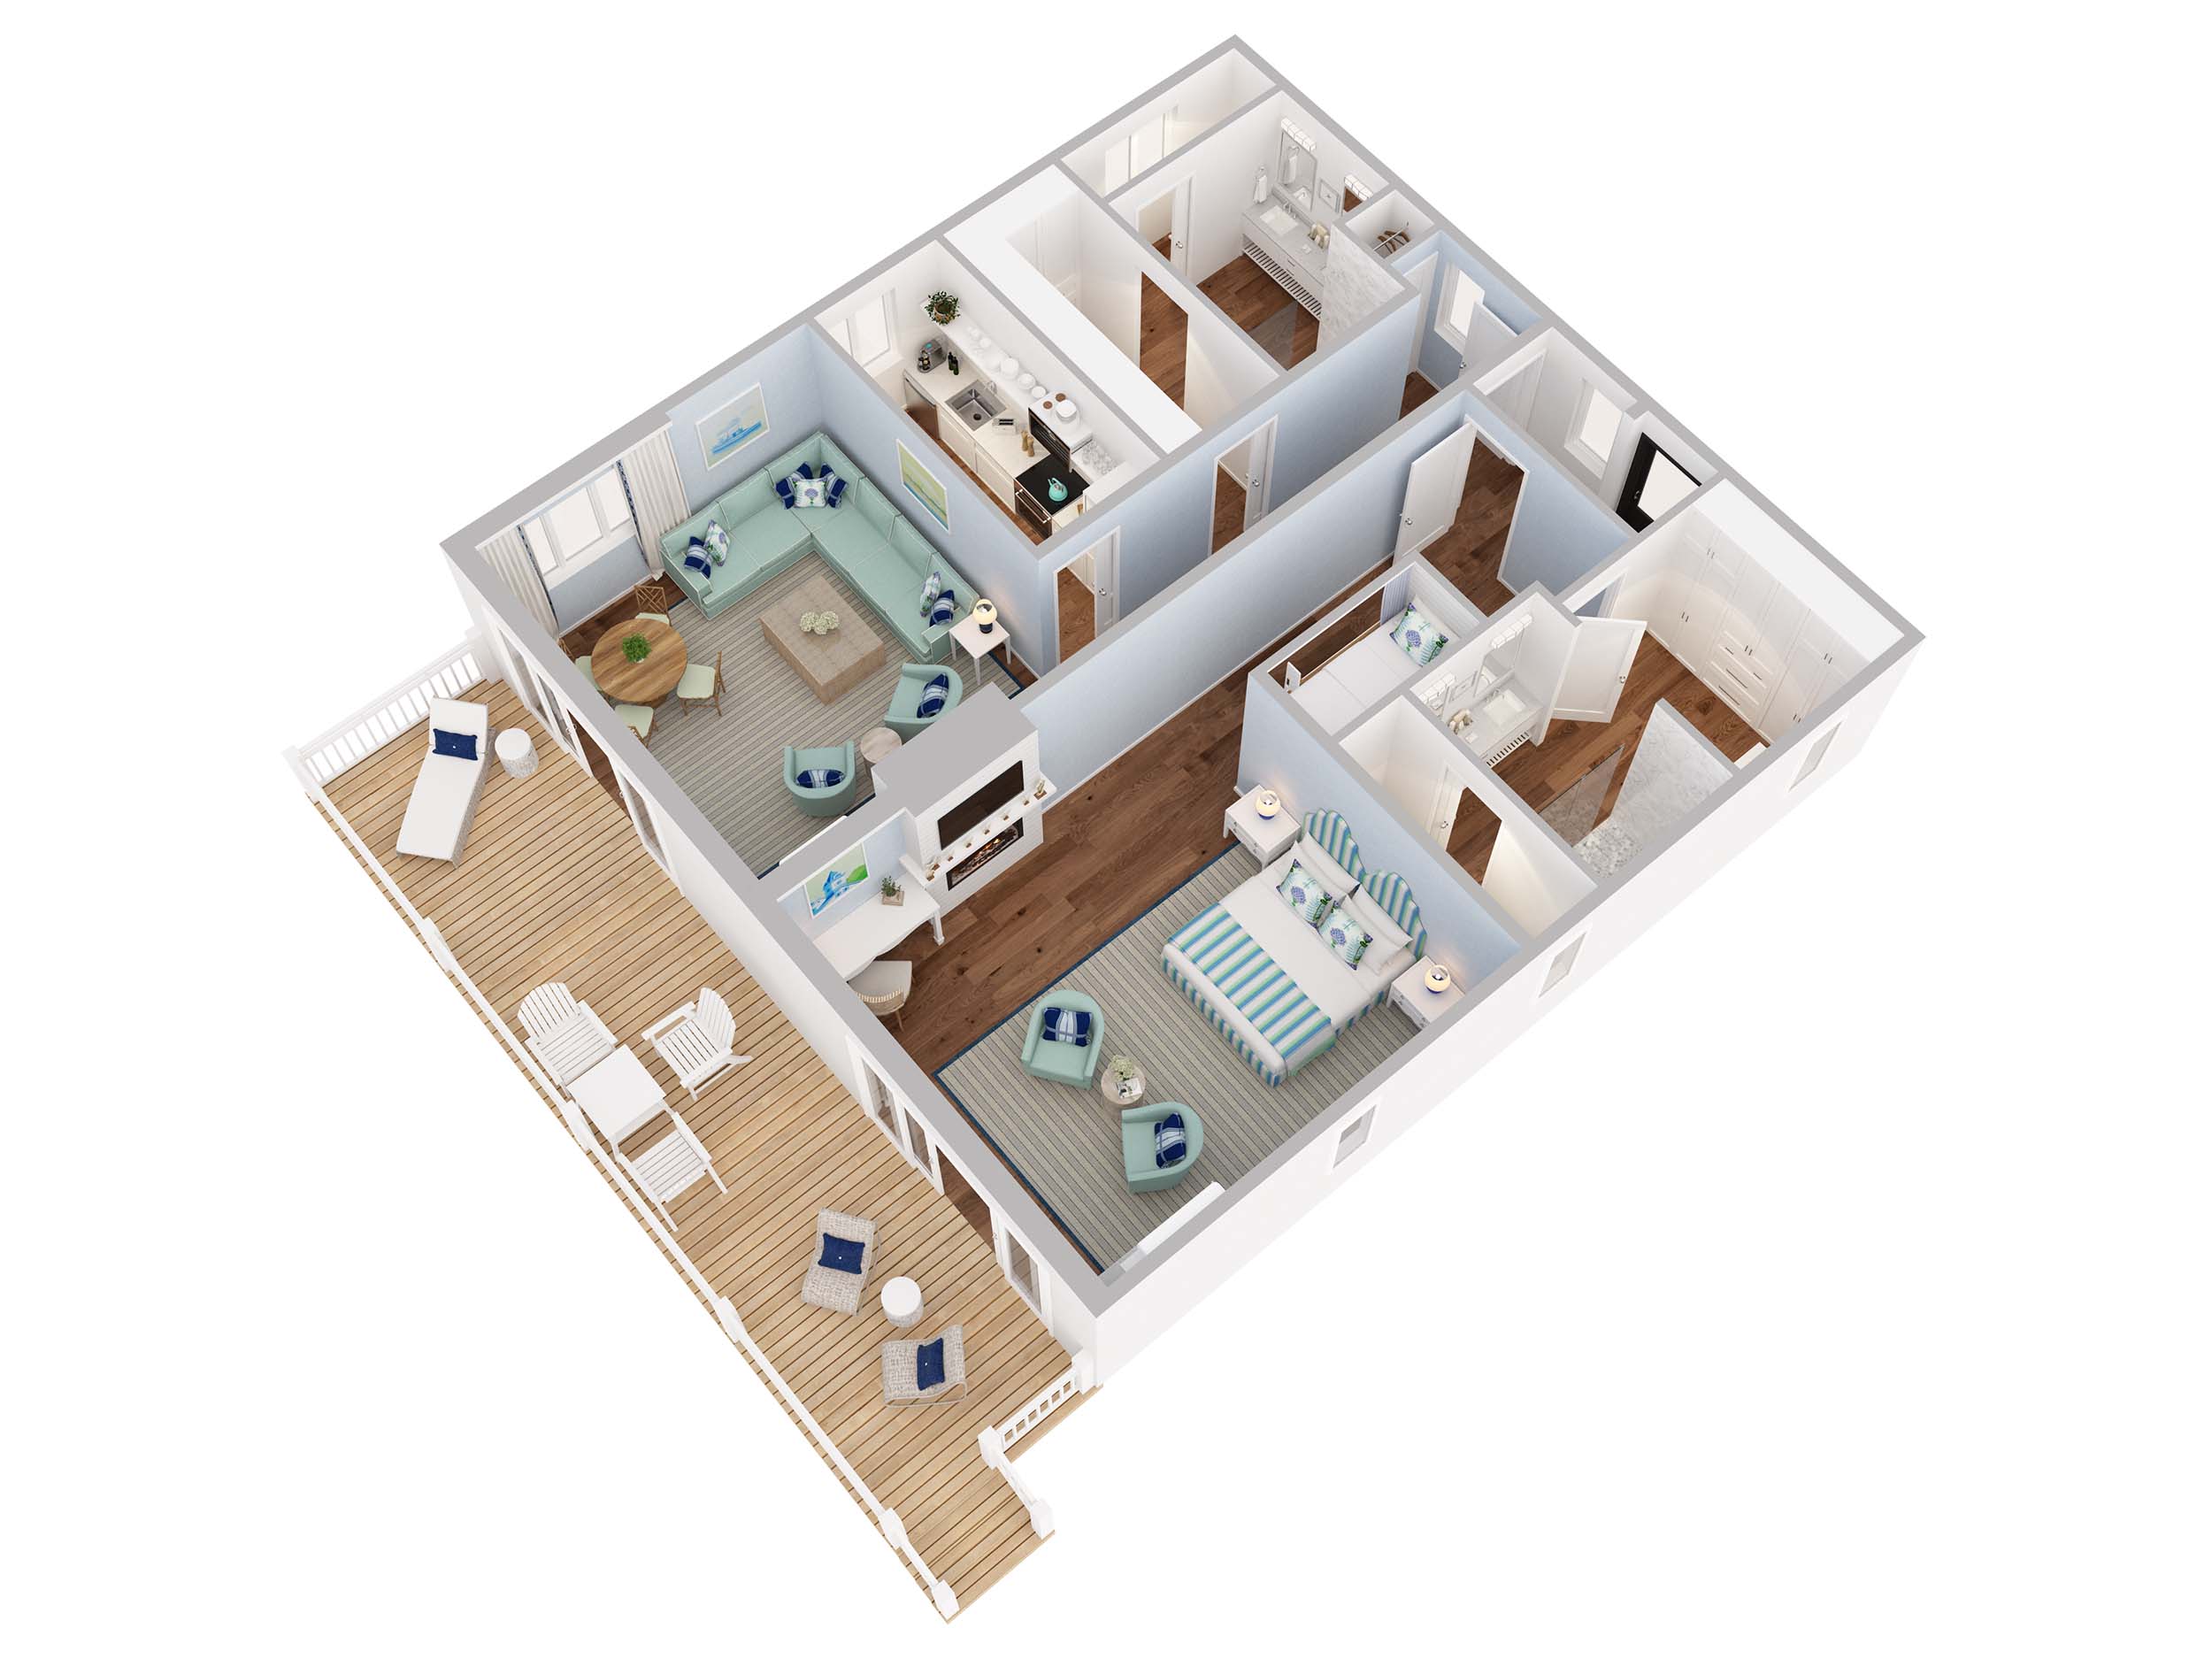
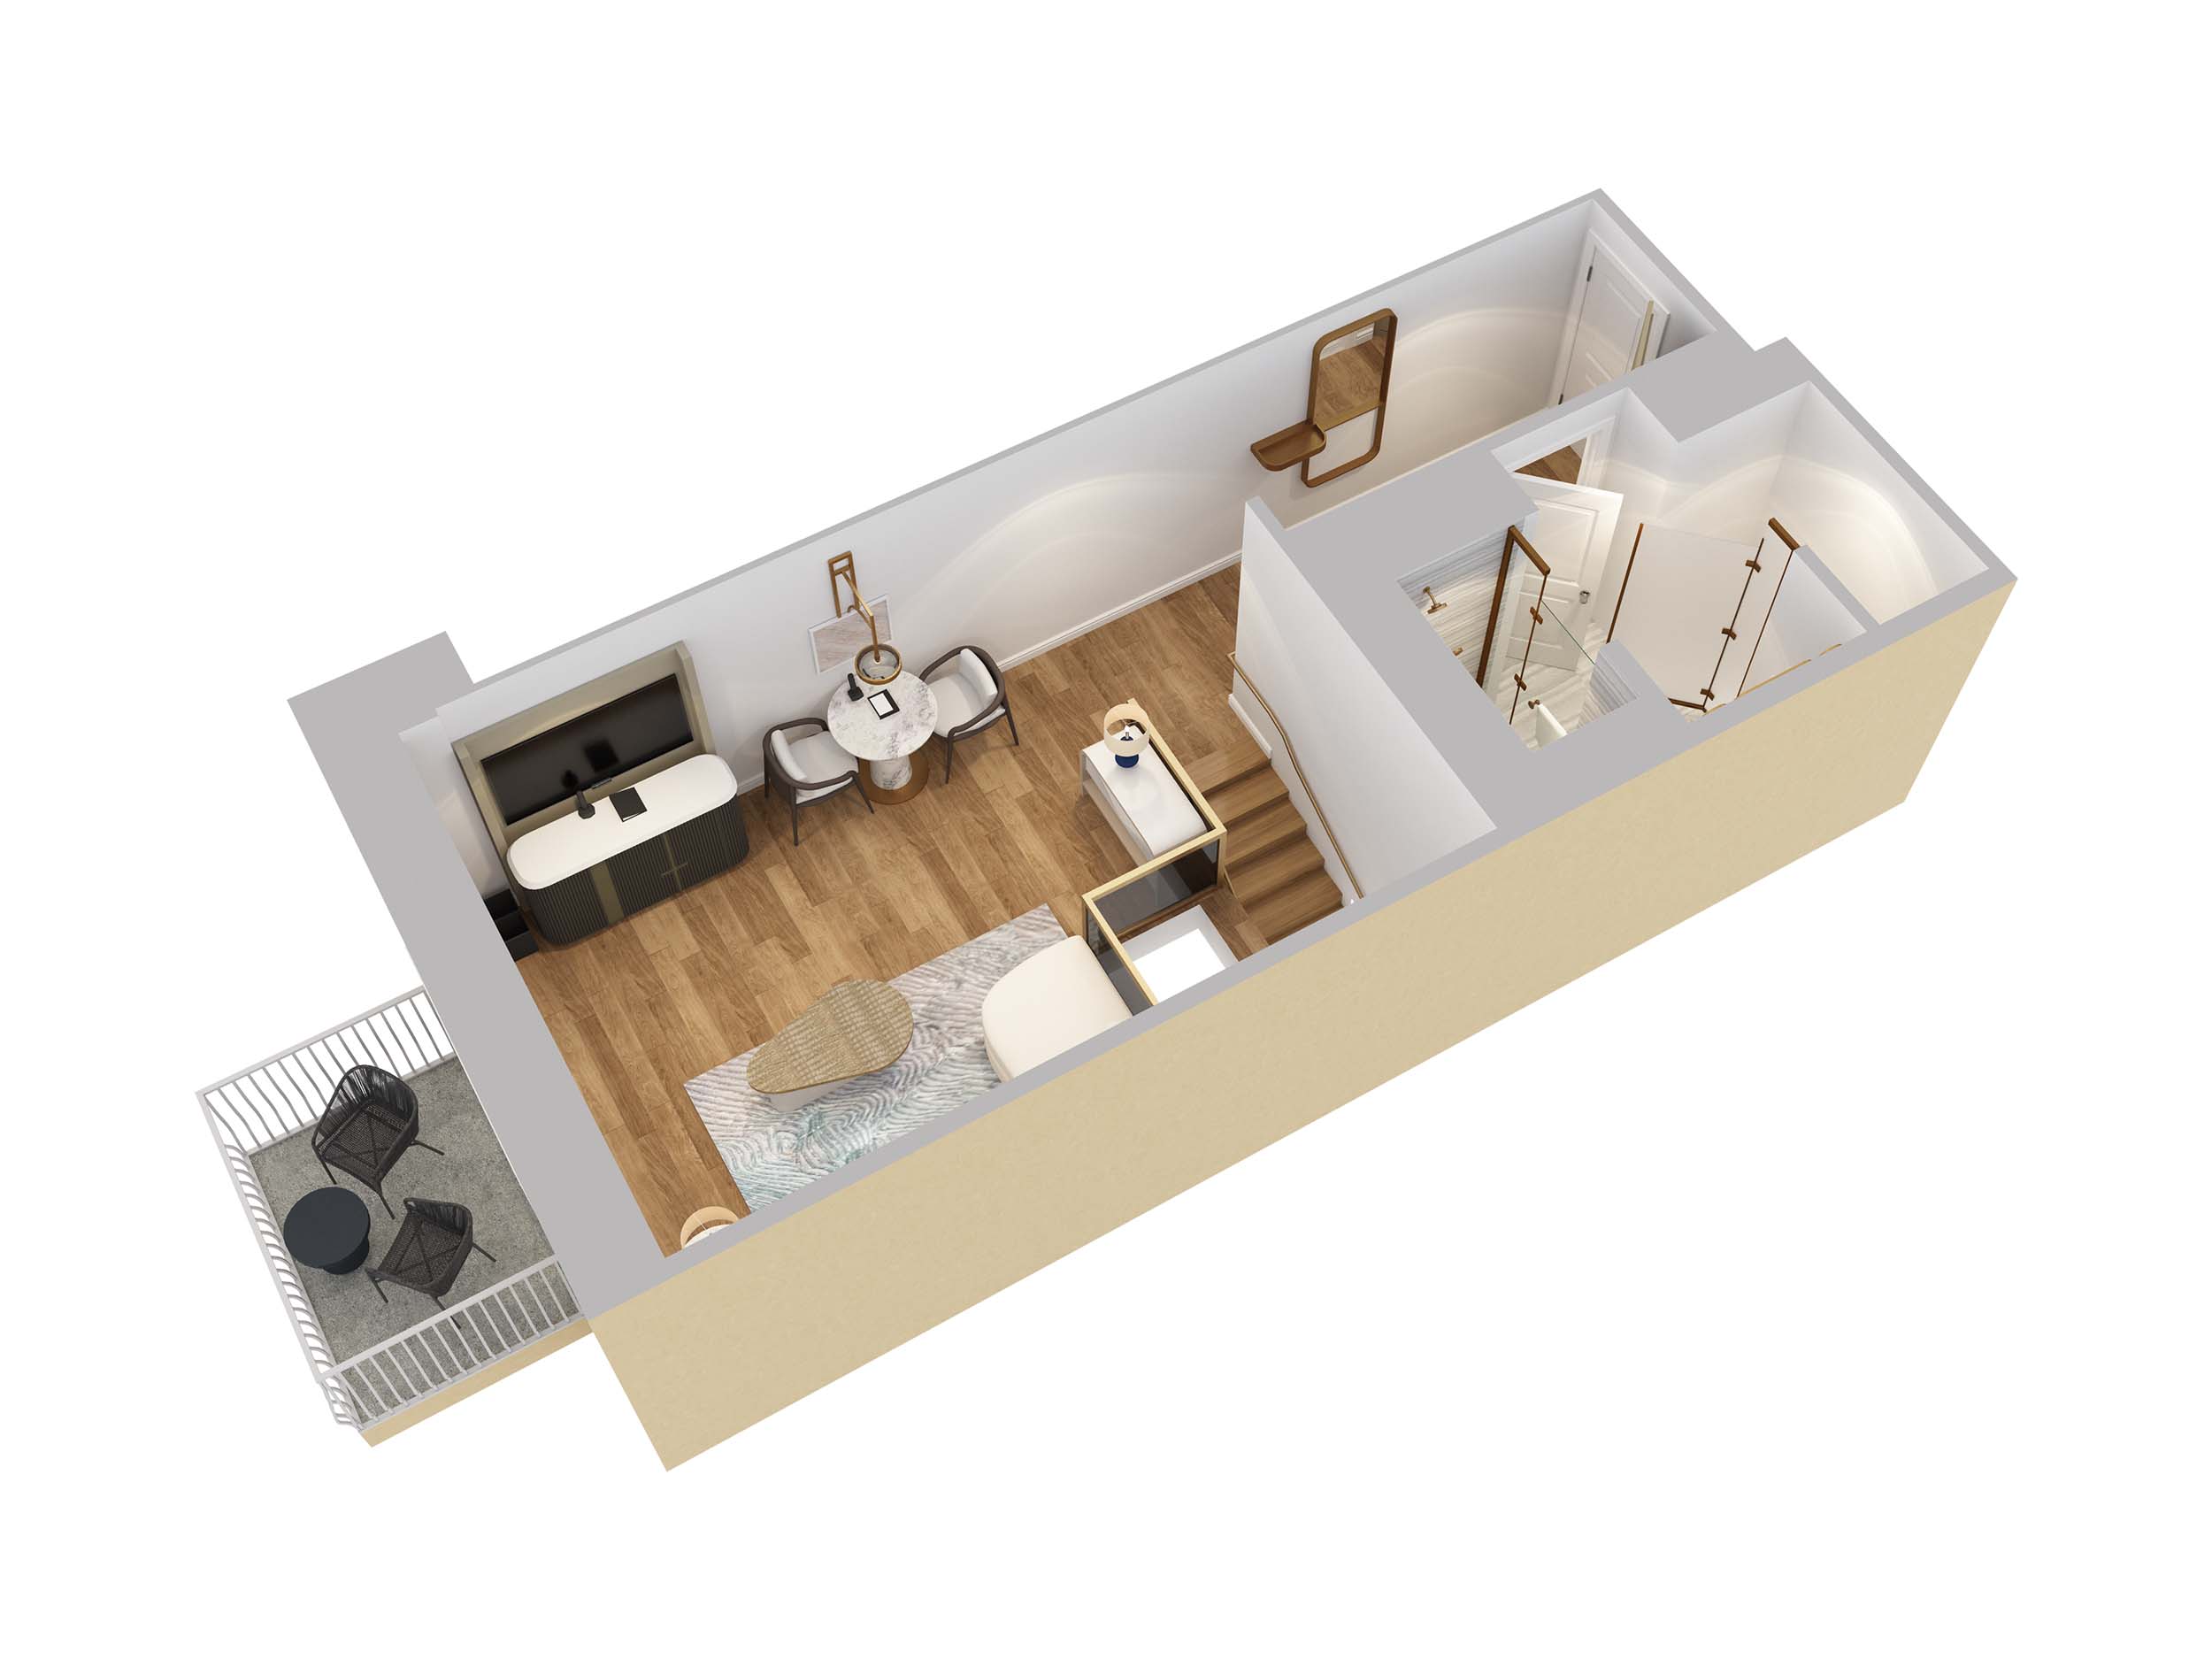
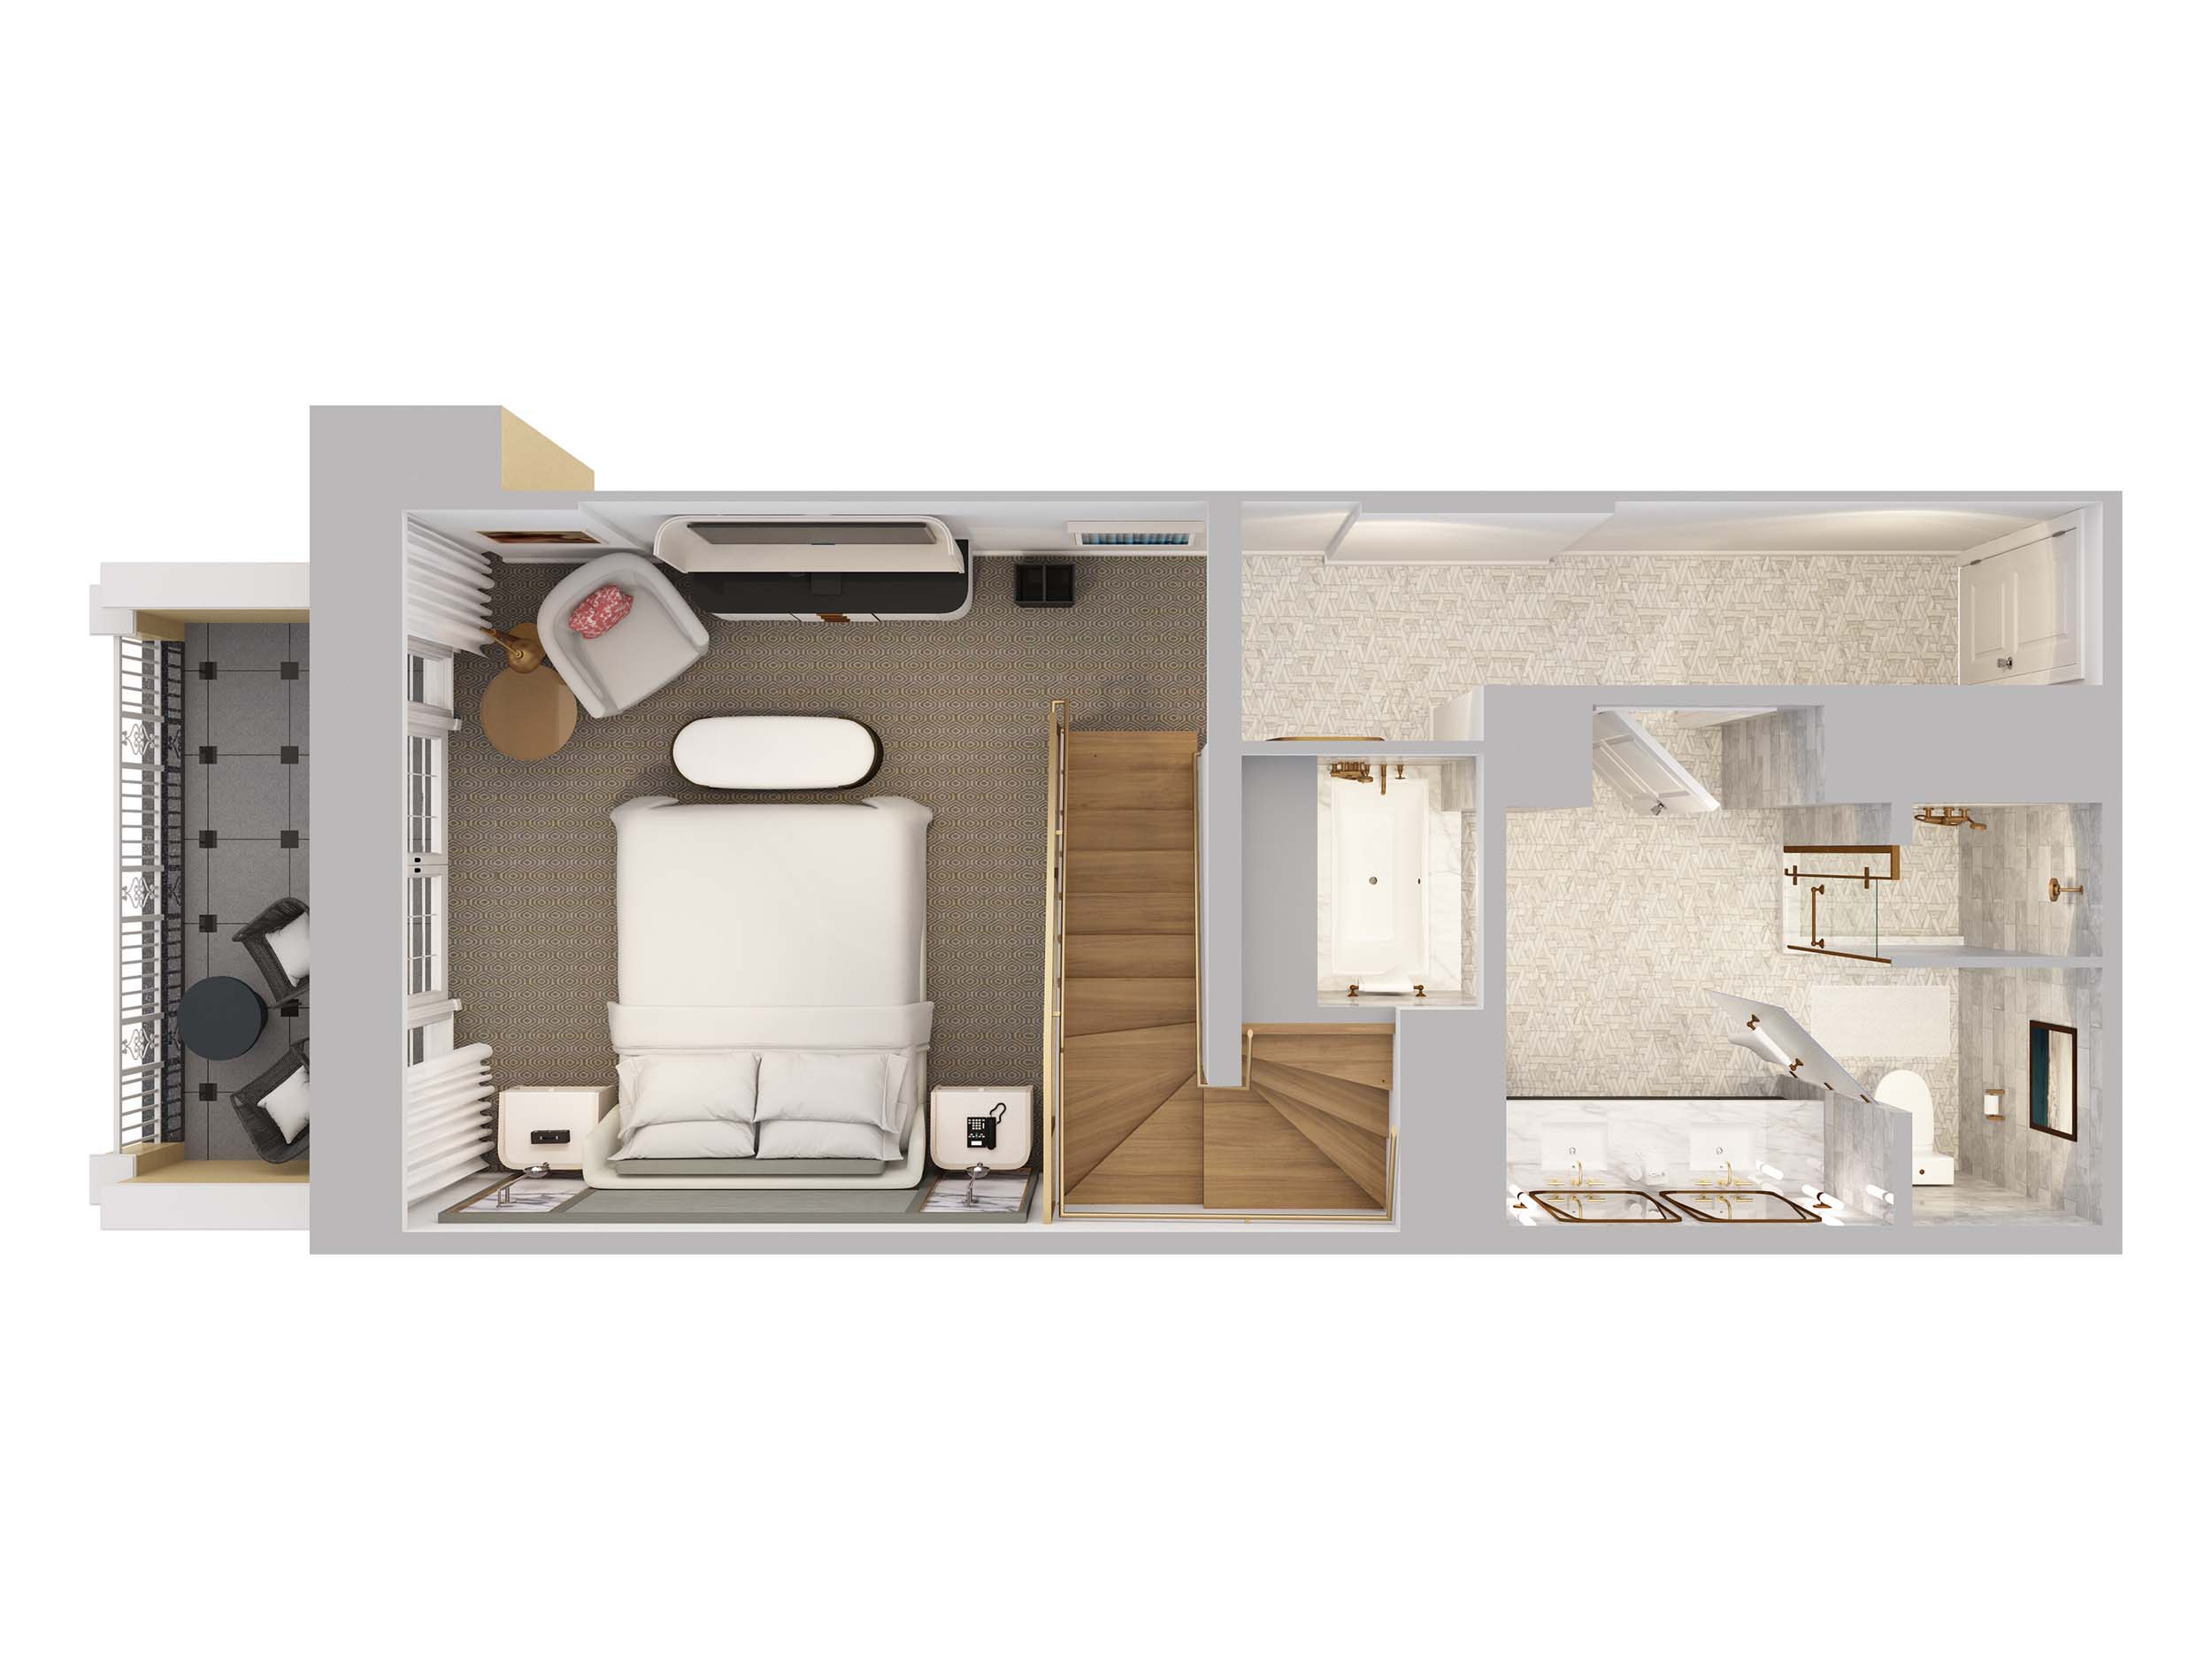
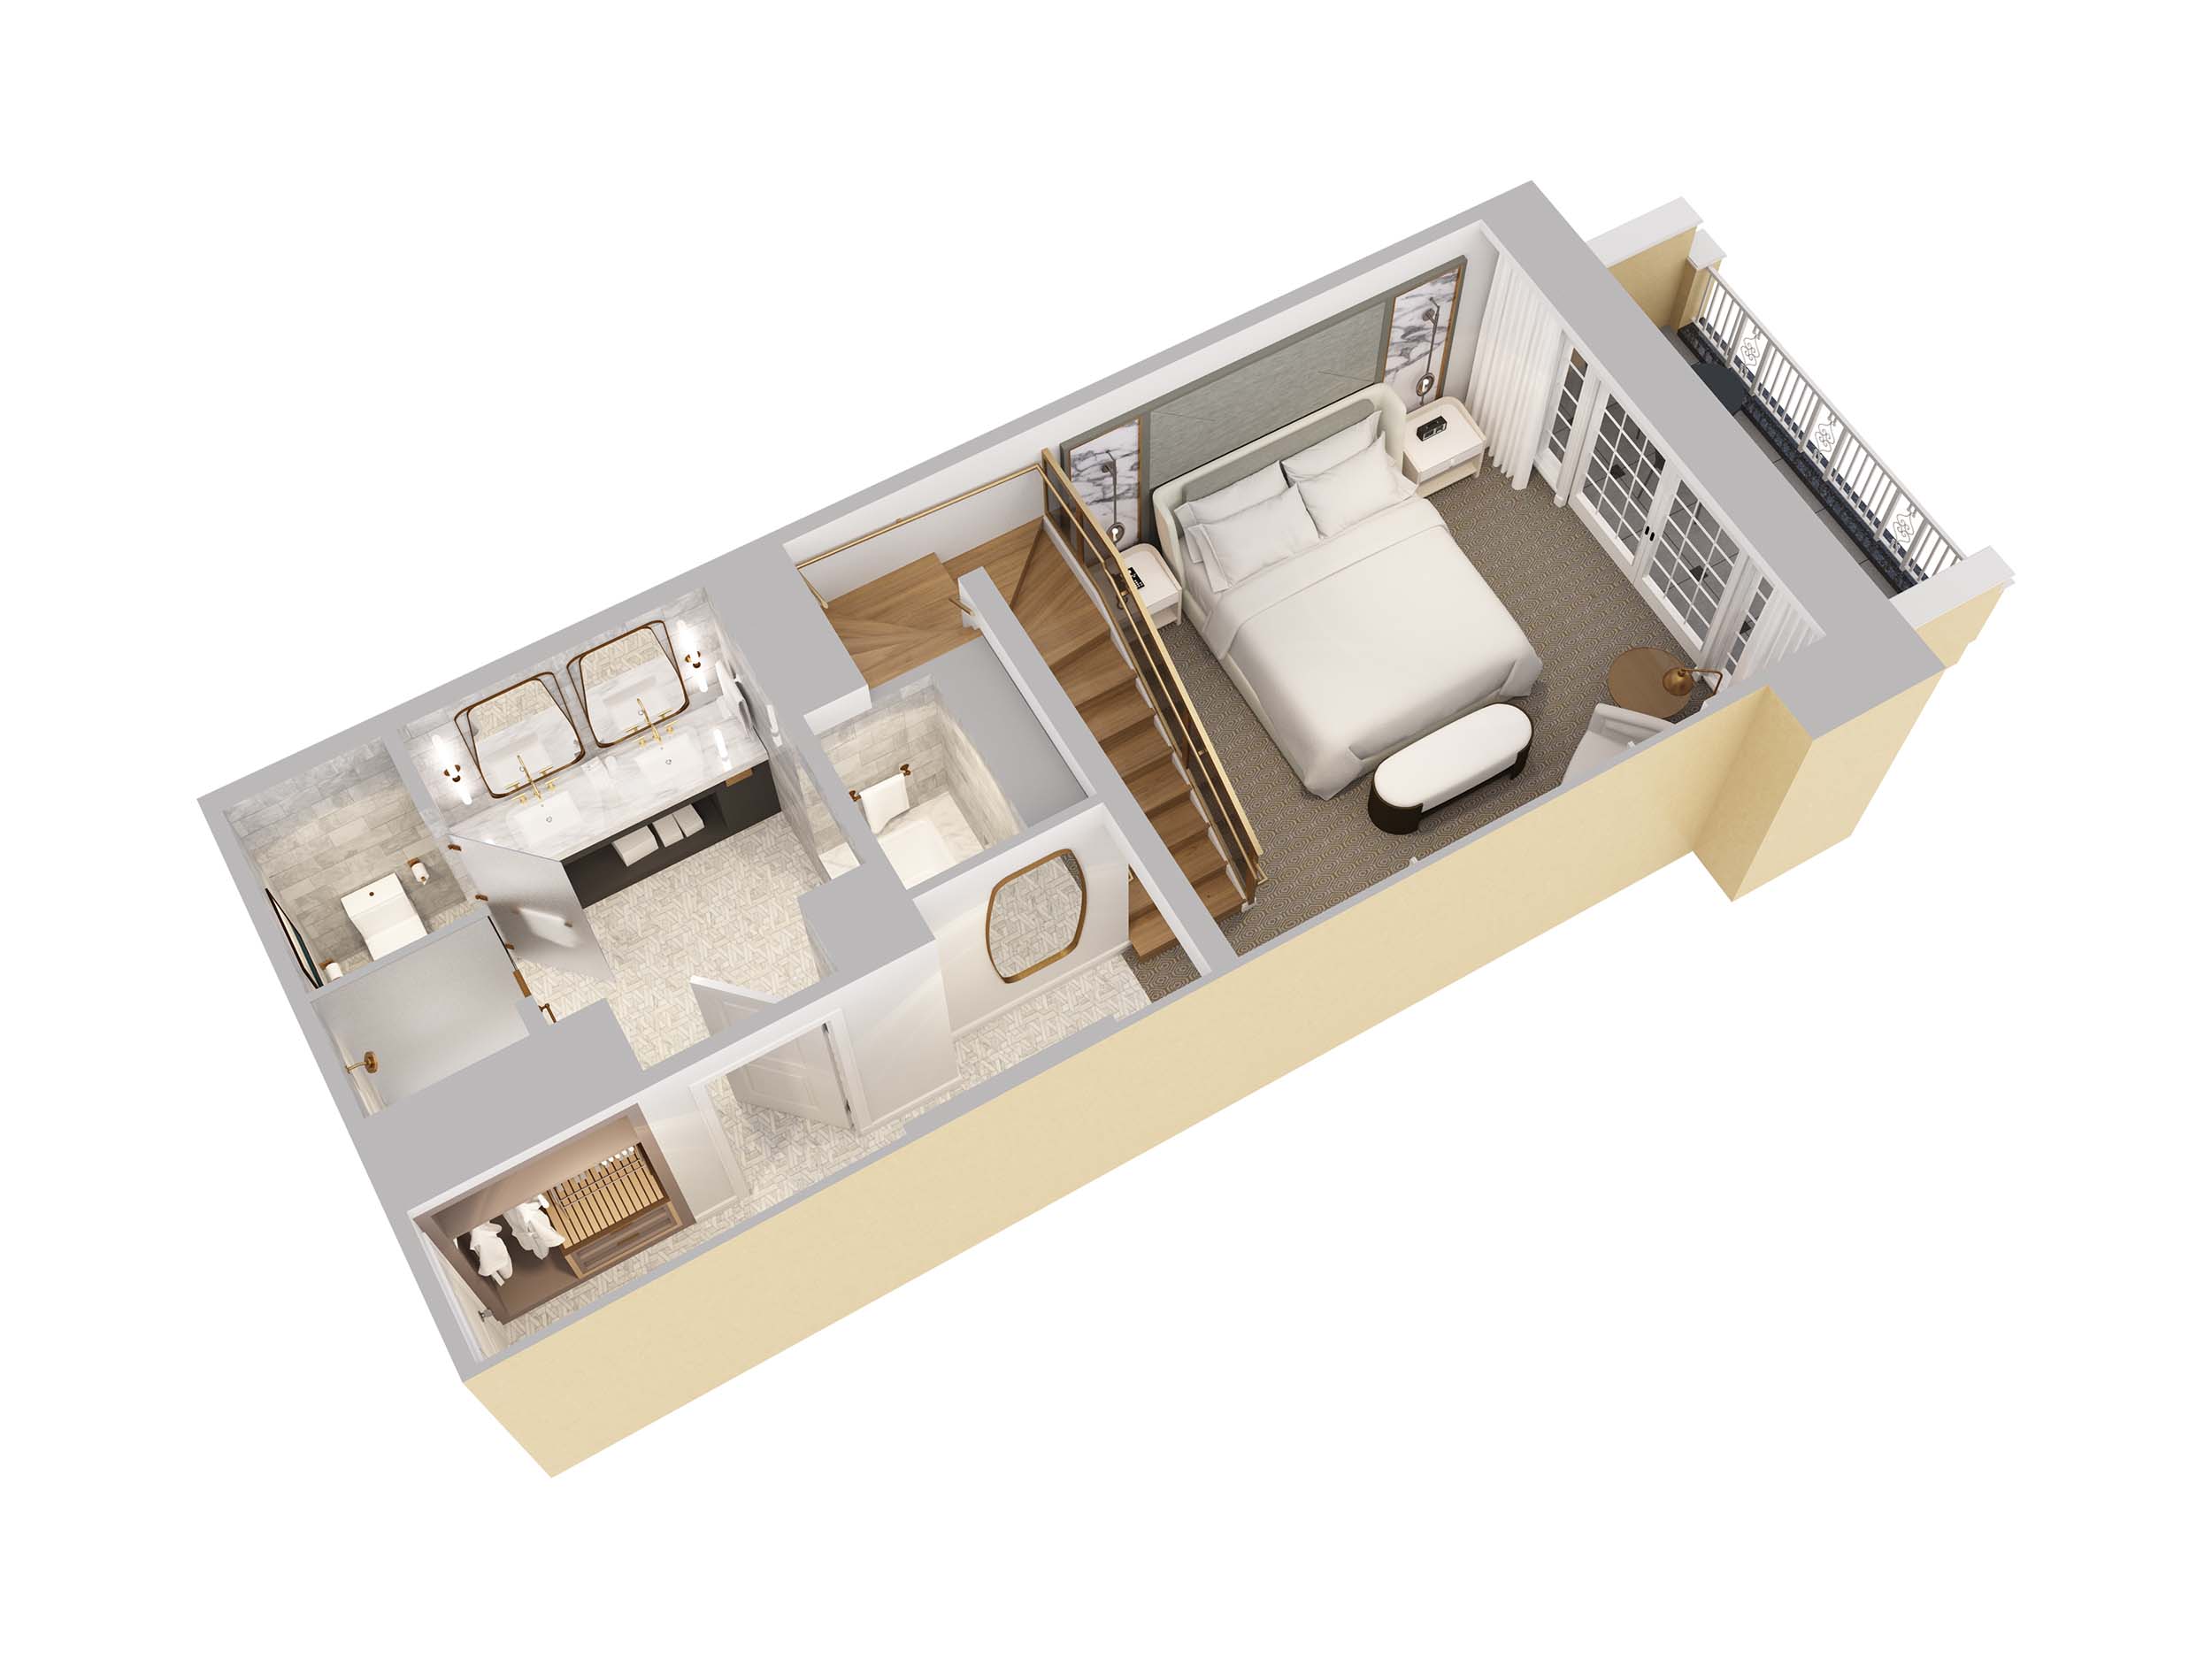
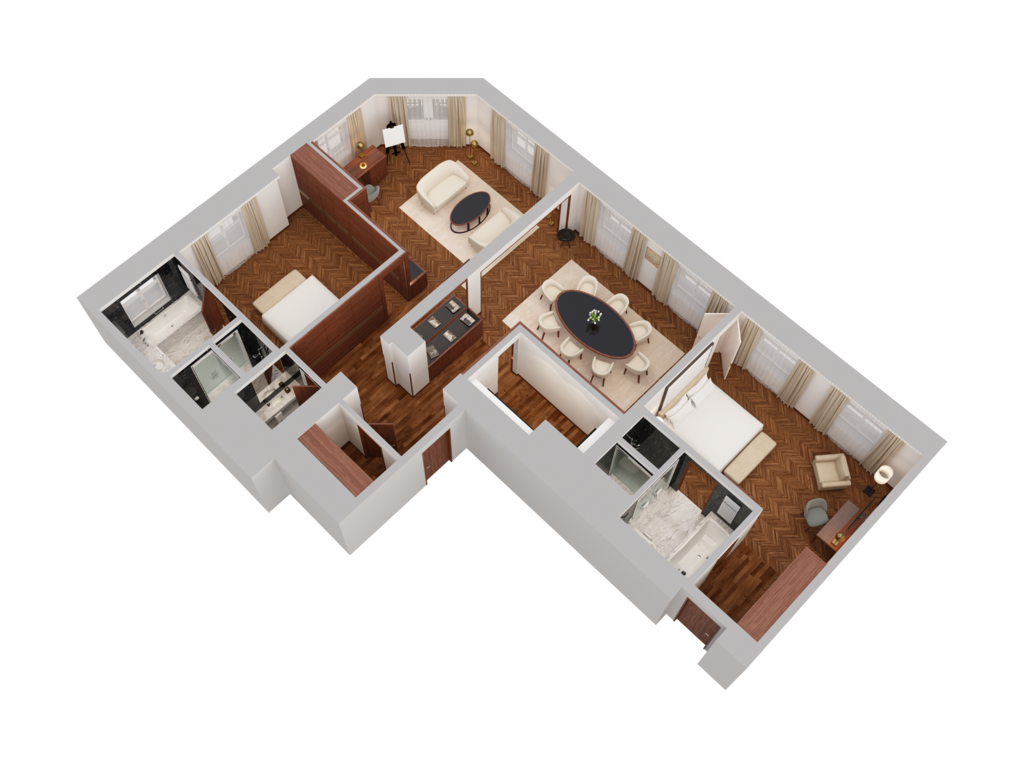
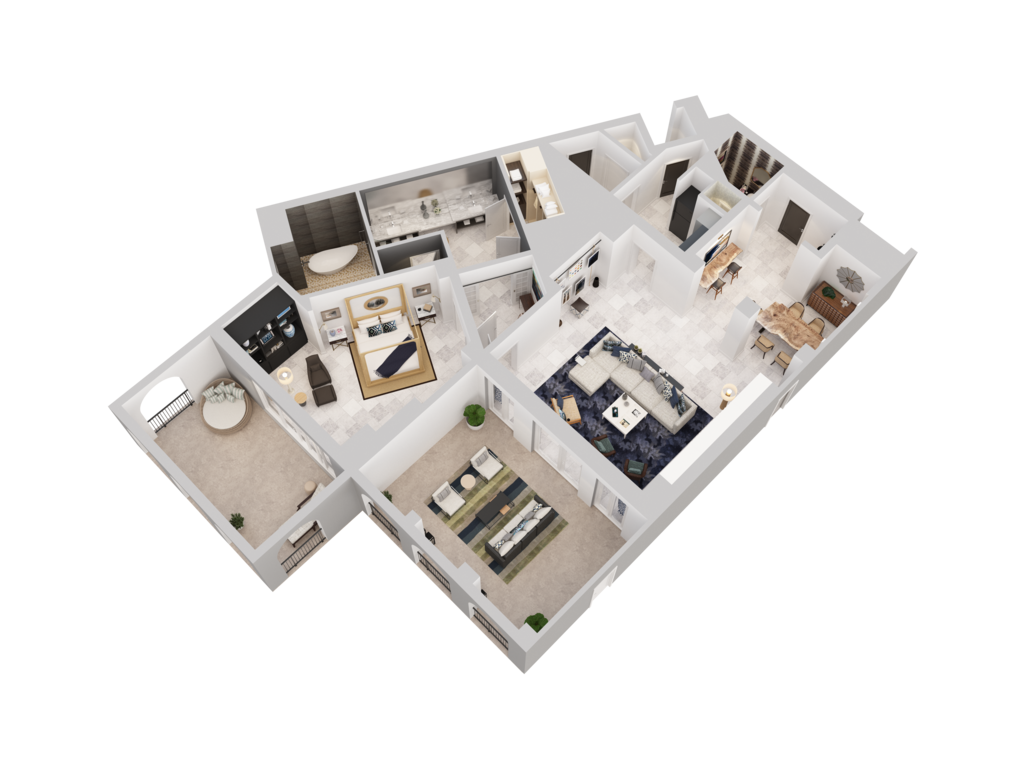
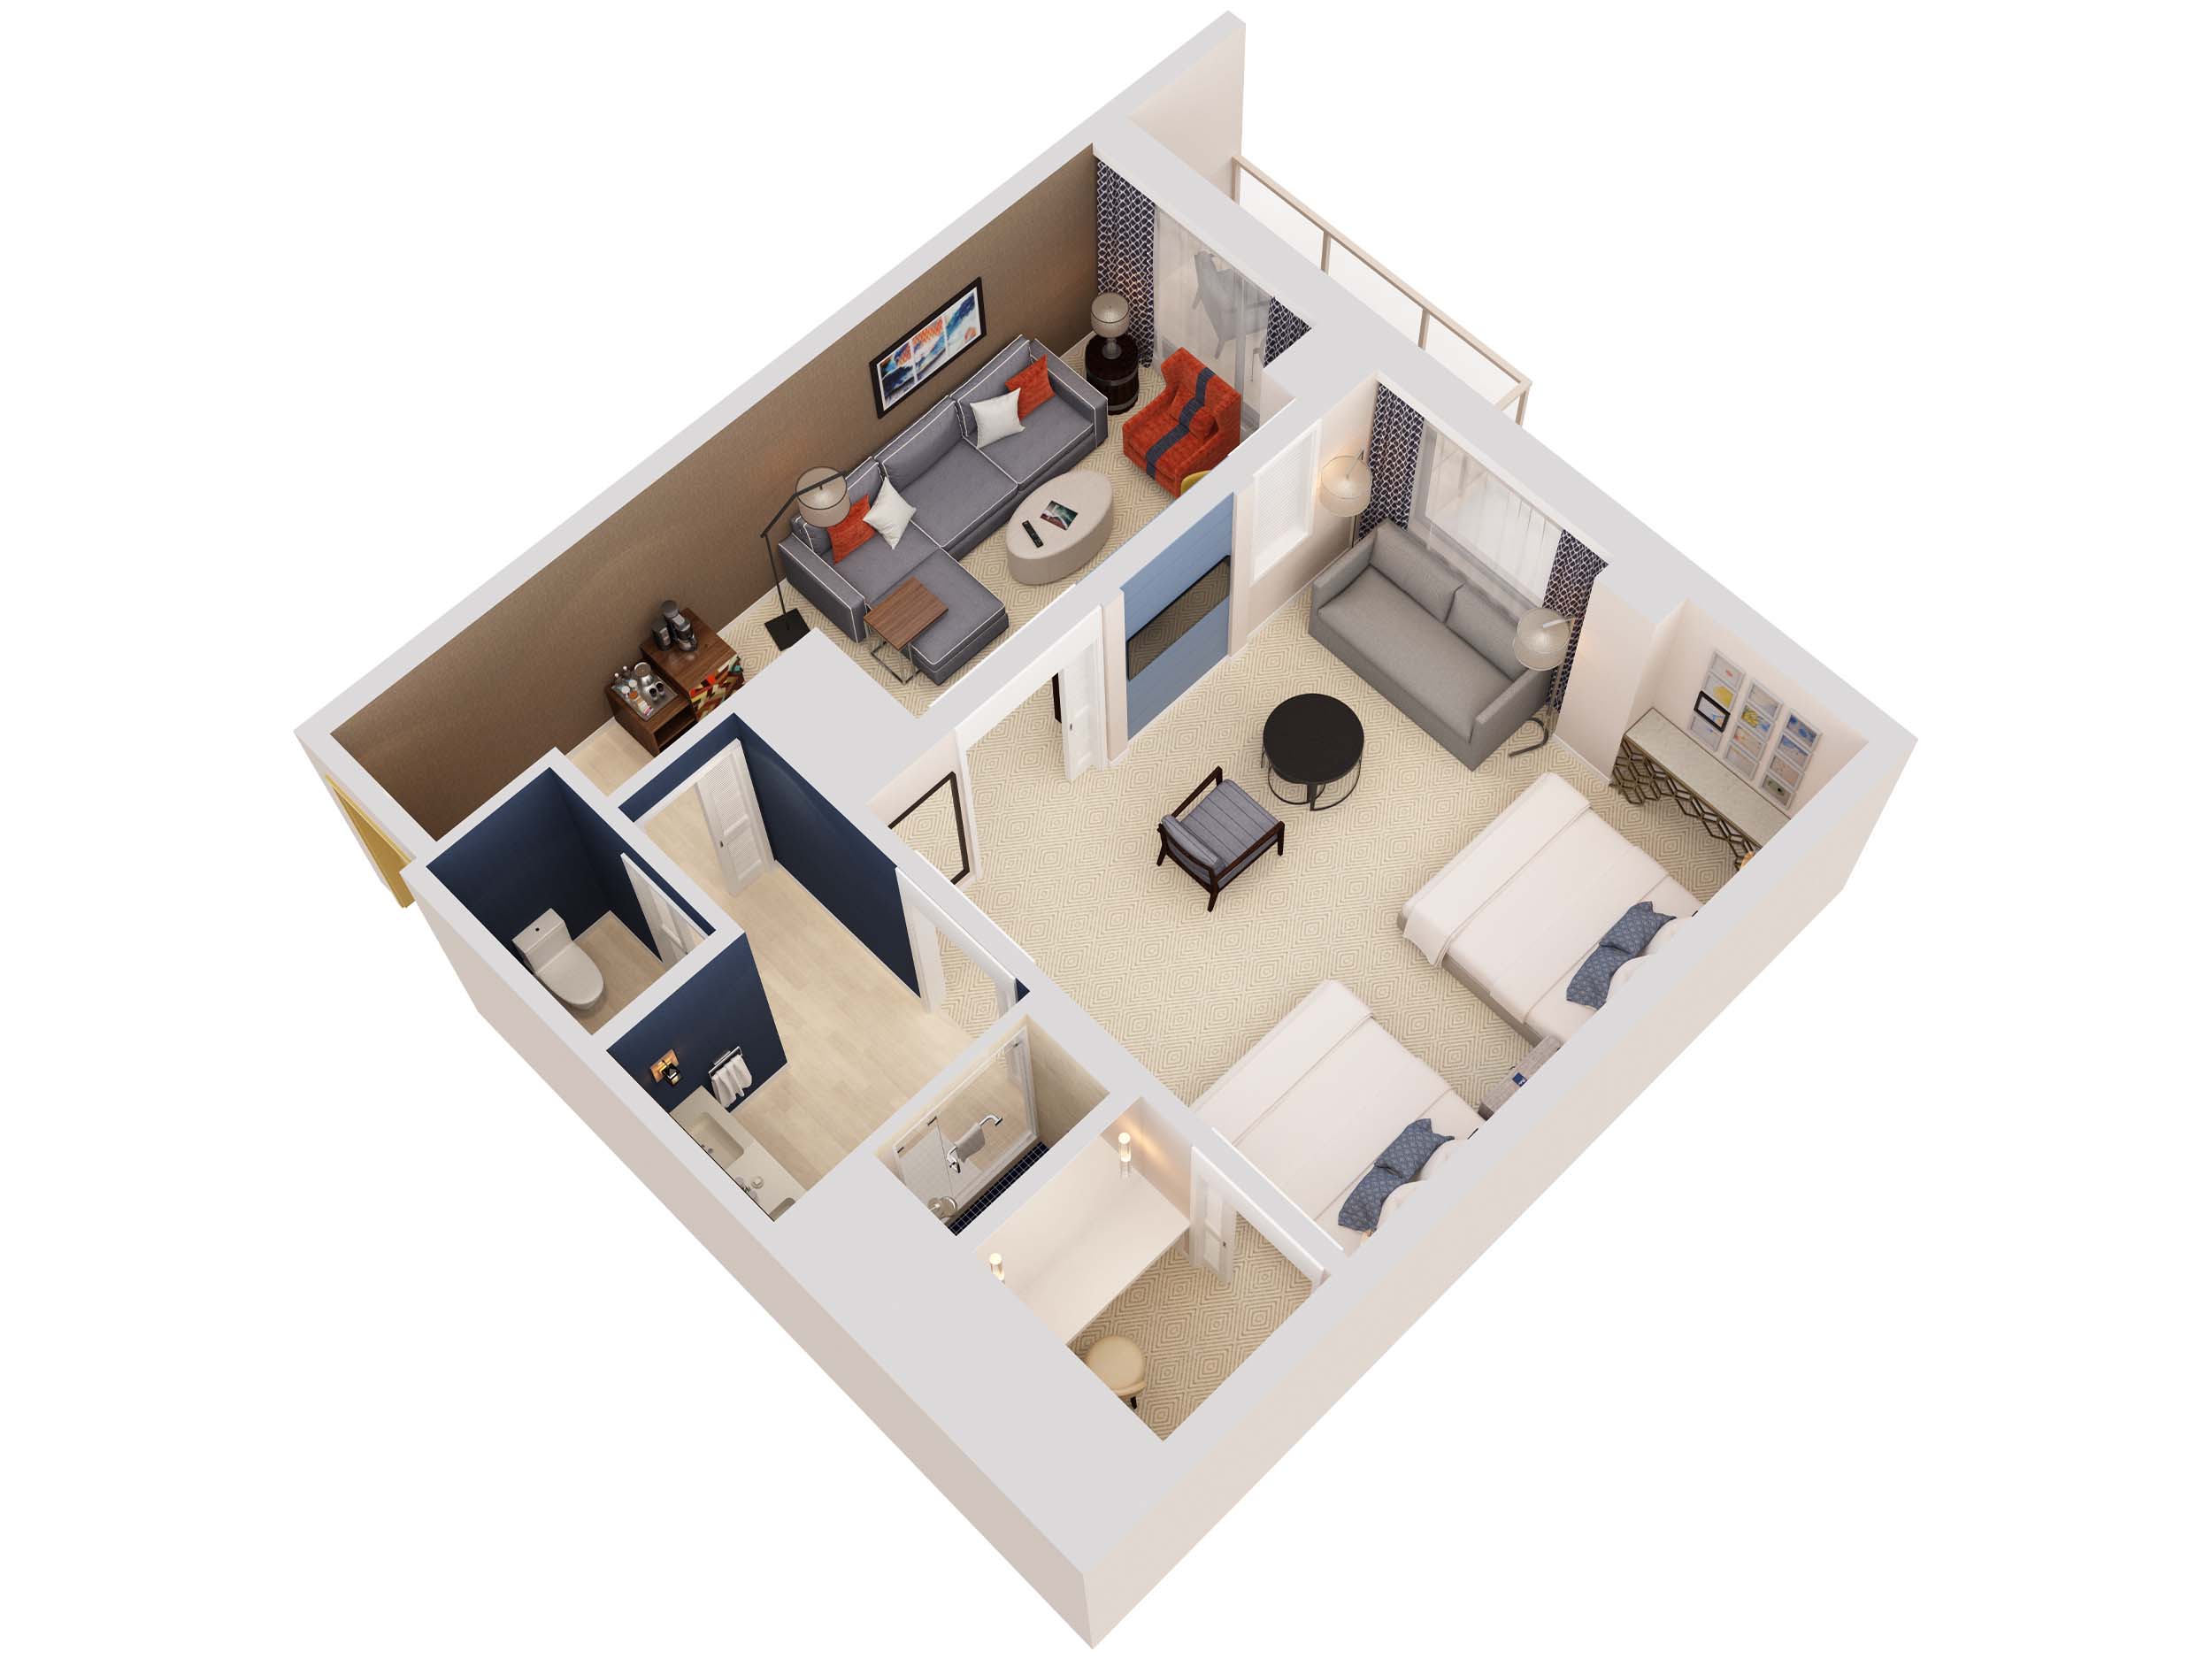
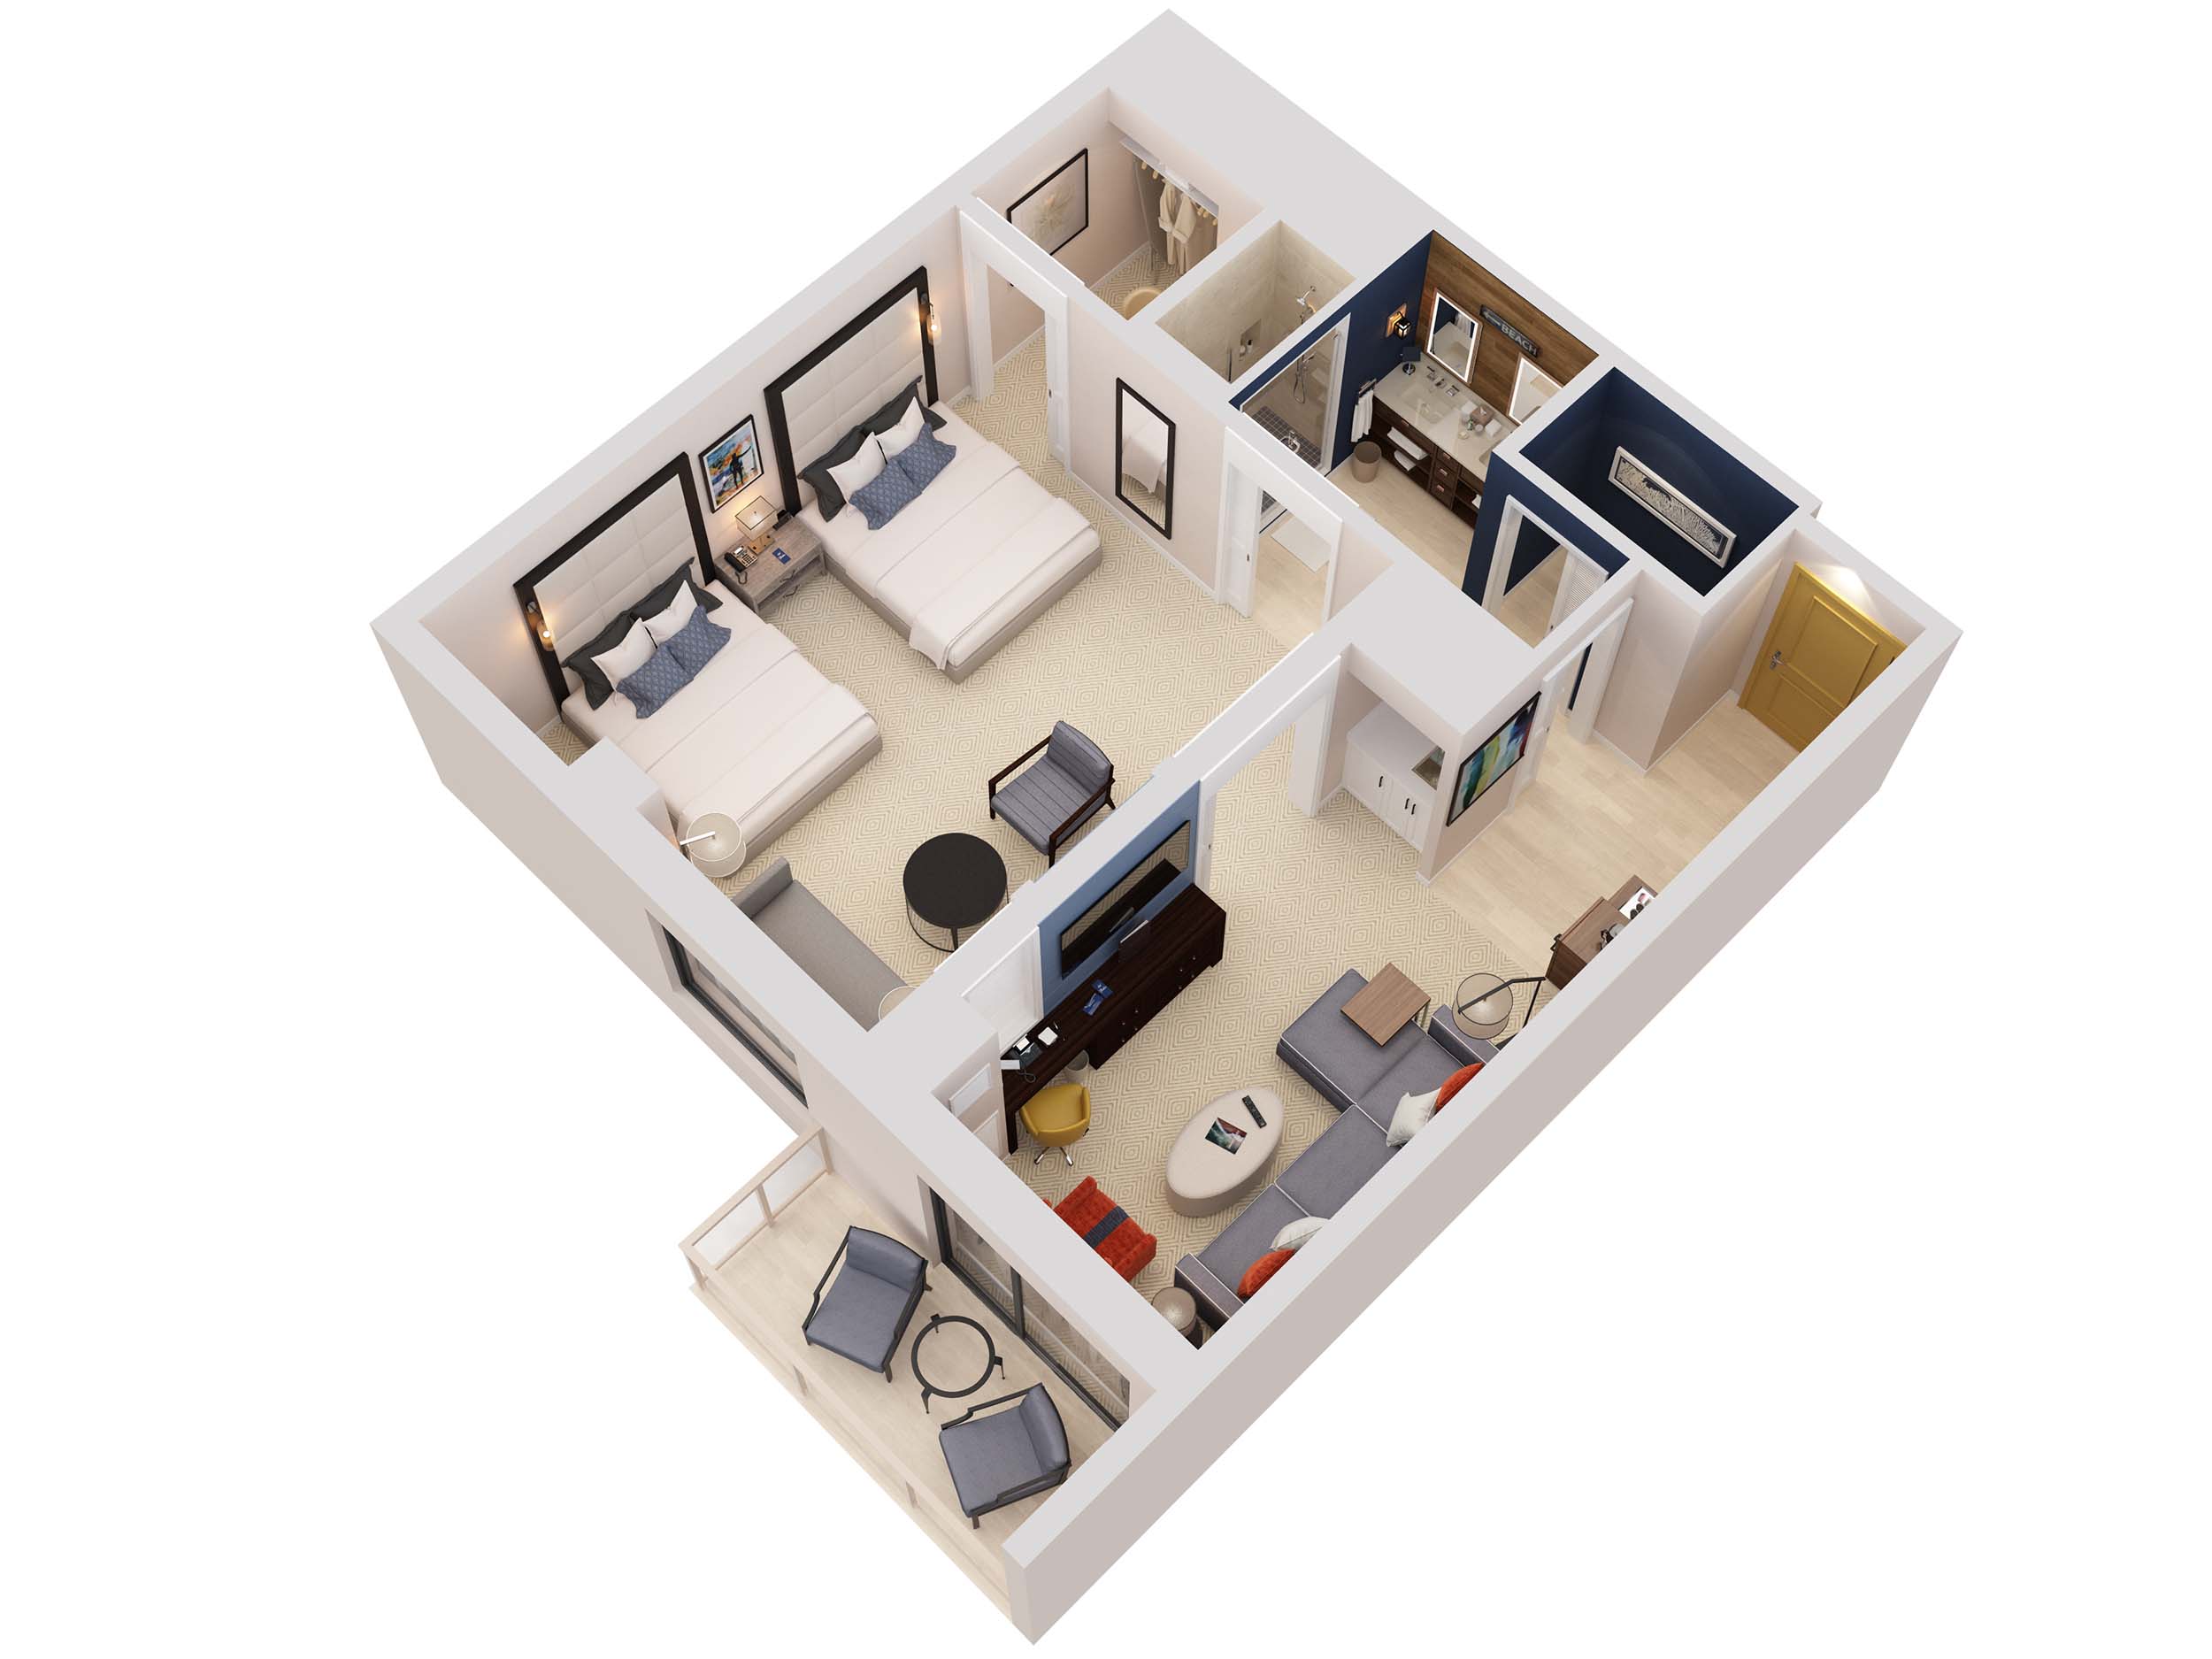
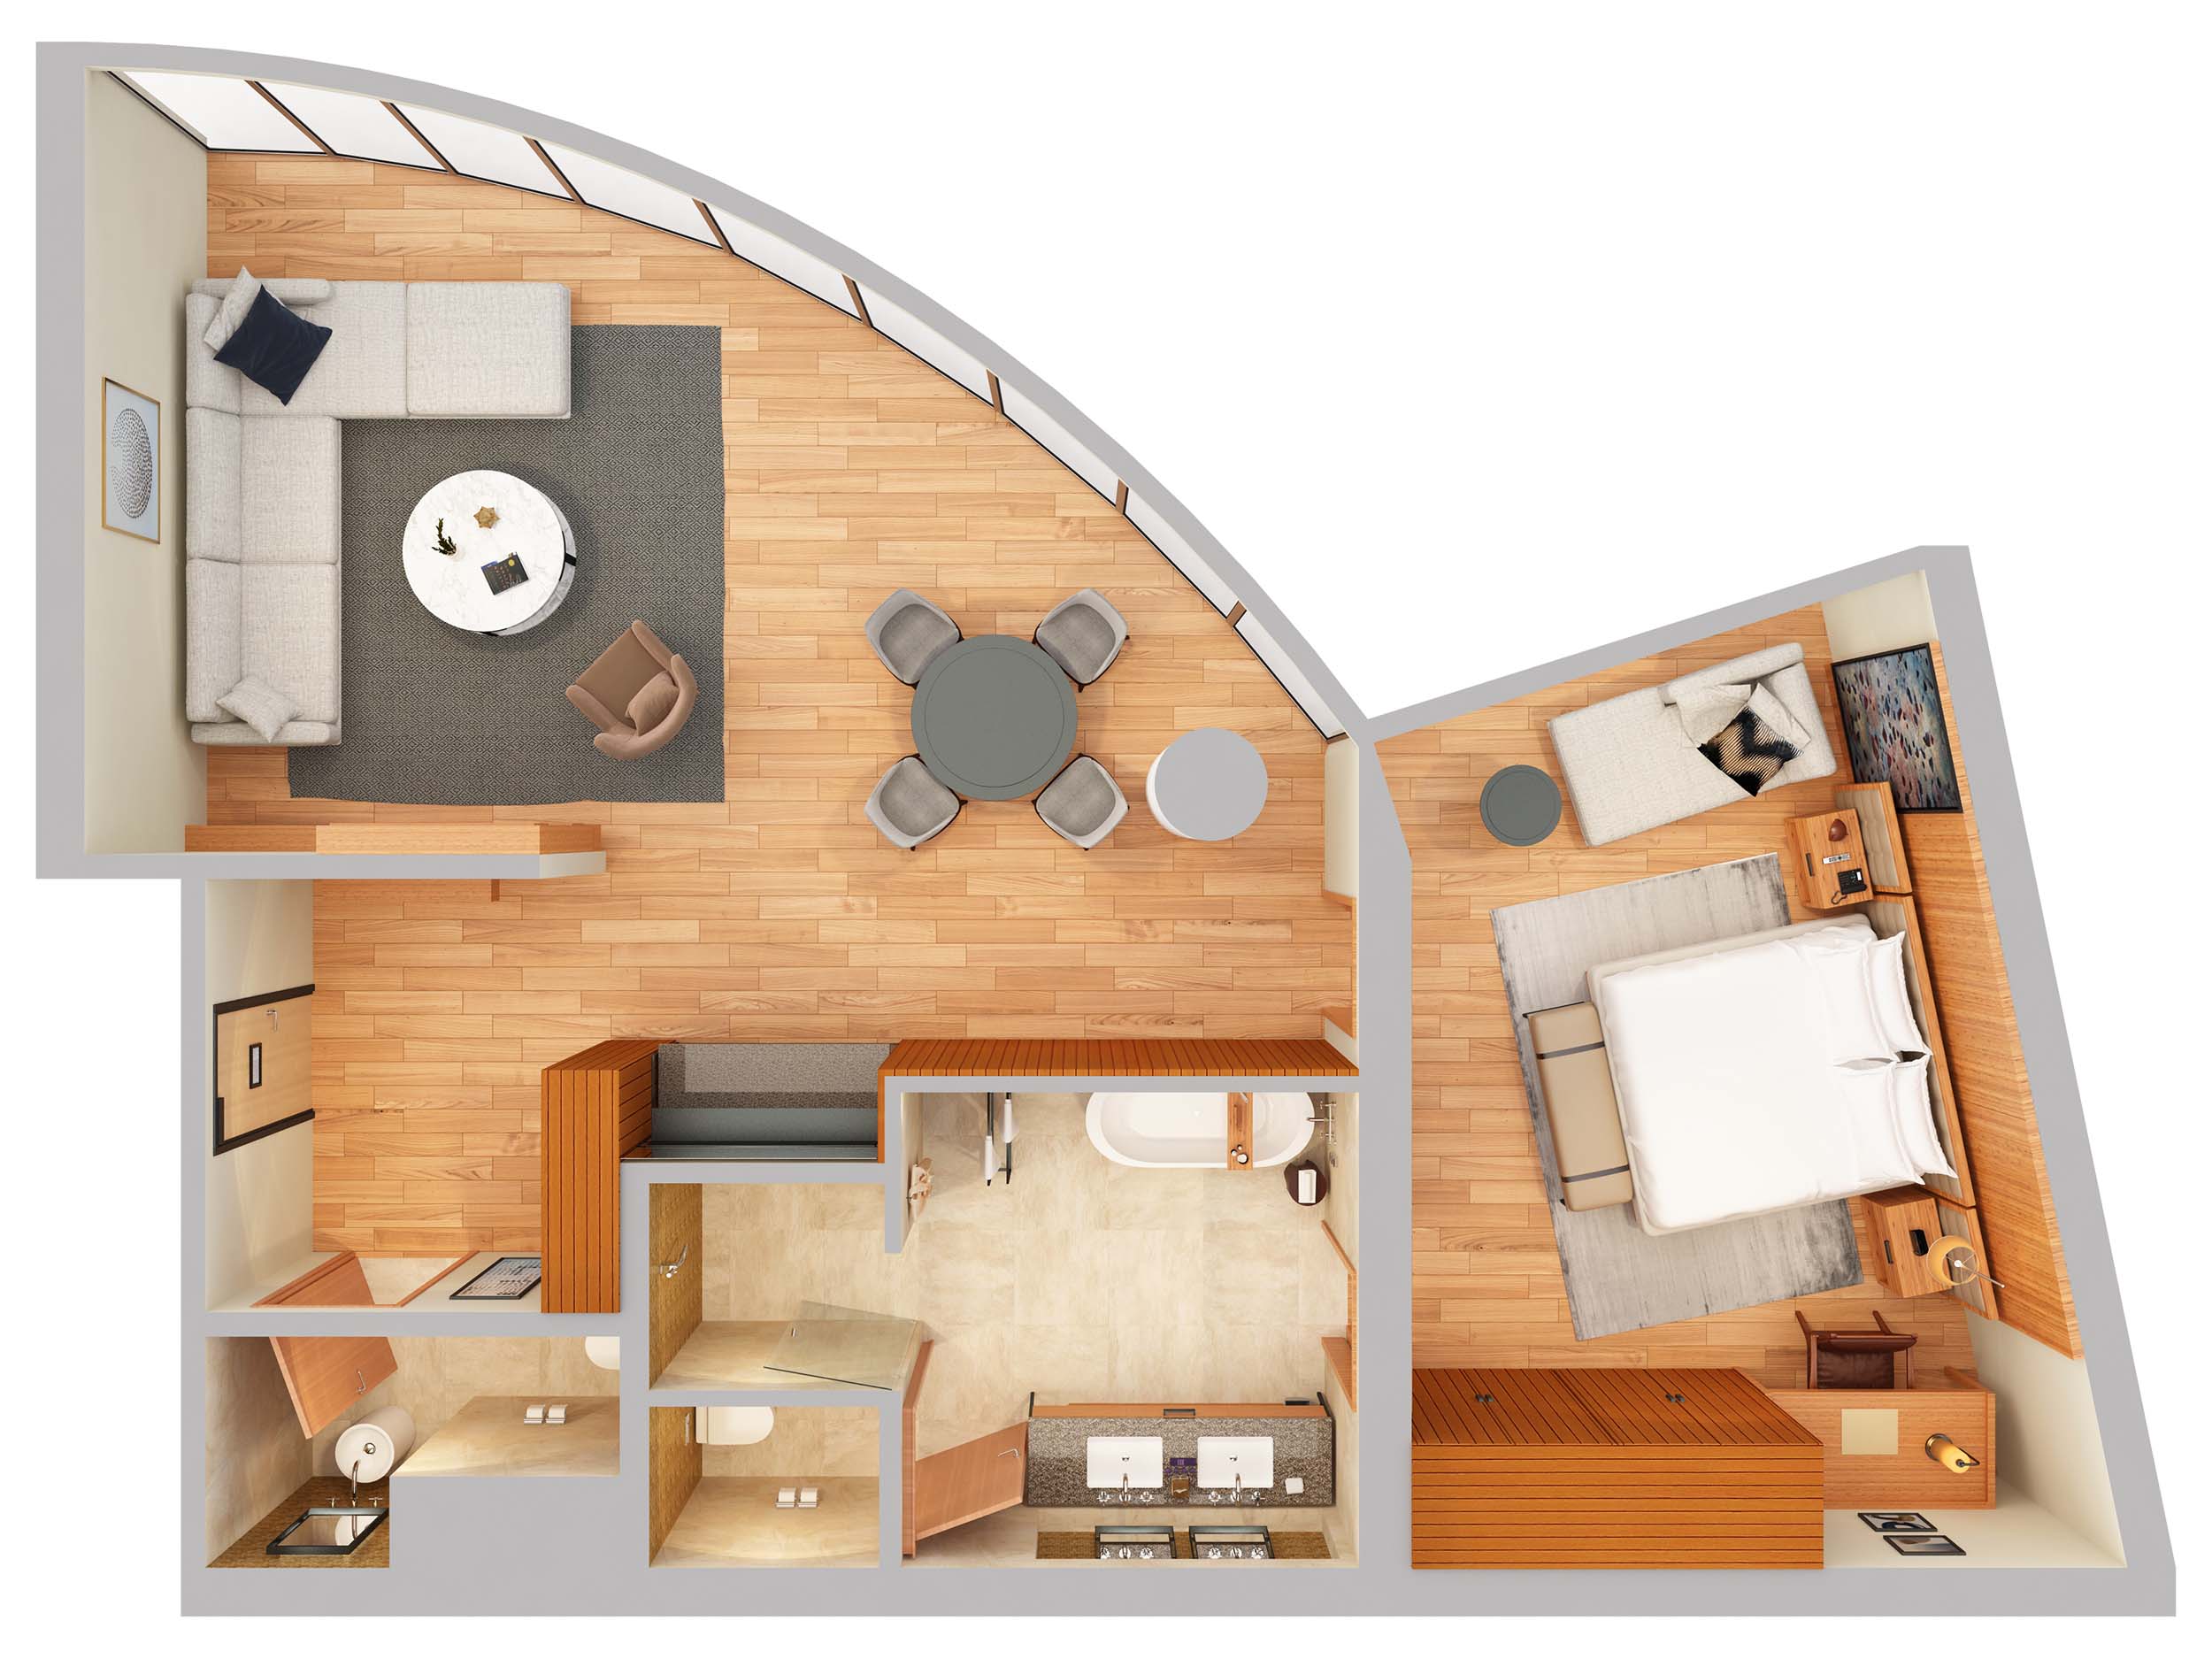
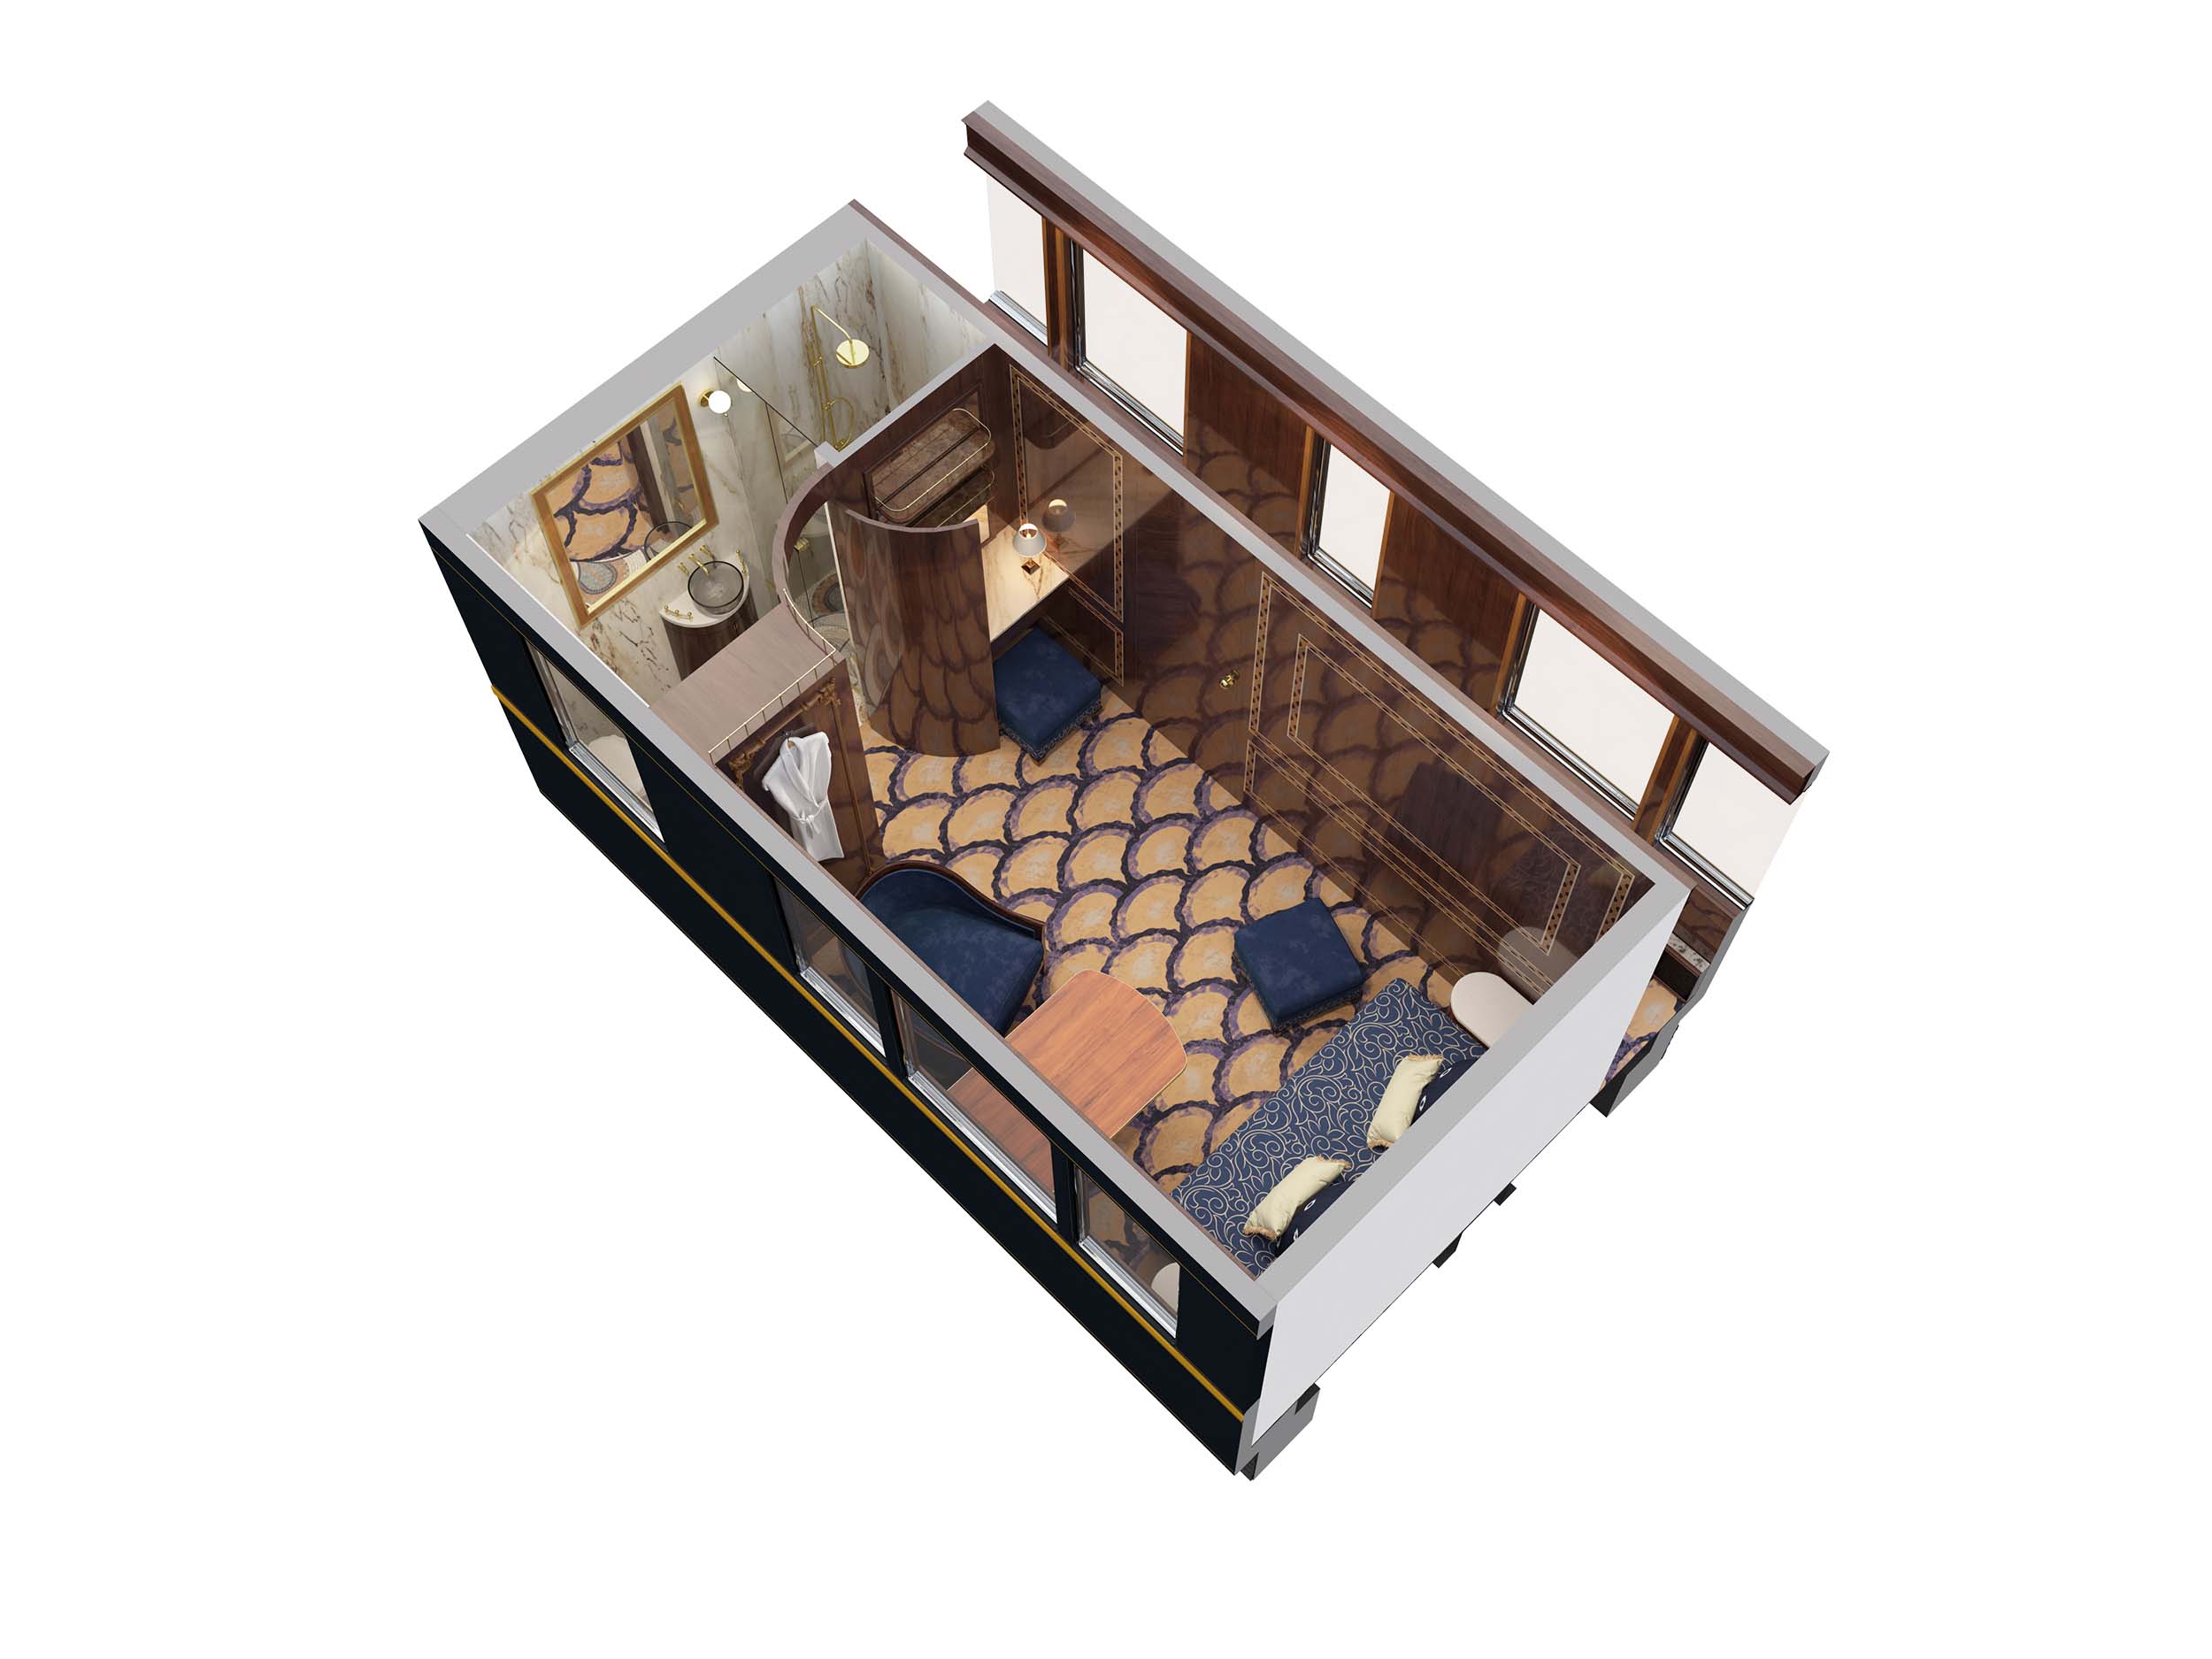
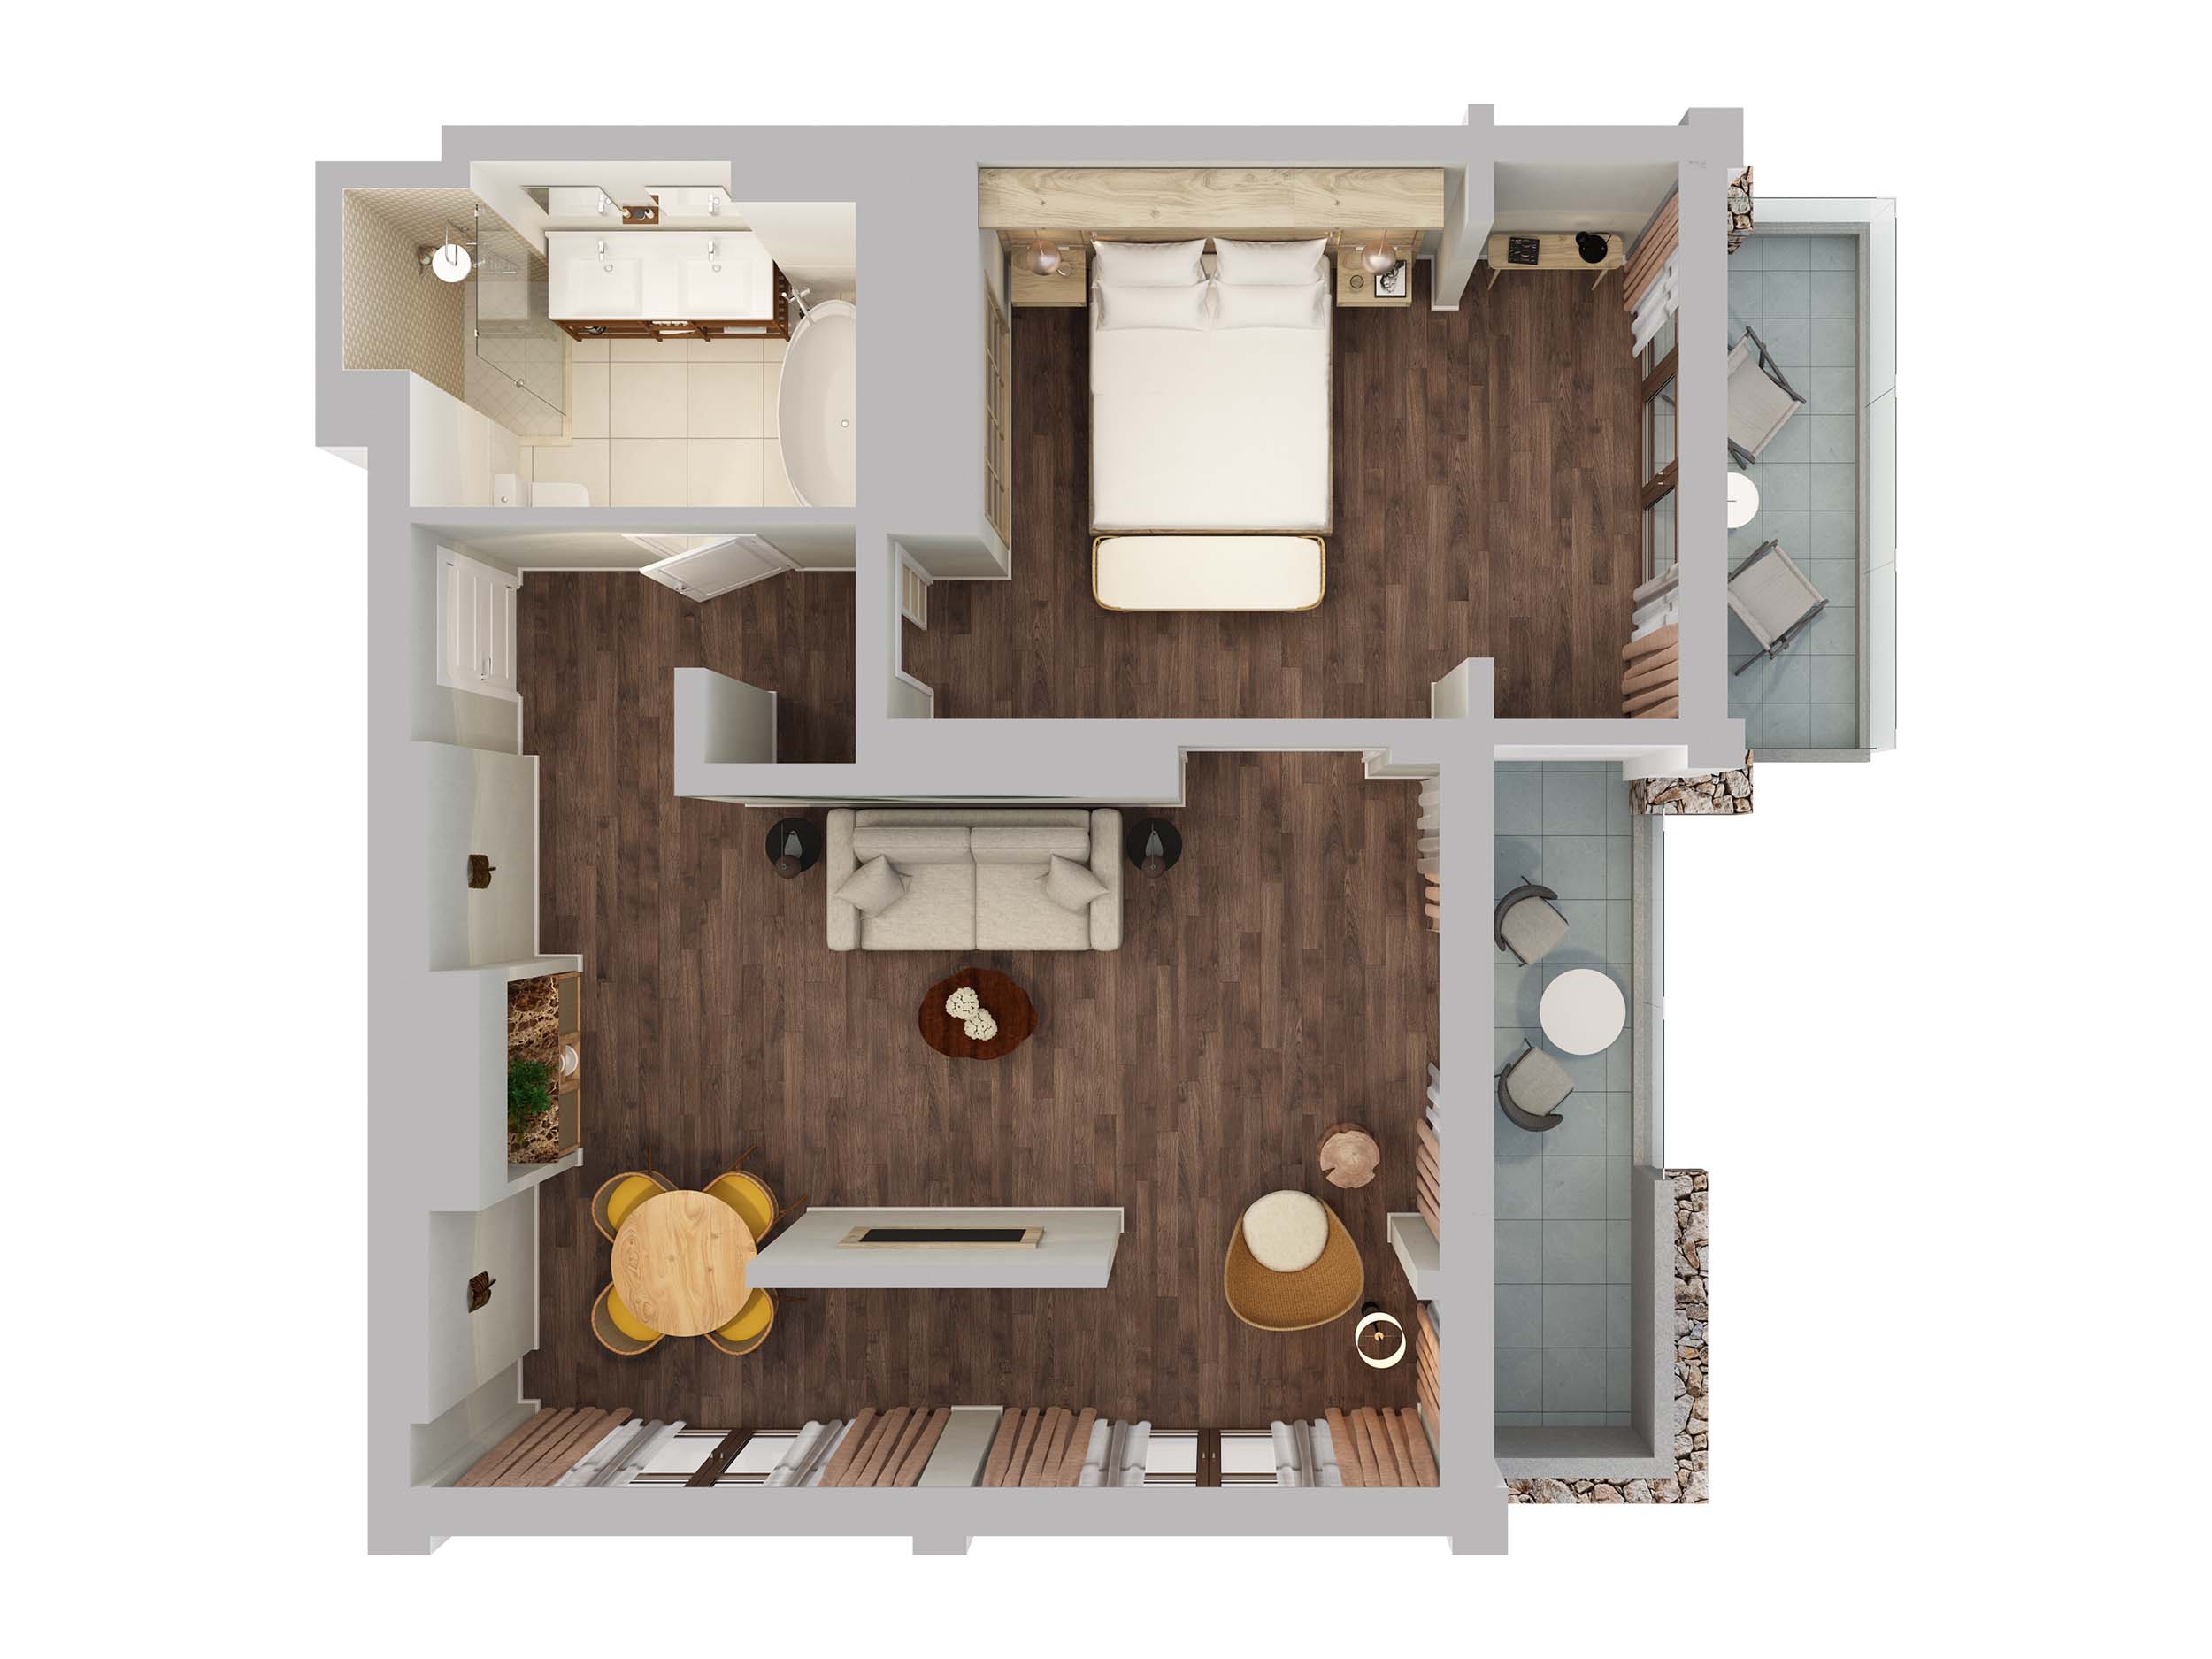
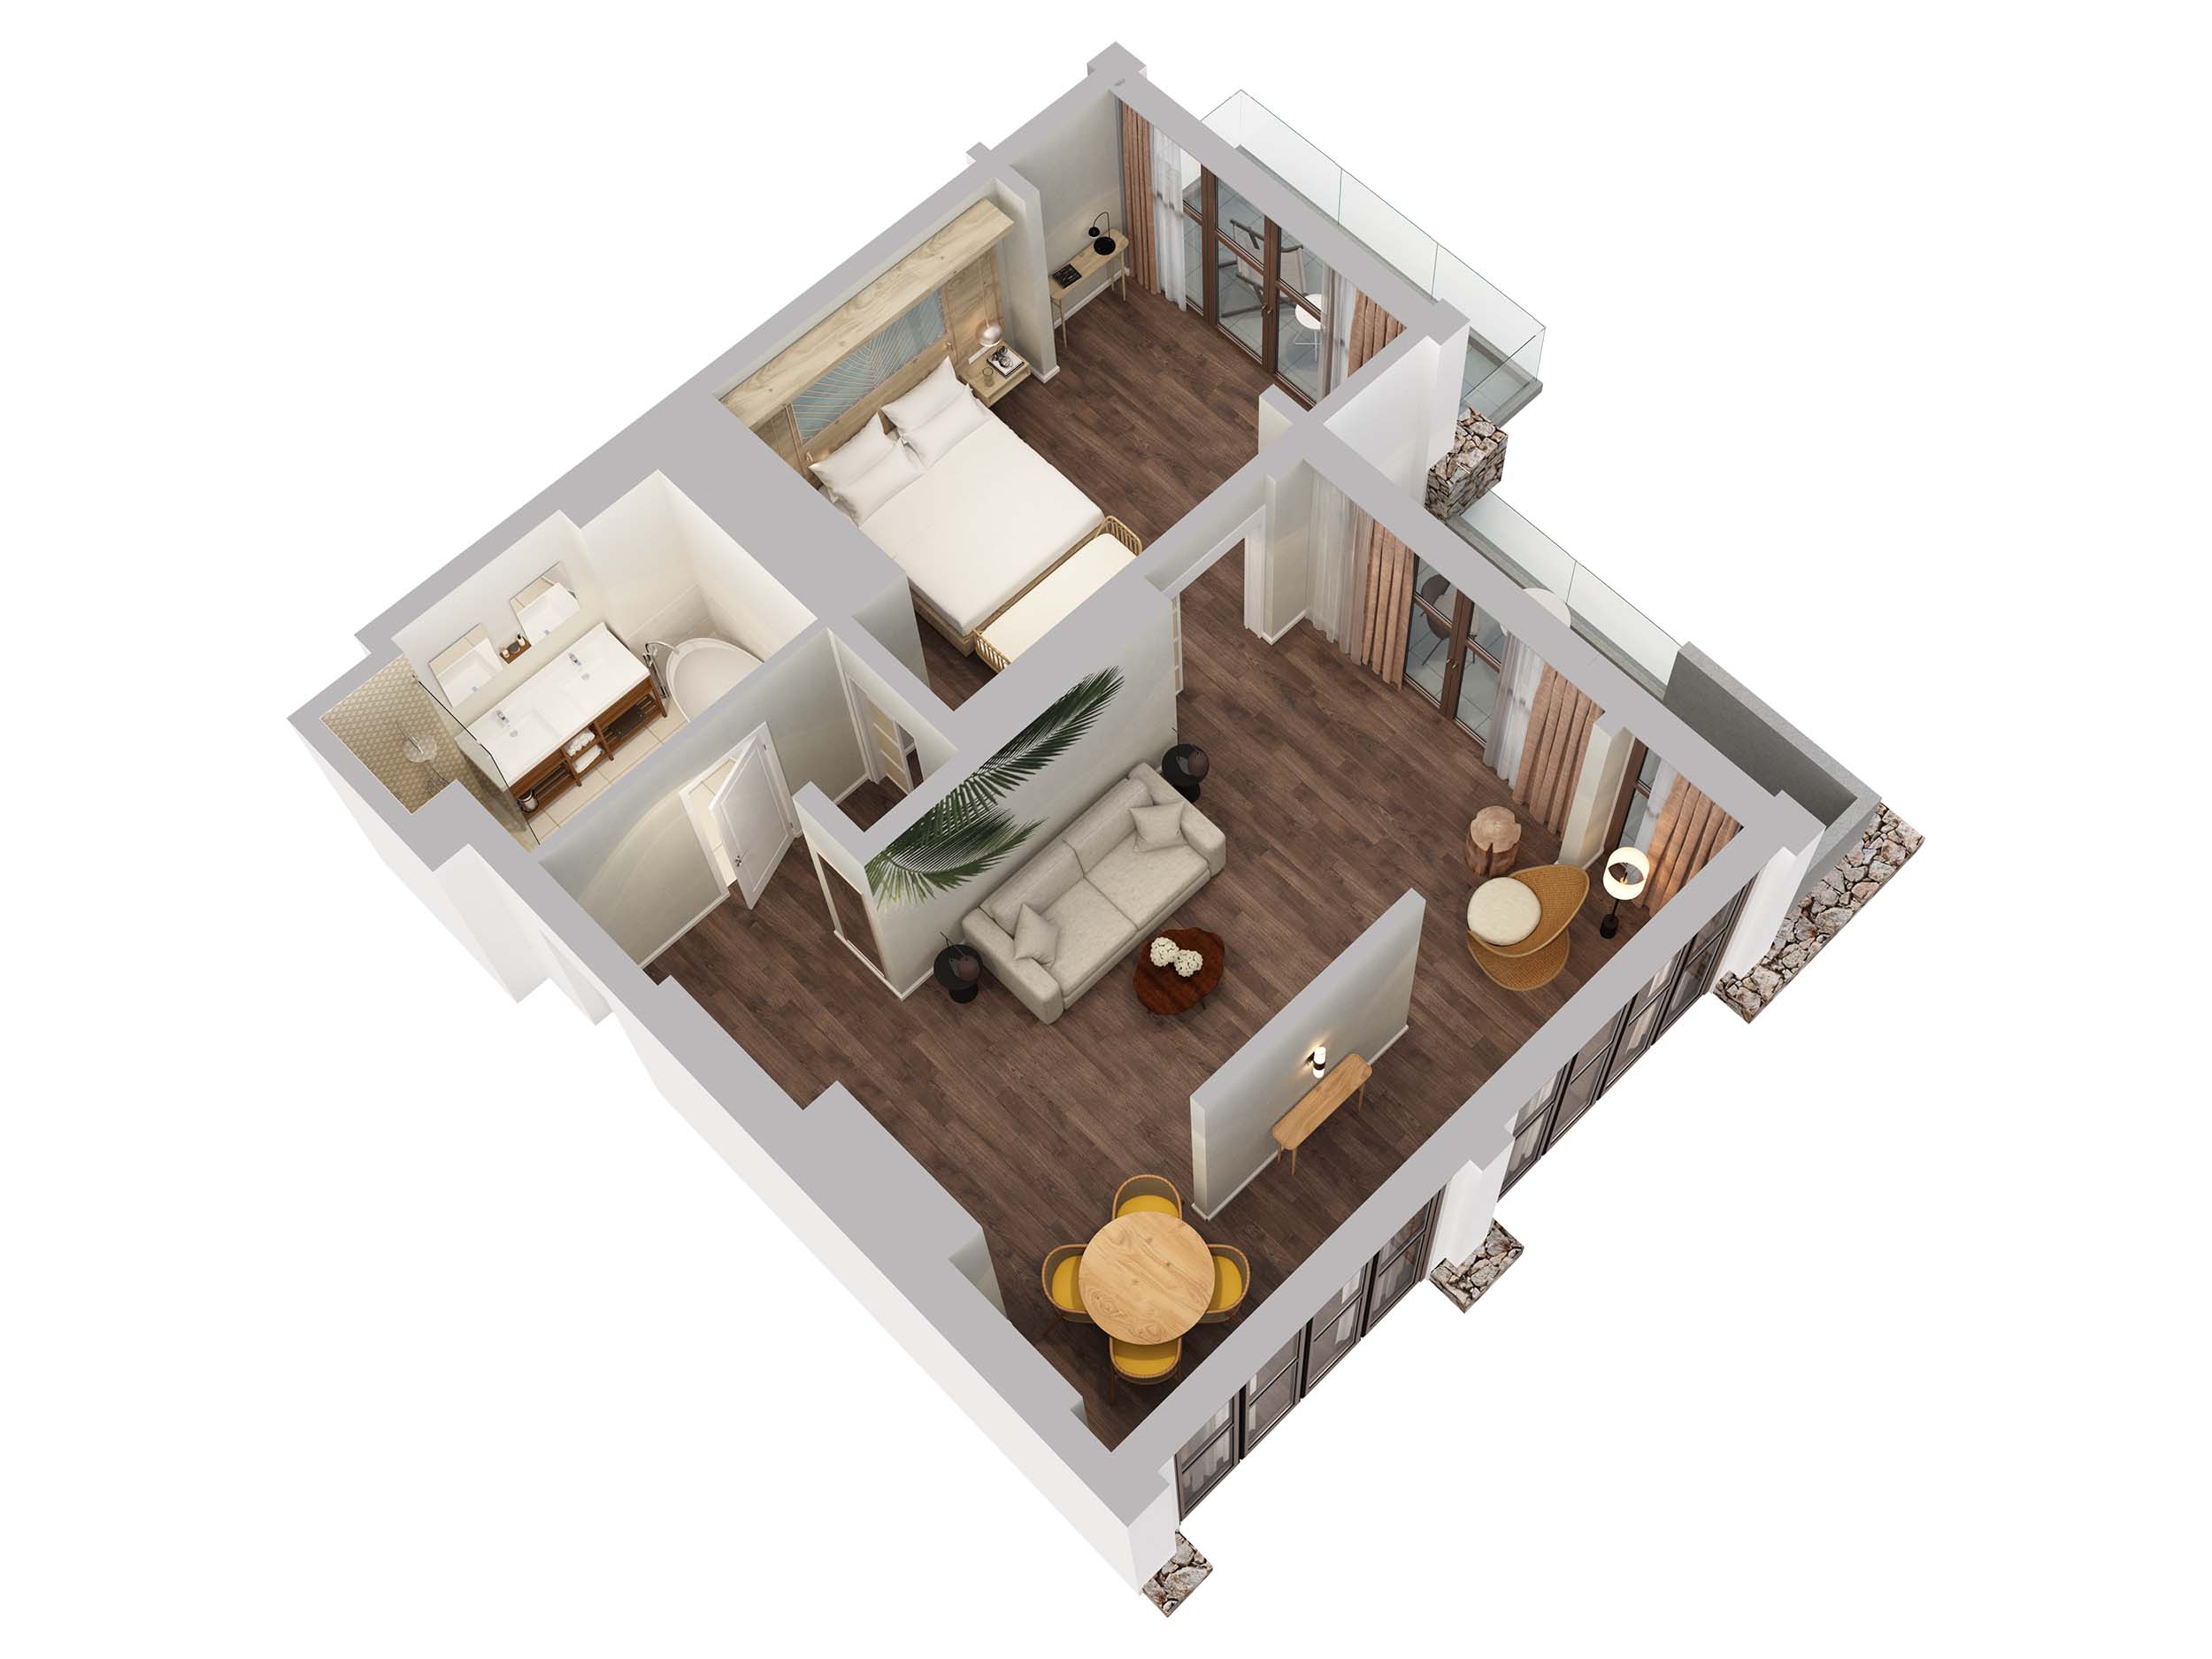
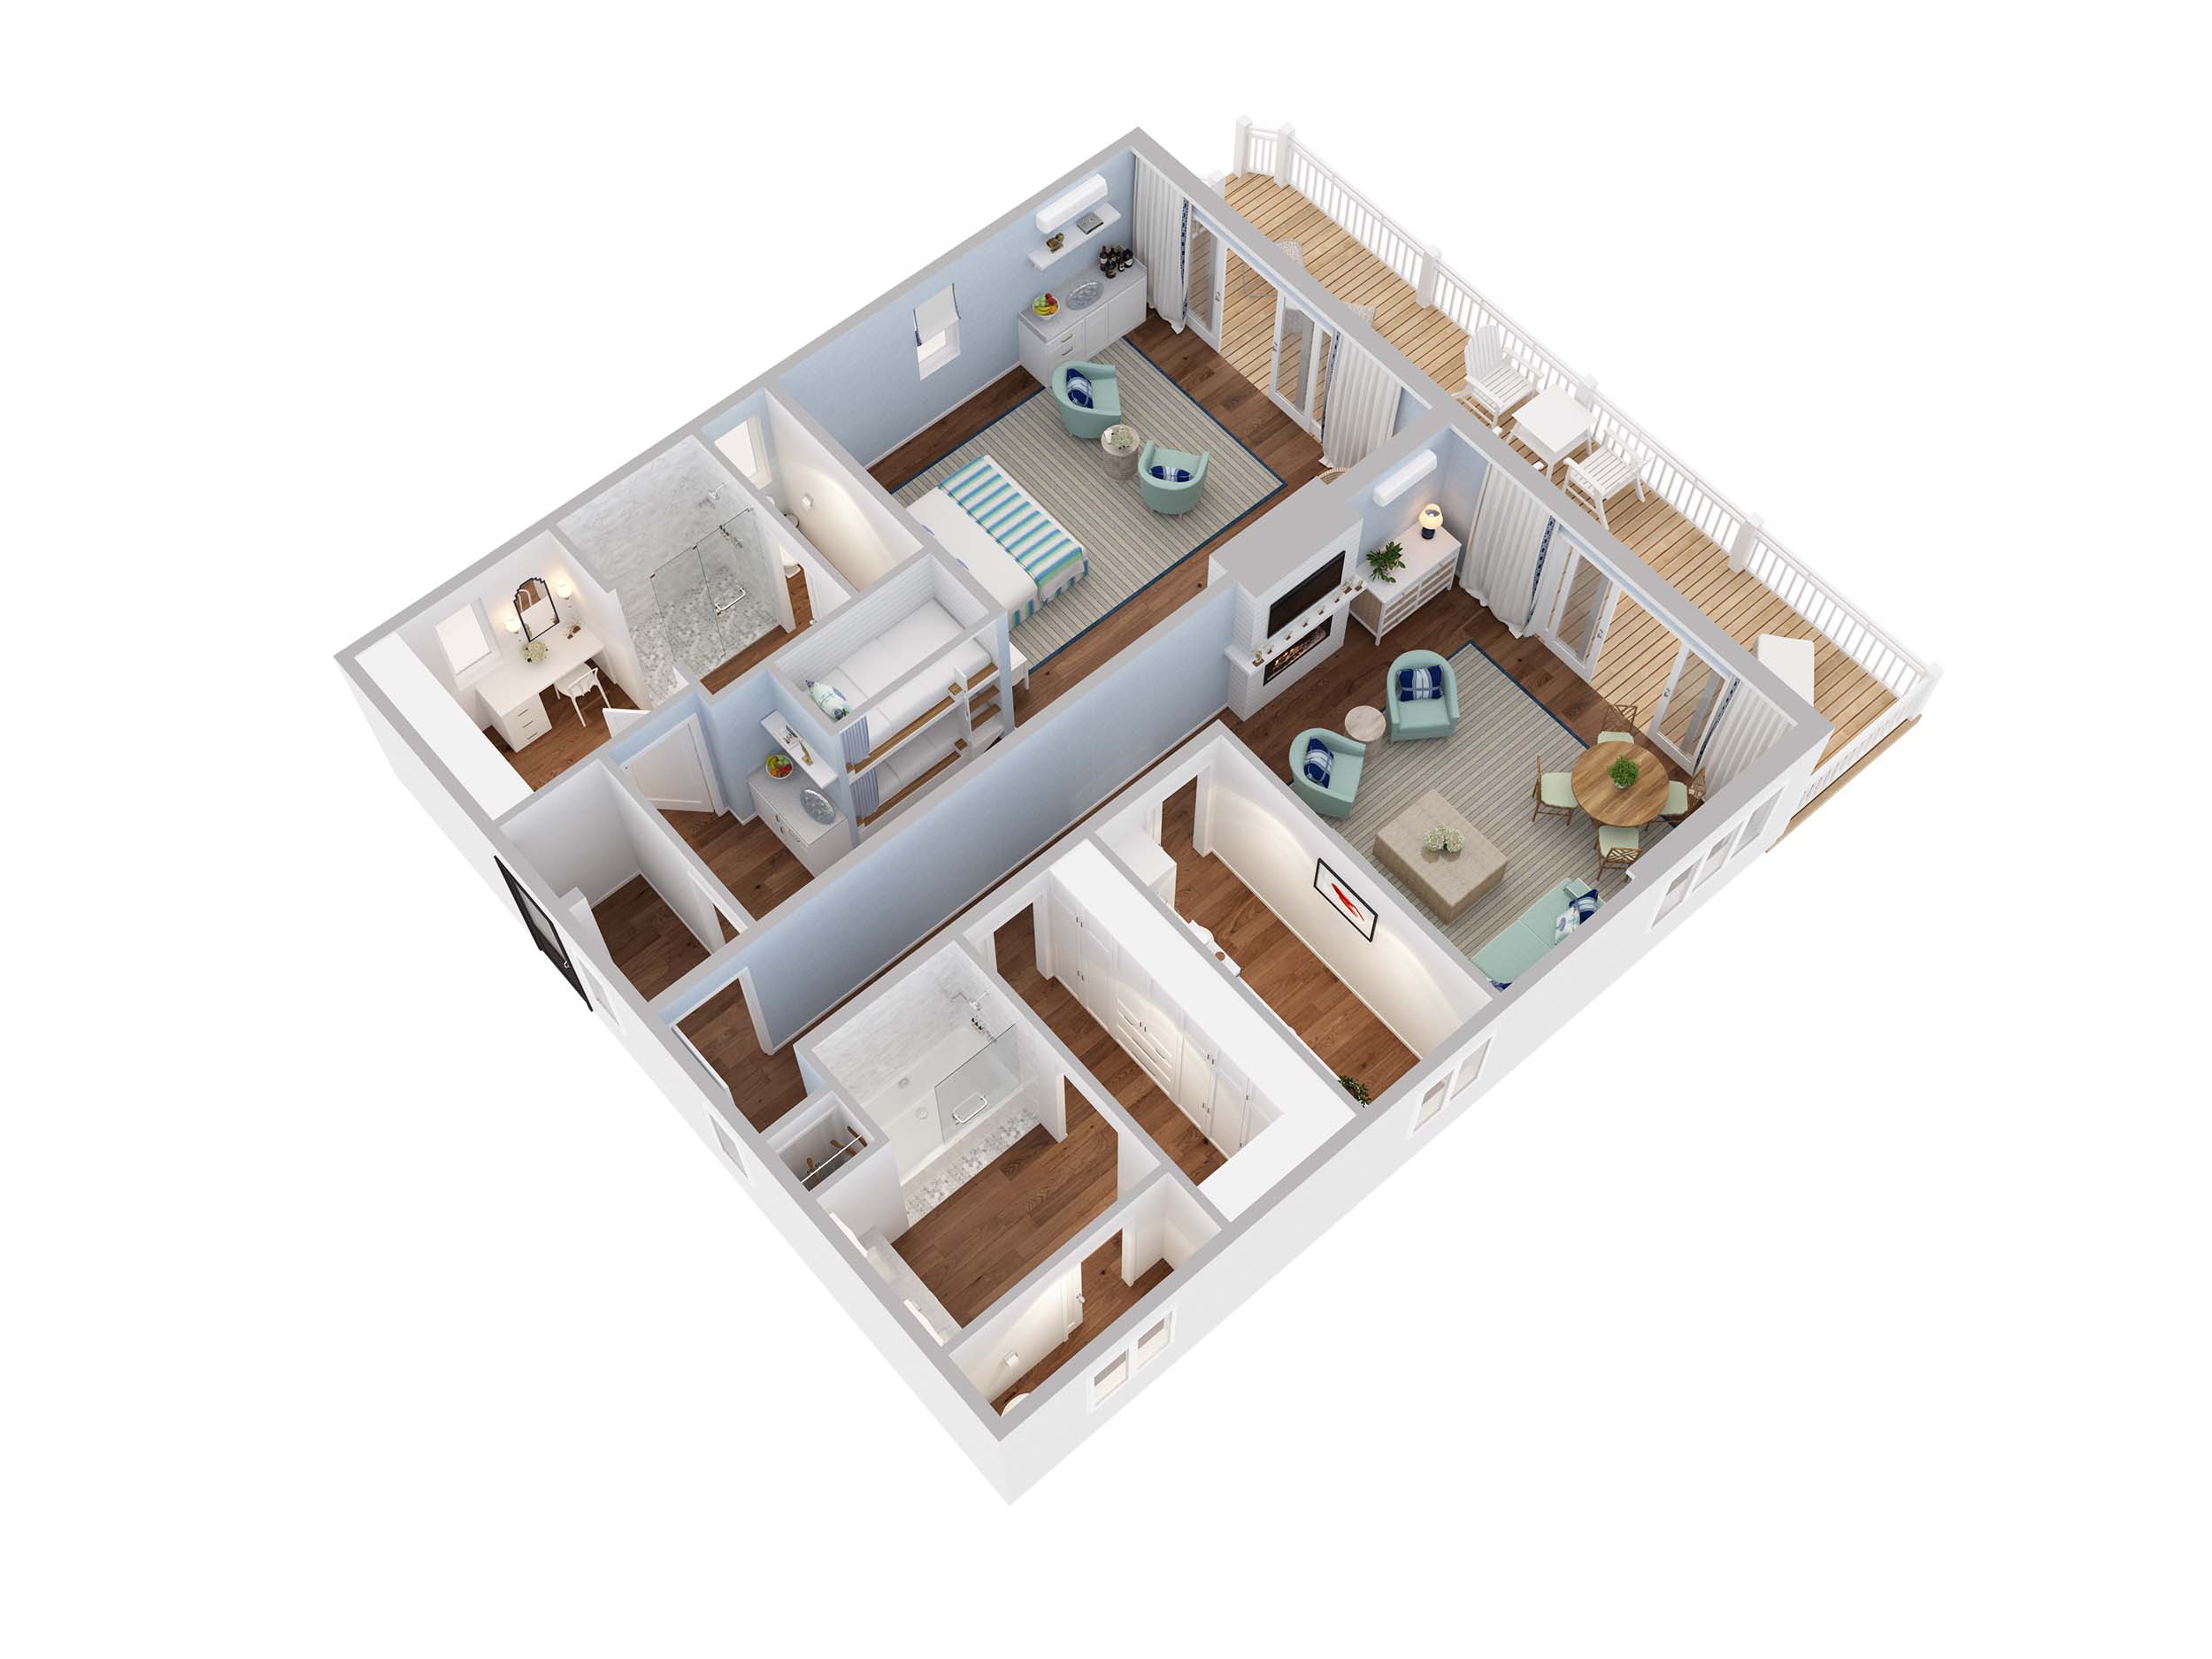
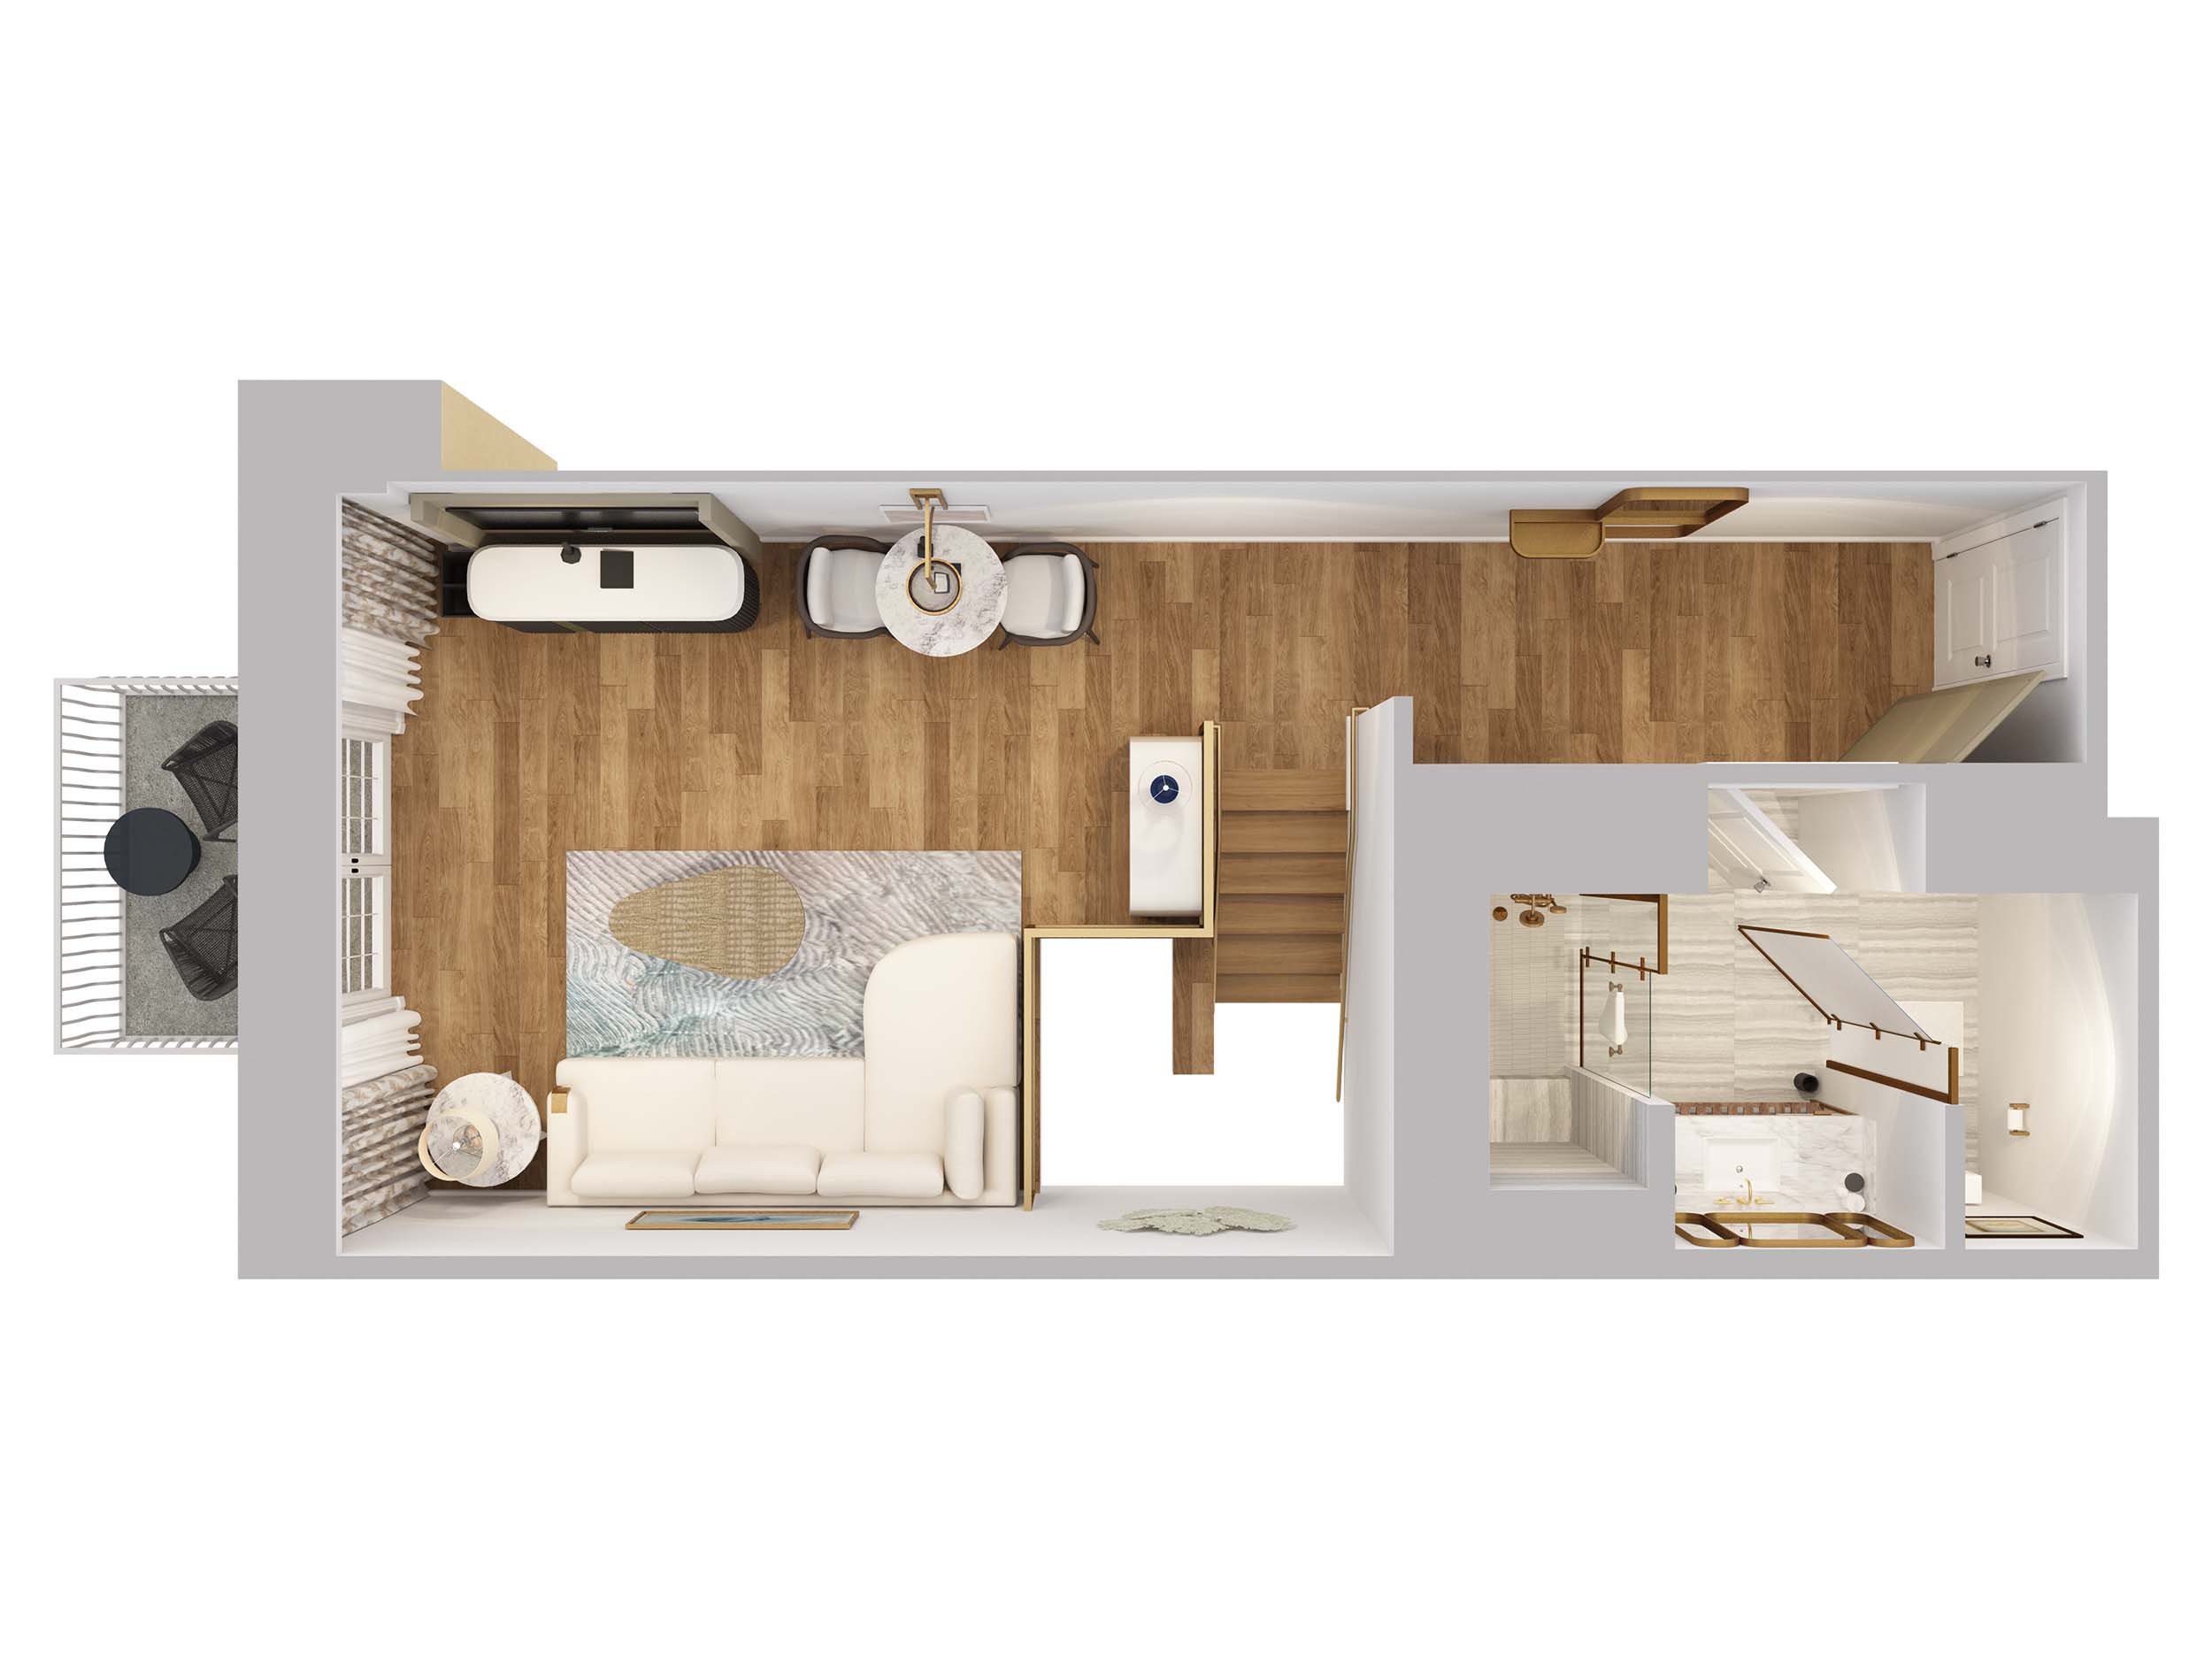
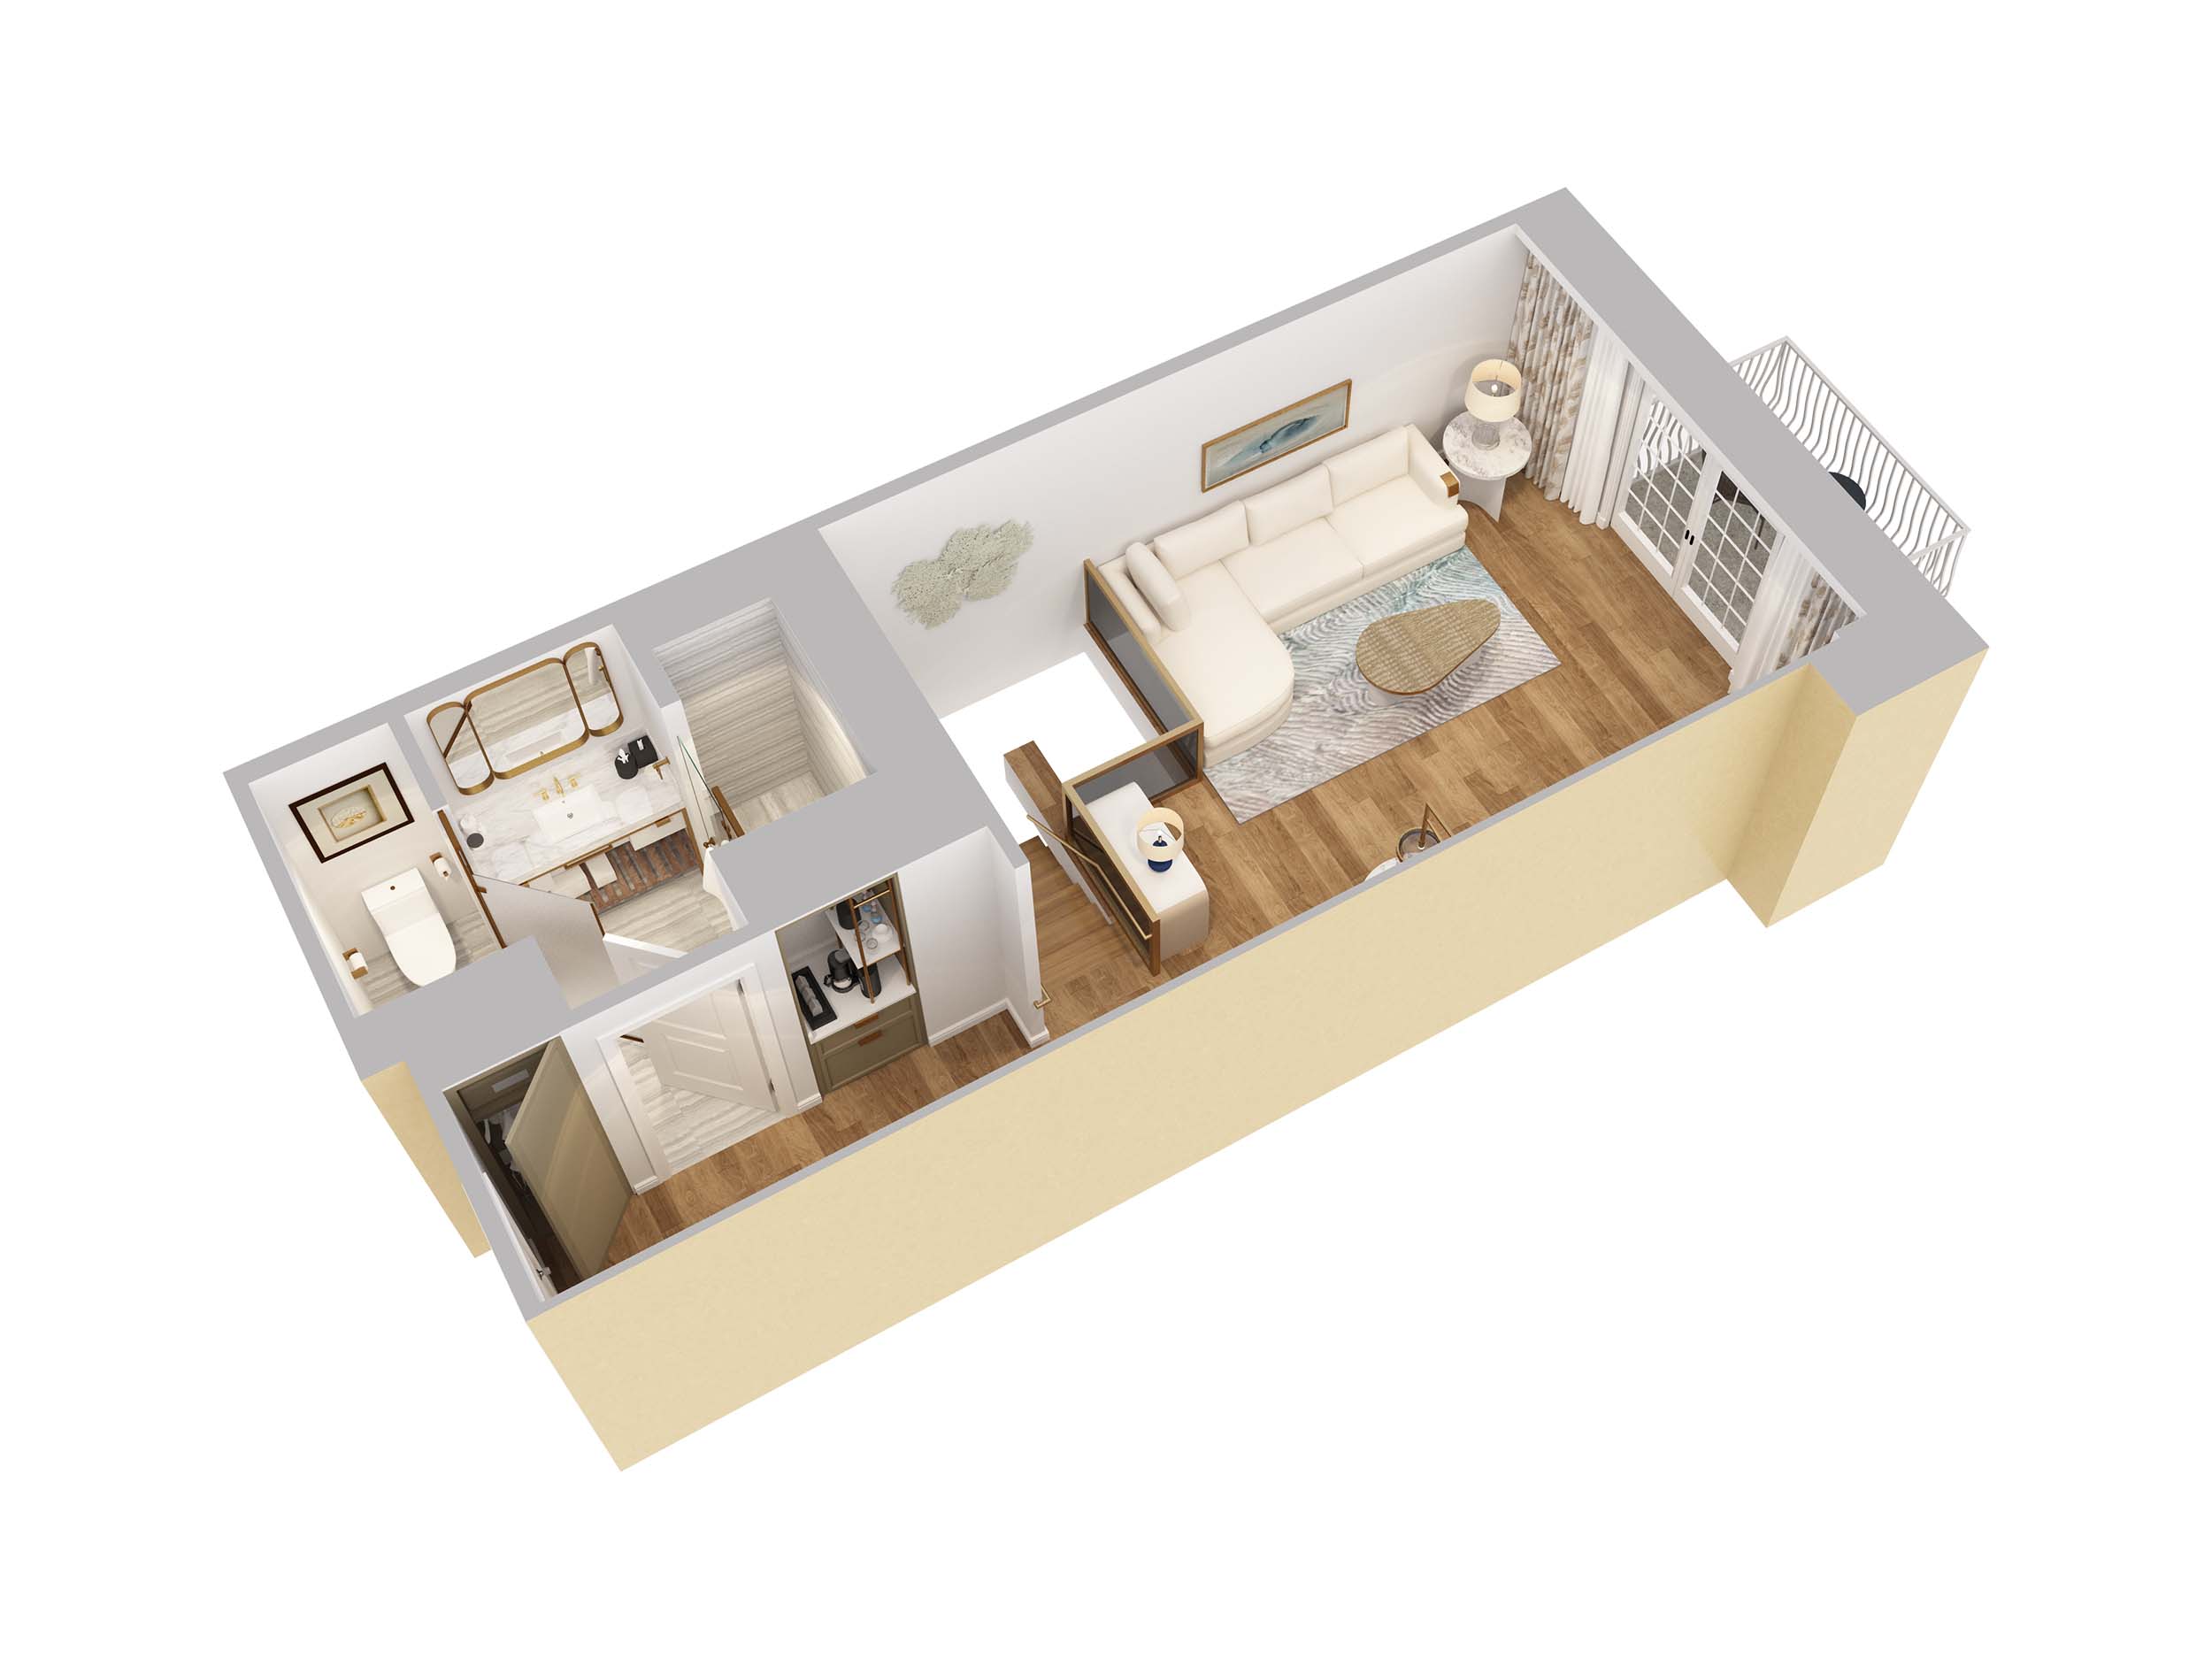
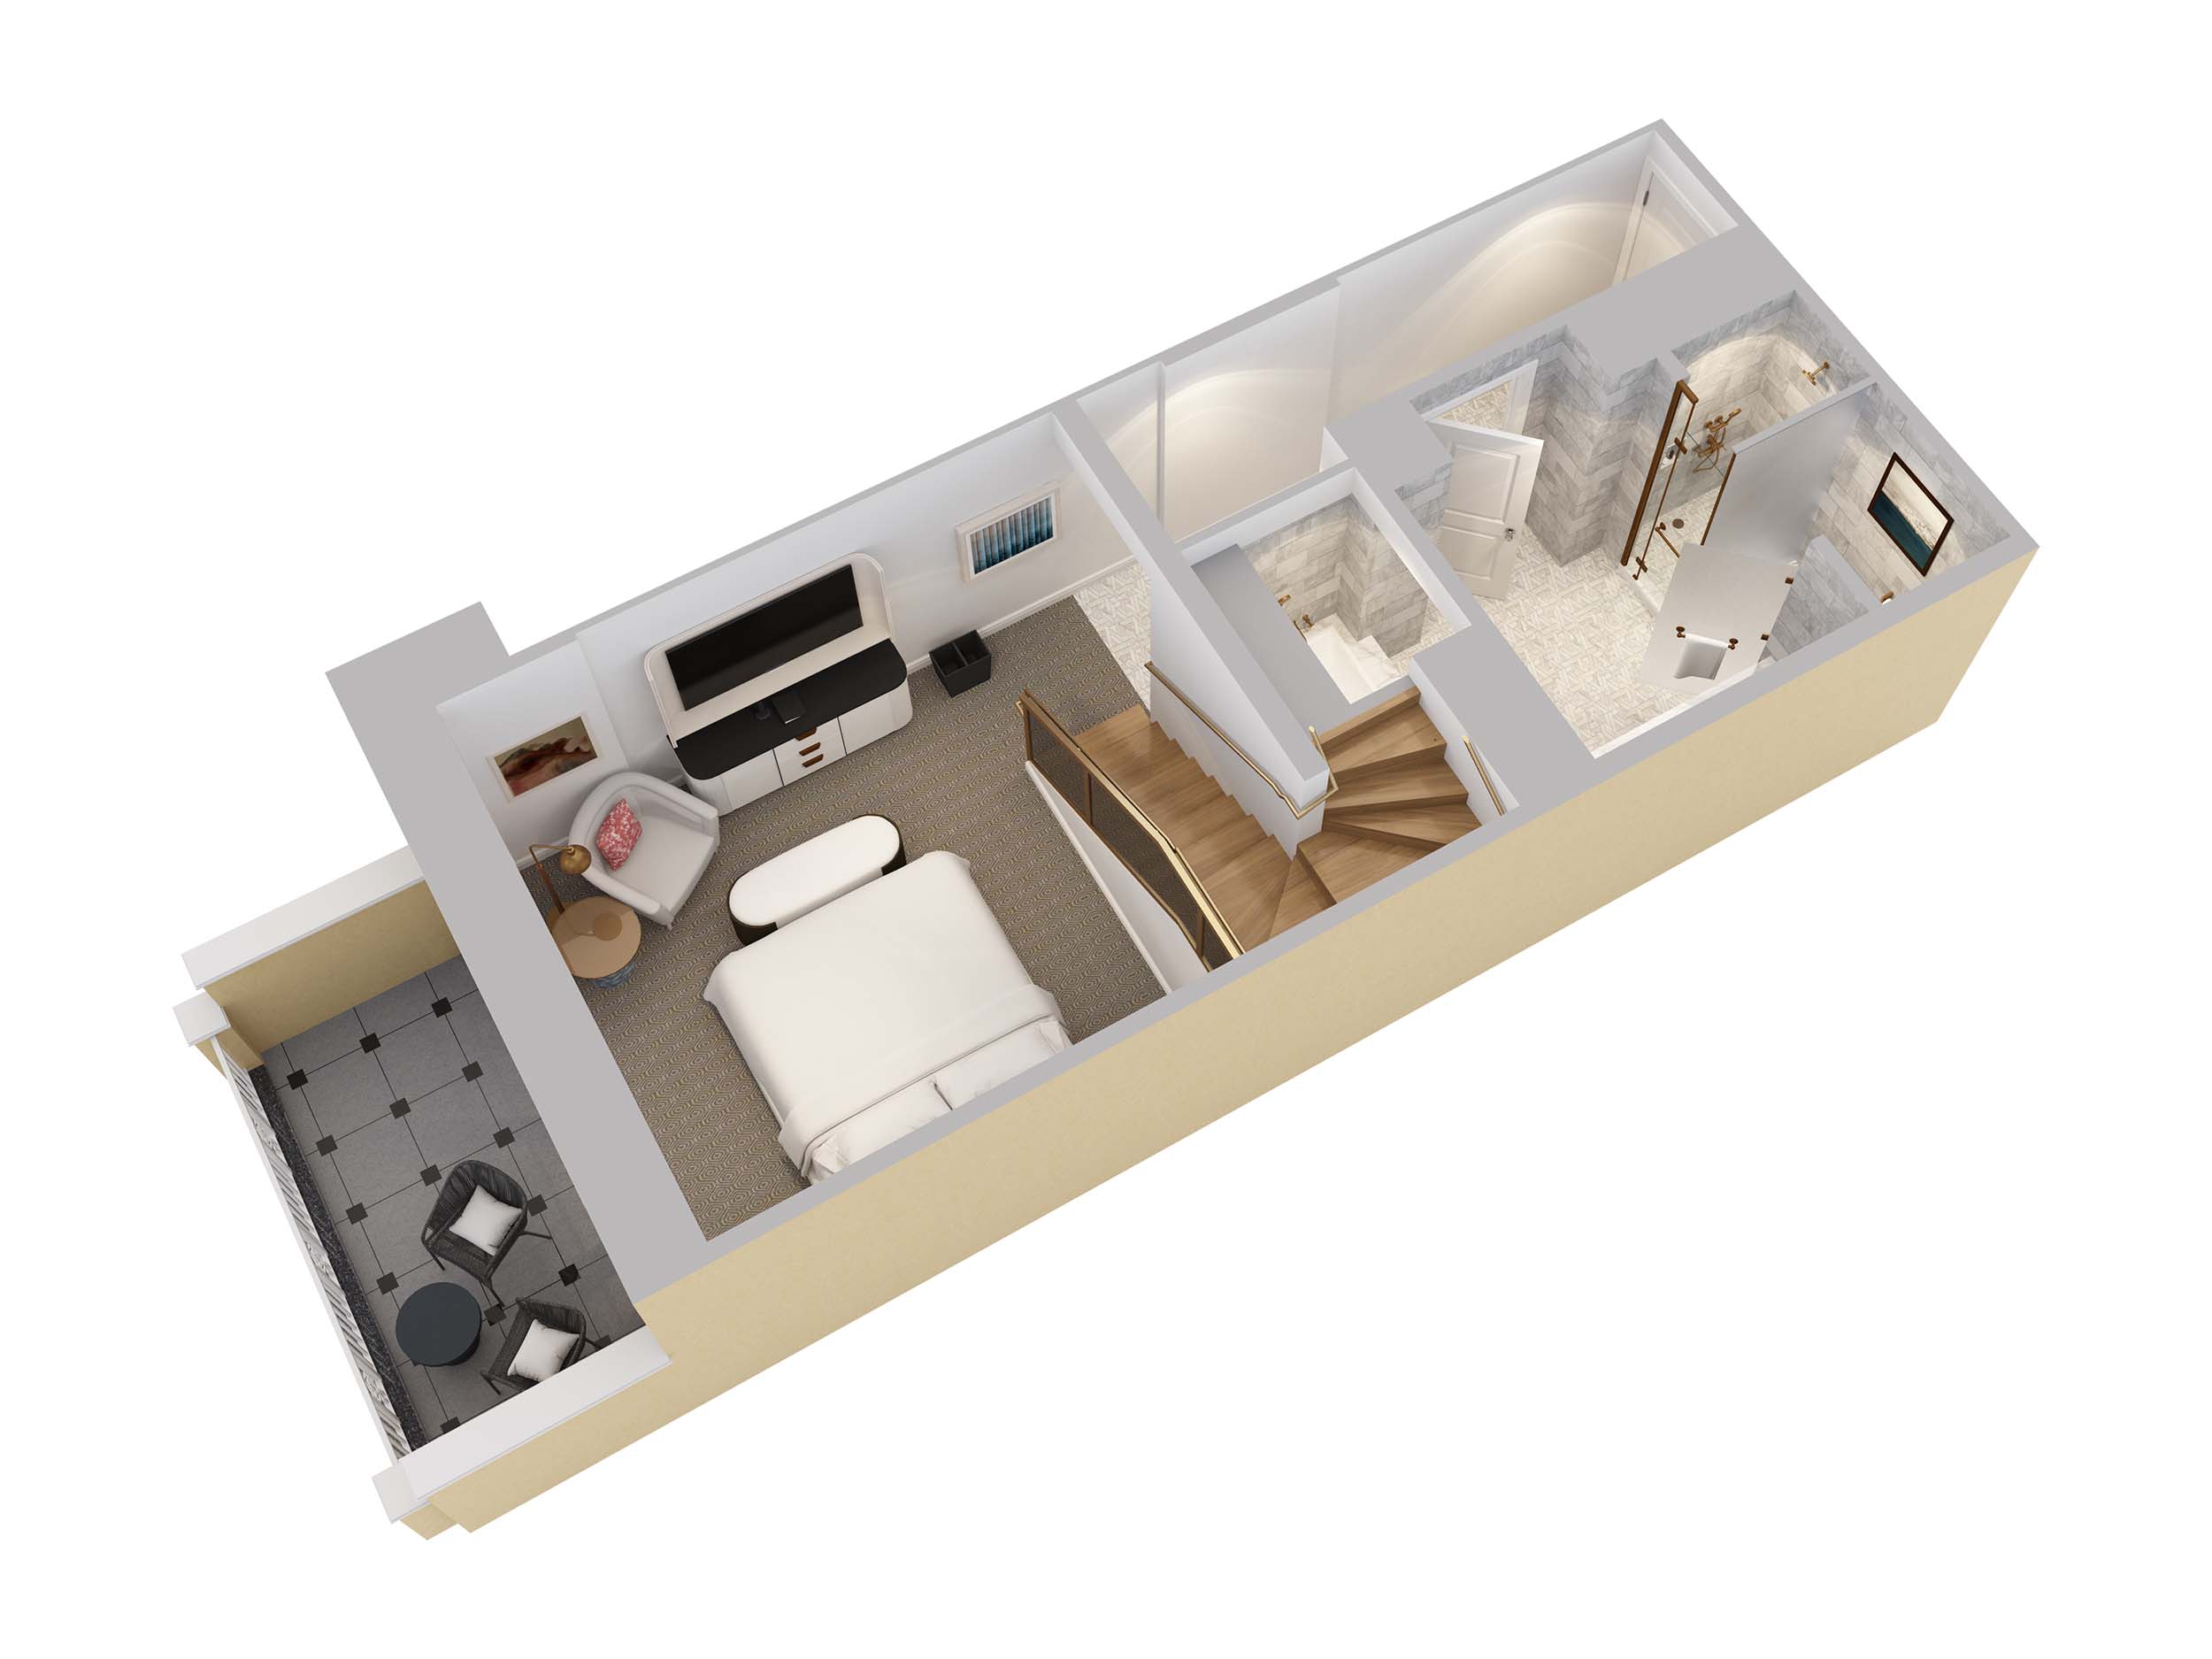
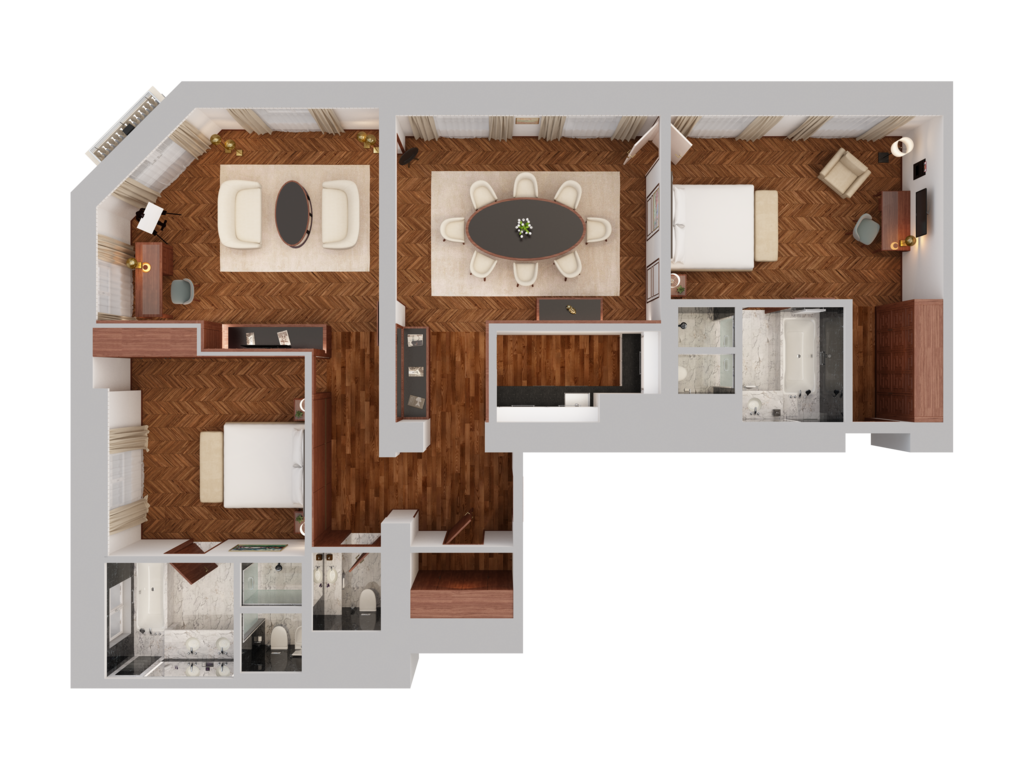
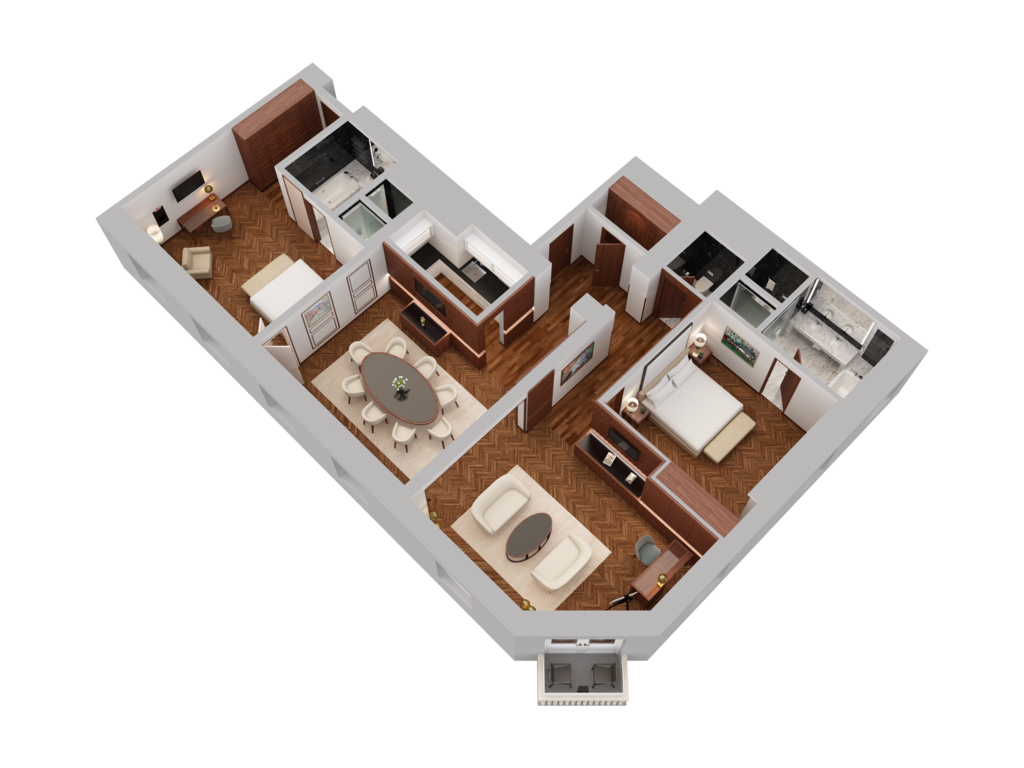
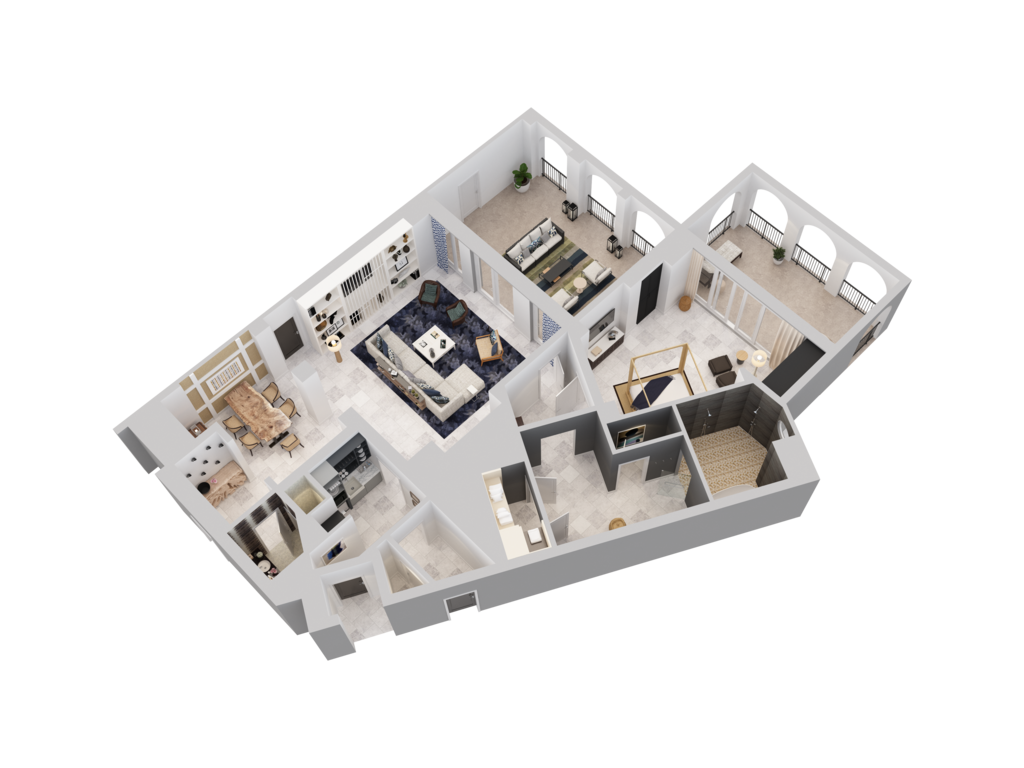
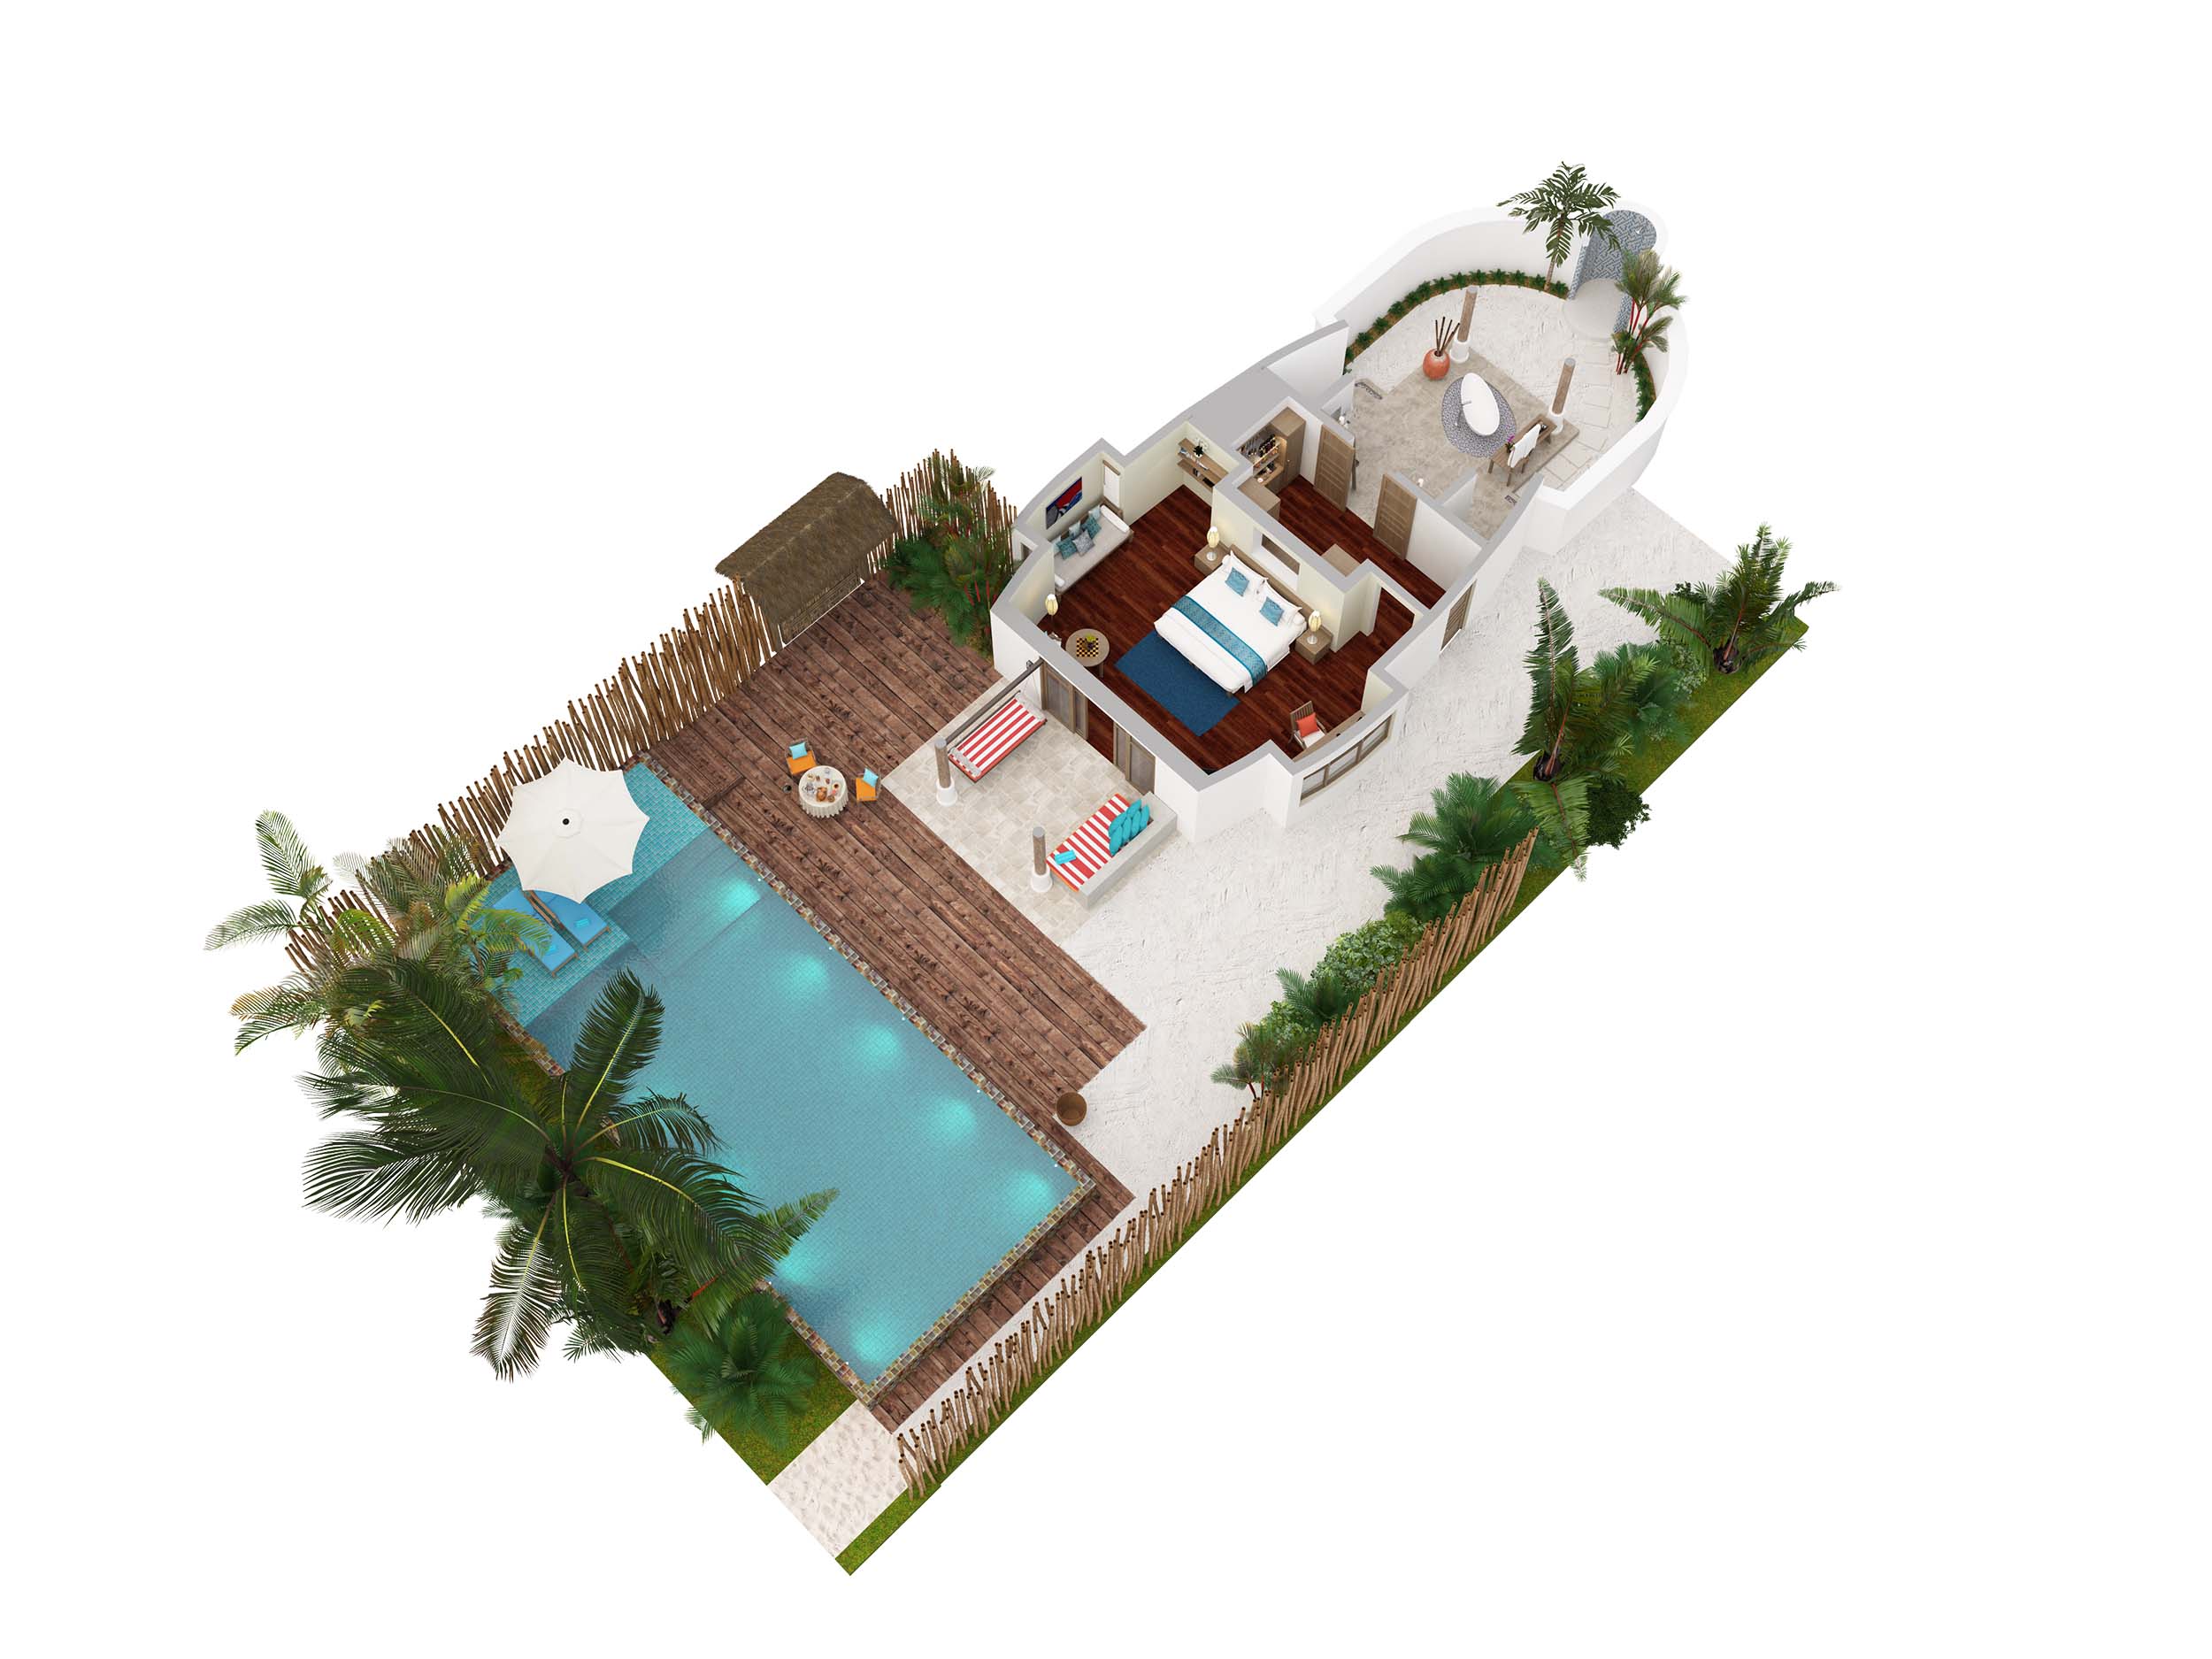
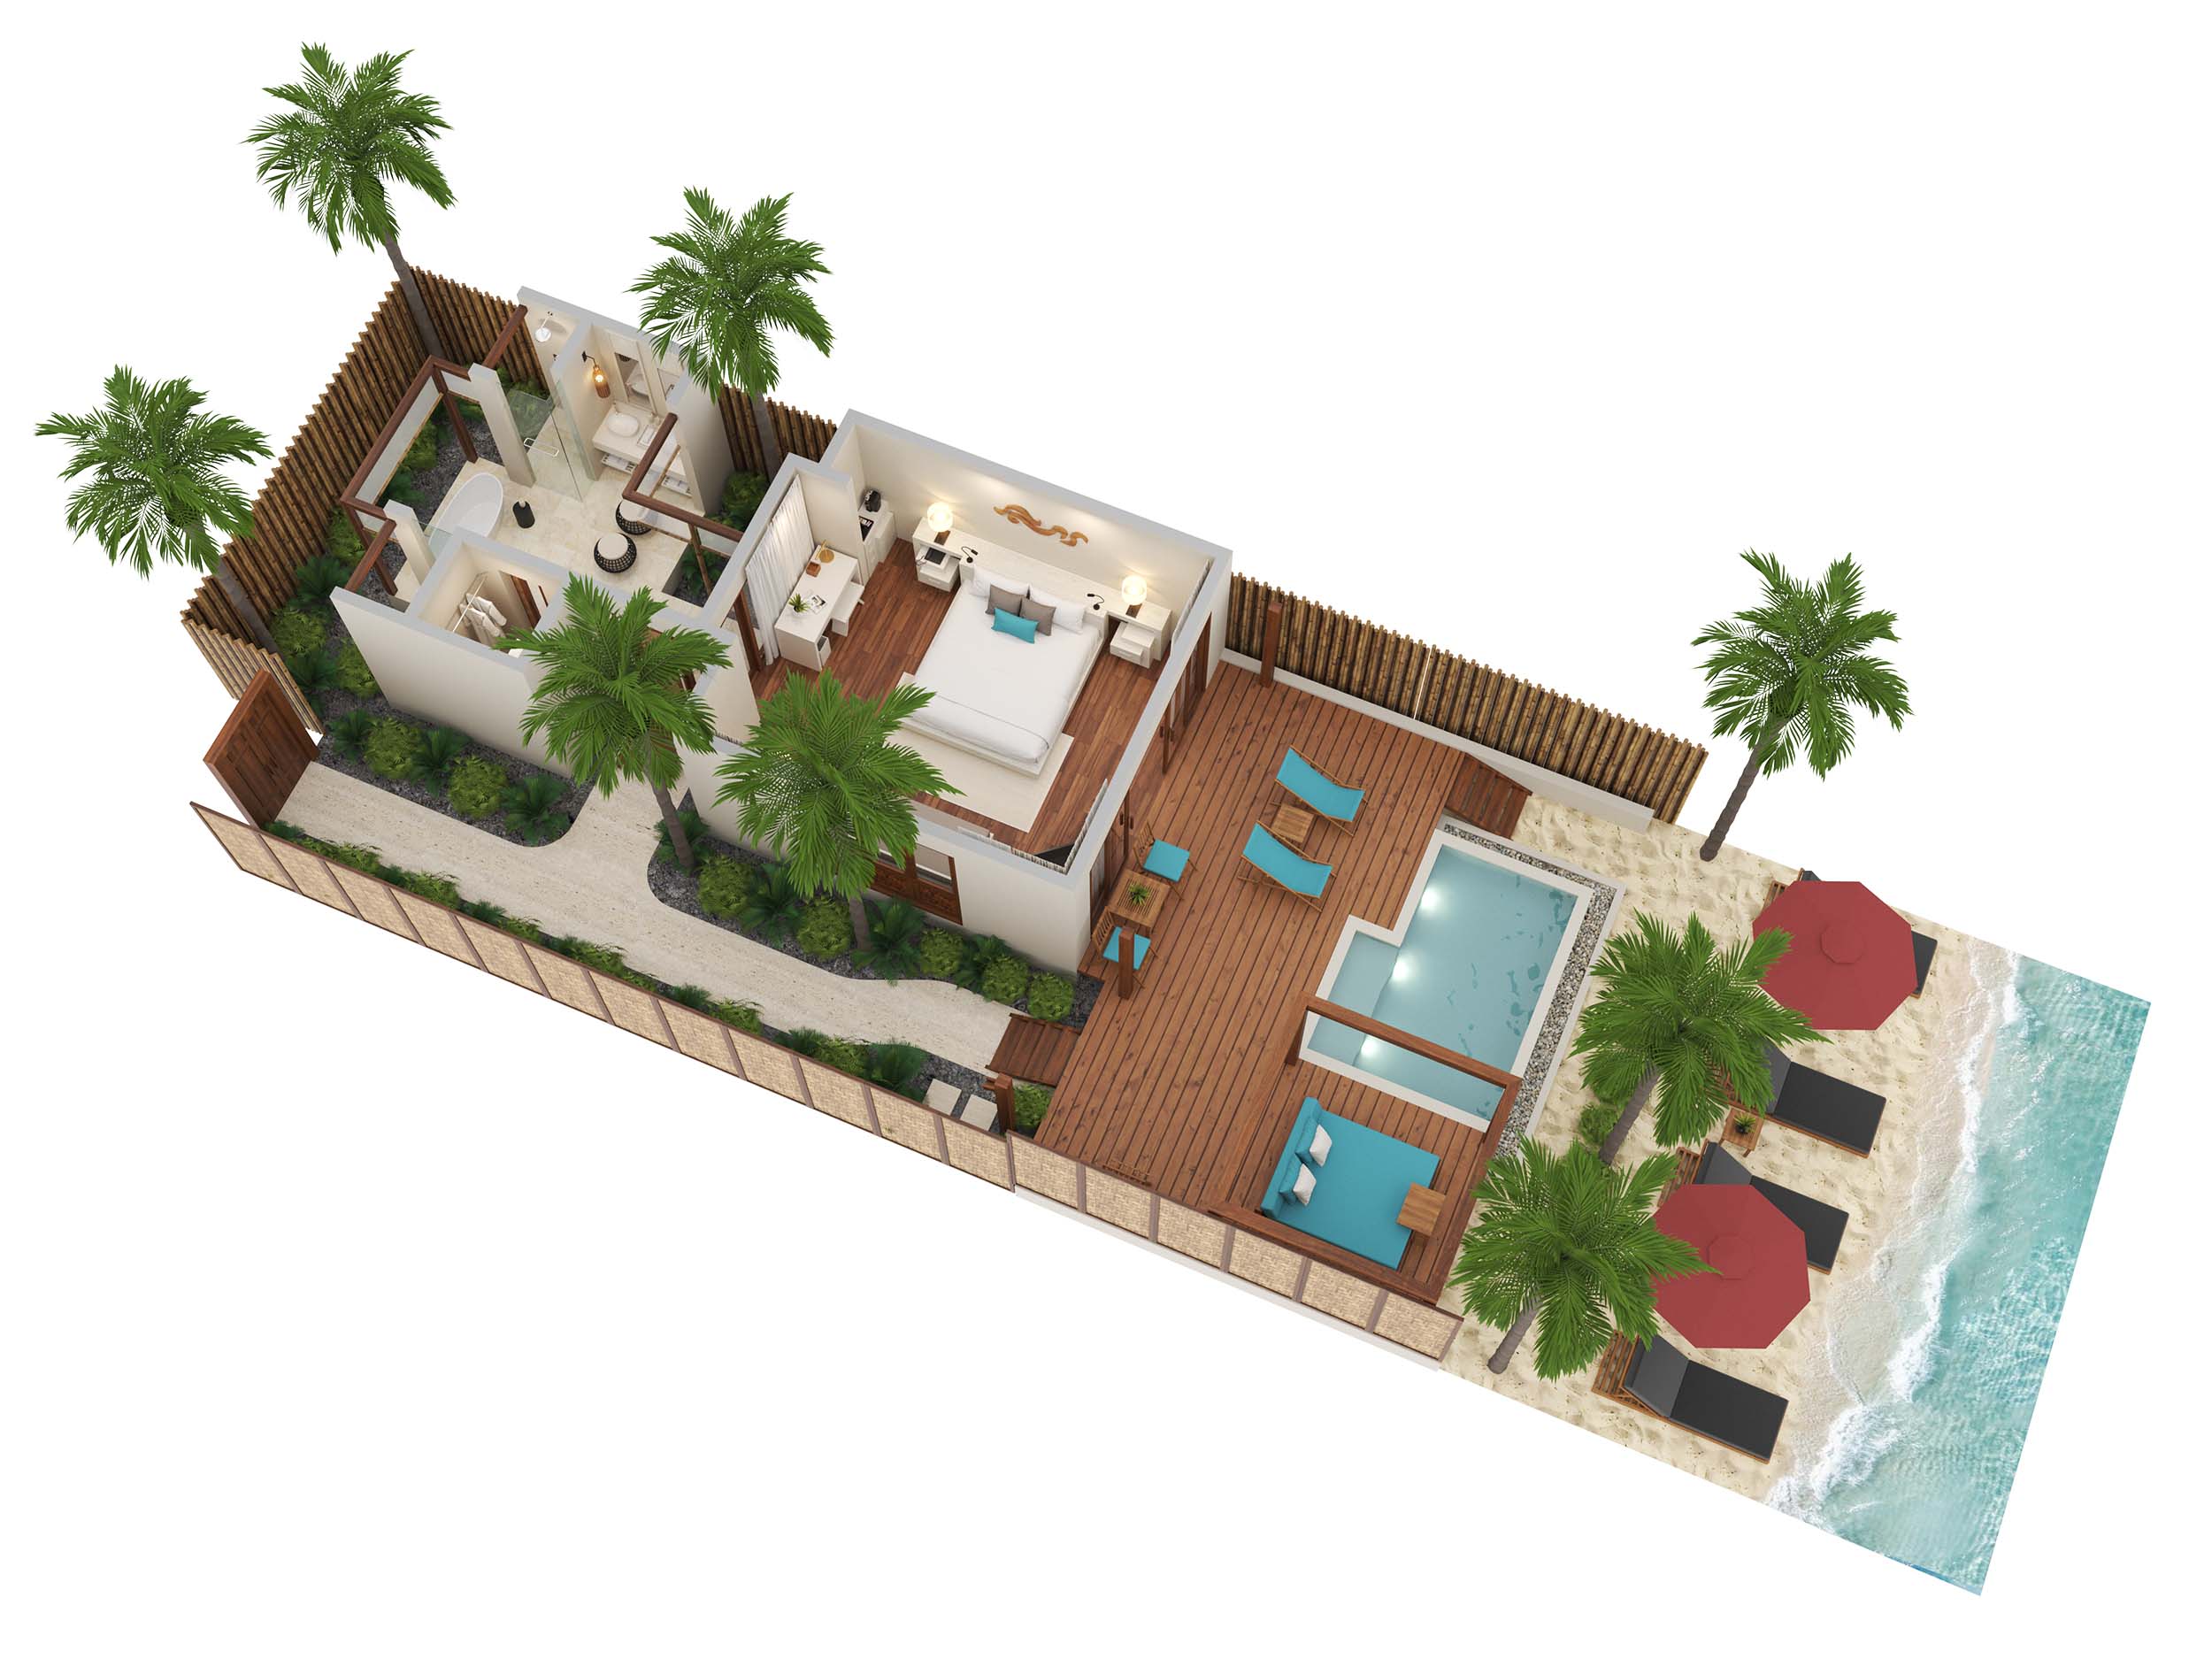
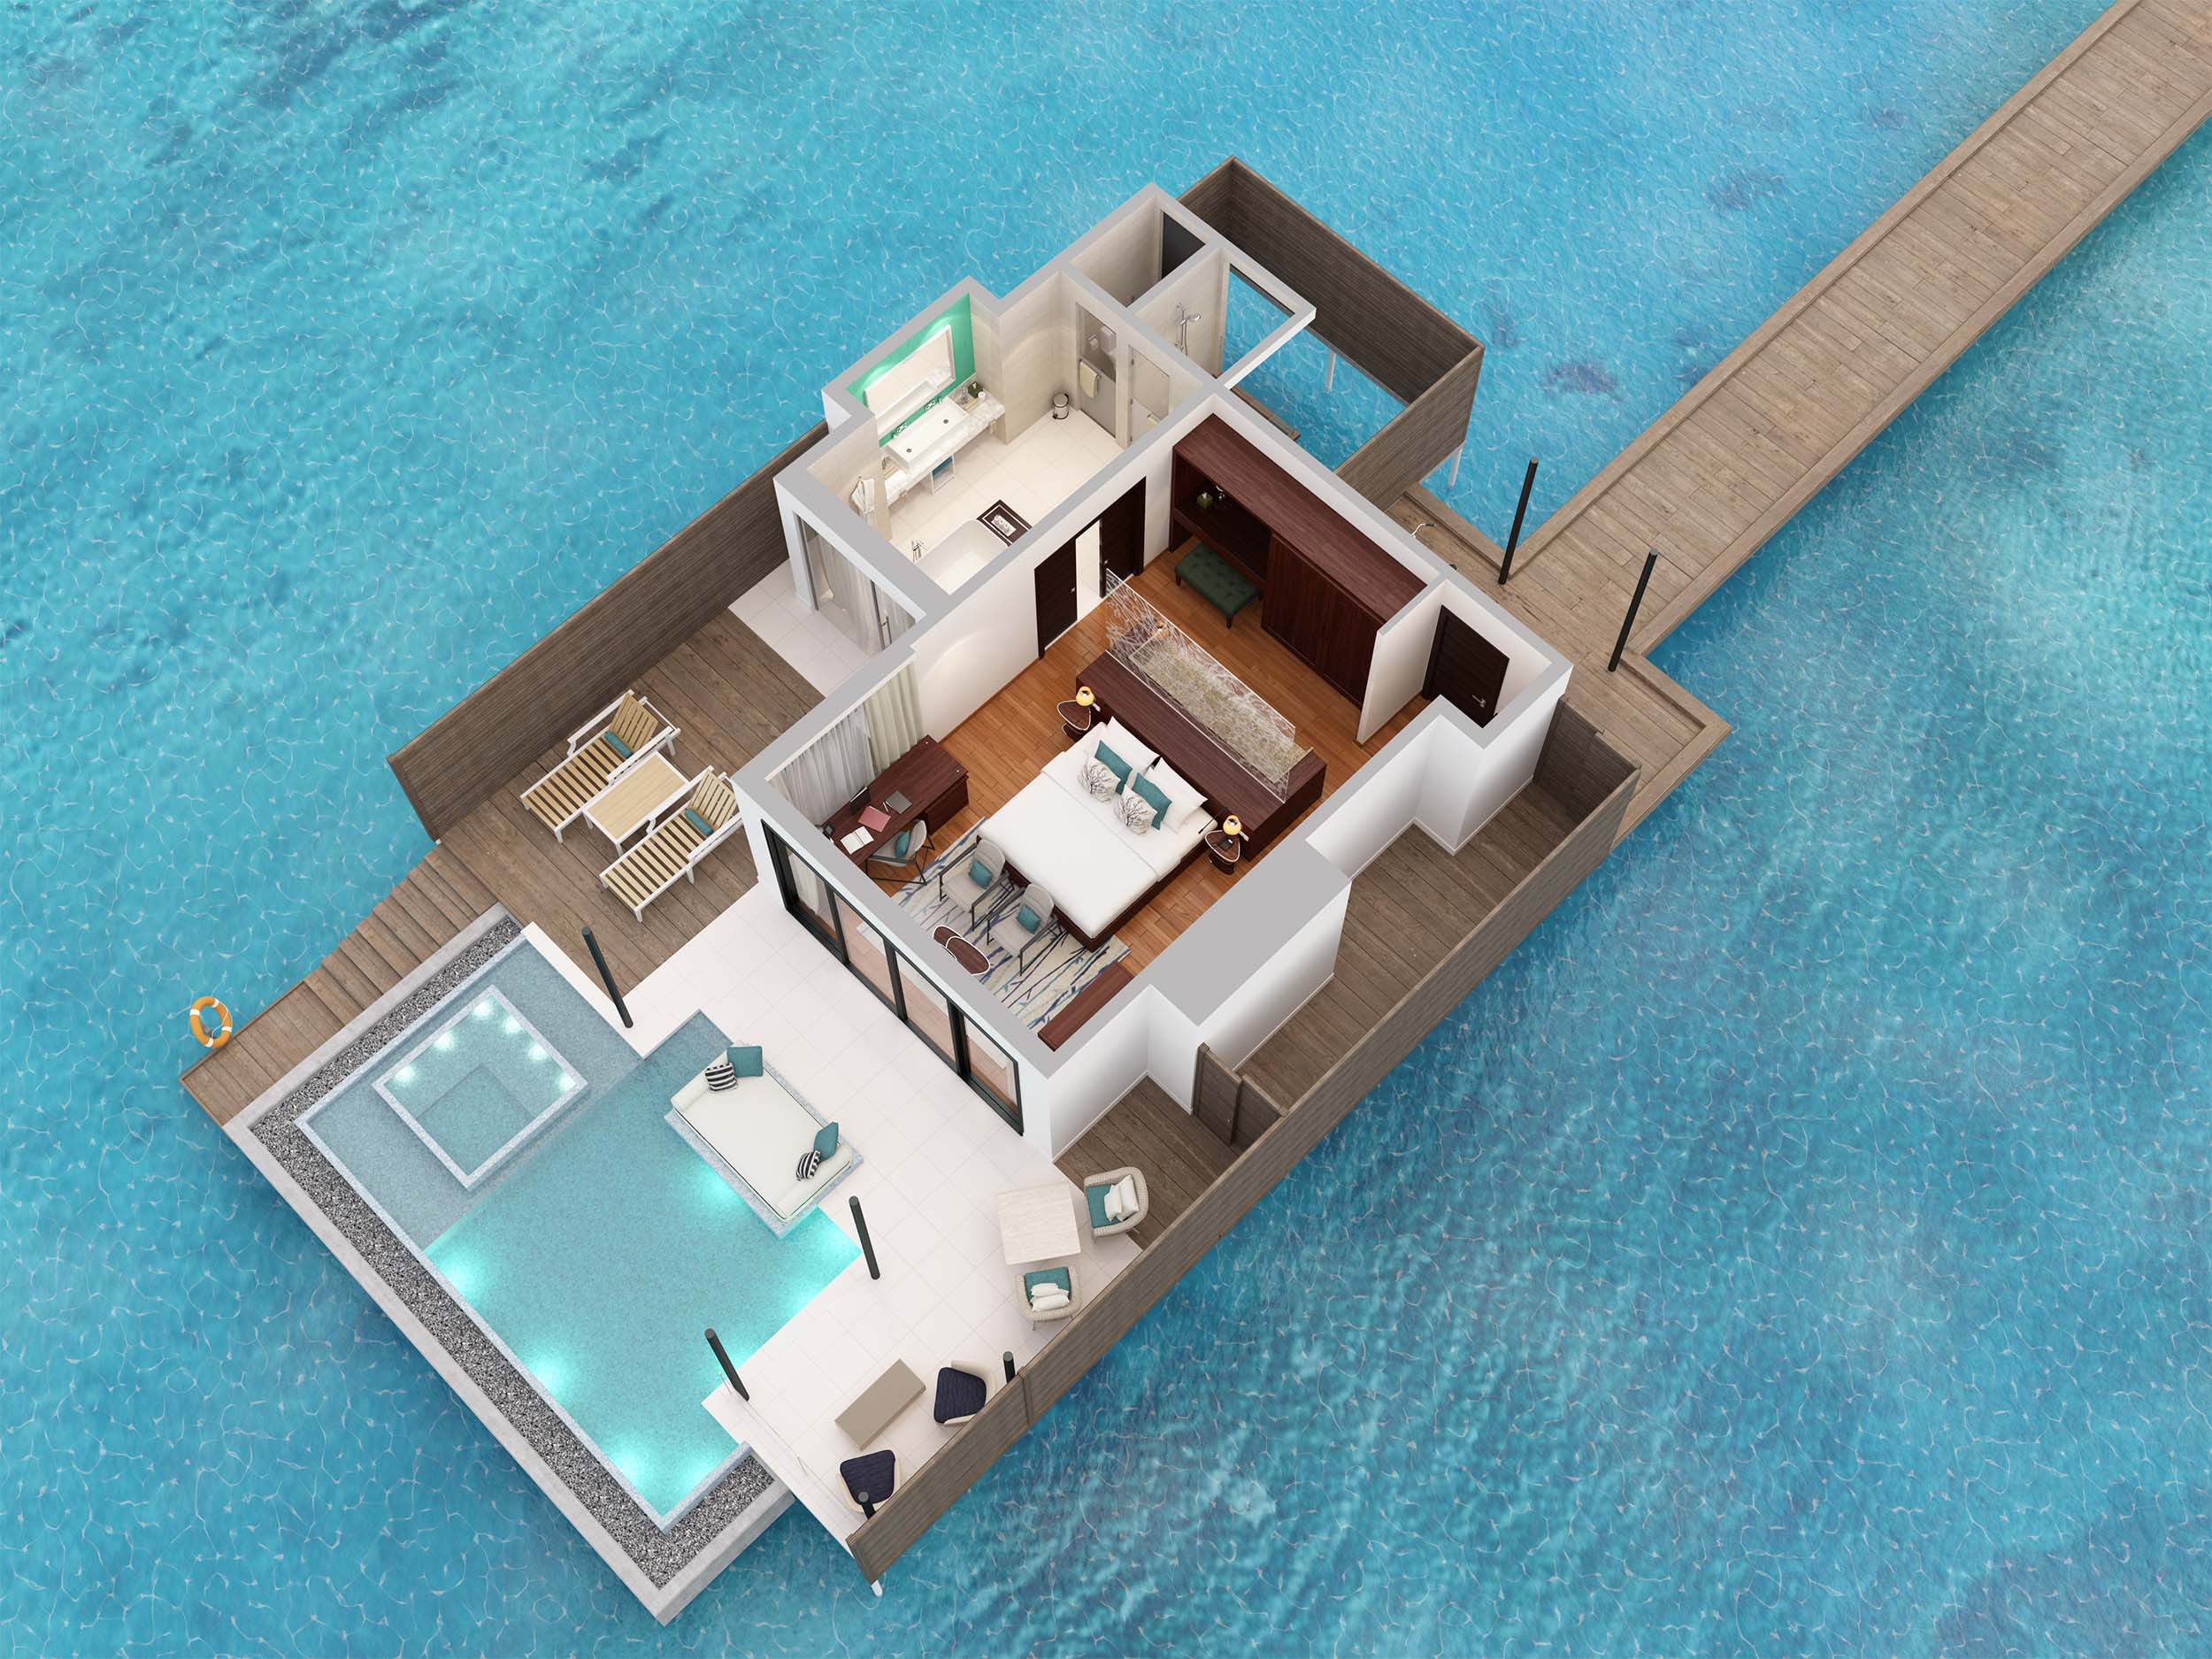
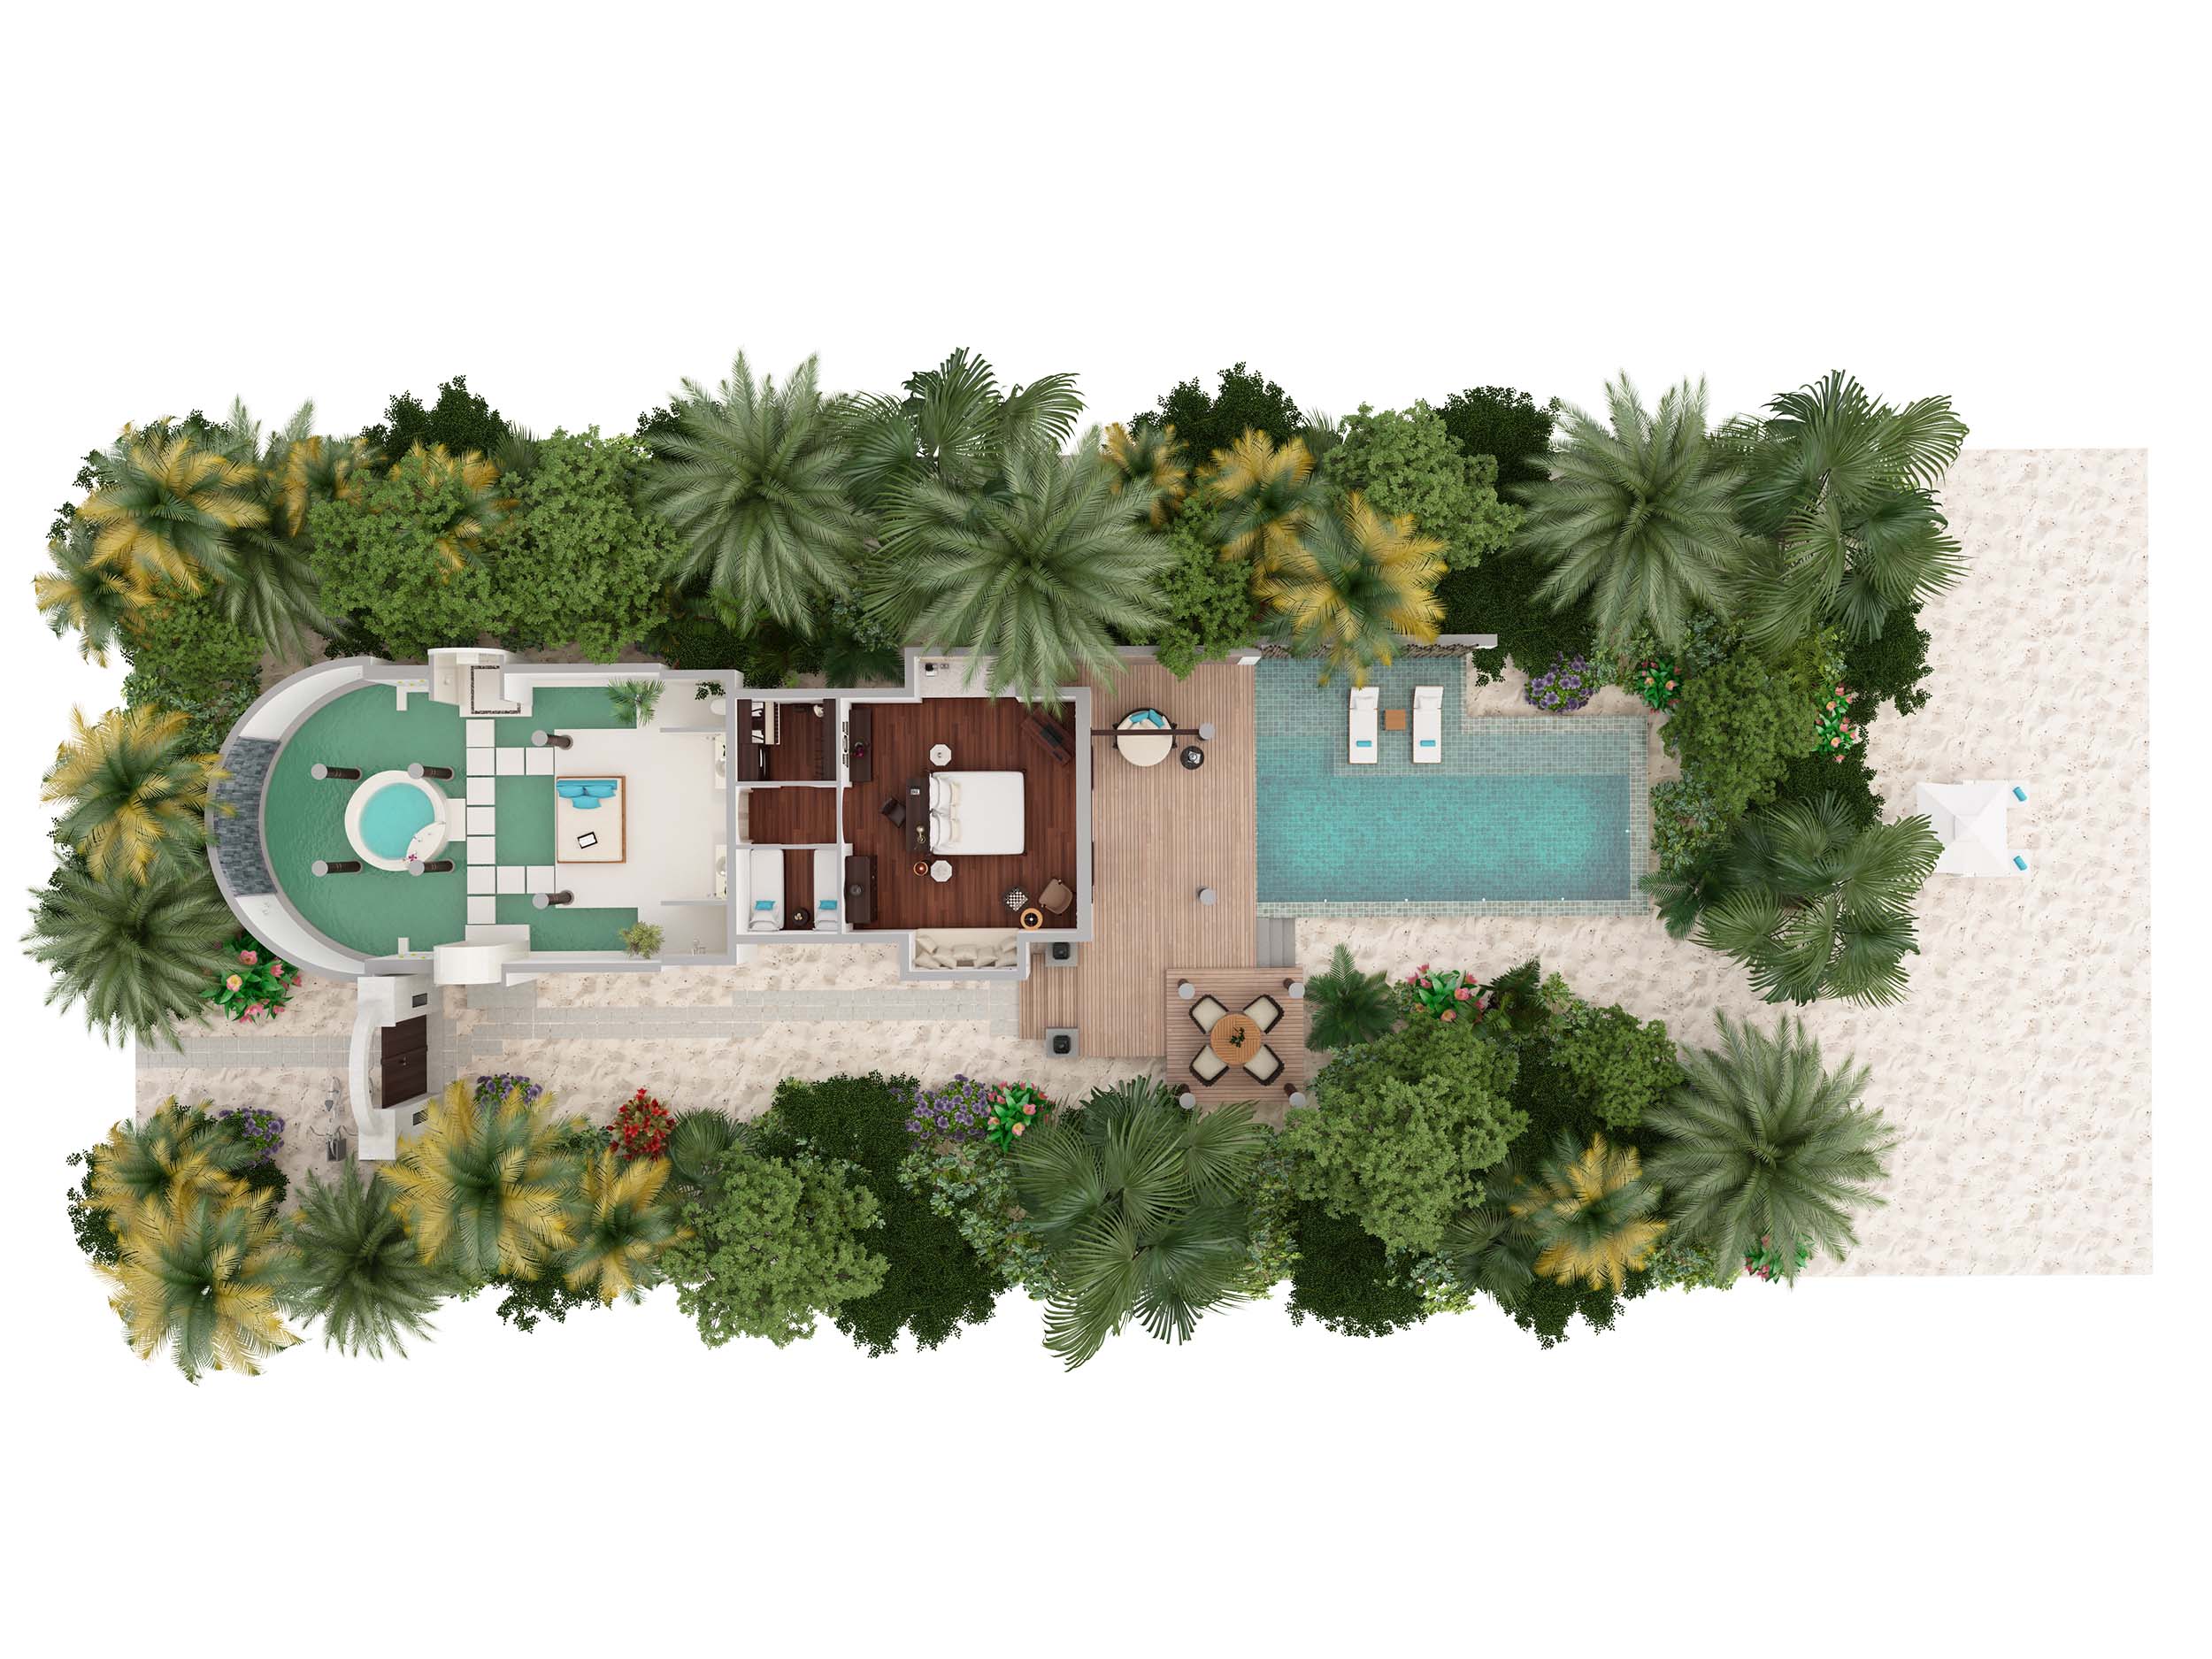
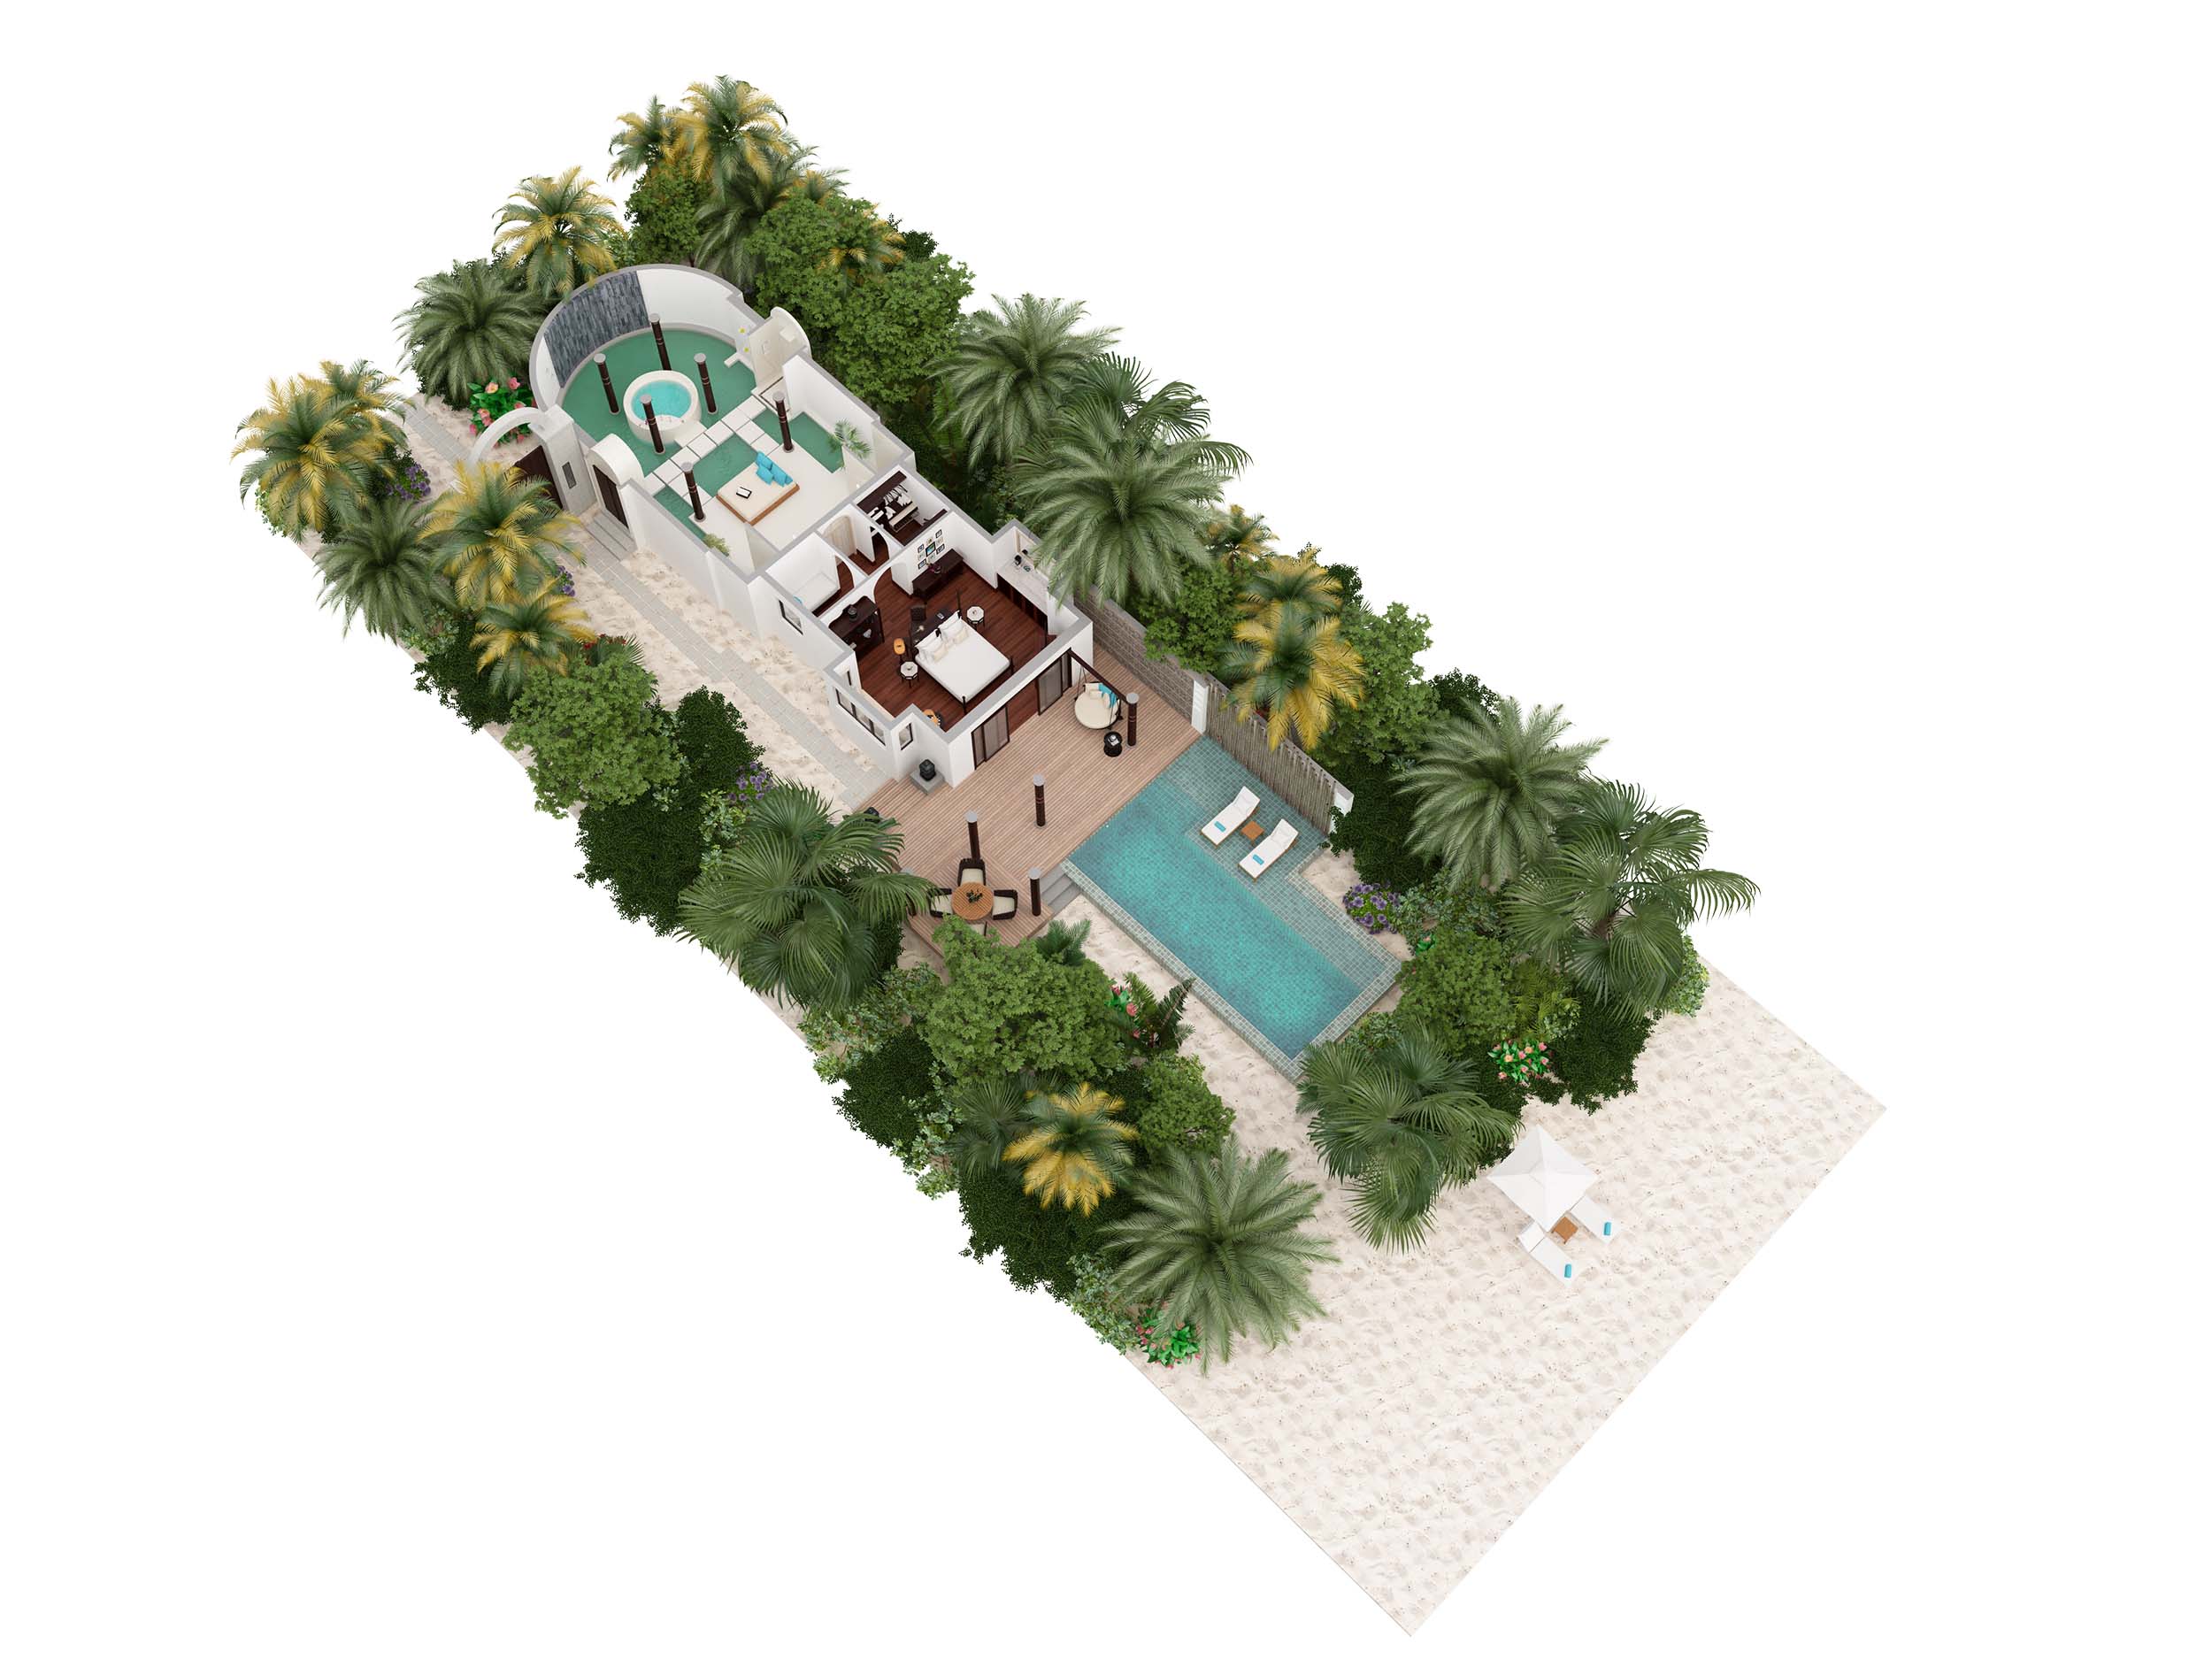
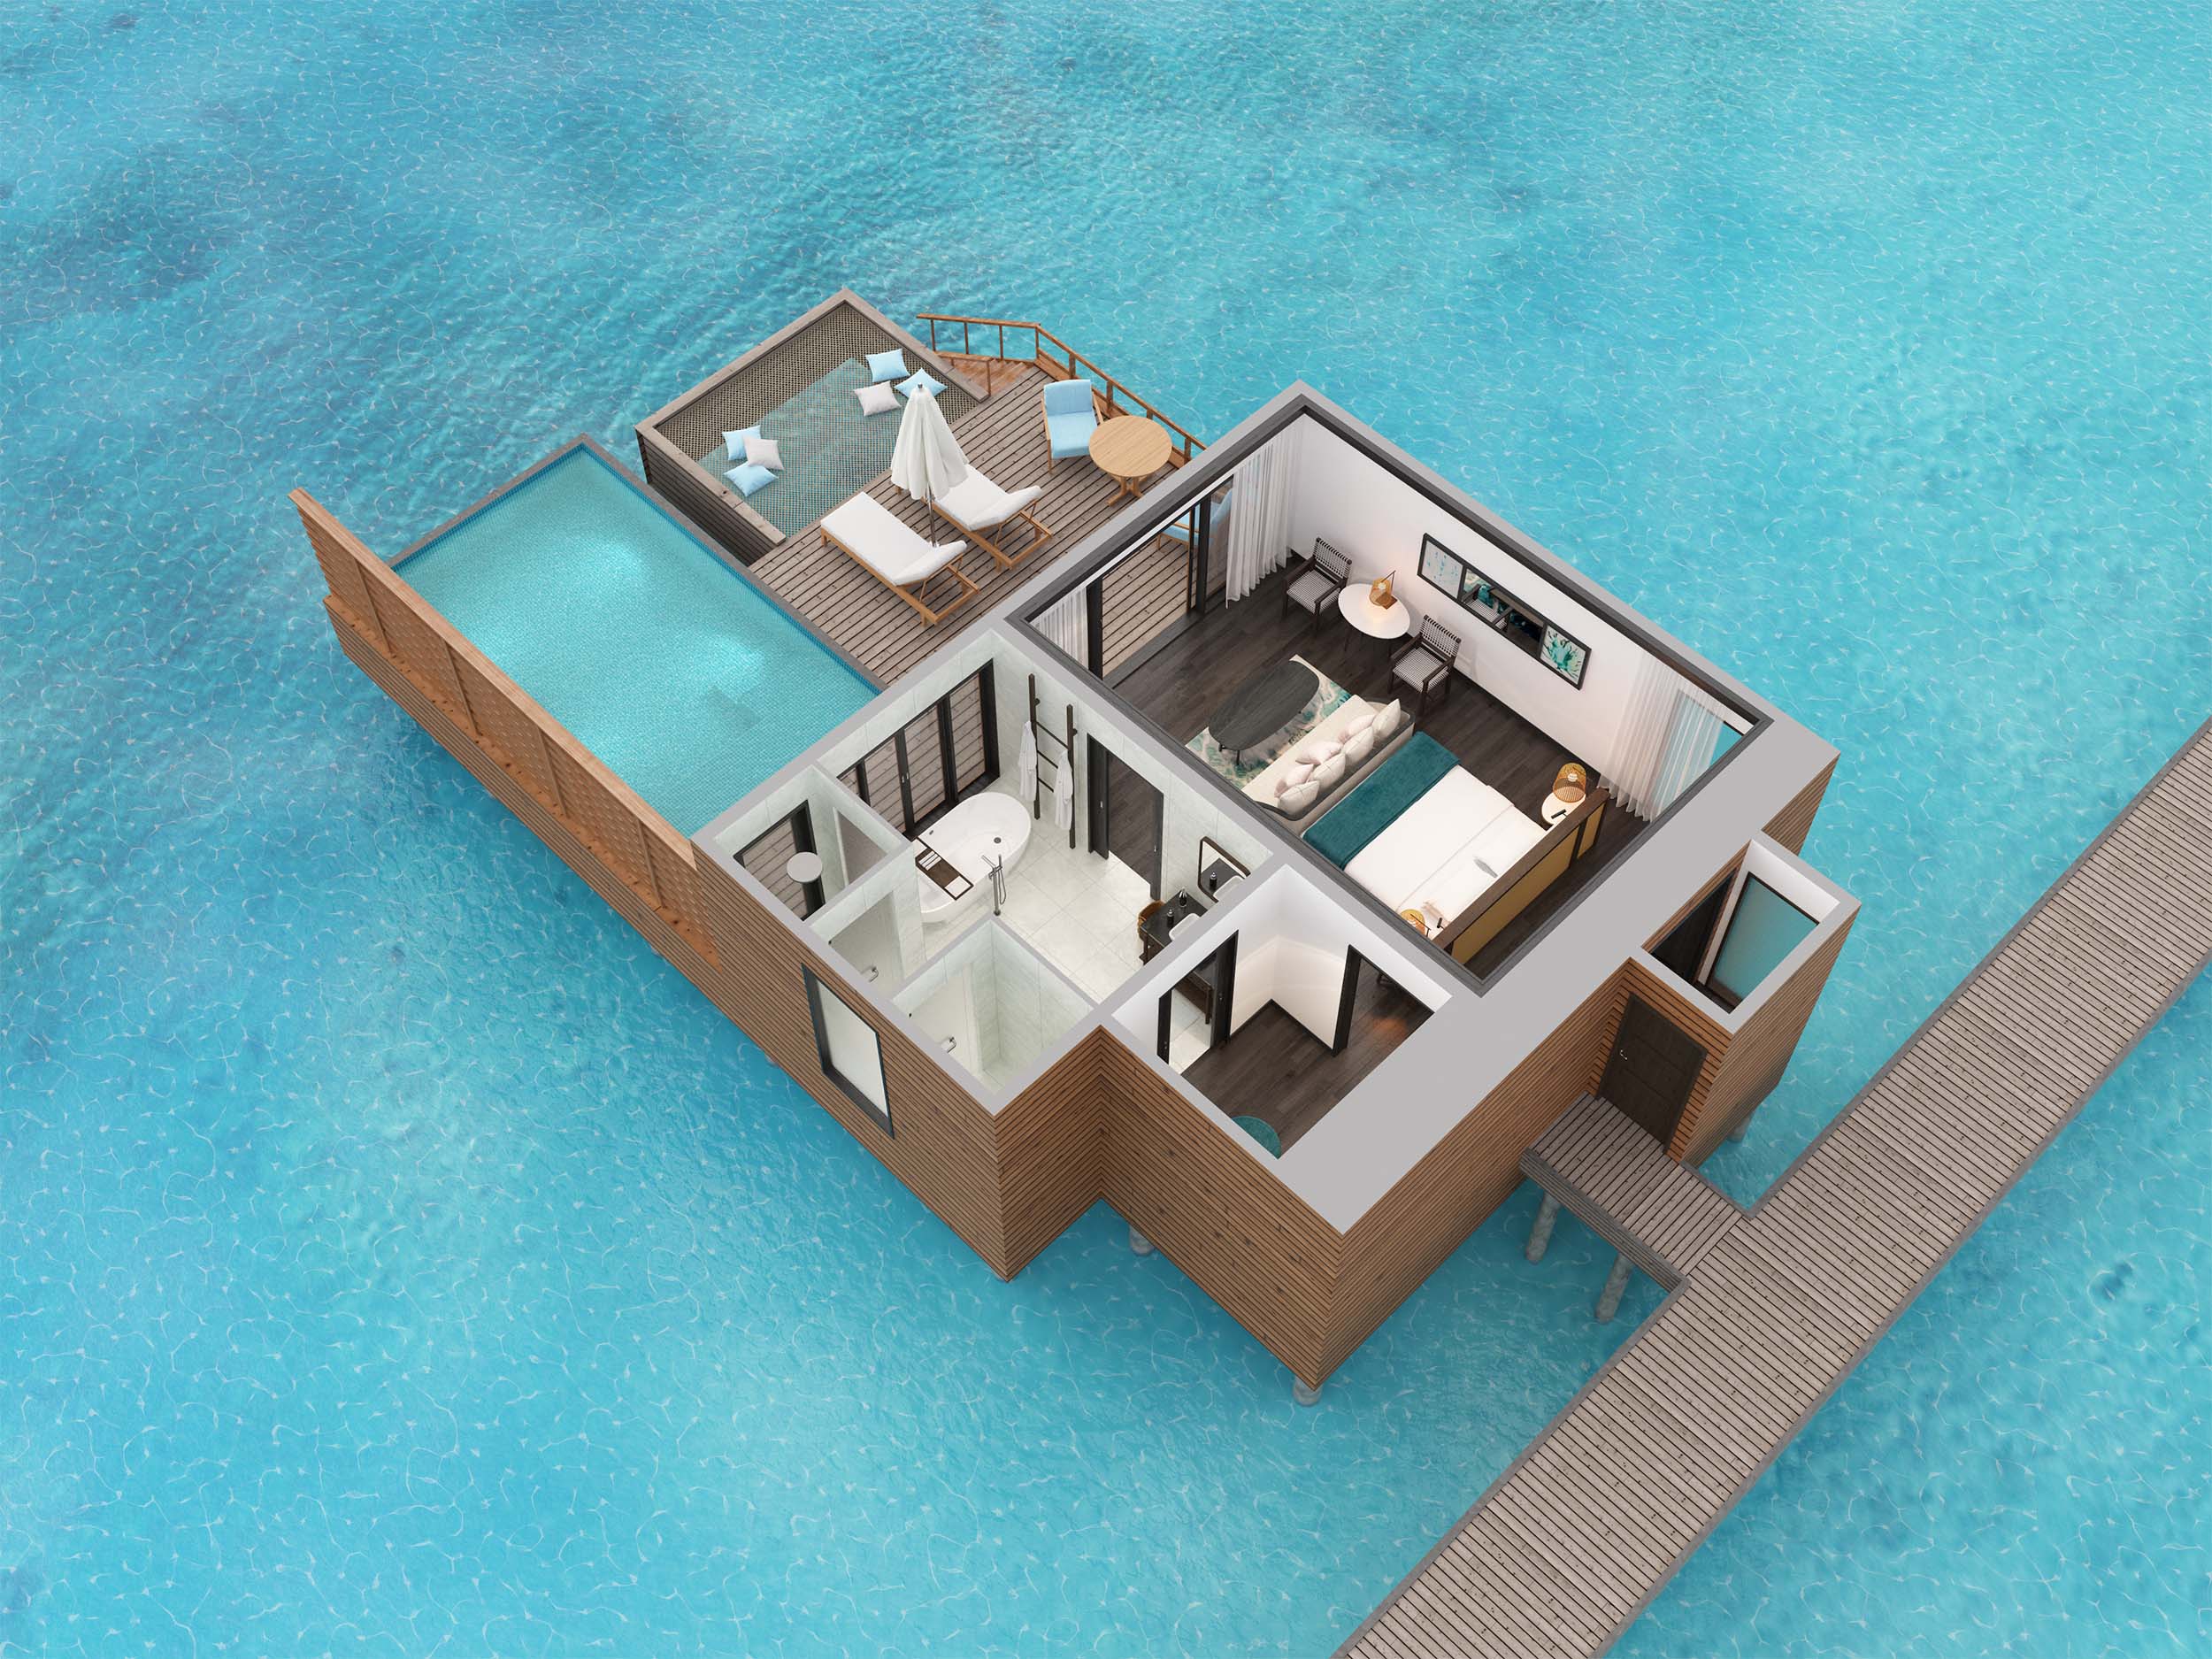
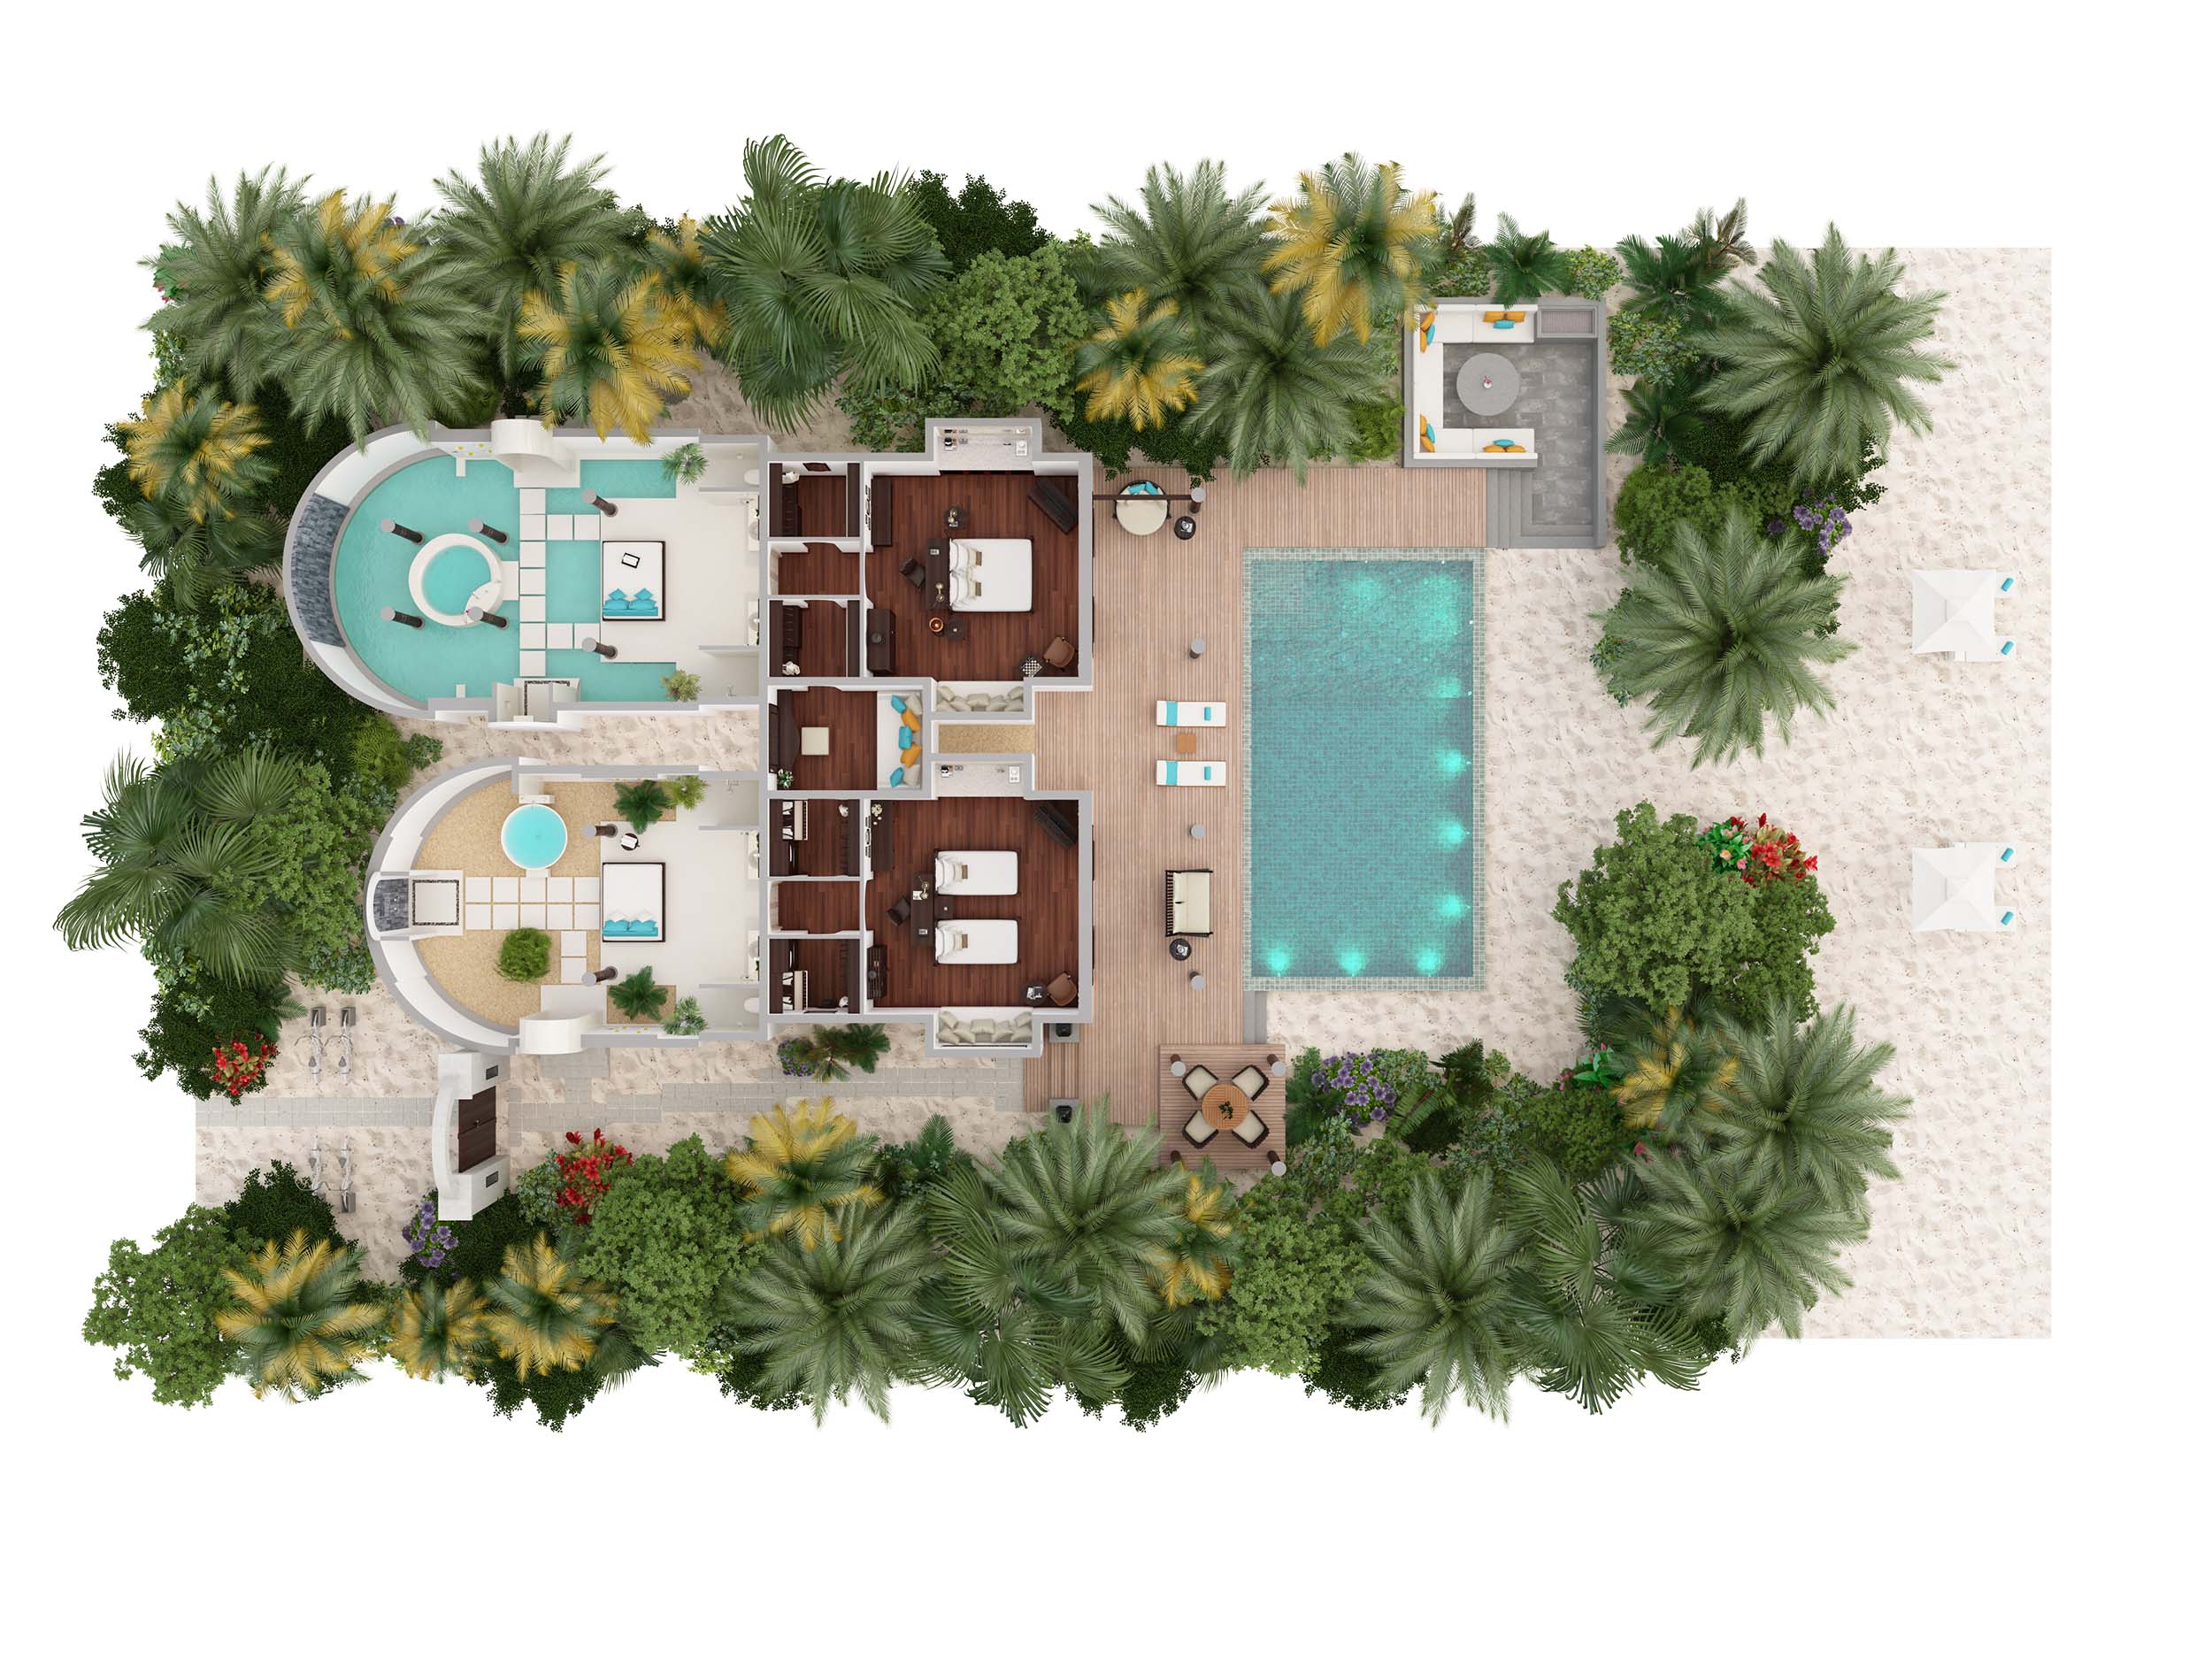
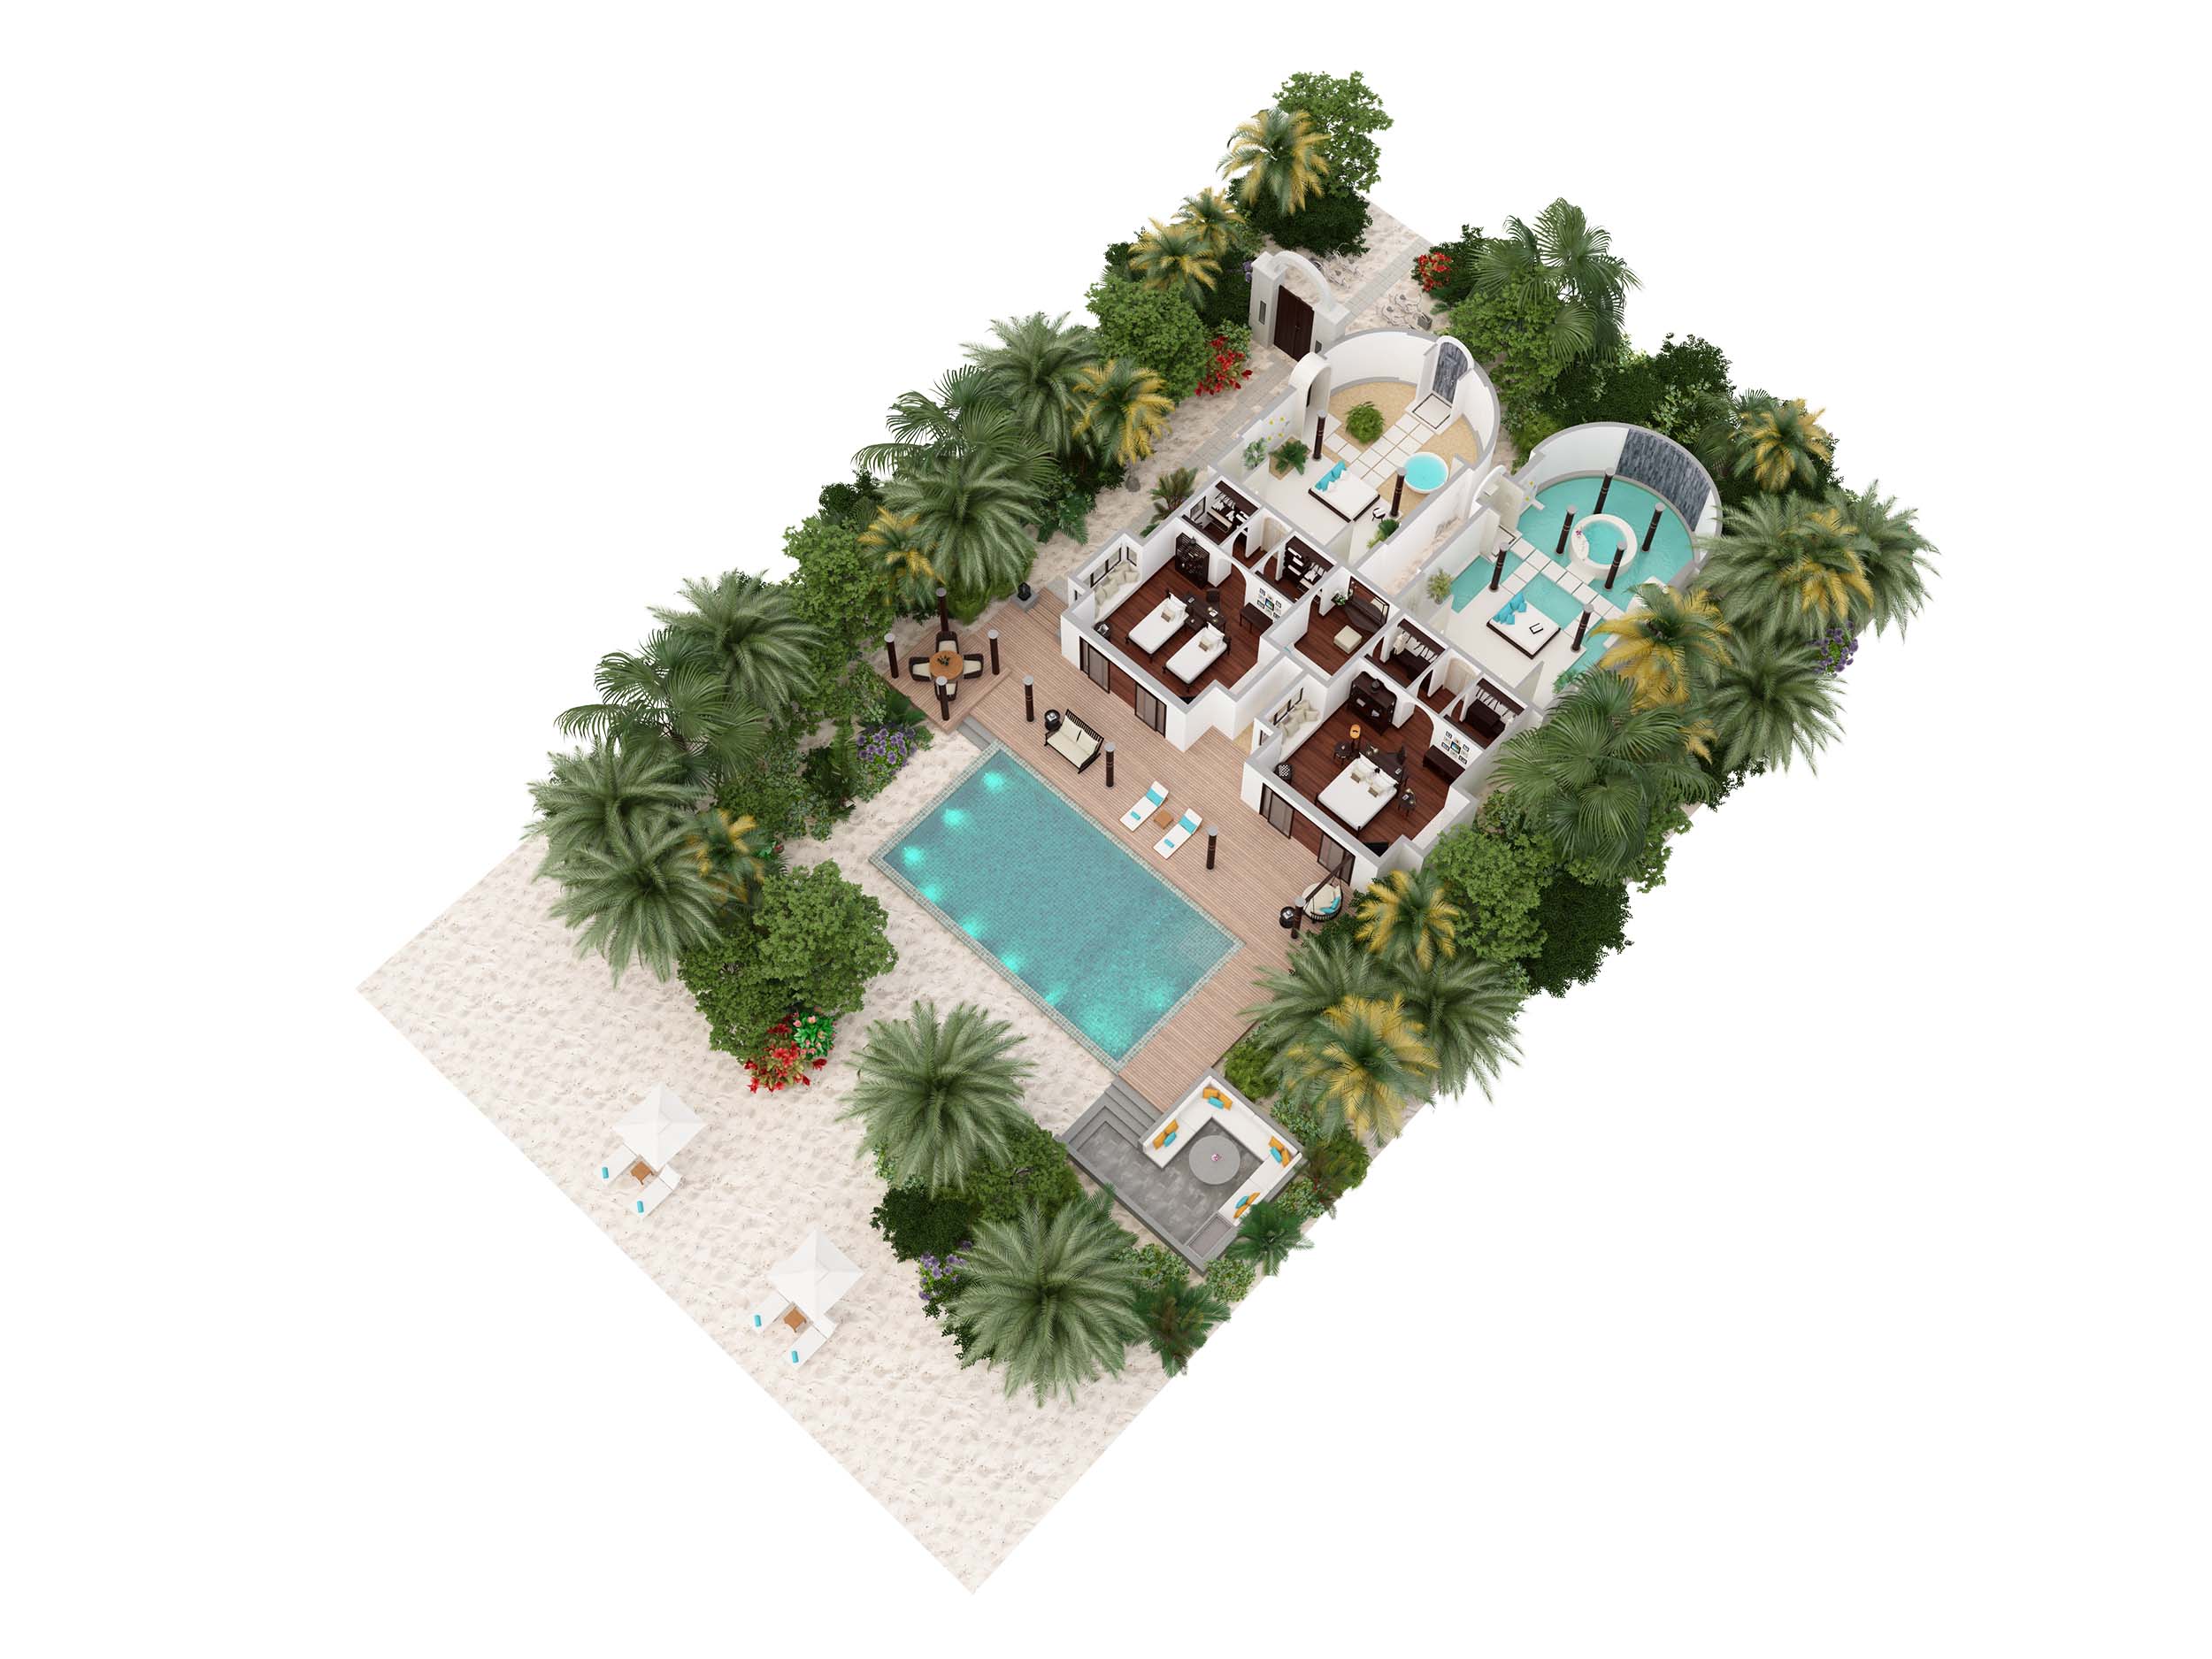
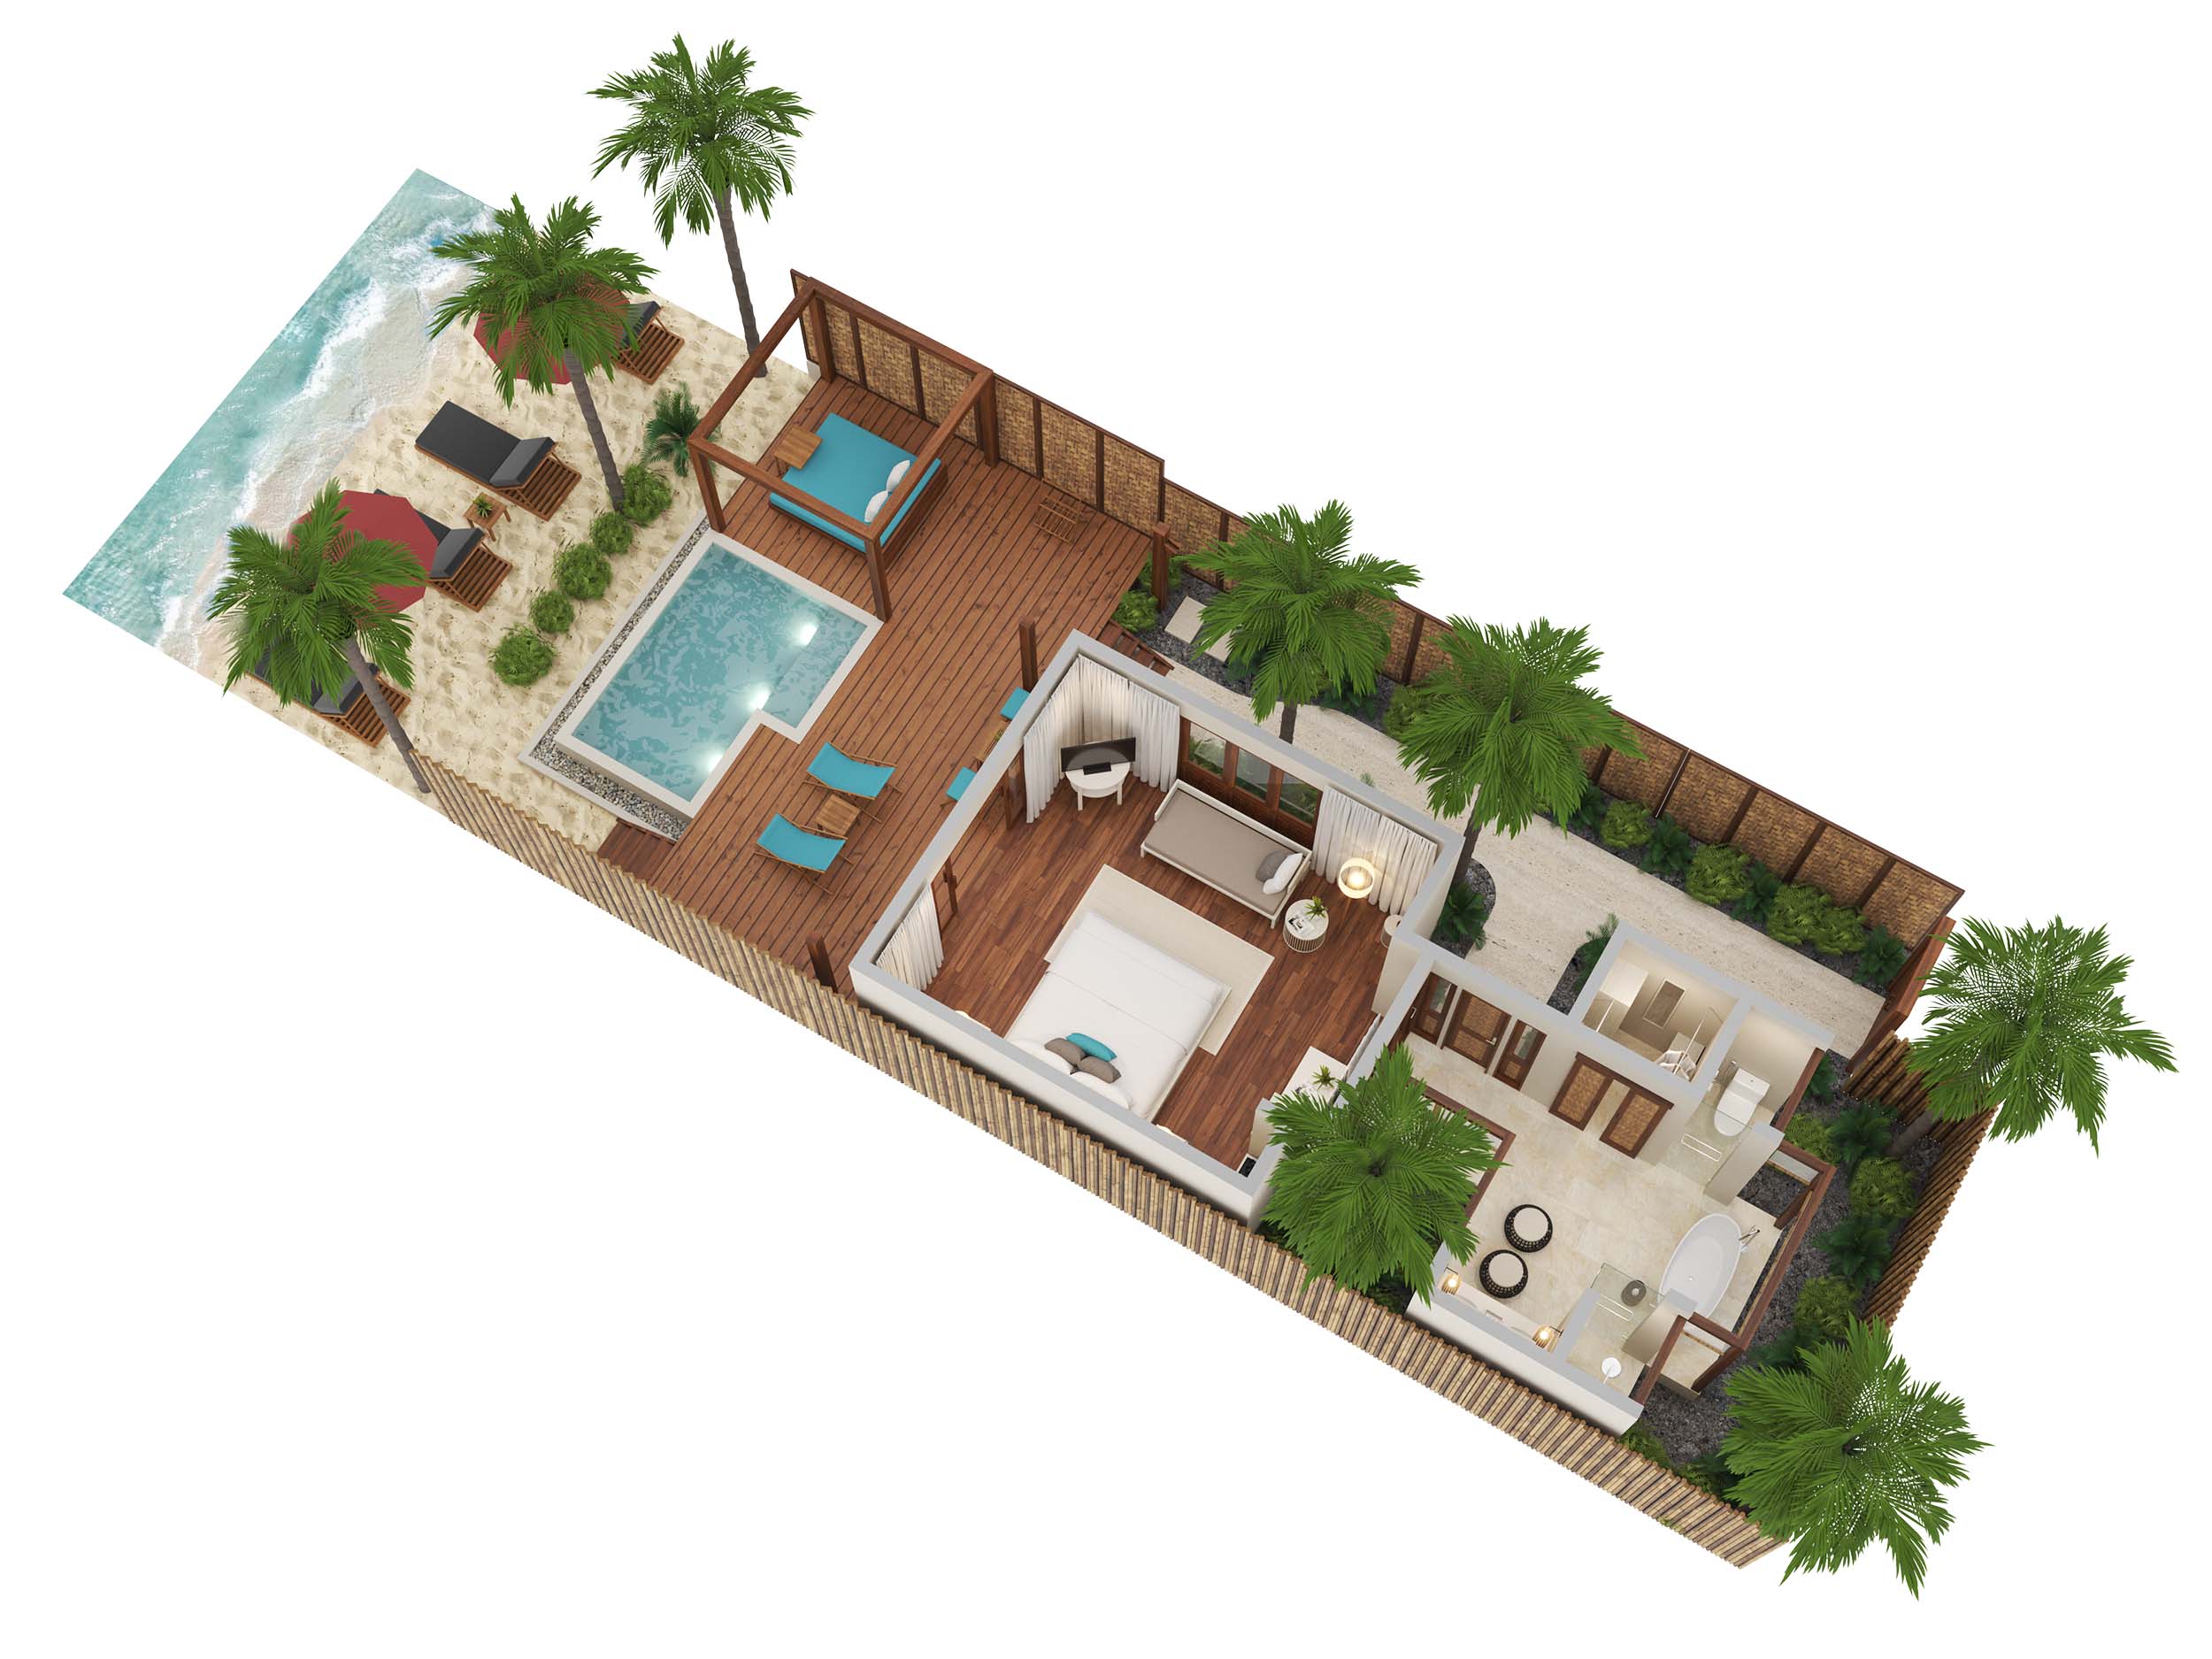
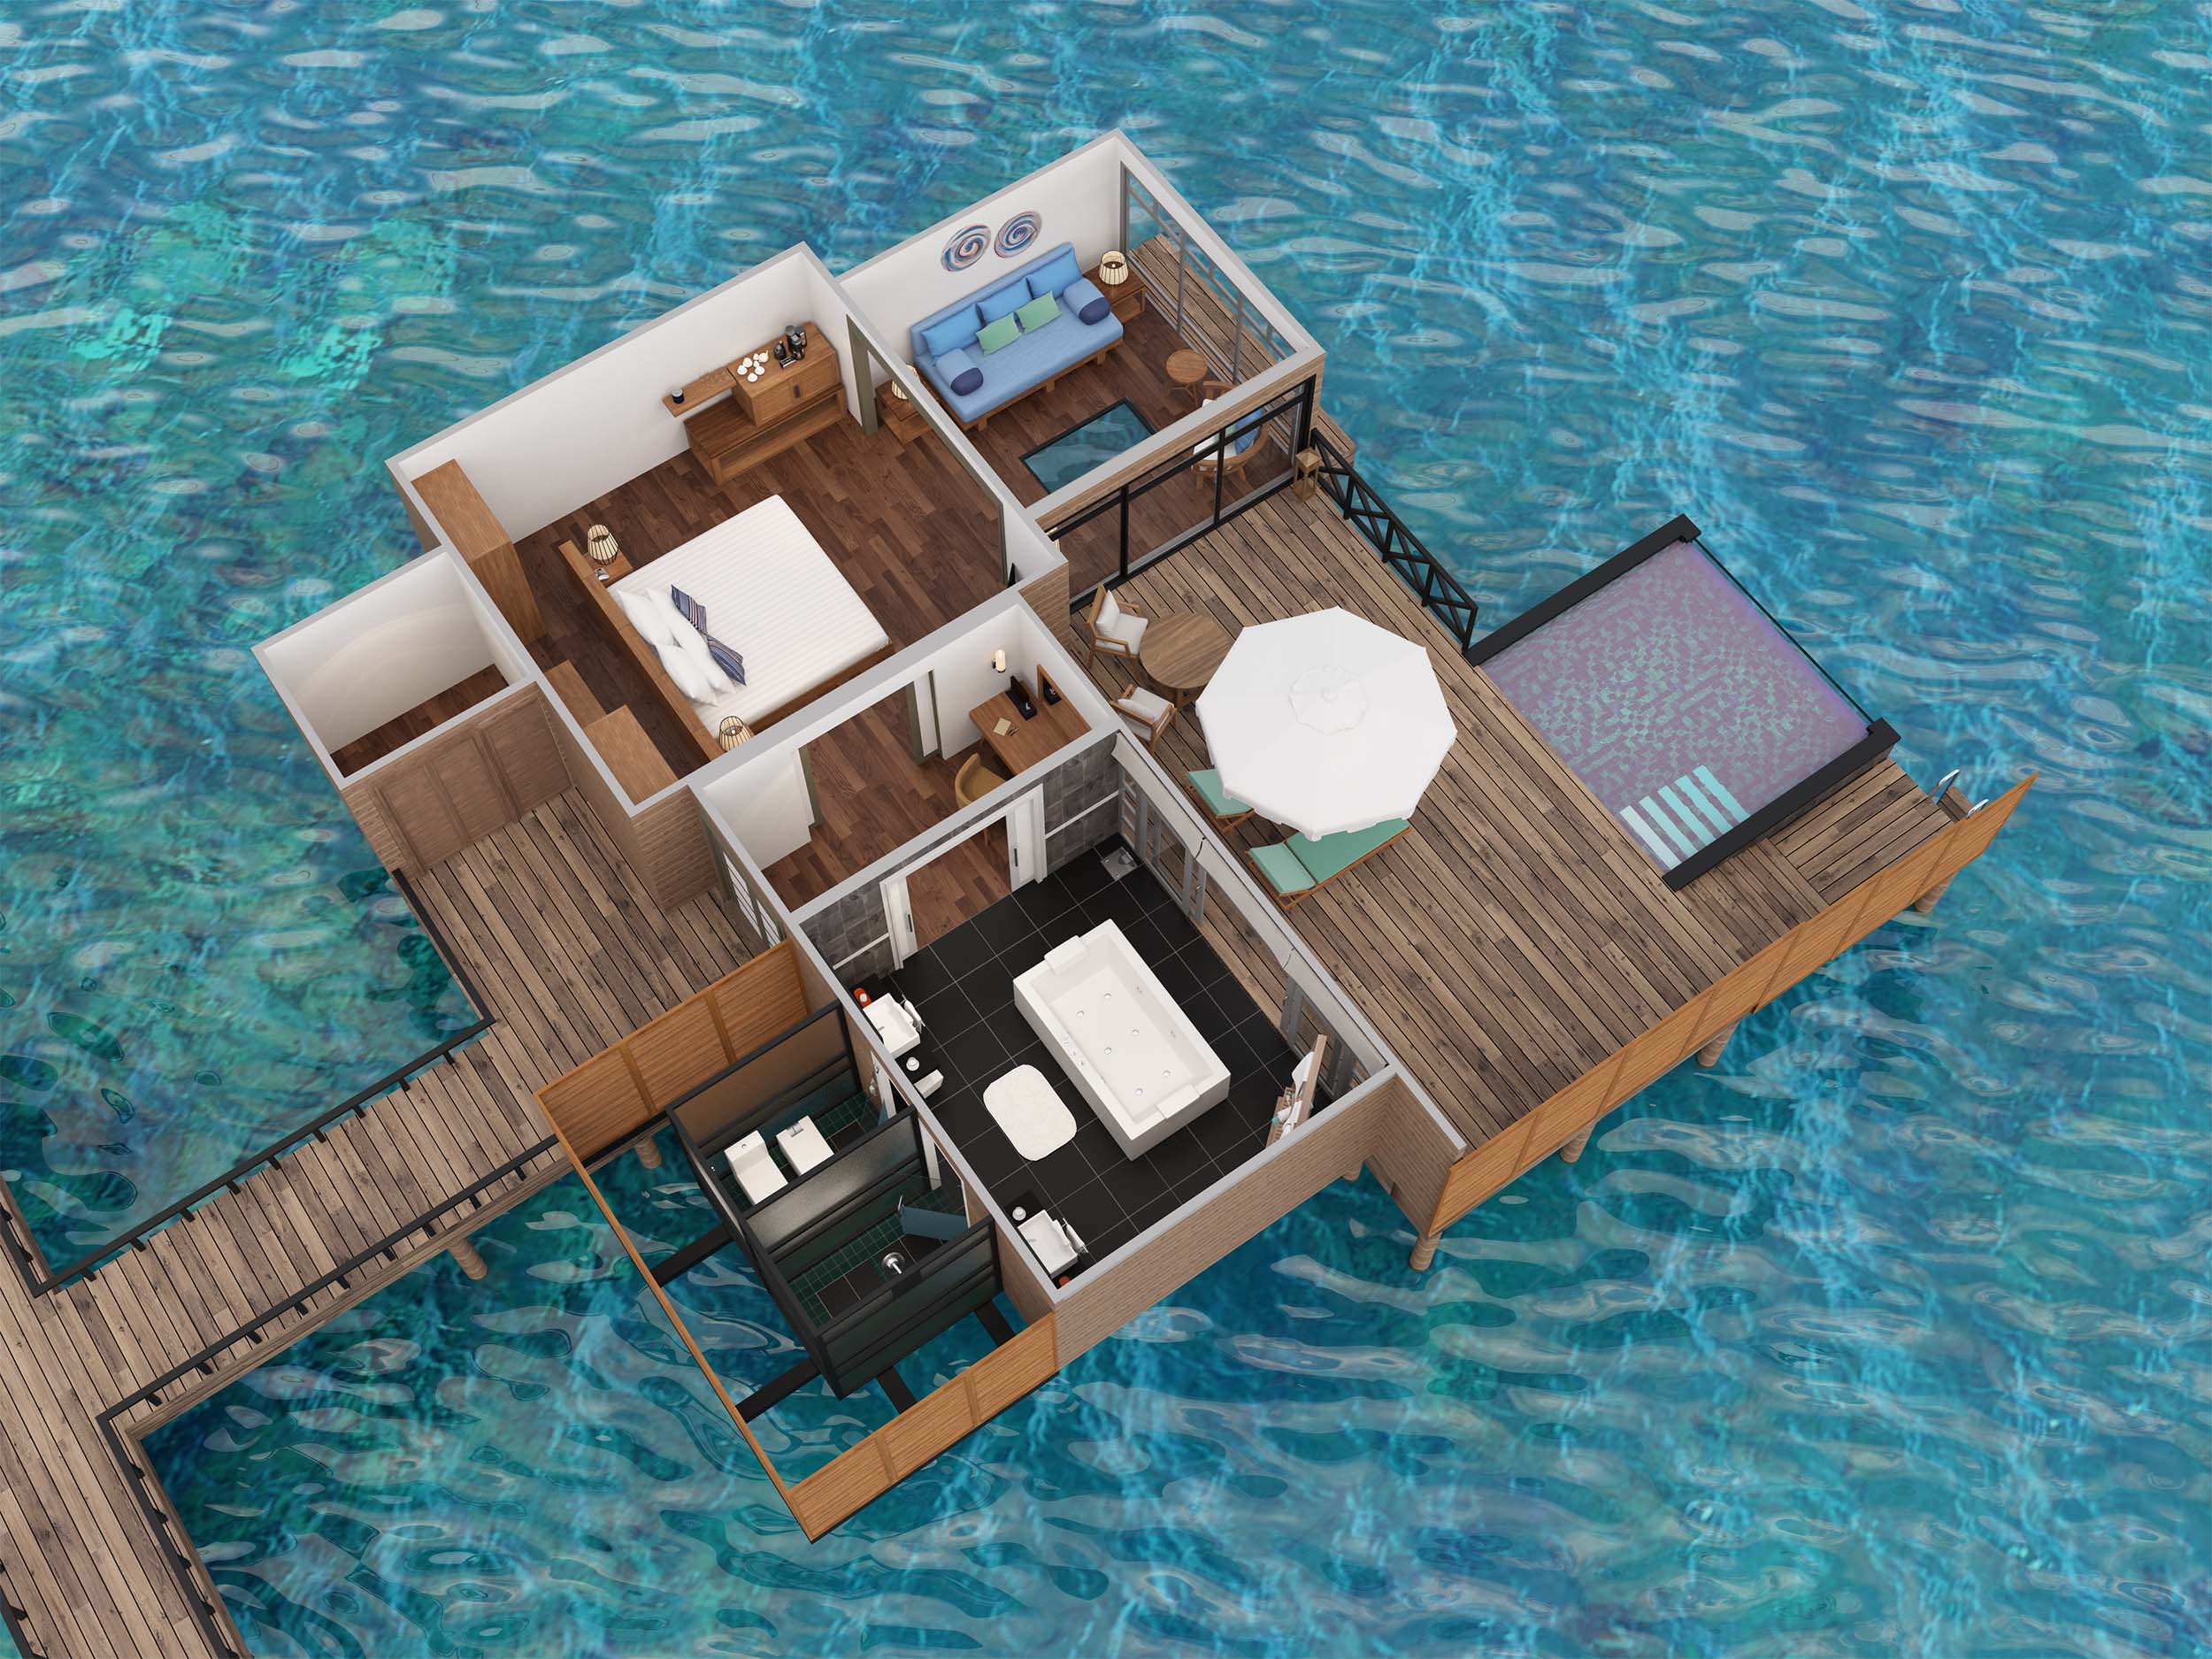
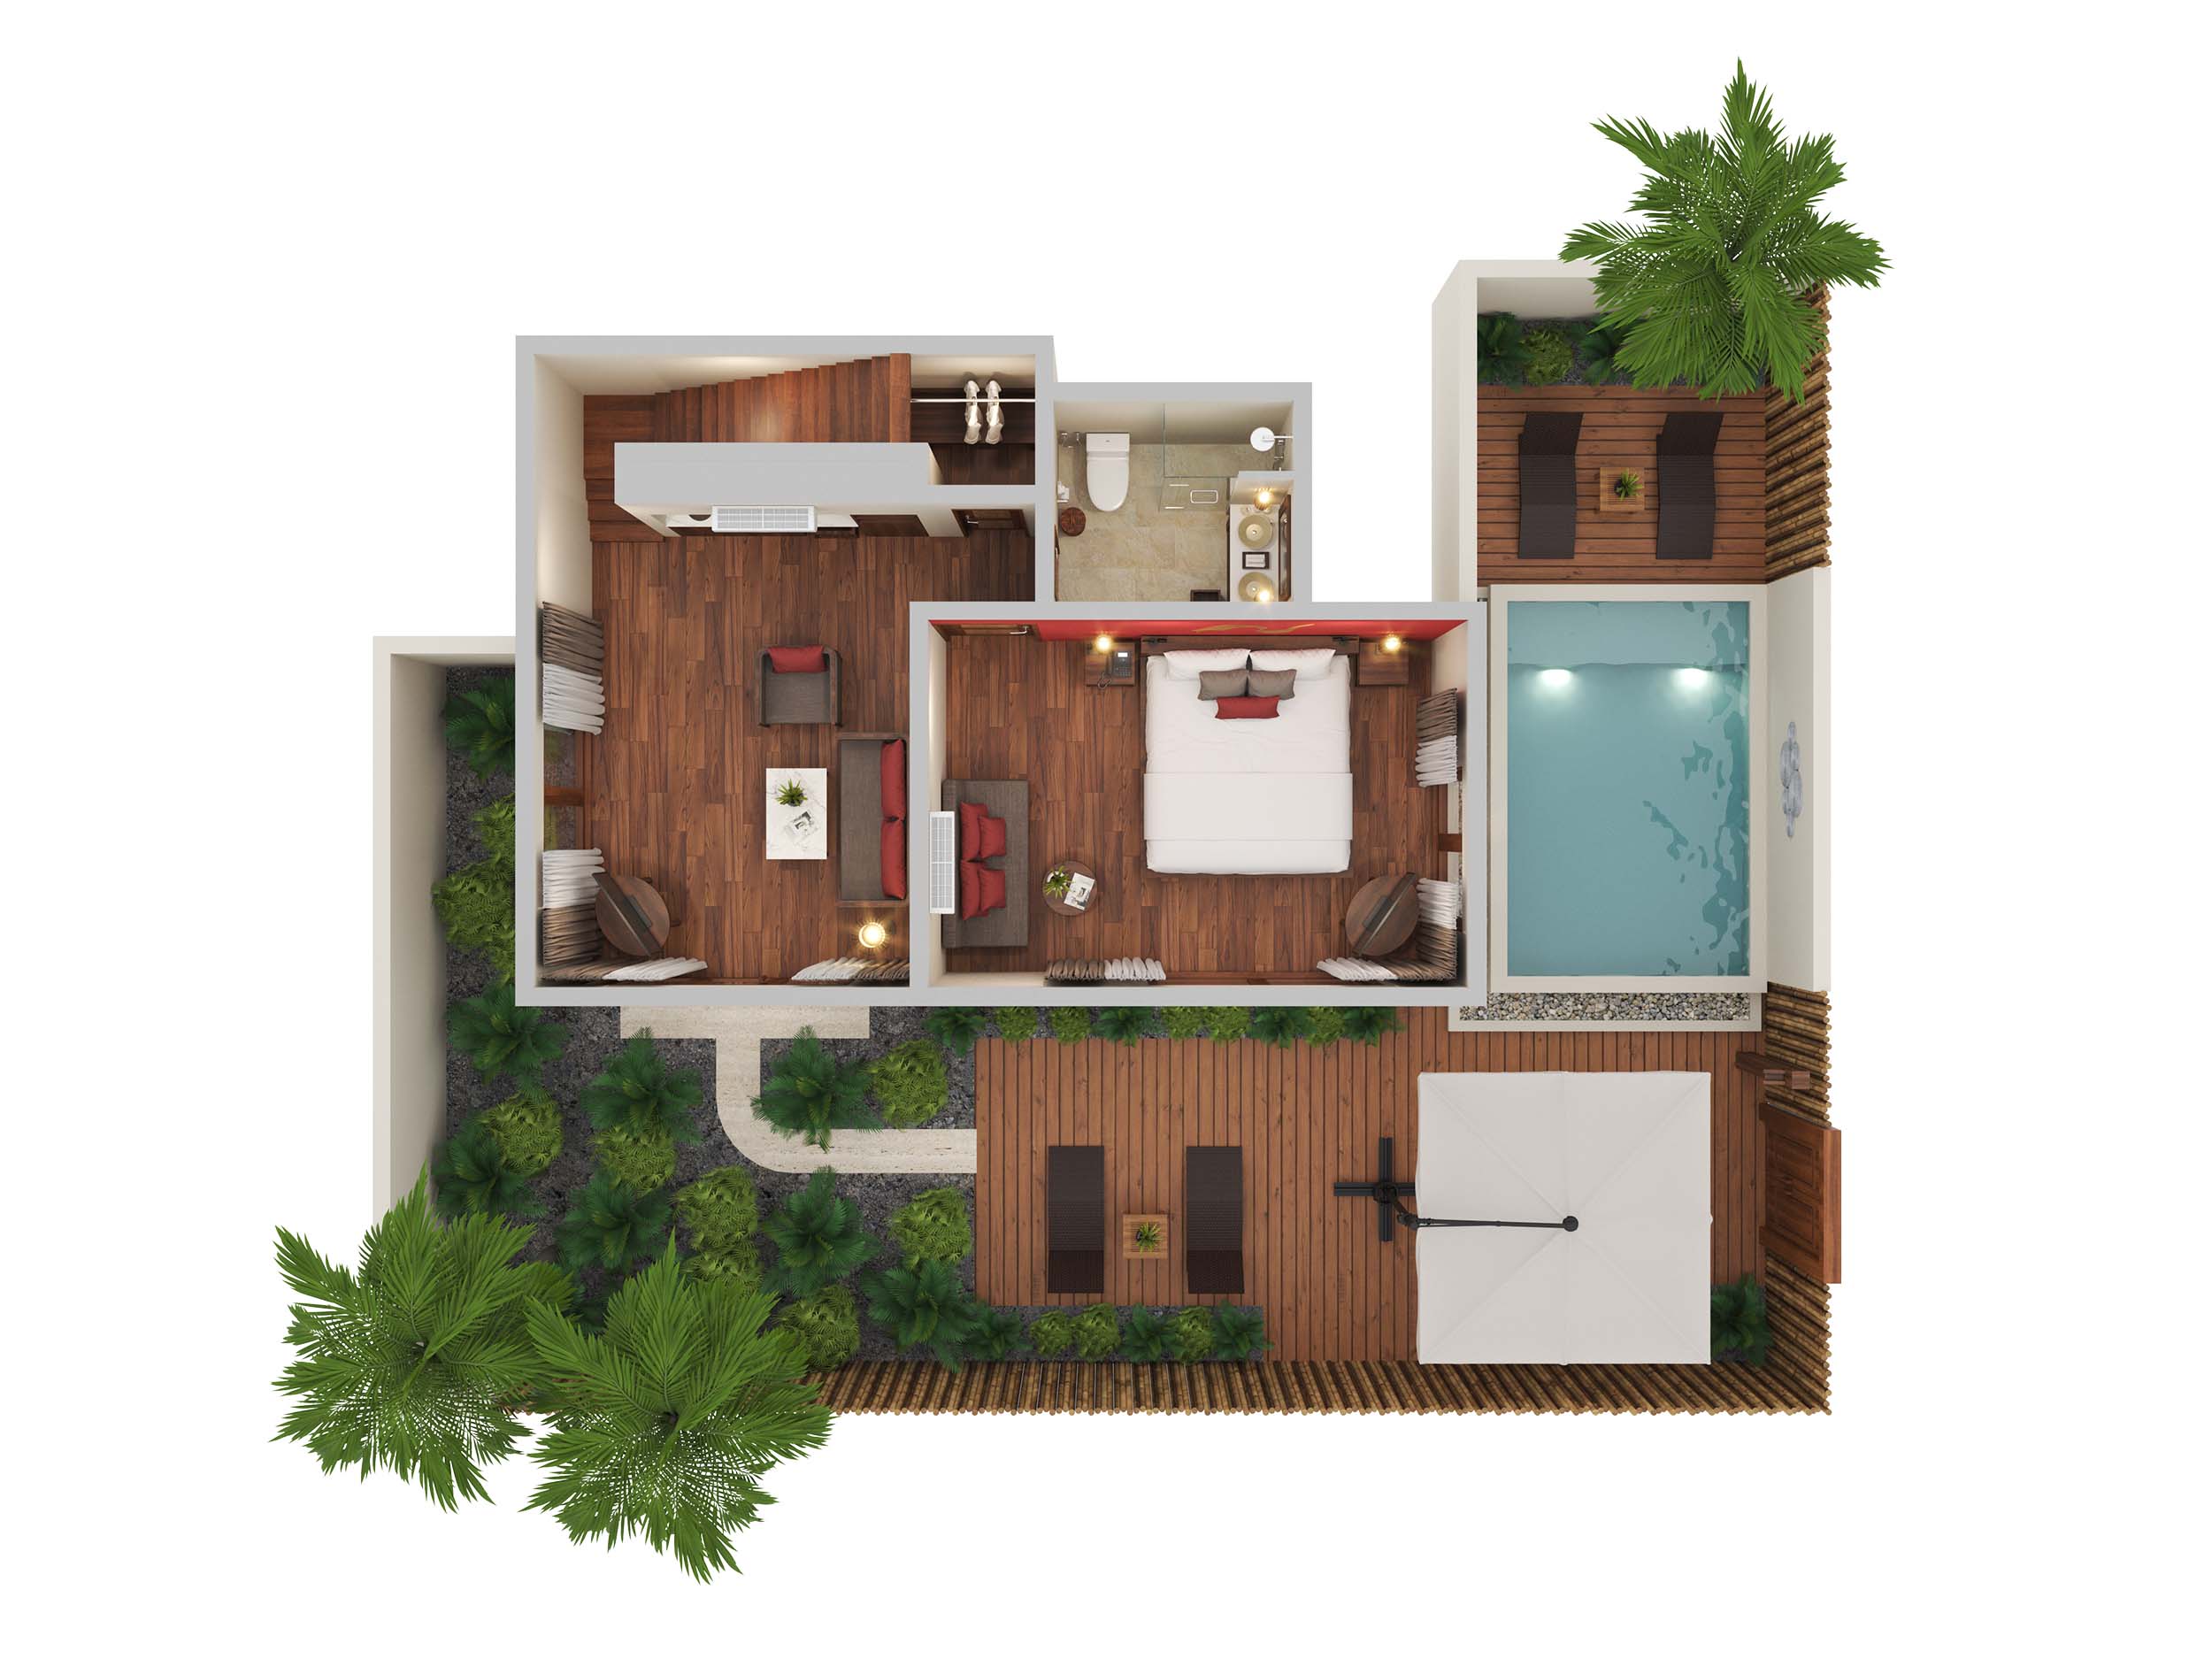
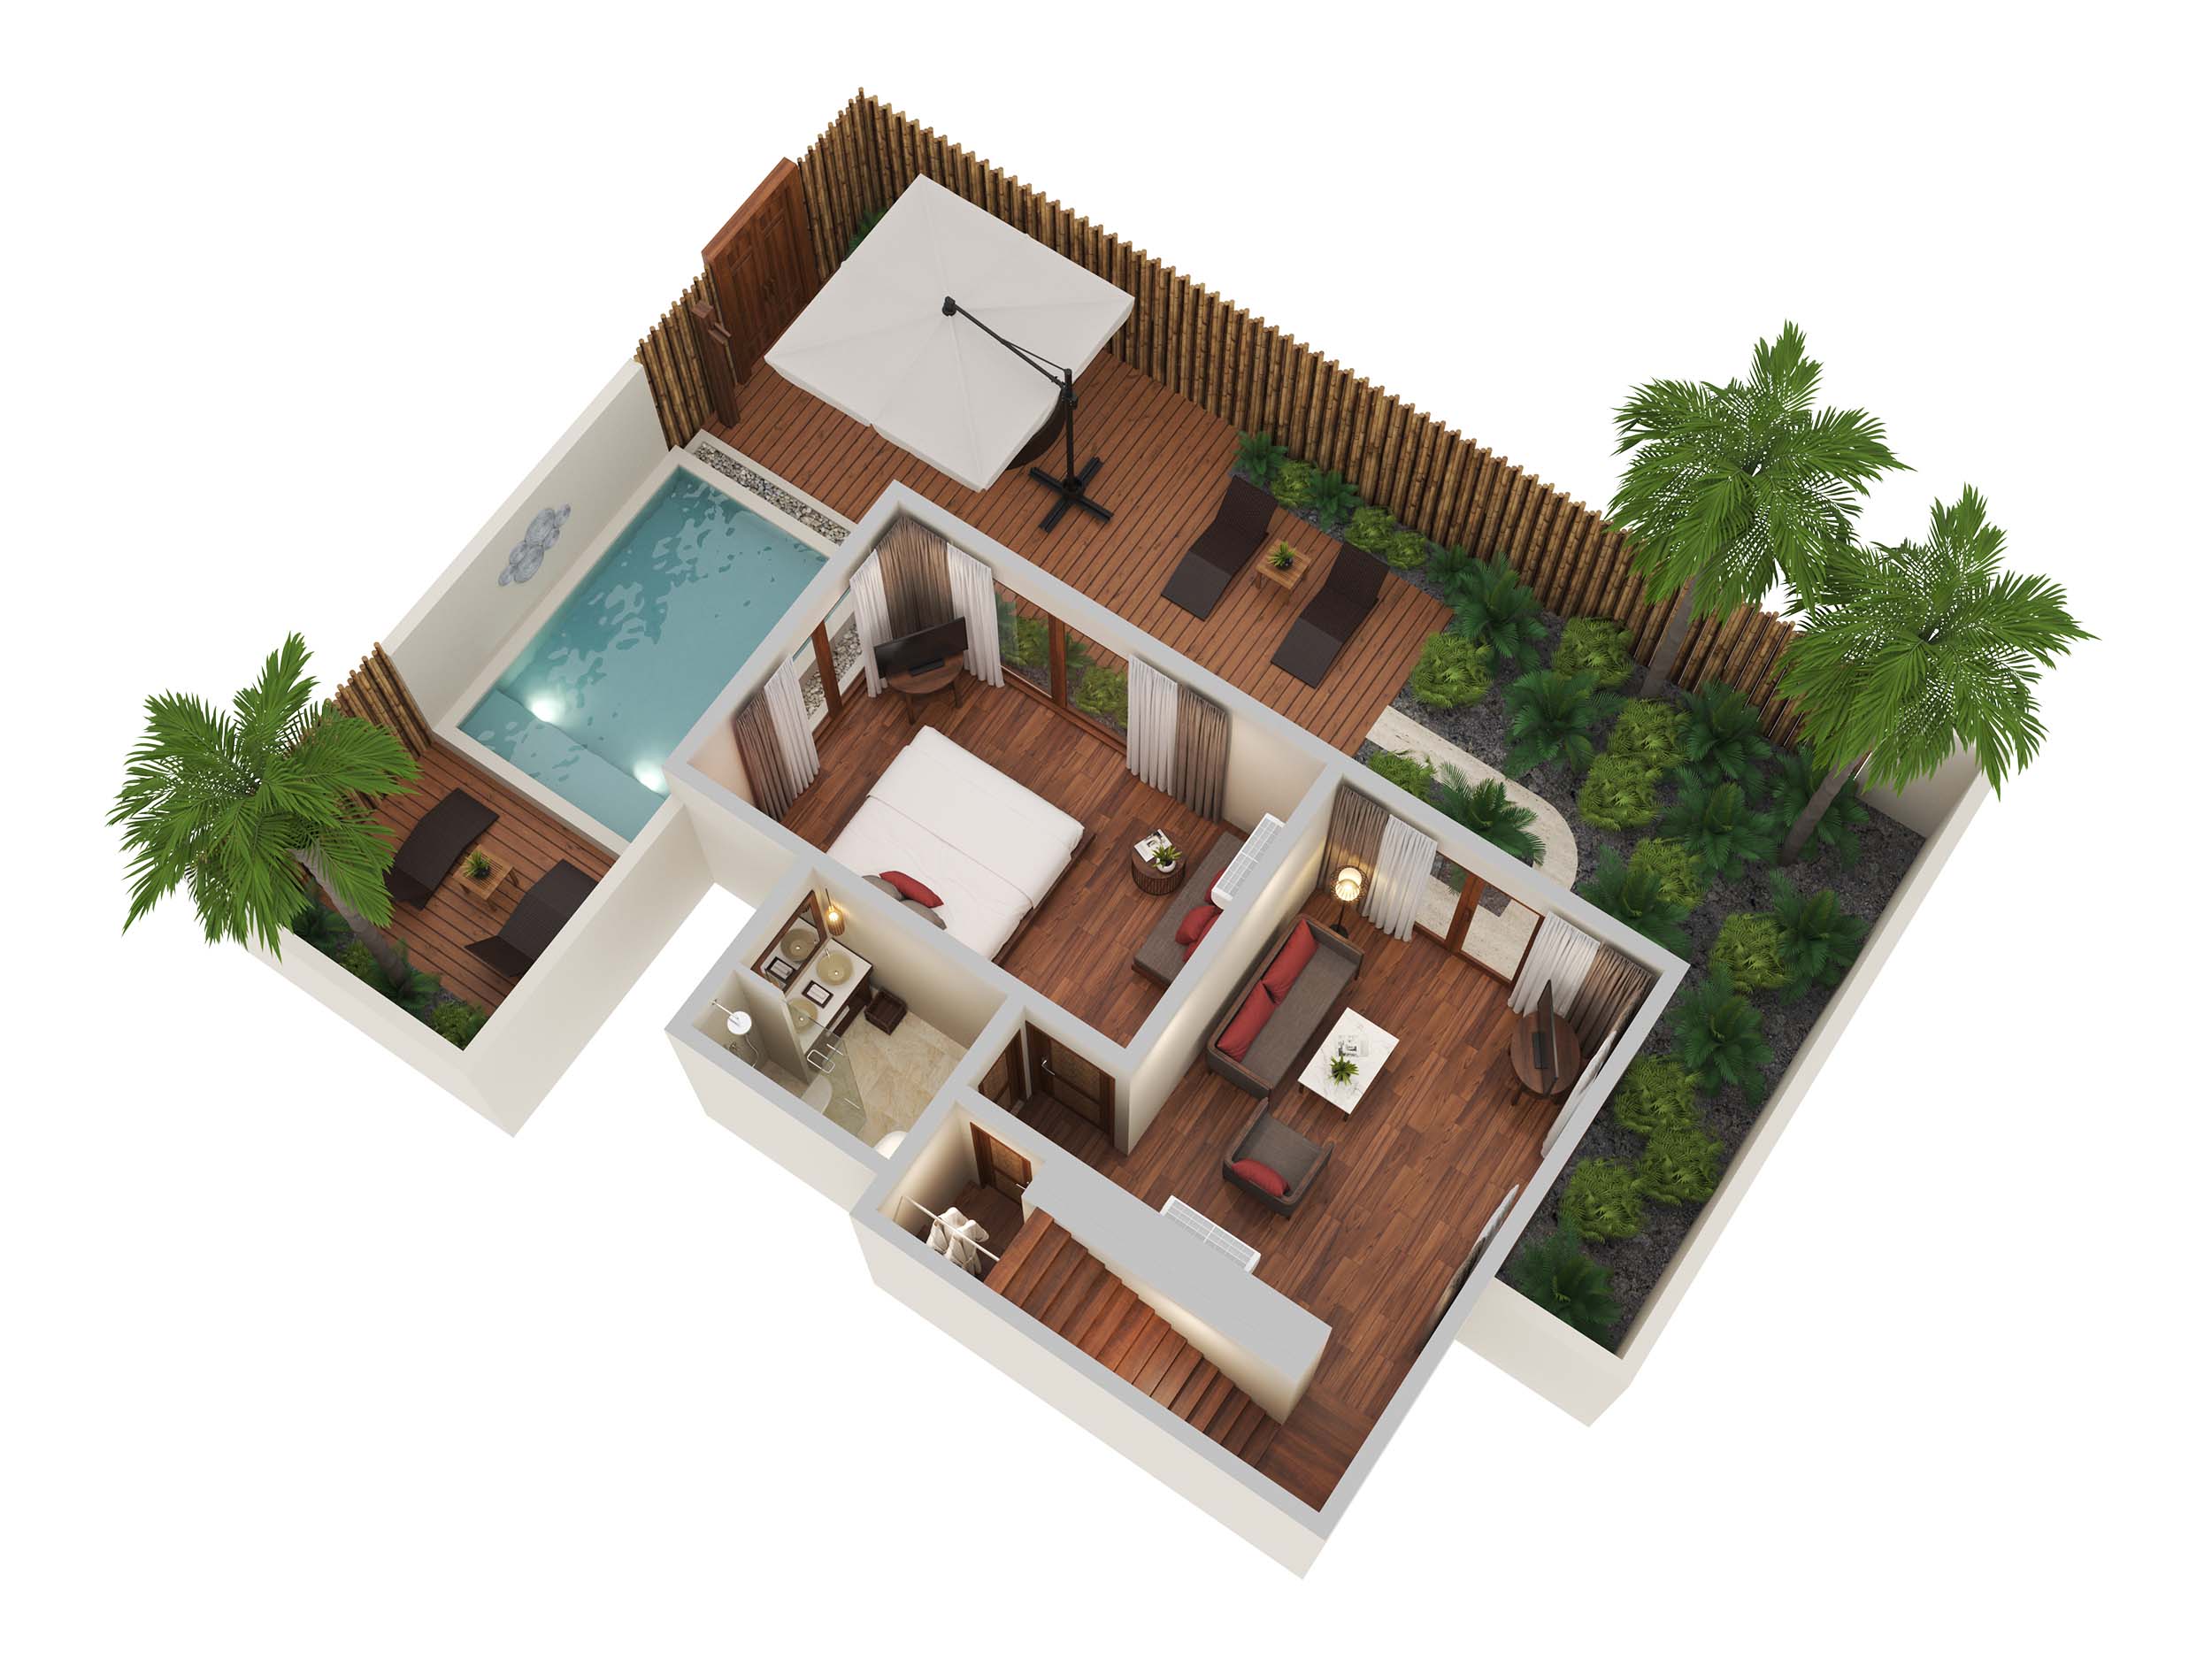
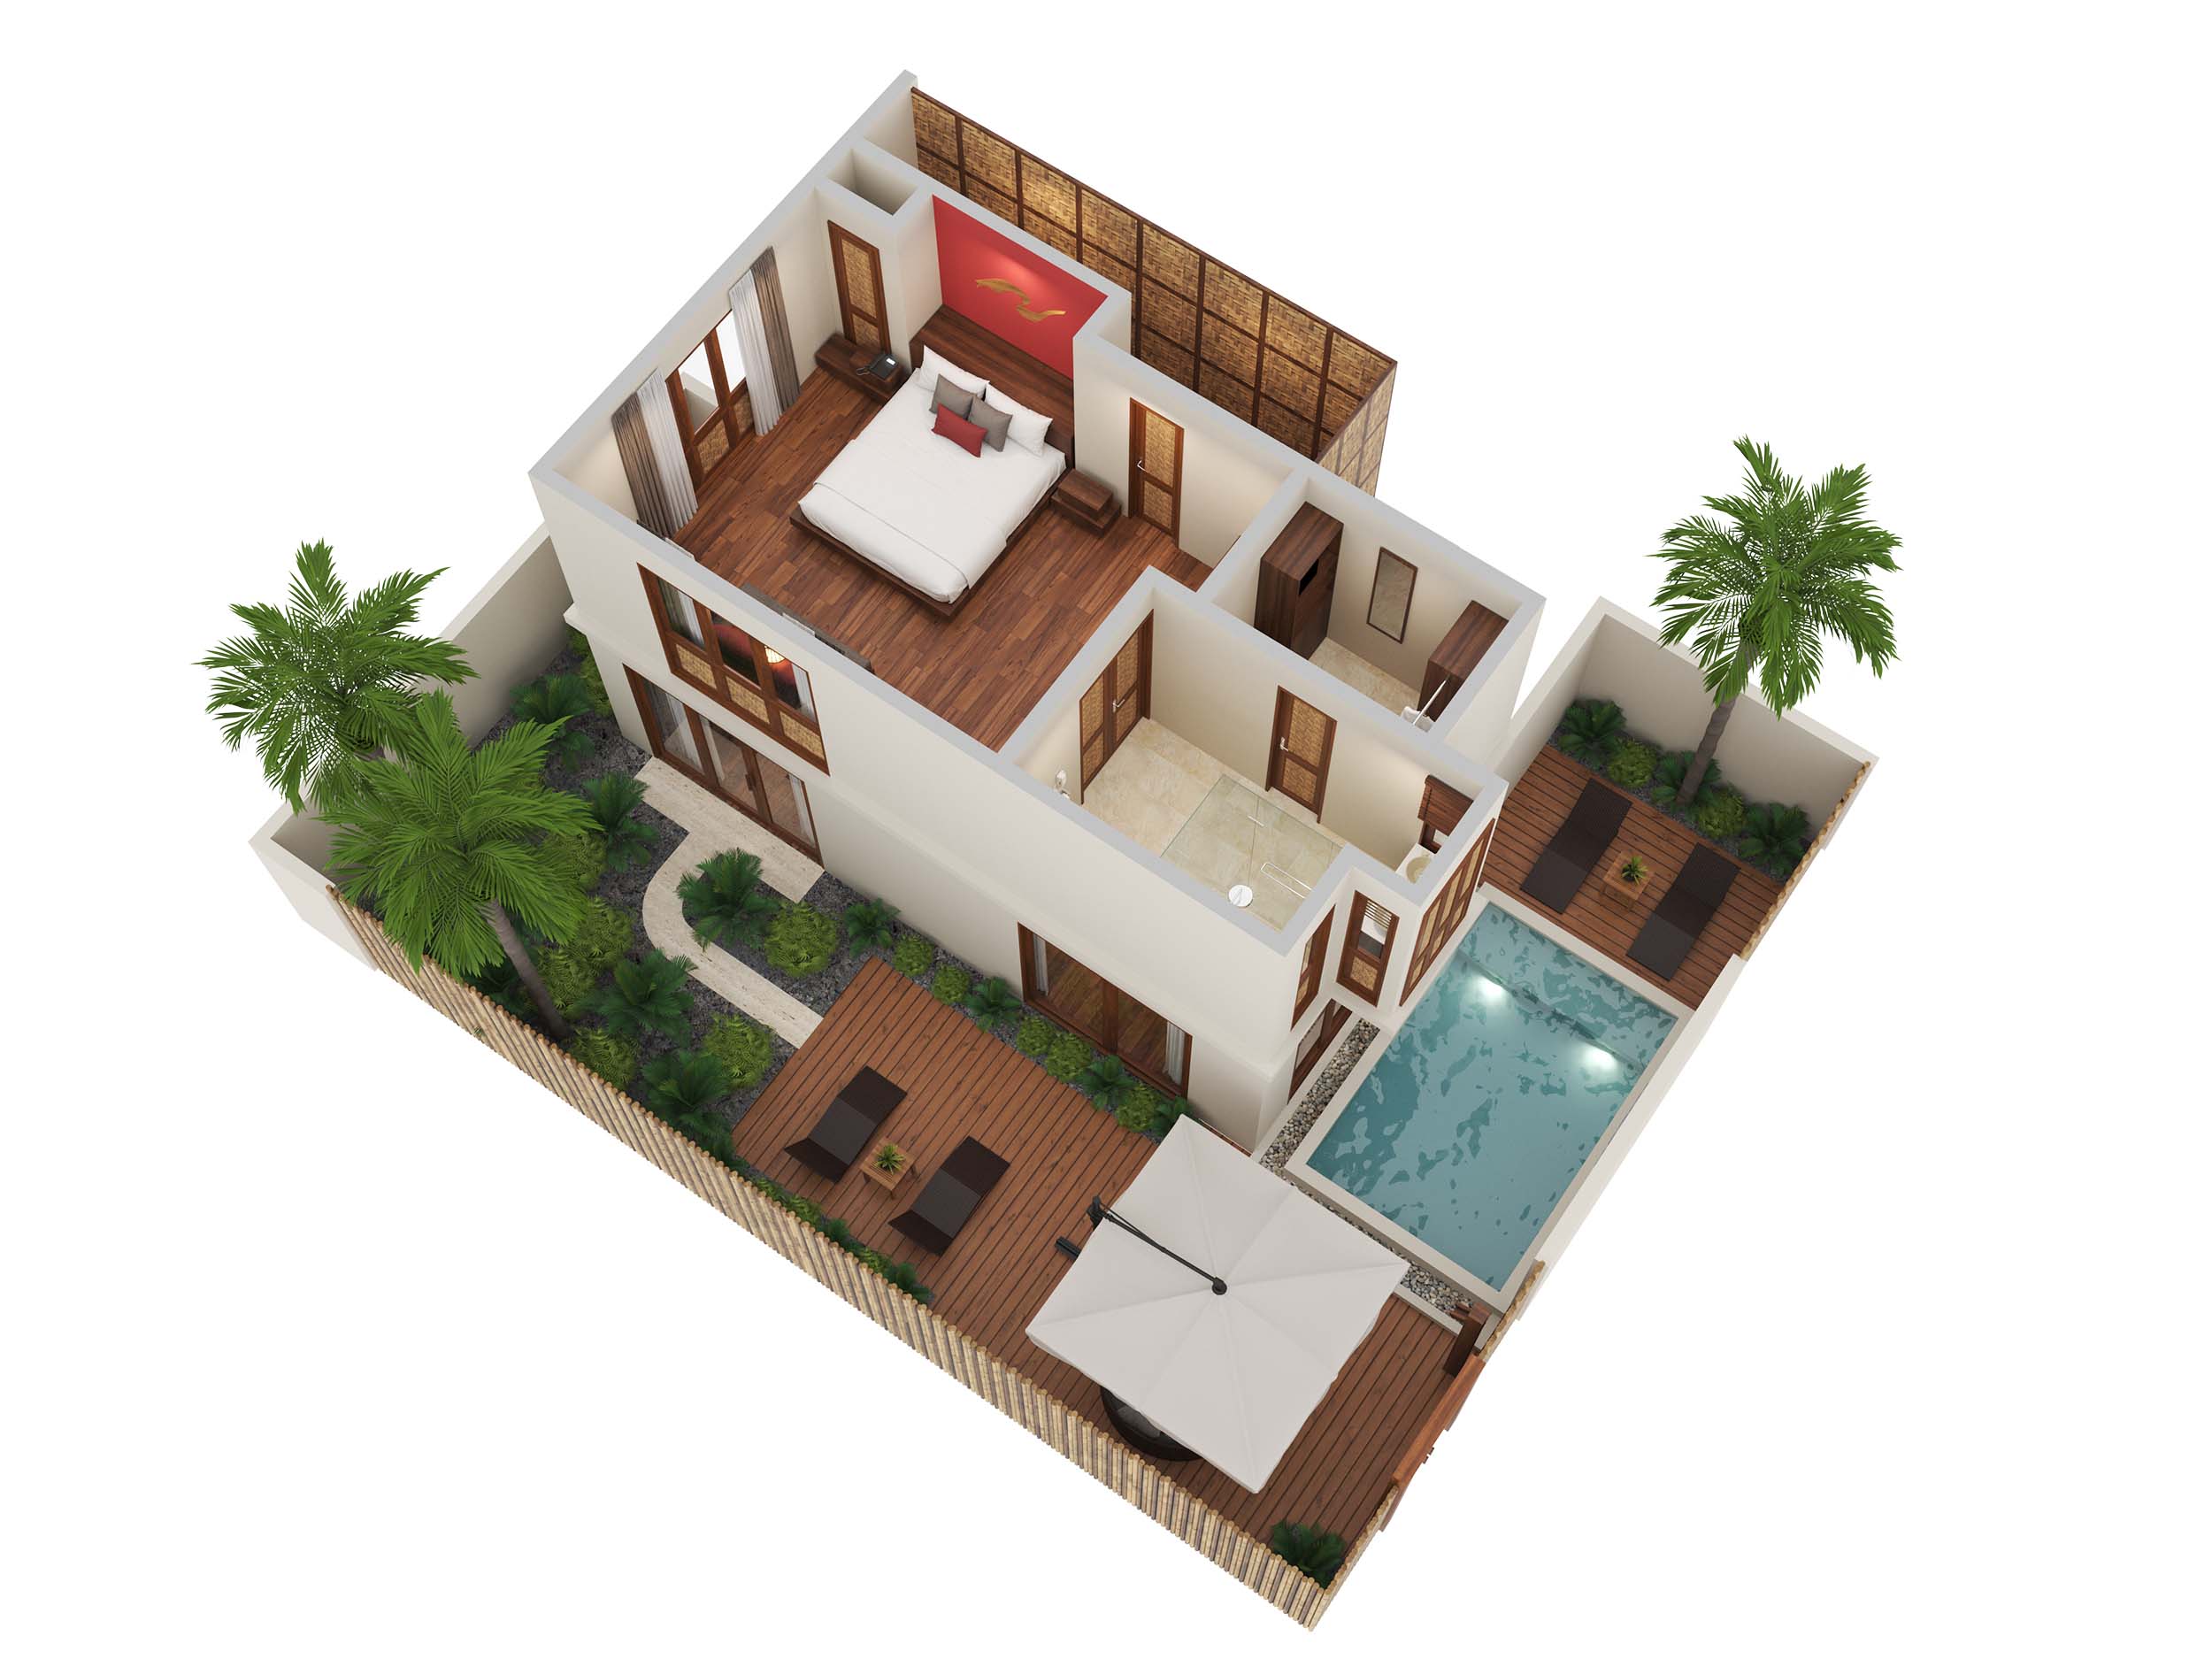
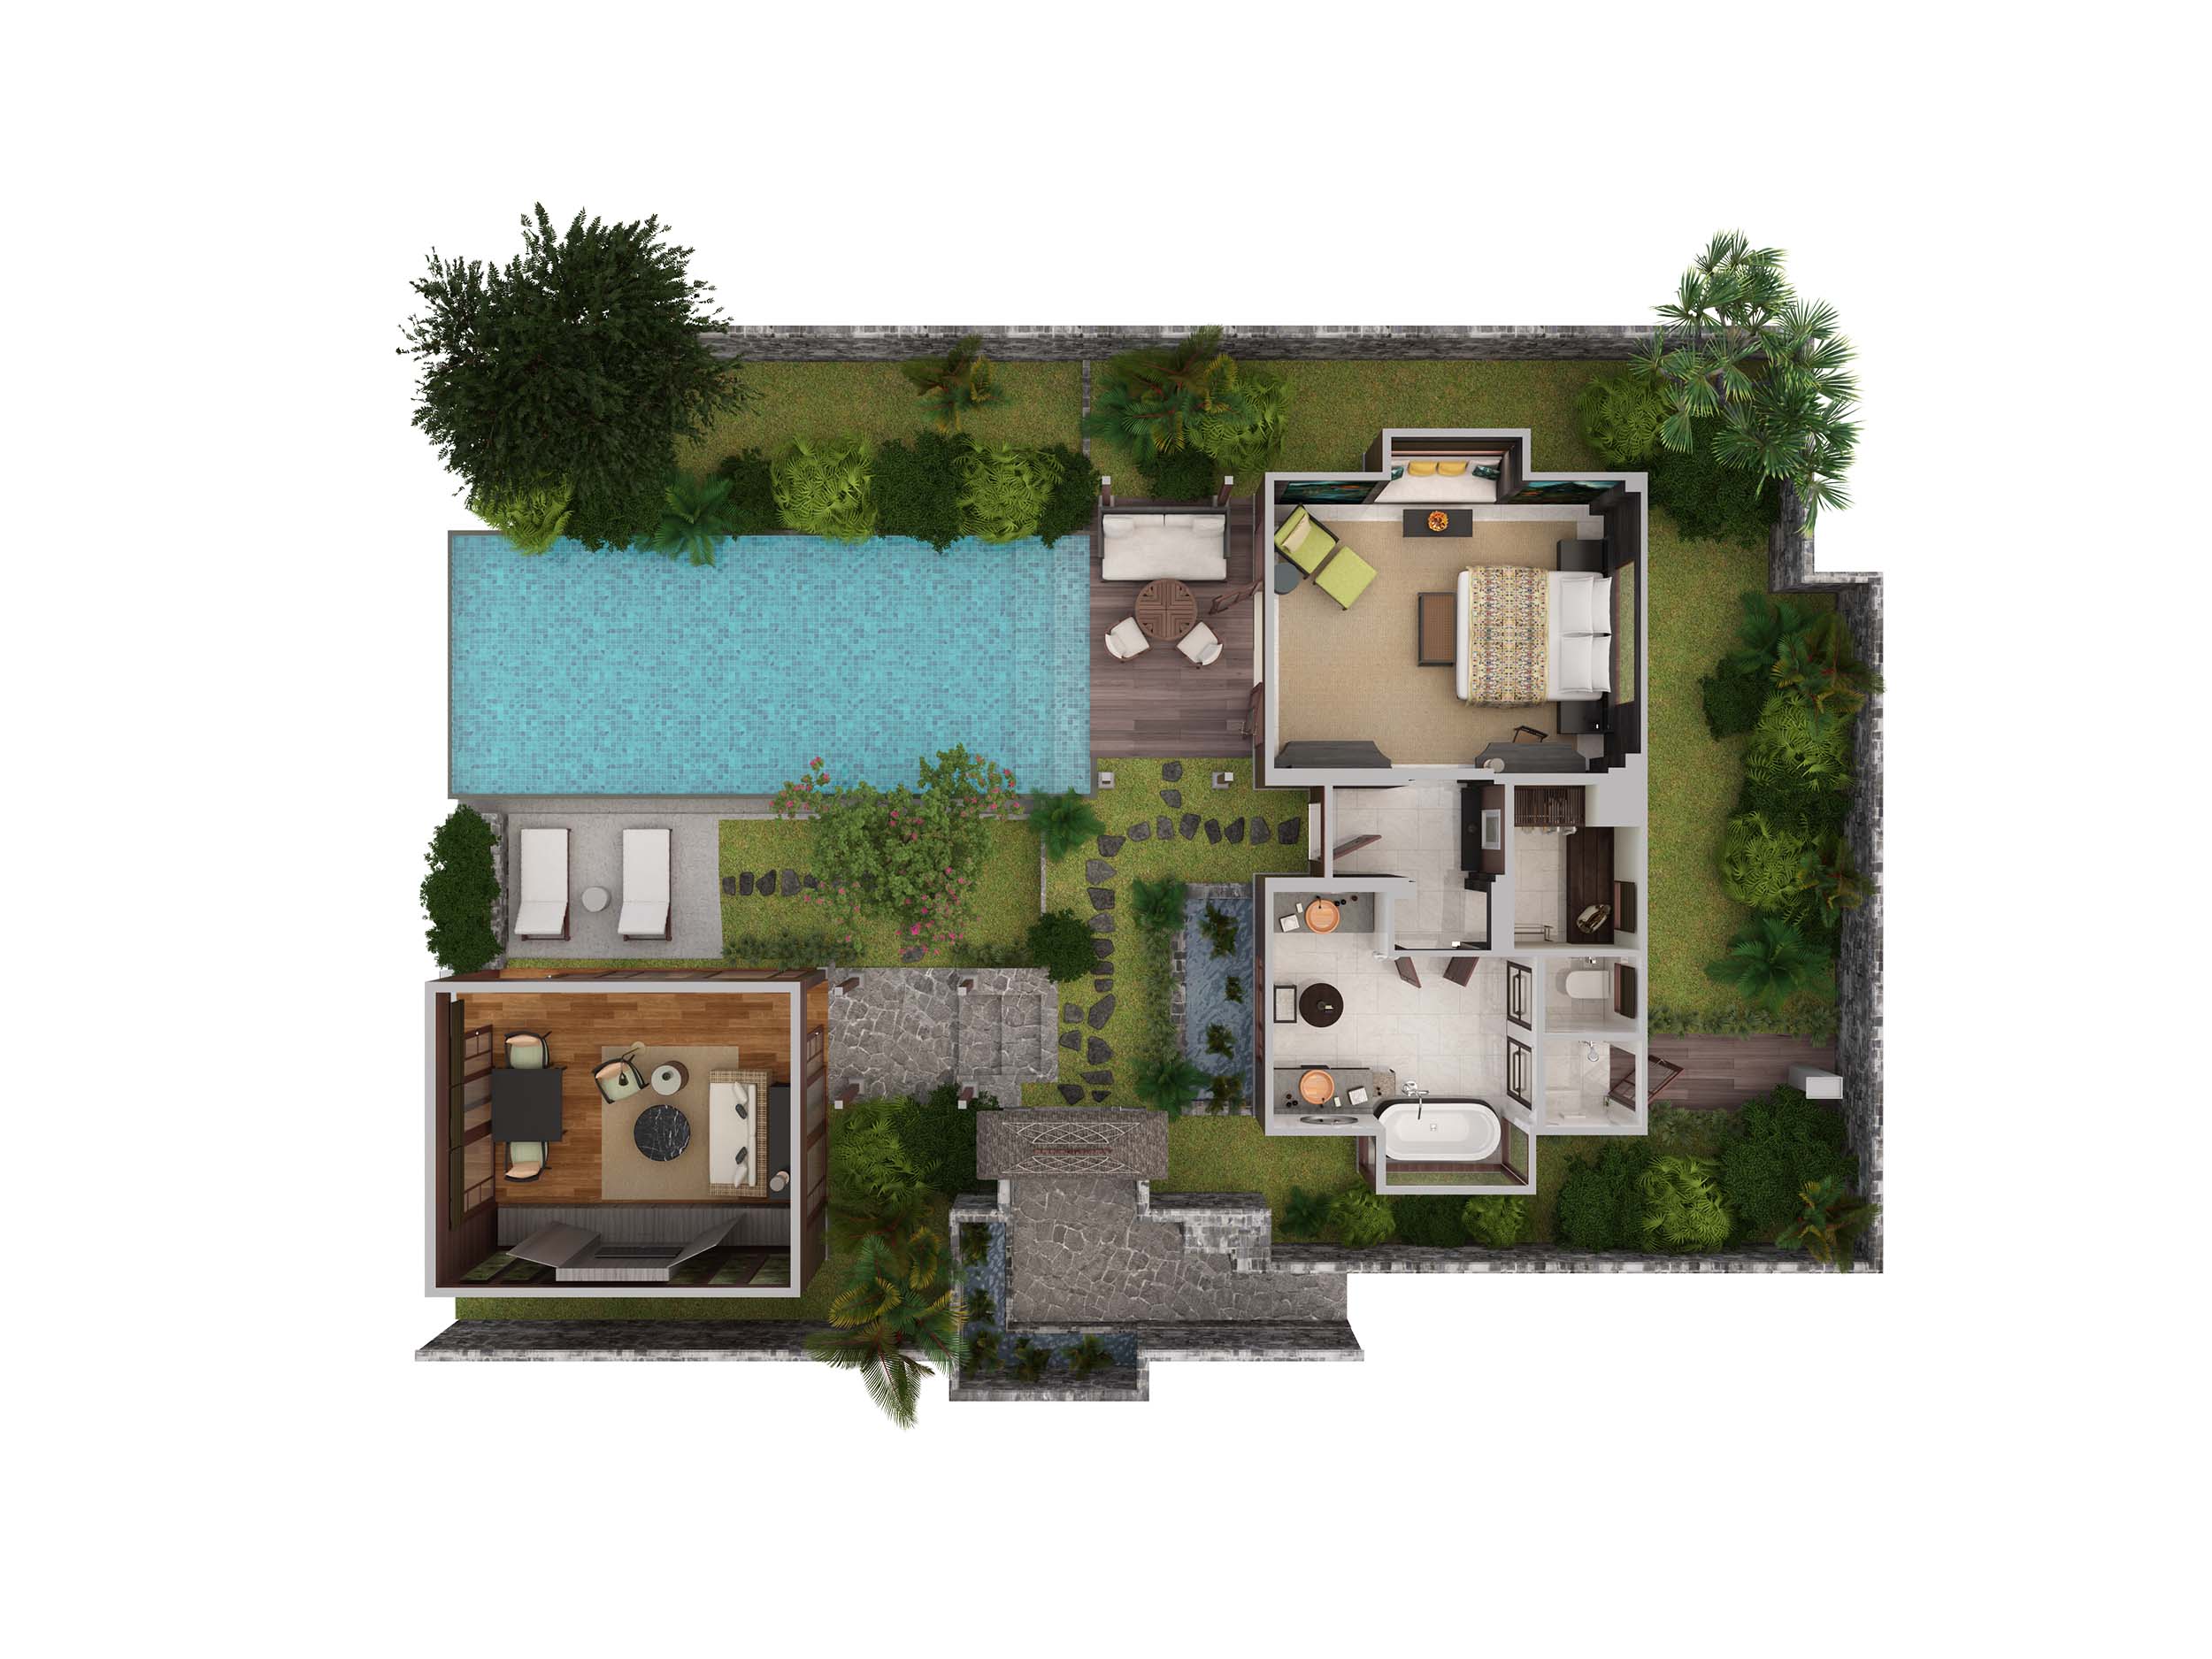
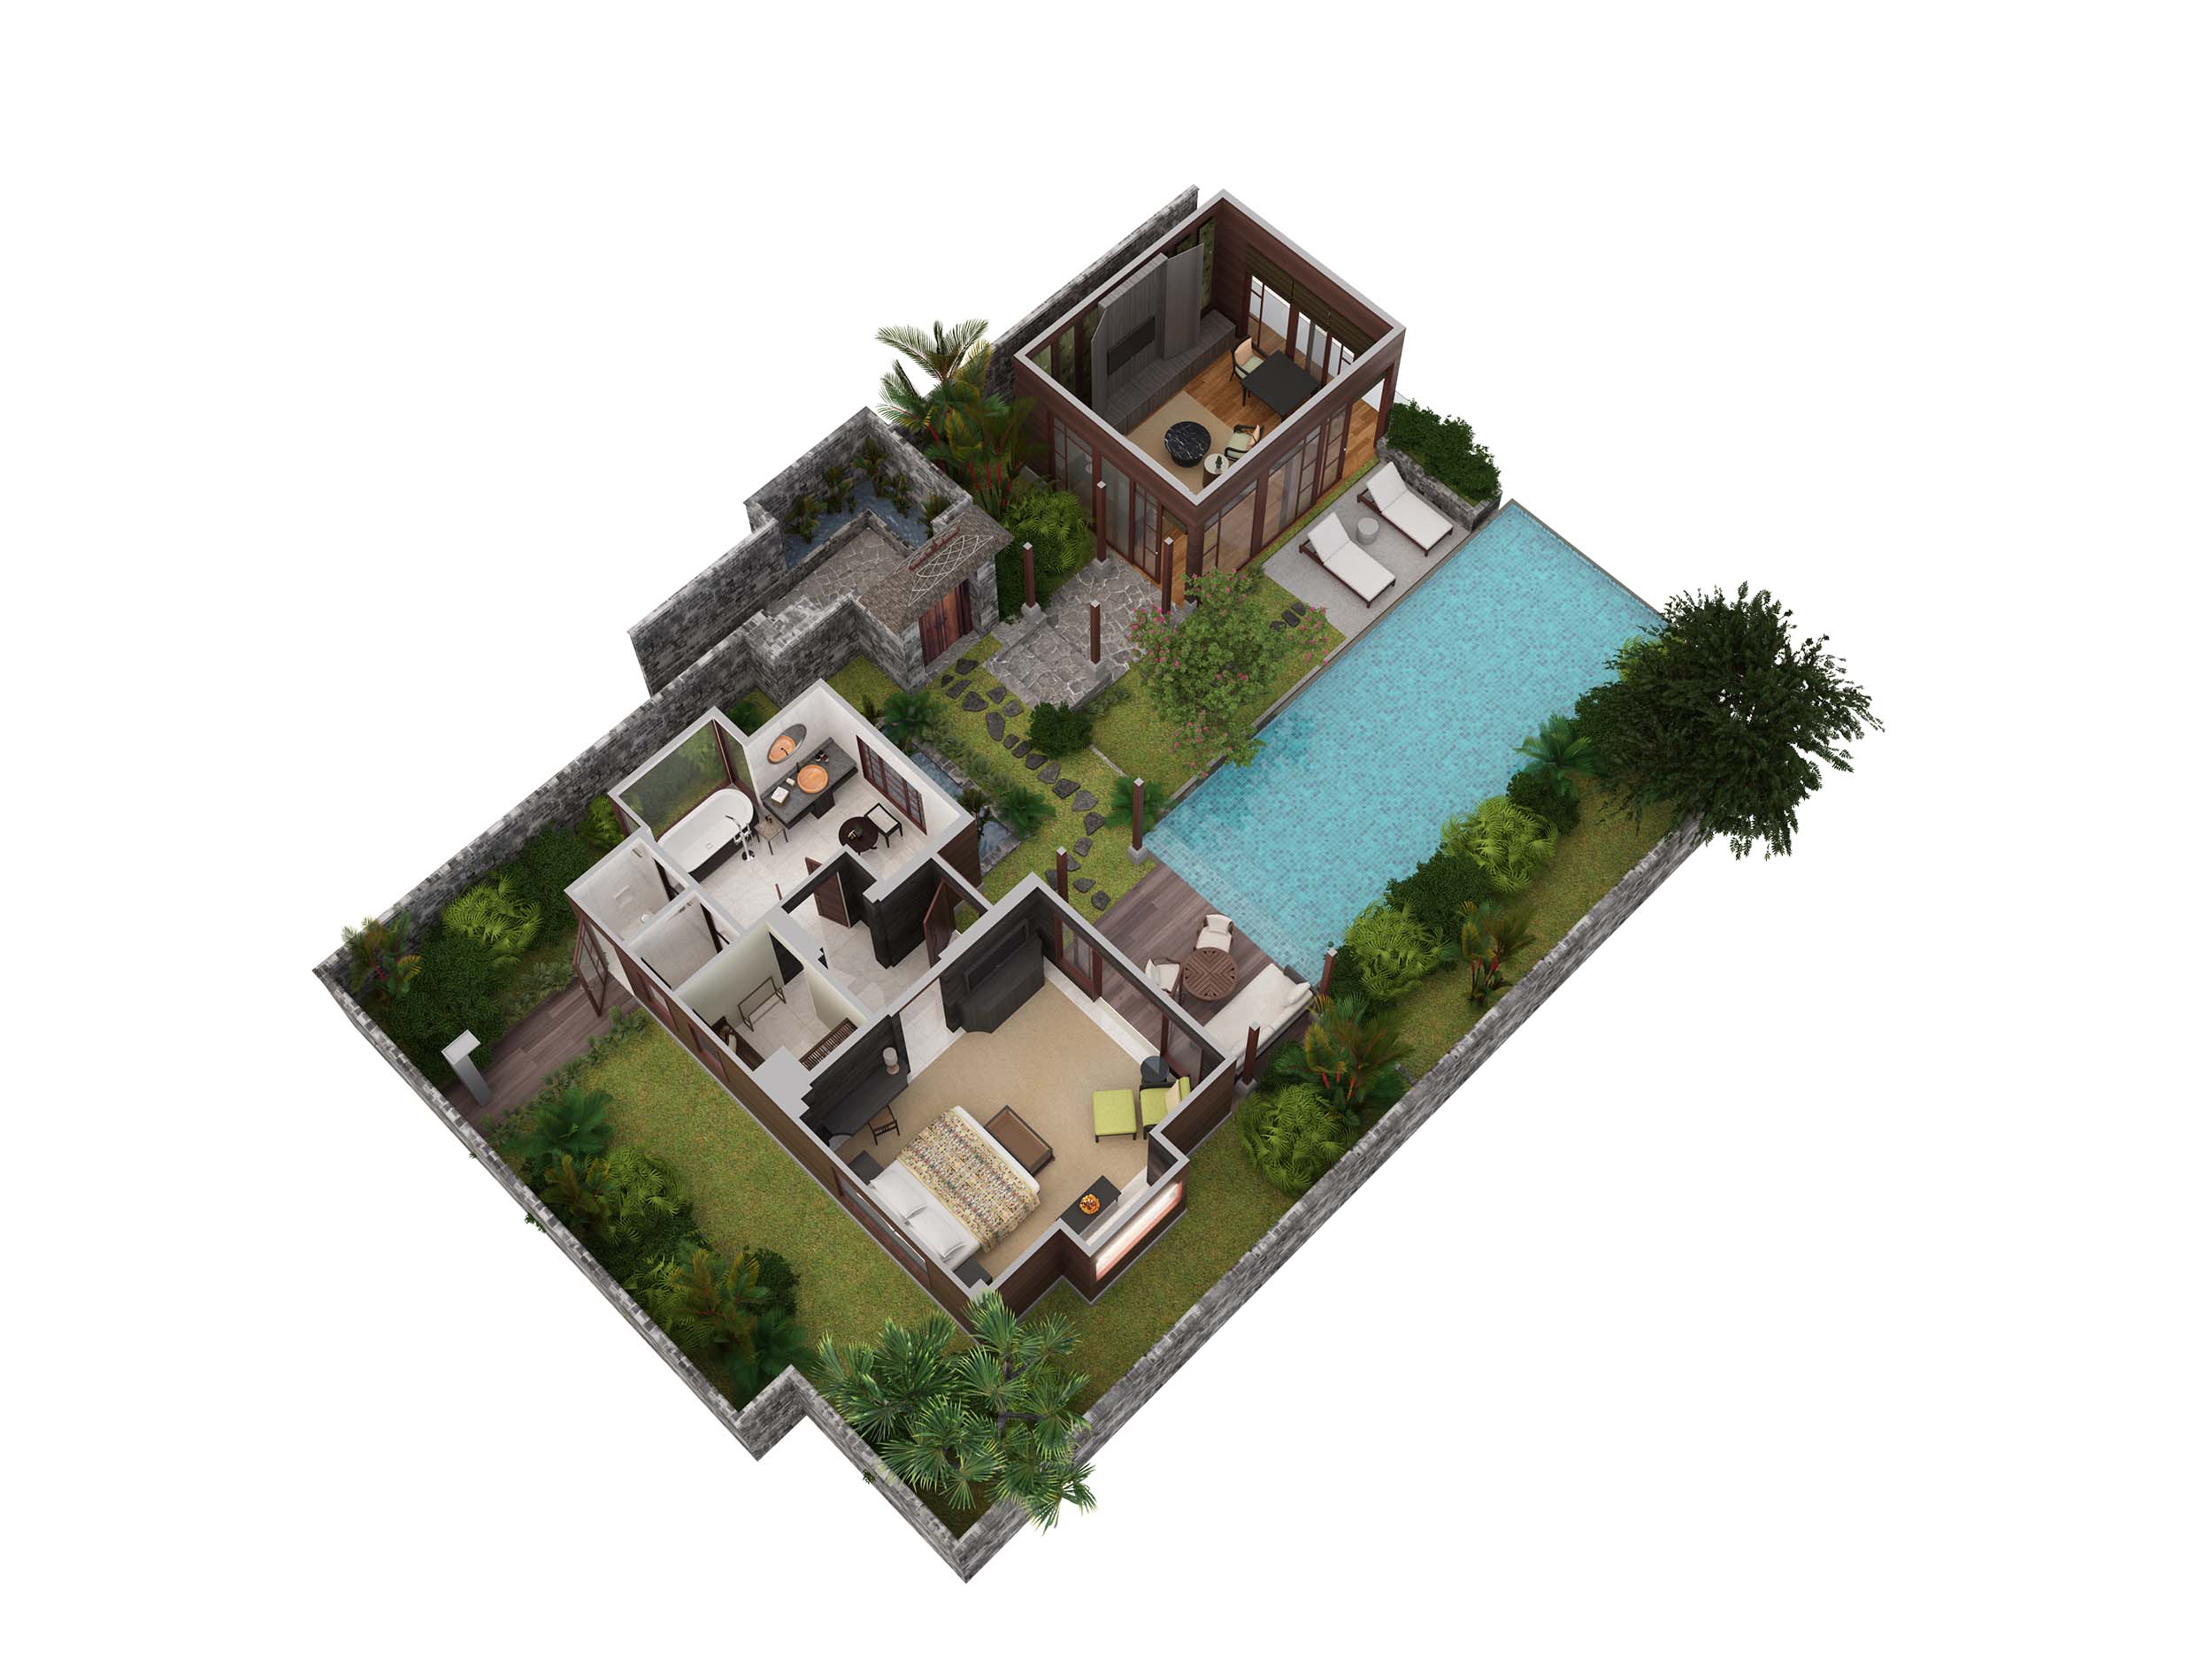
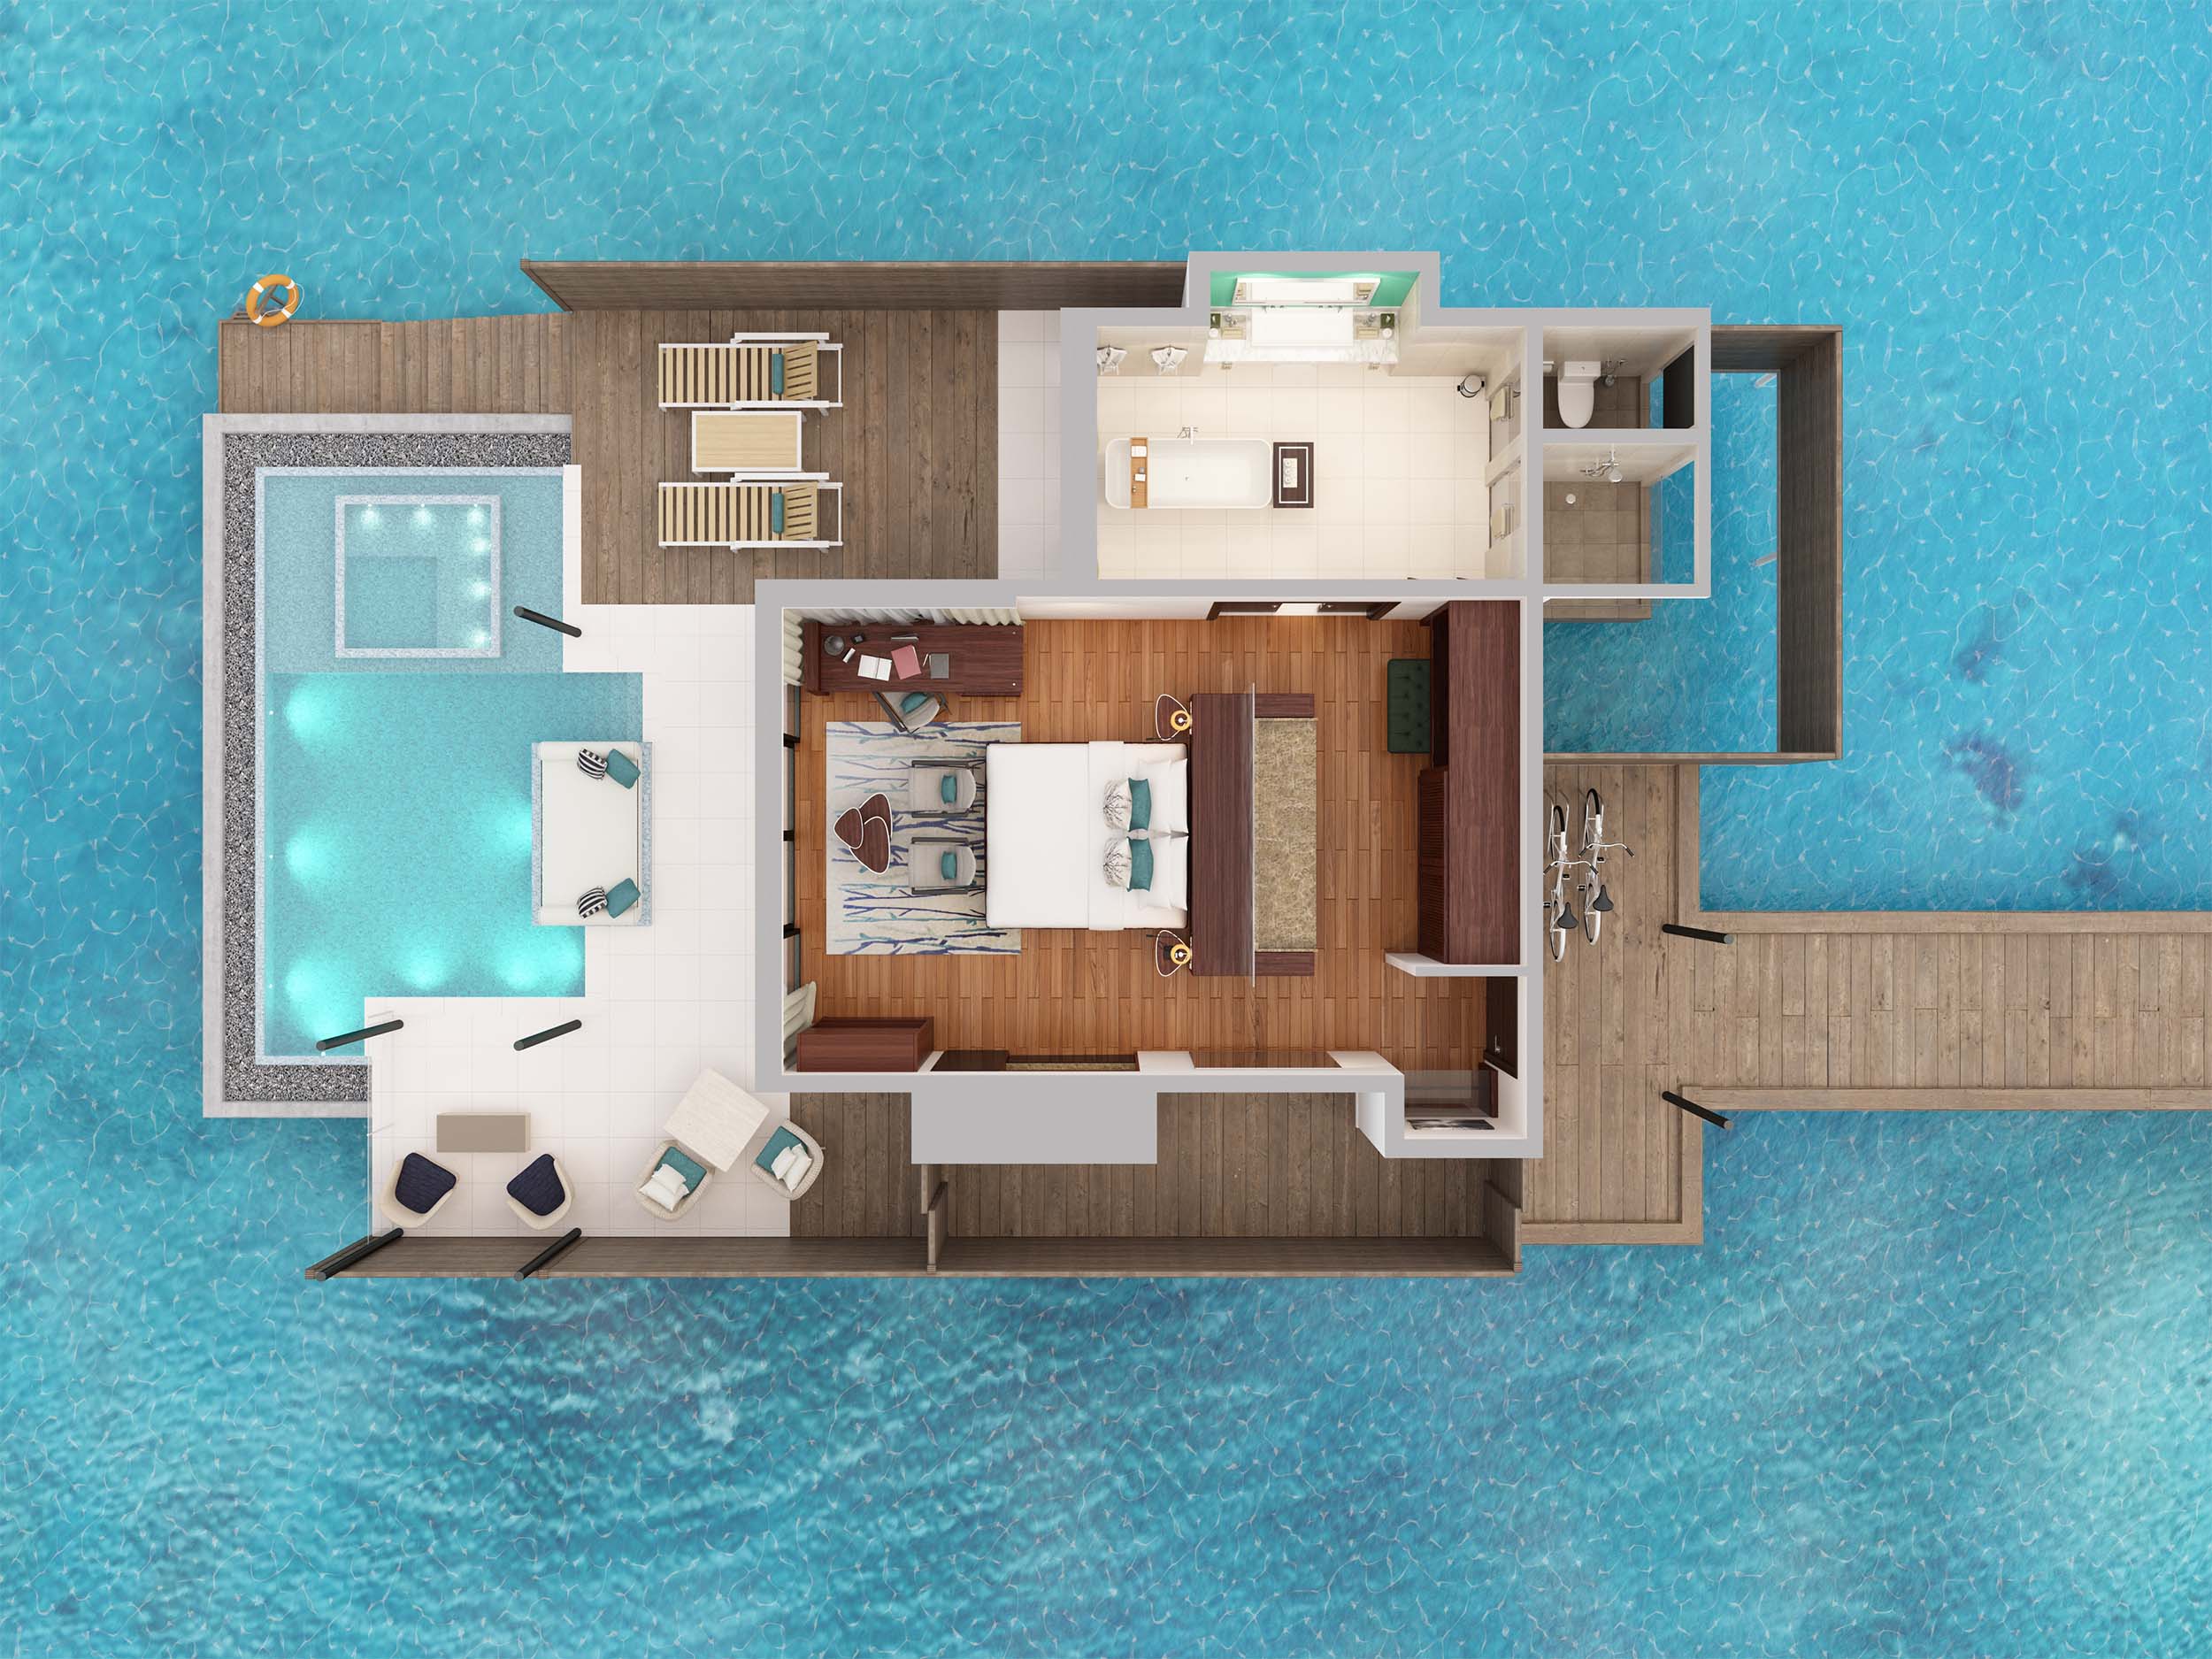
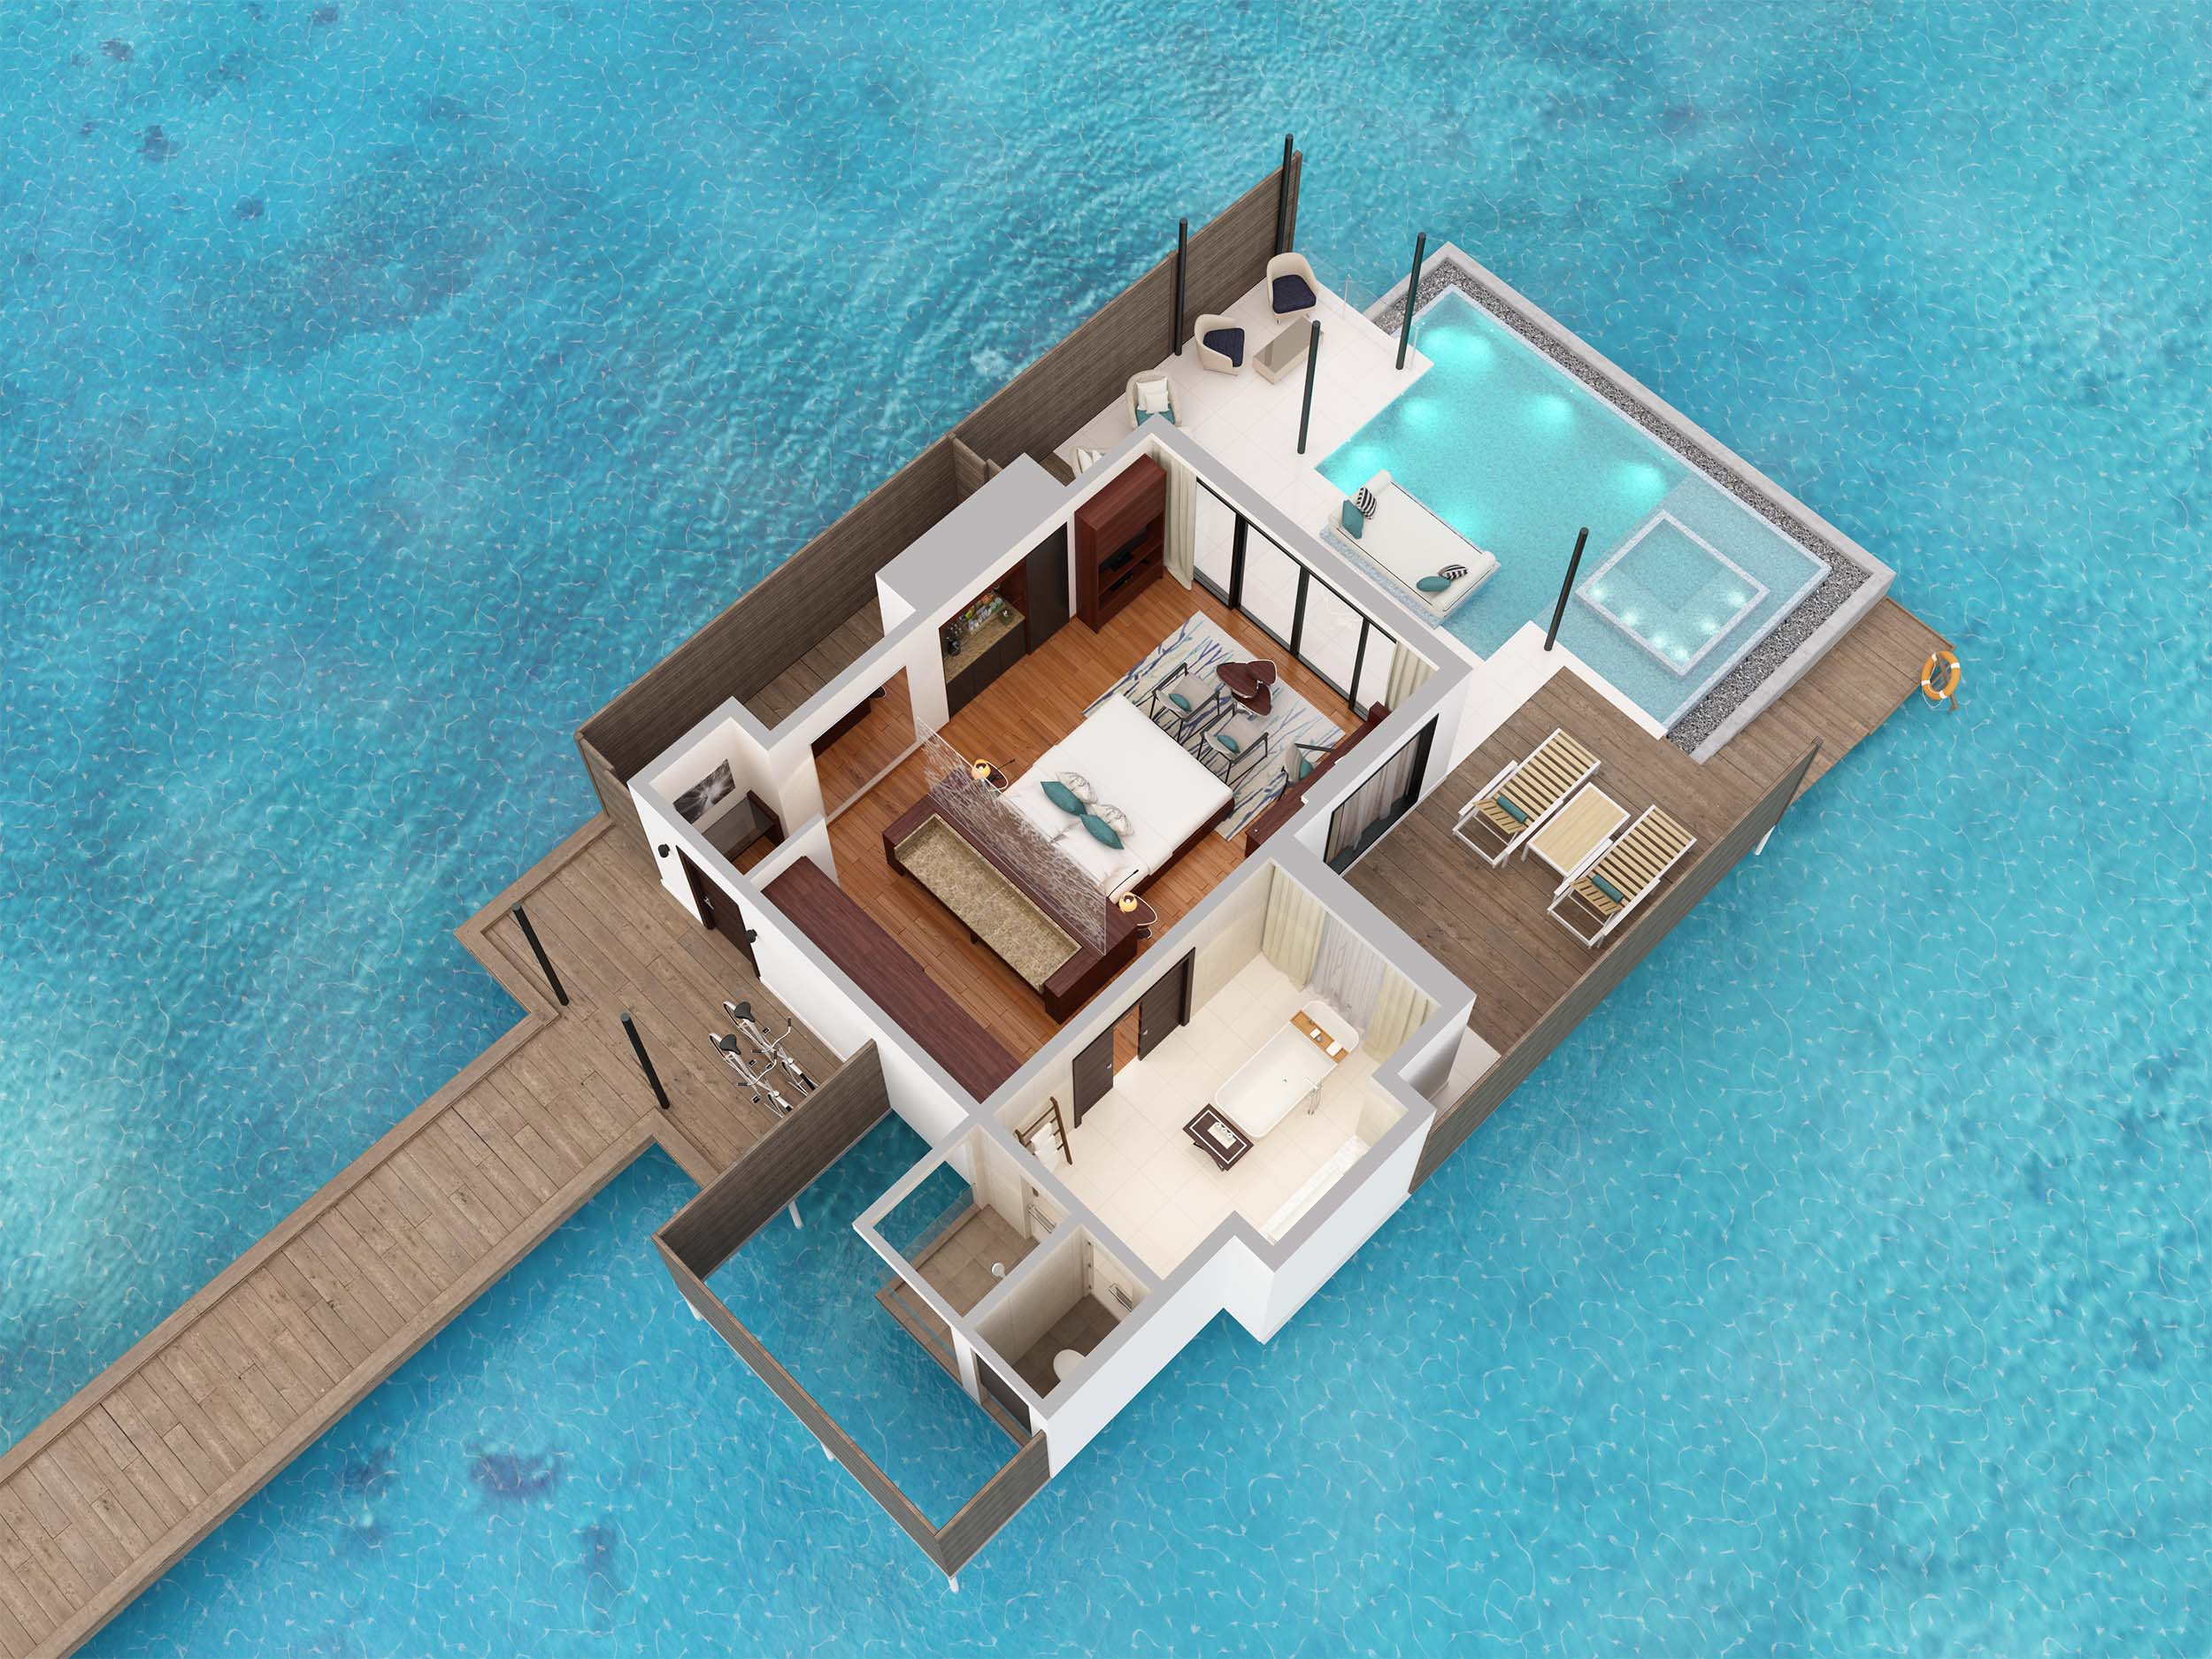
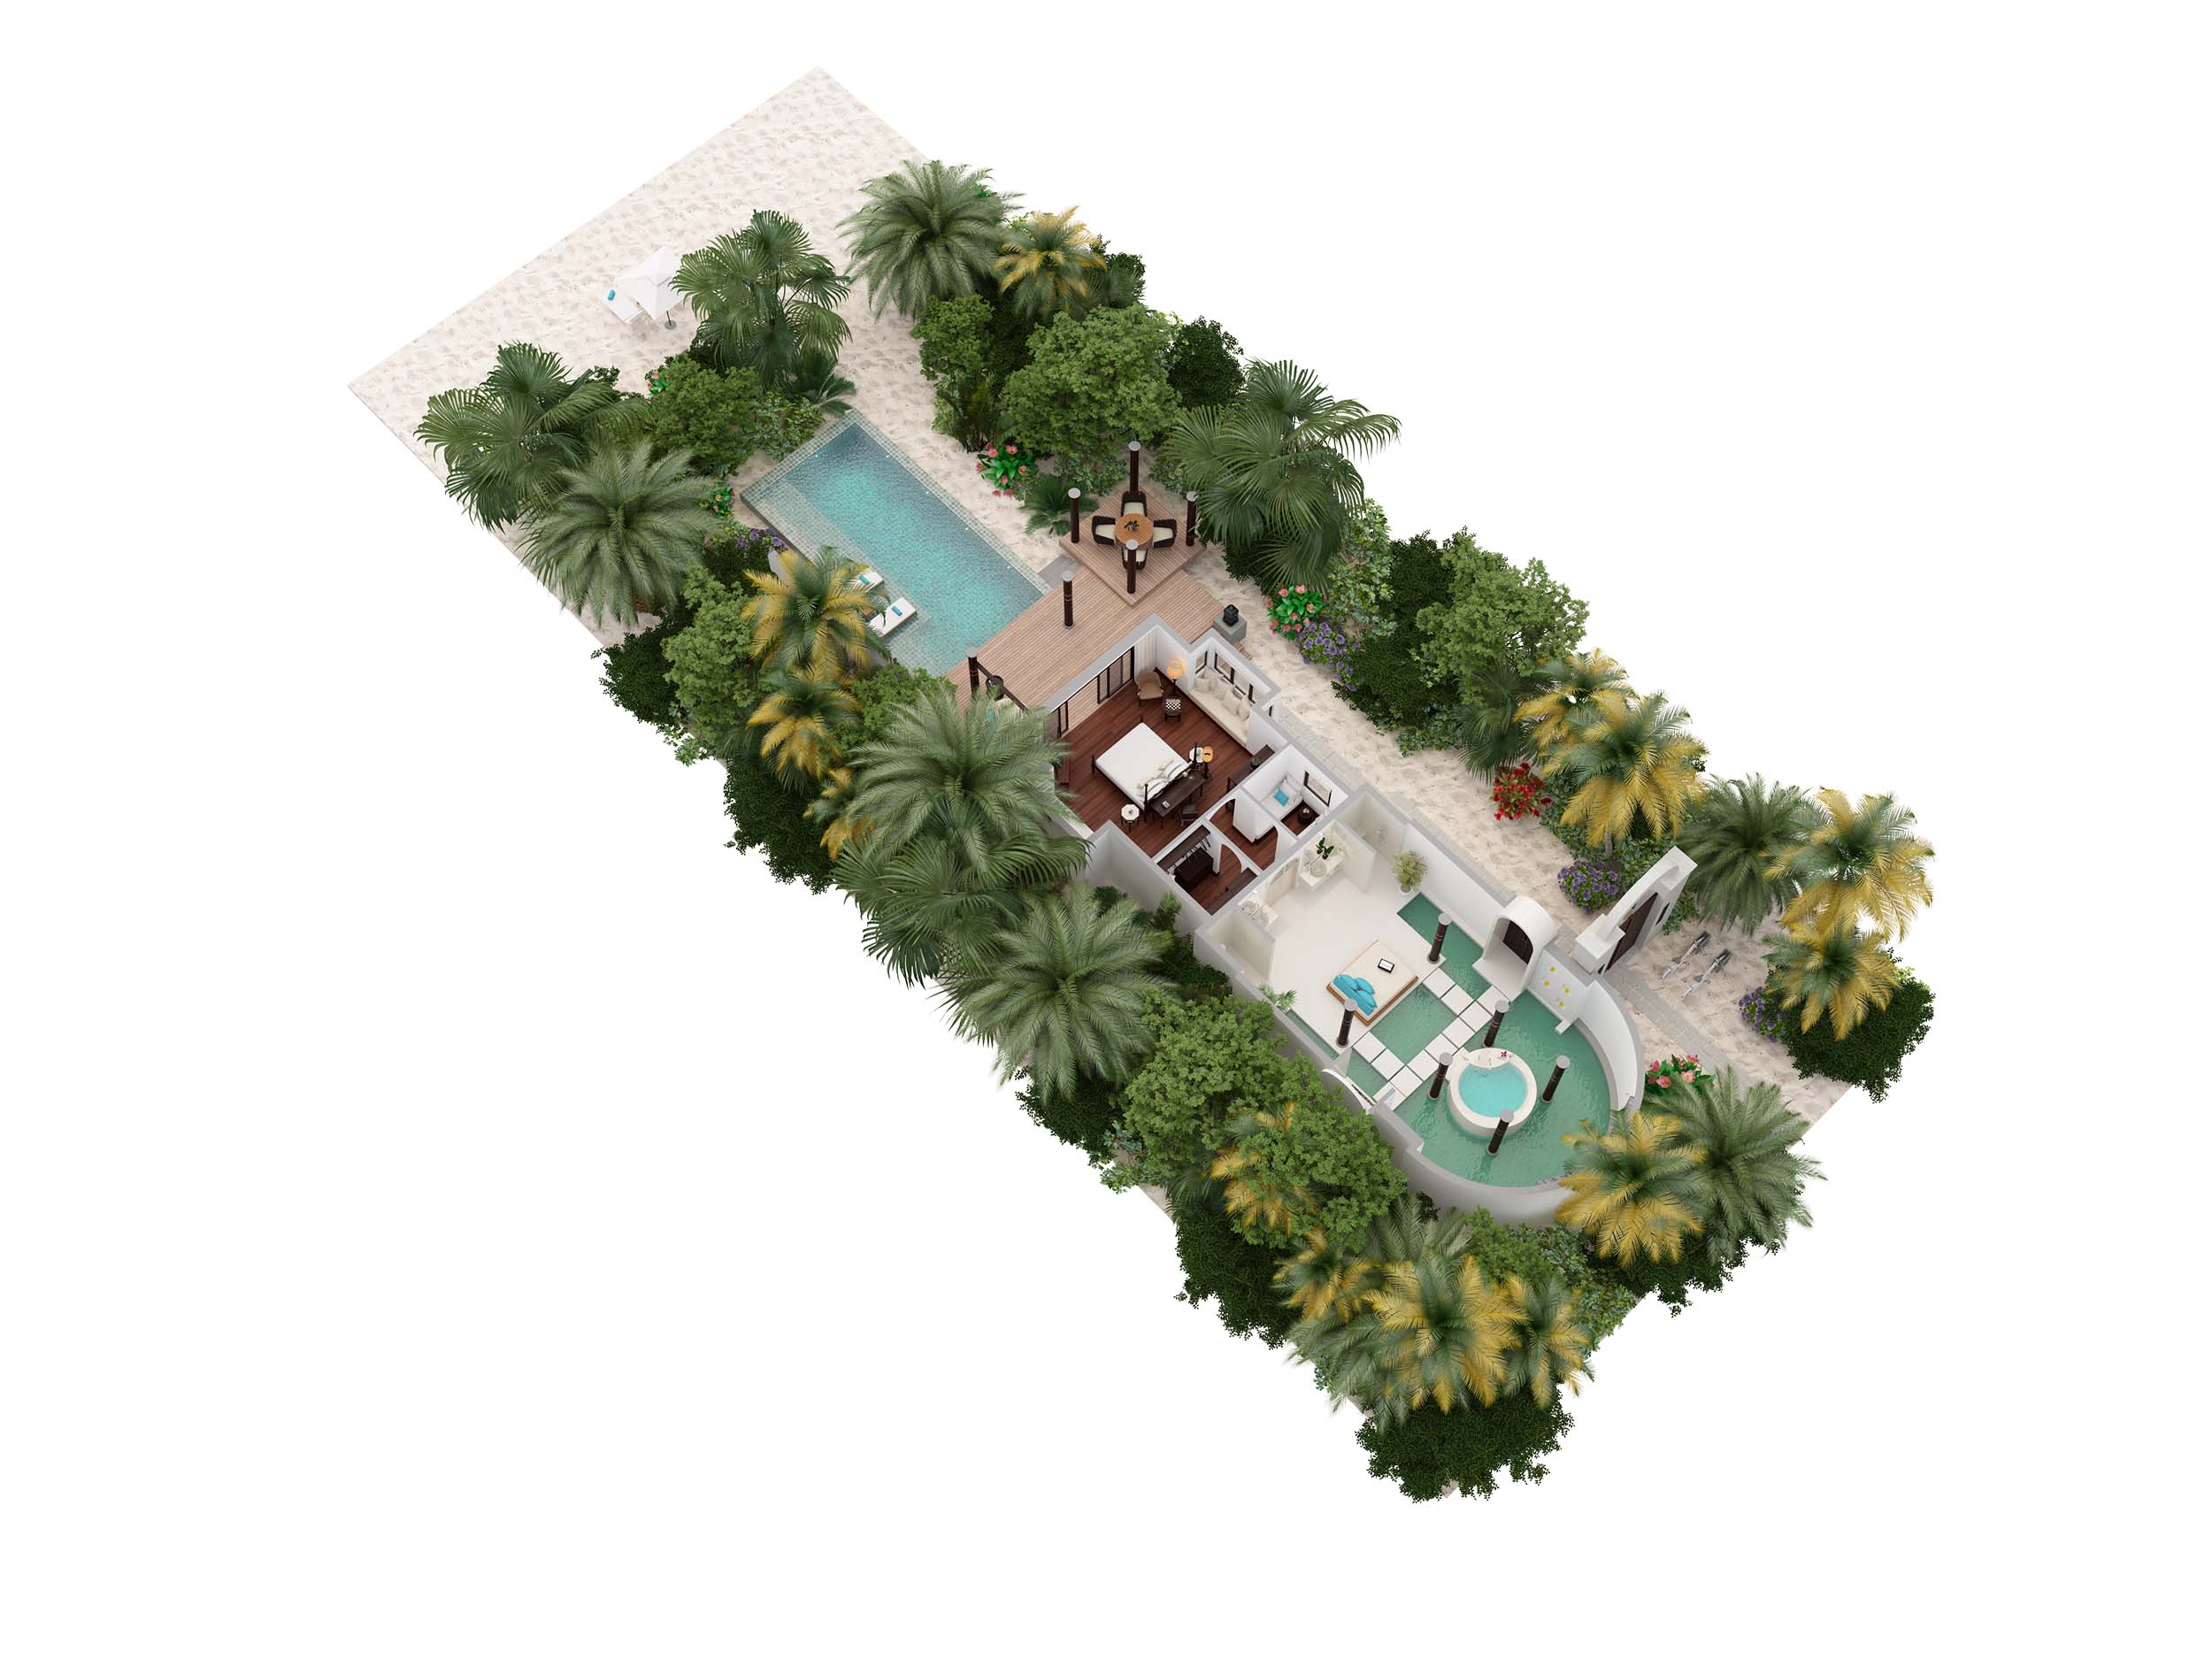
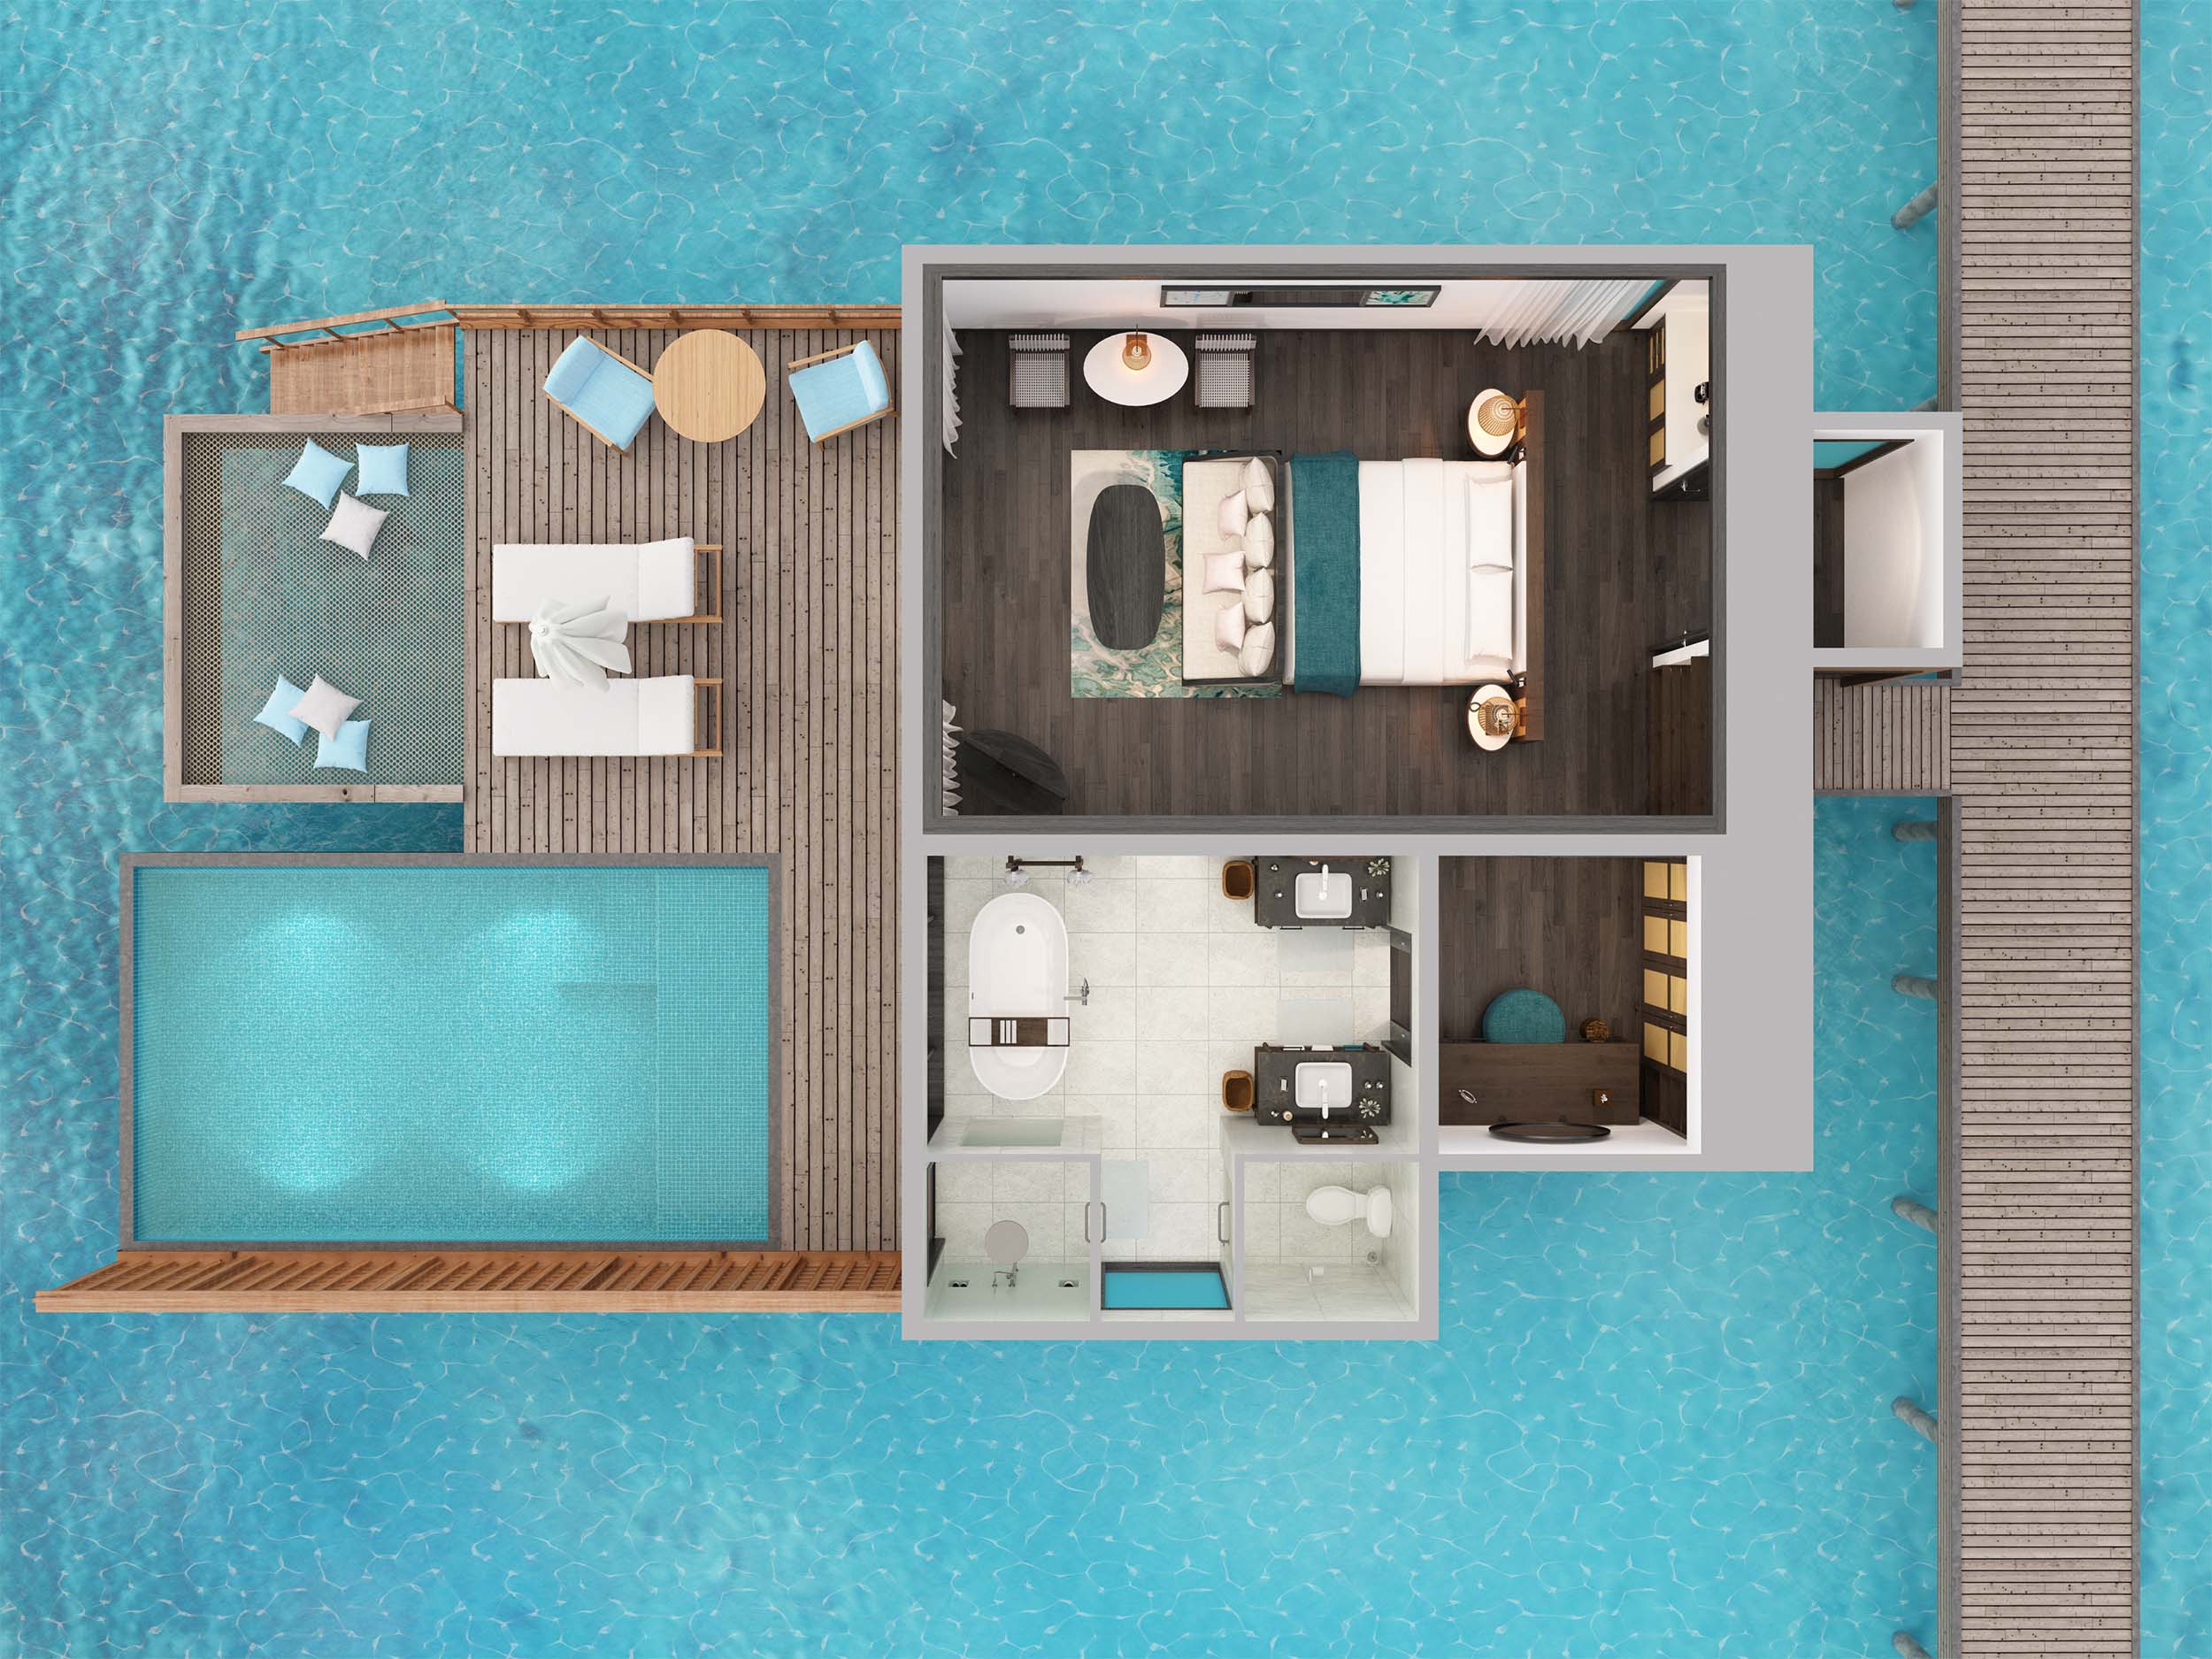
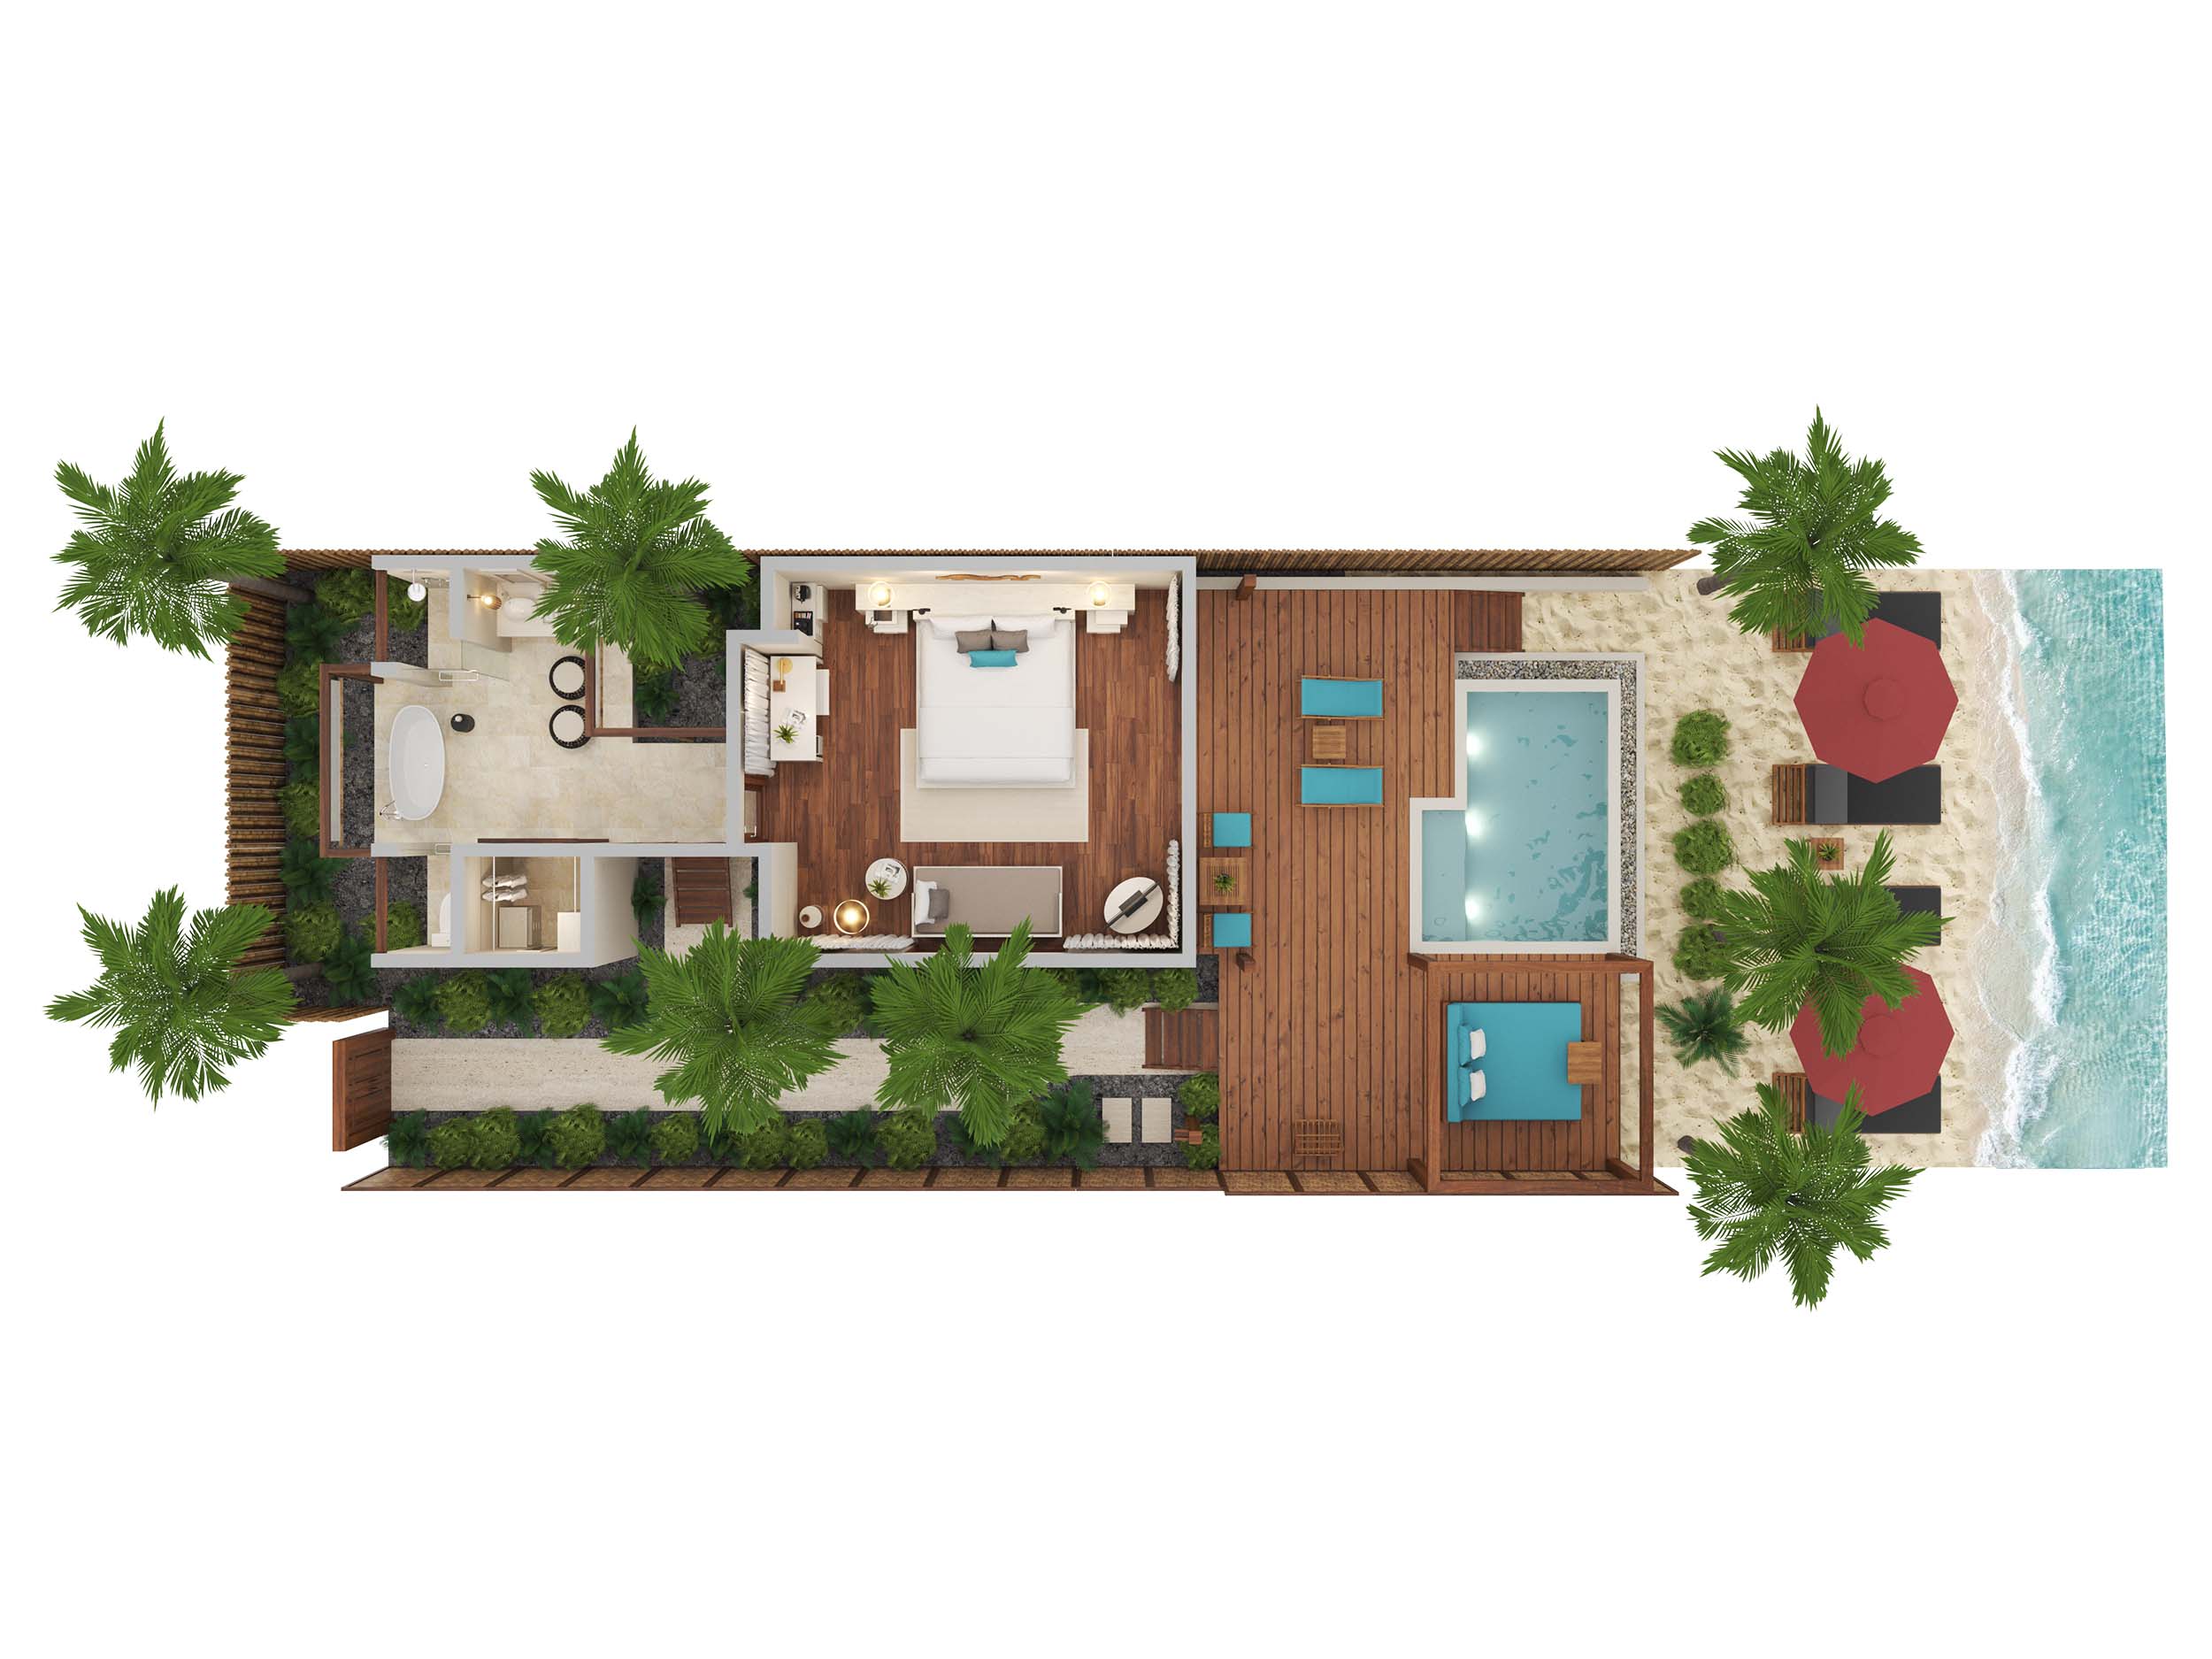
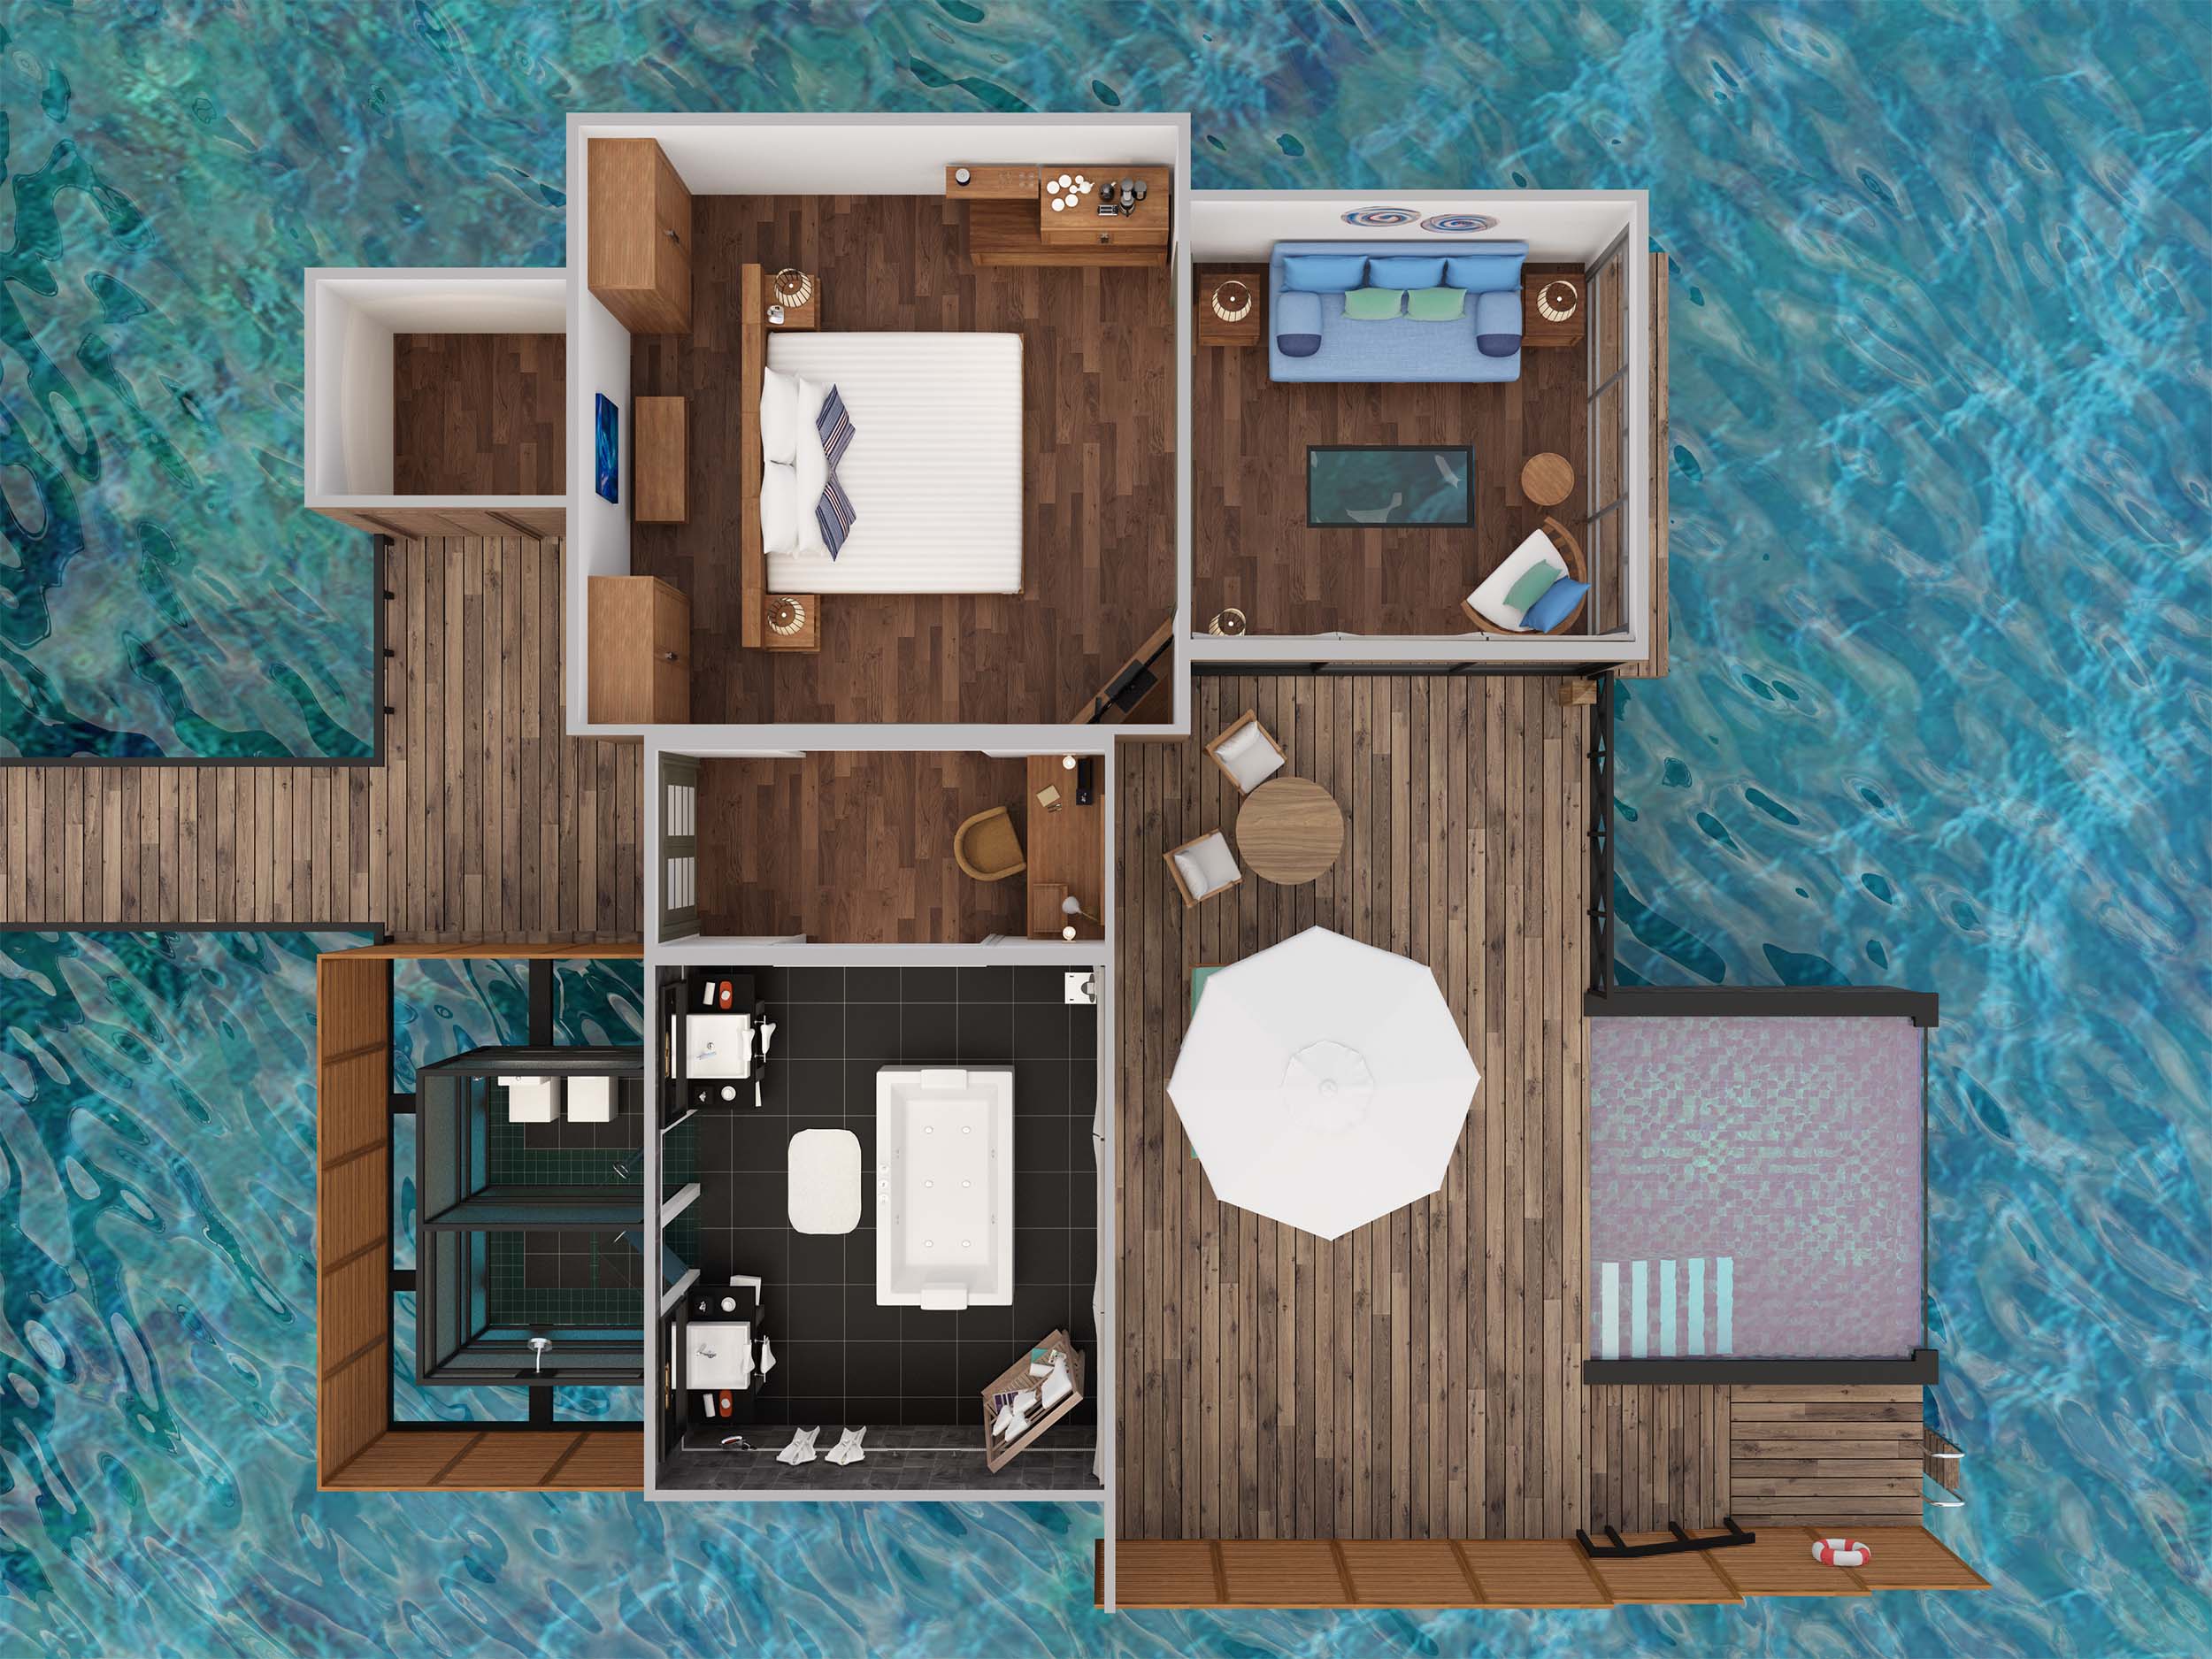
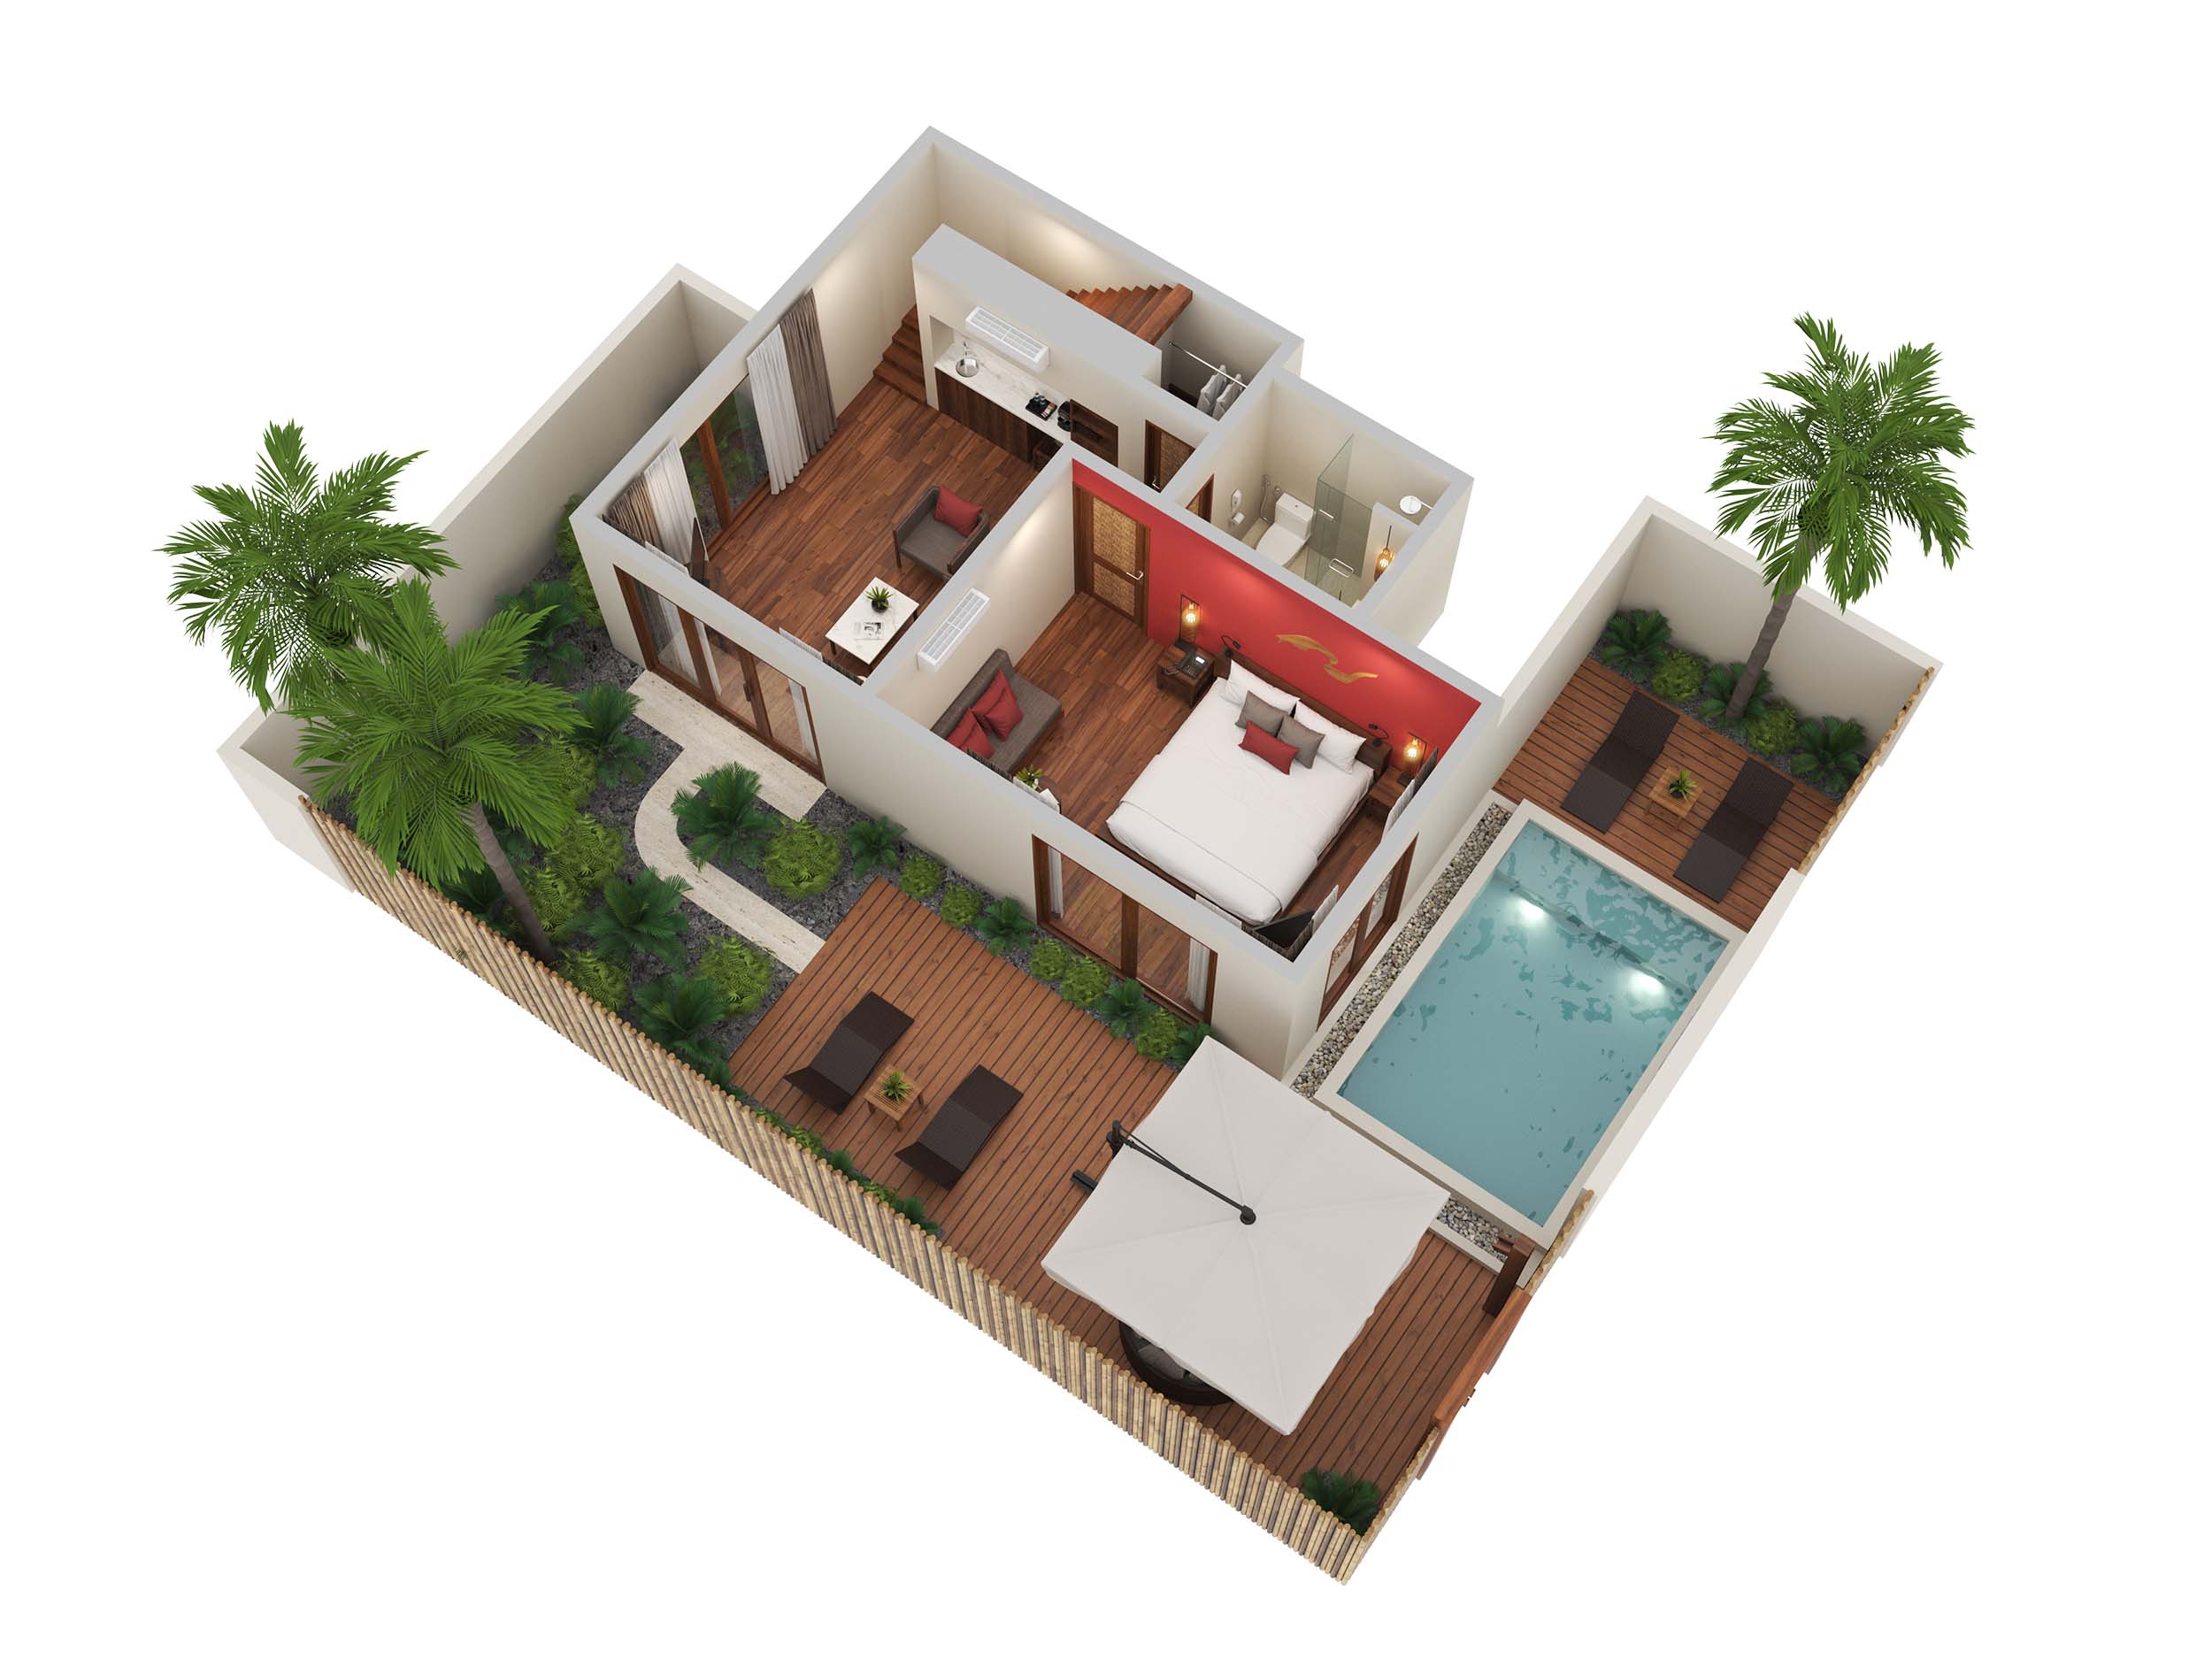
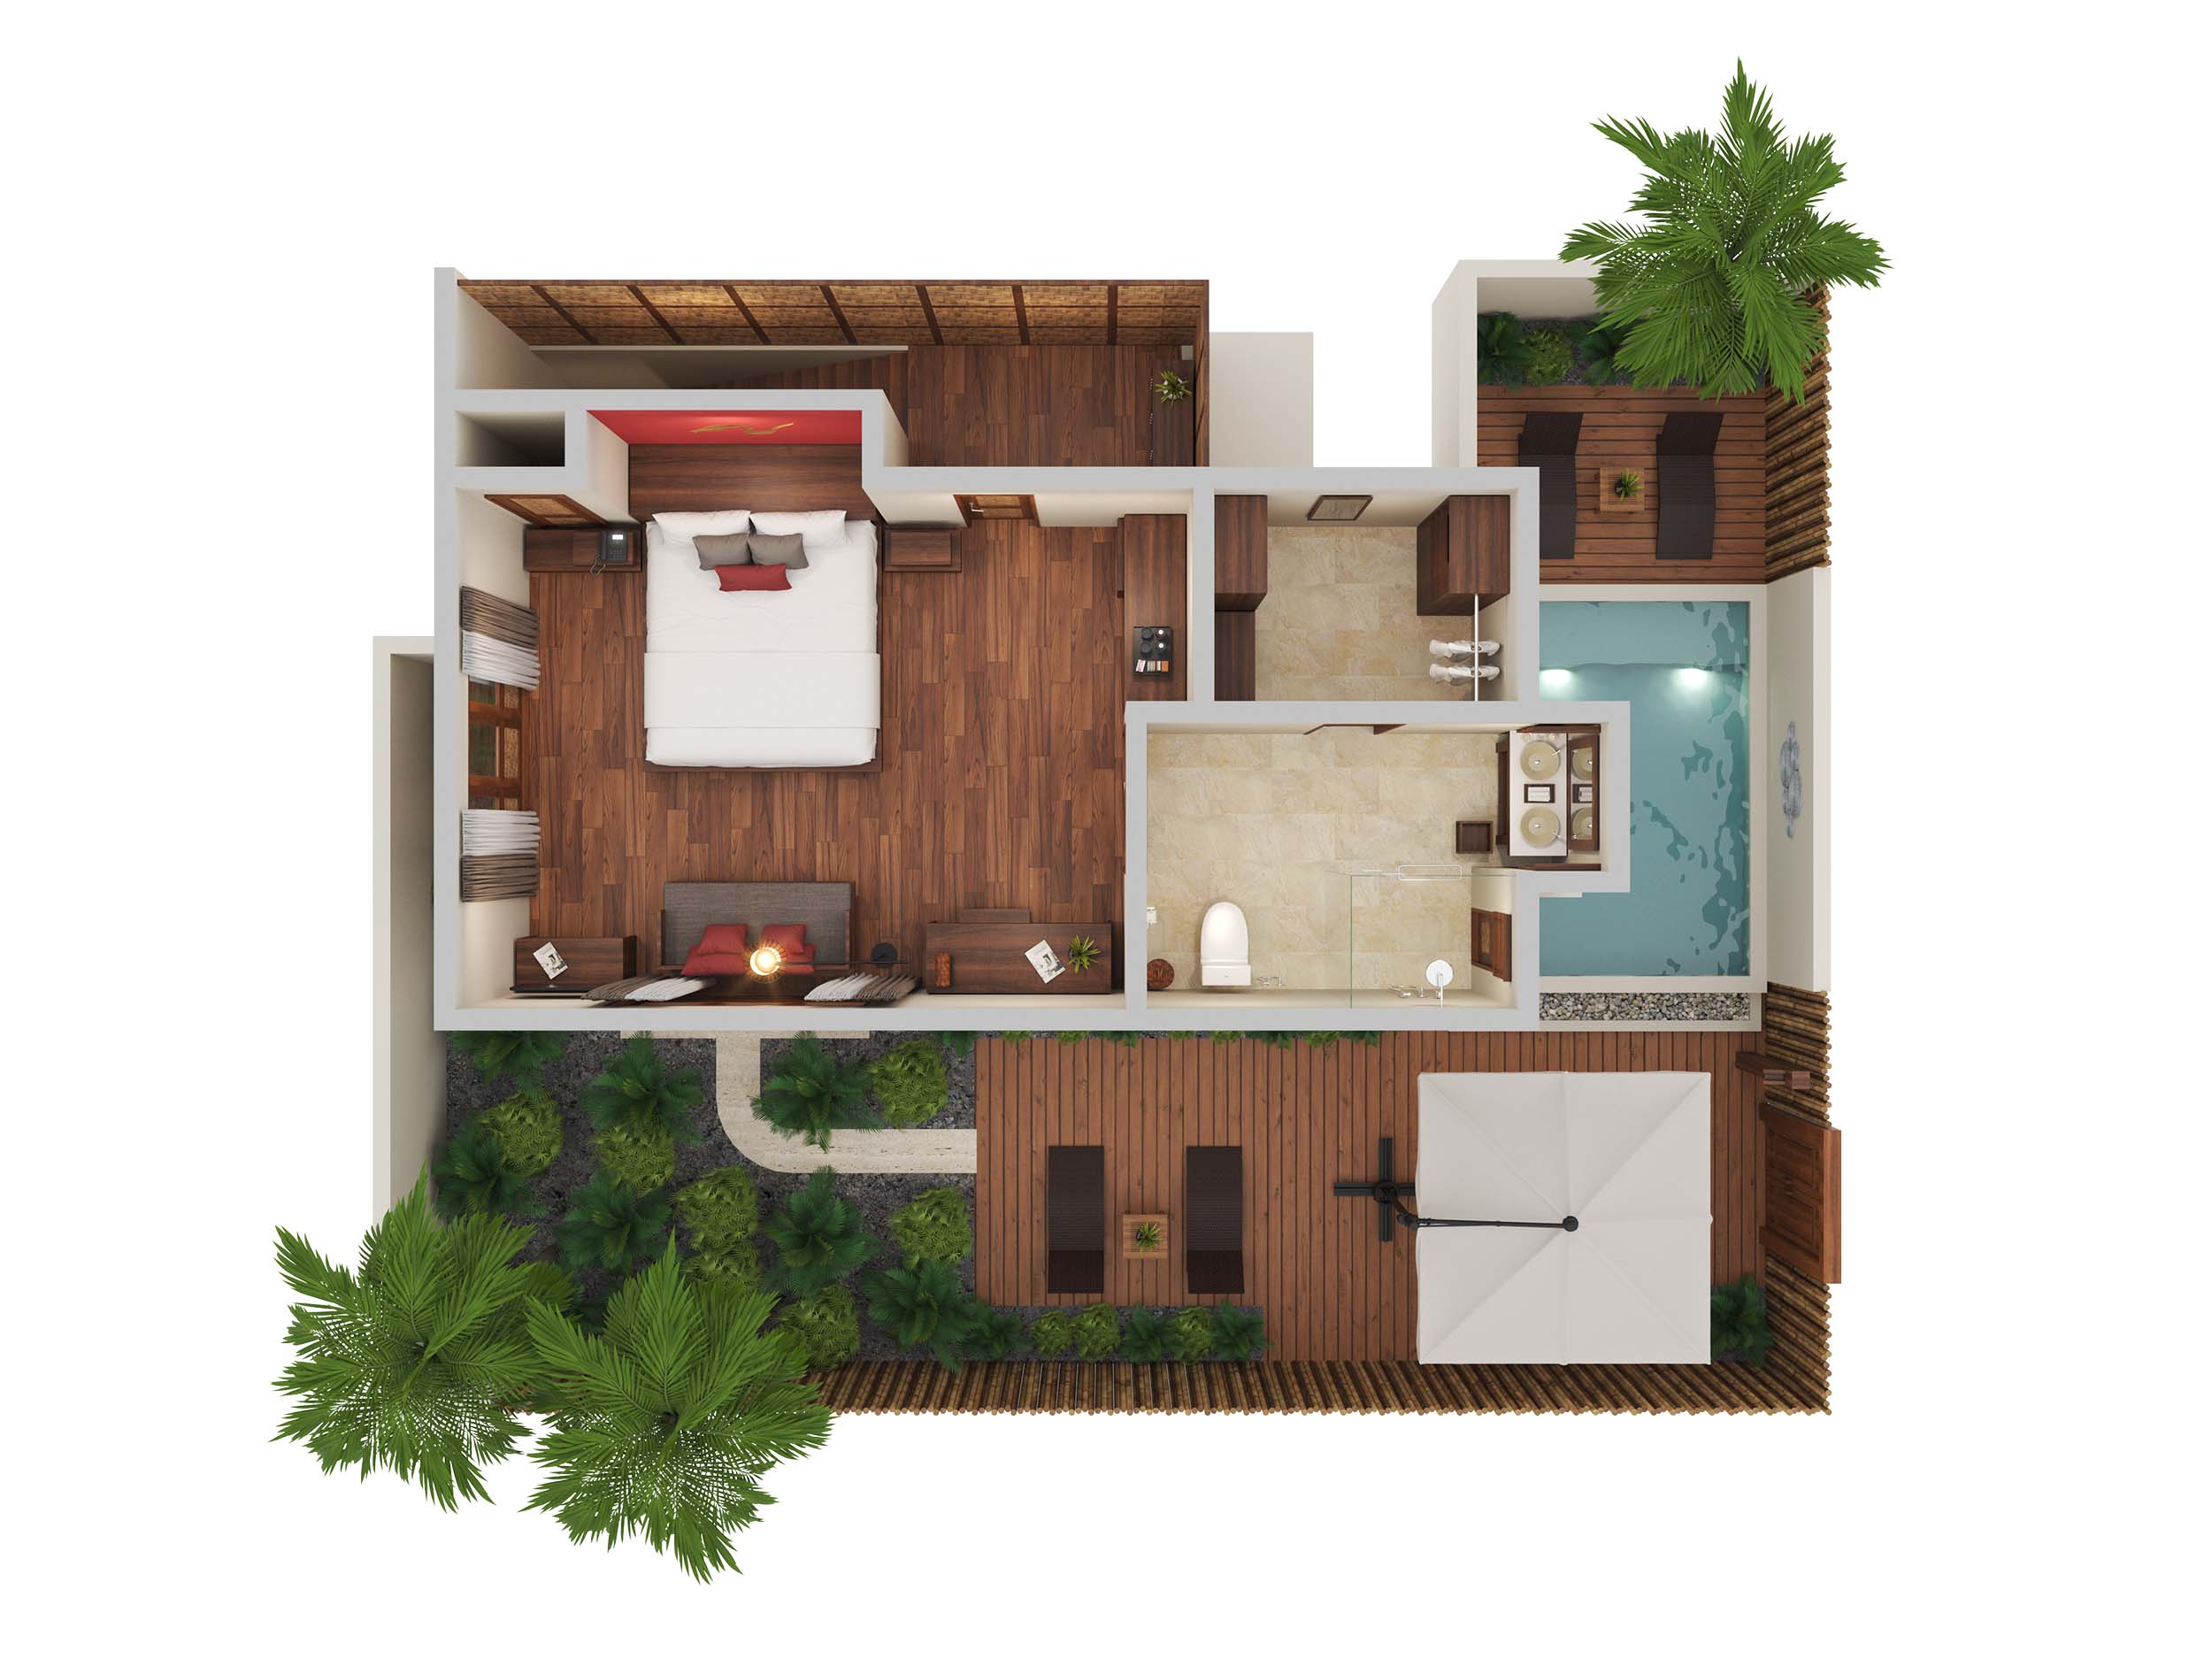
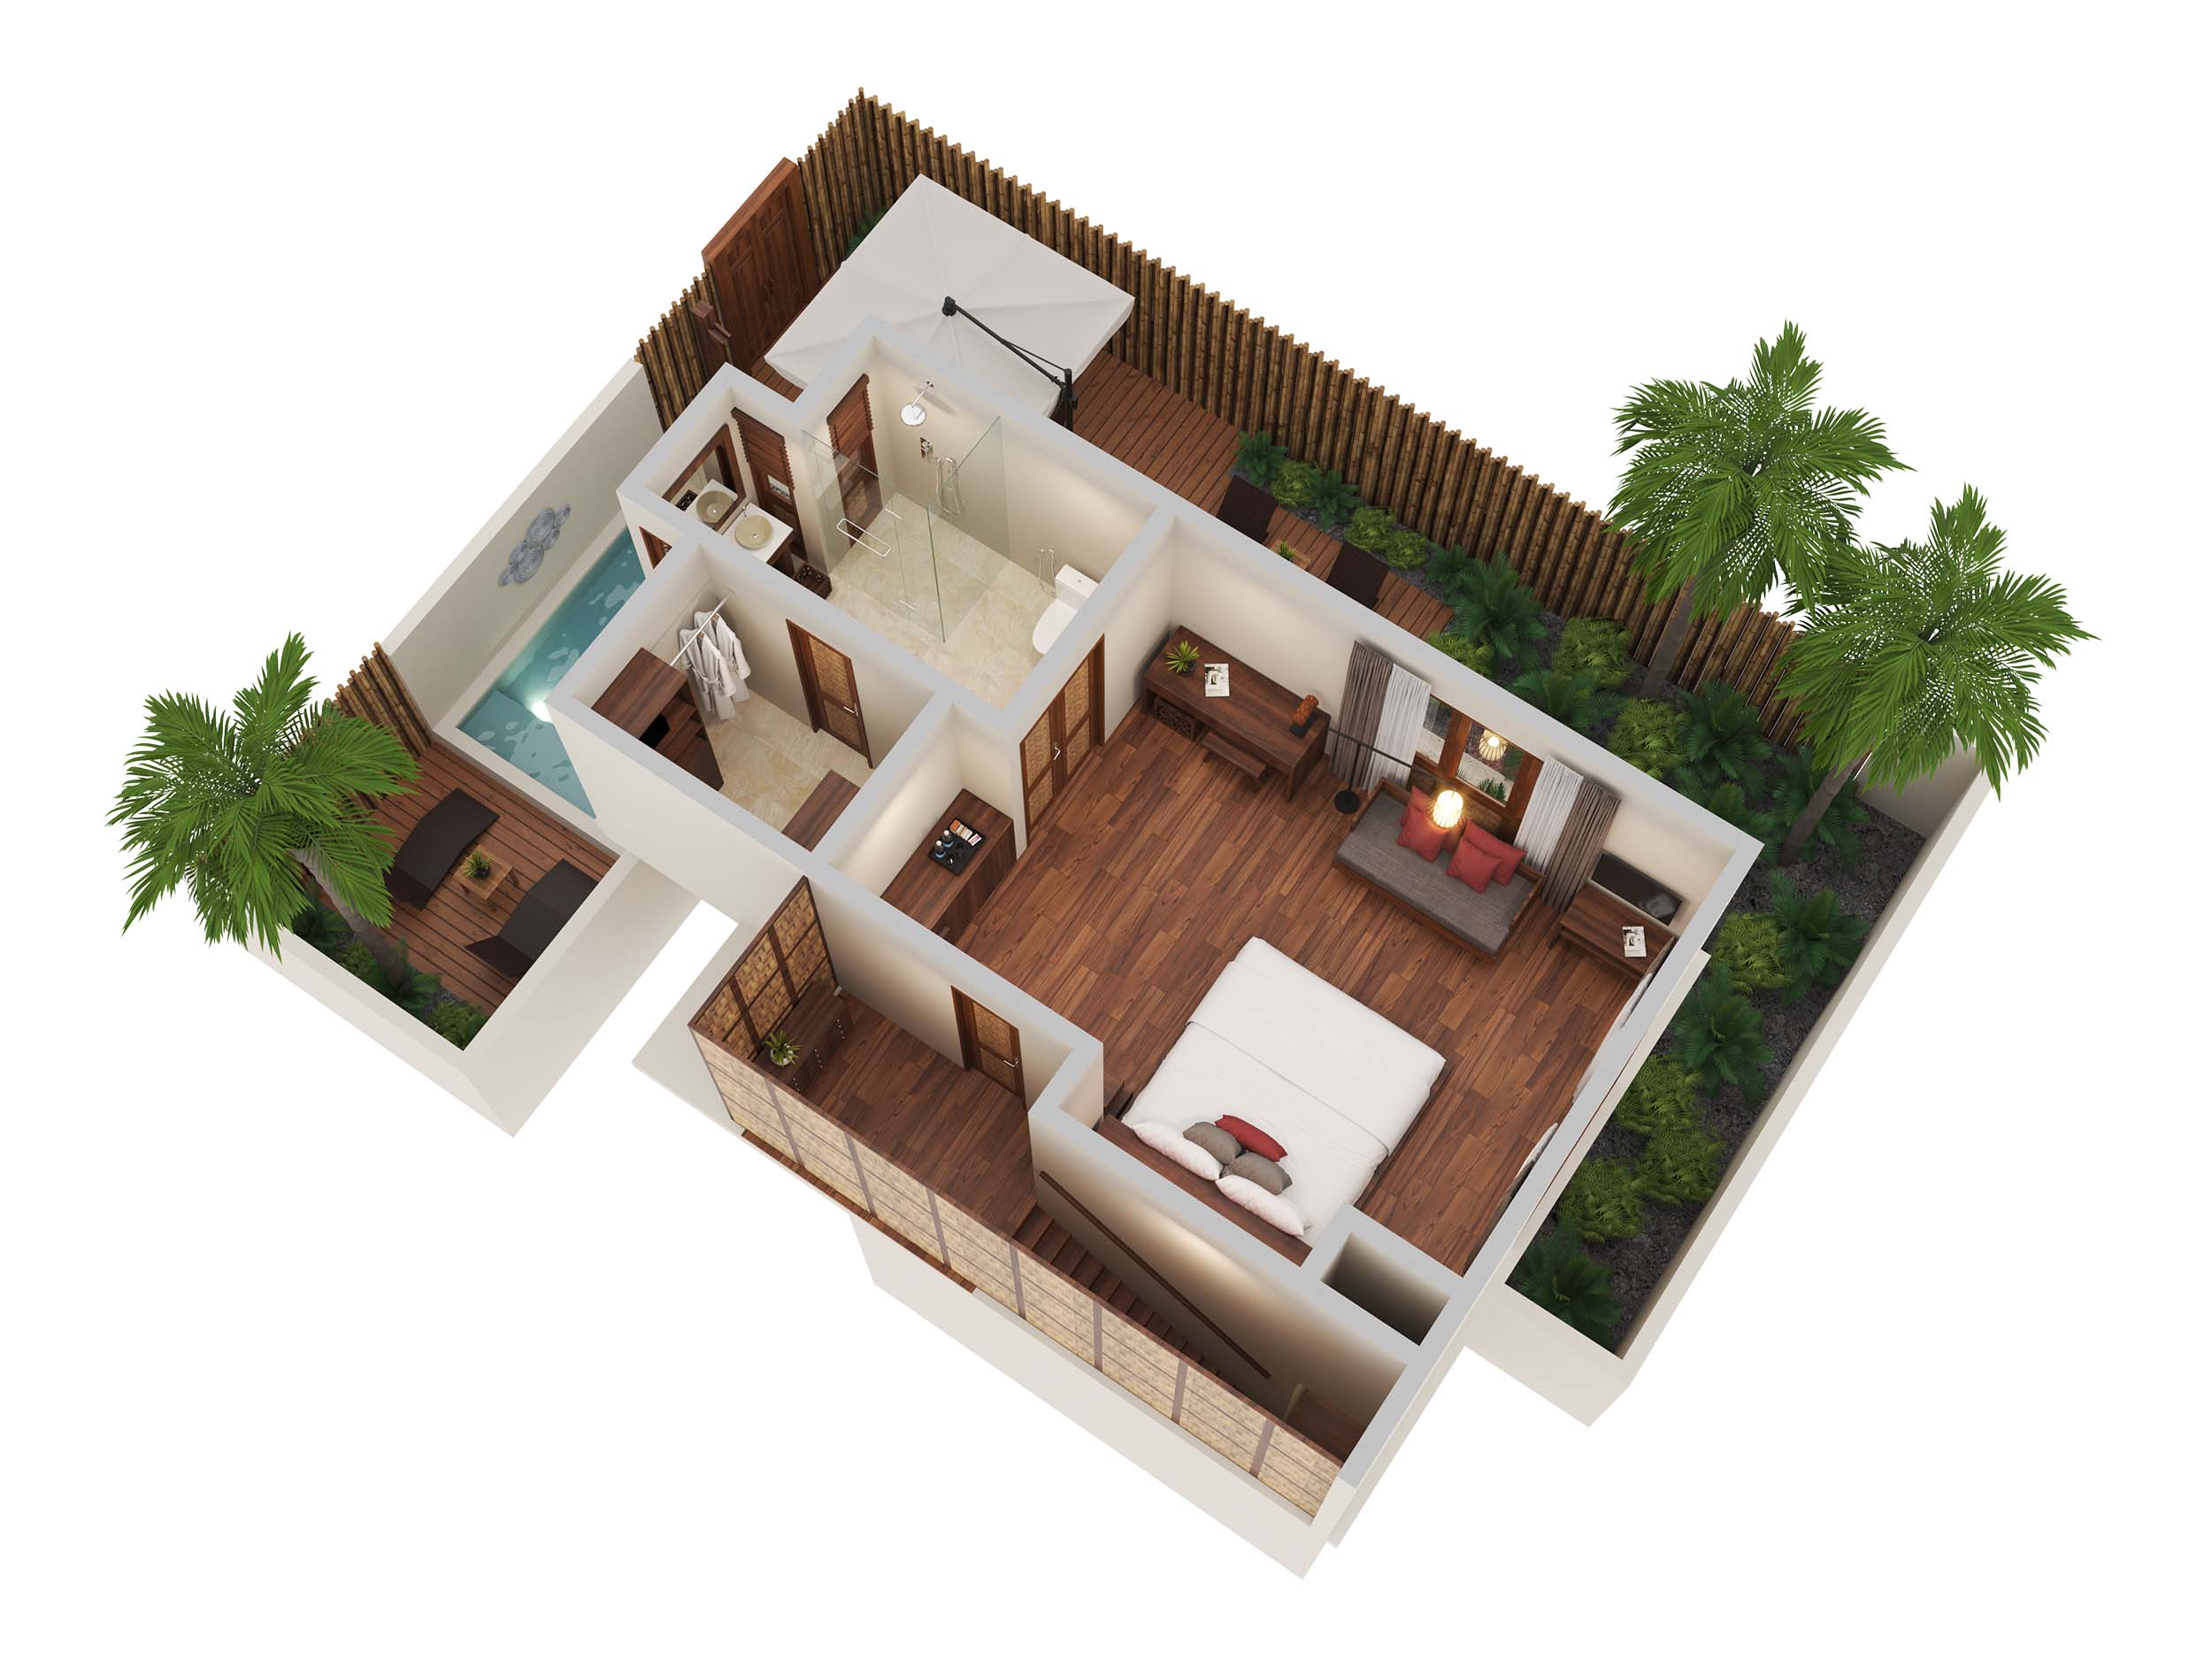
Visrez has generated thousands of 3D Floor Plans for guest rooms, suites and villas and is regarded as the gold standard throughout the hospitality industry thanks to our unique platform. Visrez has simplified the production of photorealistic 3D floor plans with a step by step process where every detail gets recreated accurately. Once good quality source assets are provided Visrez can turn around a set of 3D Floor Plans in just a few days. Revisions can be marked directly in your account and the plans can be downloaded or added to a website using our floor plan viewers.
Revisions
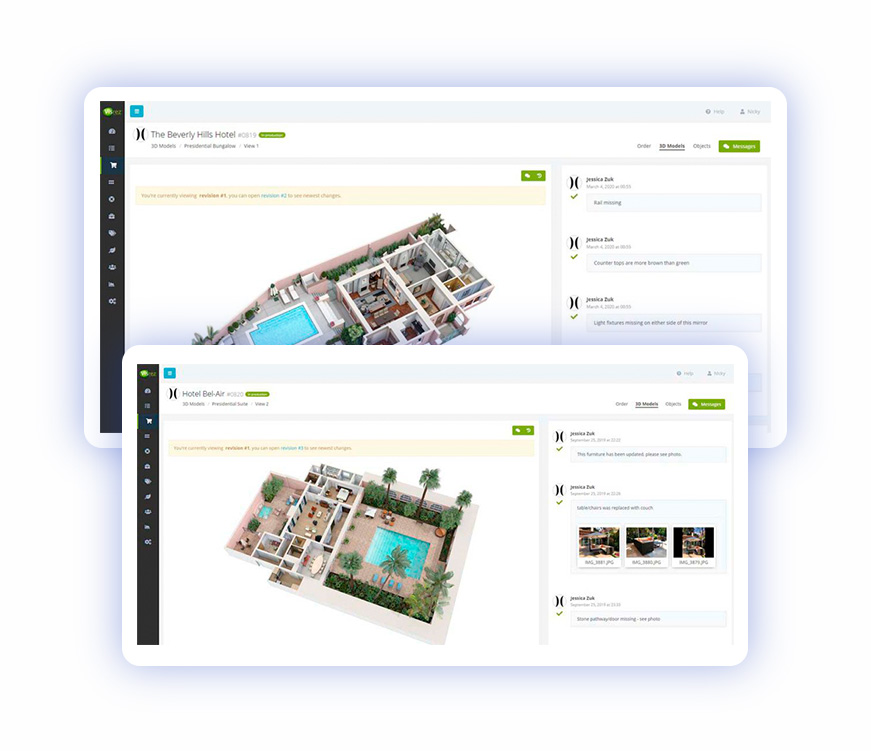
To complete your plans in a timely fashion is recommended to use the revisions tool in your Visrez account as it has been designed spefically for this purpose. This tool allows users to mark comments onto any individual item in the floor plan and makes it much easier for our team to understand each request.
Additional assets can be required to clarify items that get missed in the first drafts or features for which no reference material was supplied. You can upload additional reference photos on the right side of the model along in the comments box. Please note that Visrez does not process revision requests submitted by email these must be submitted directly onto the relevant page for each model in order to keep track of production.
How Many Revisions Are Permitted?
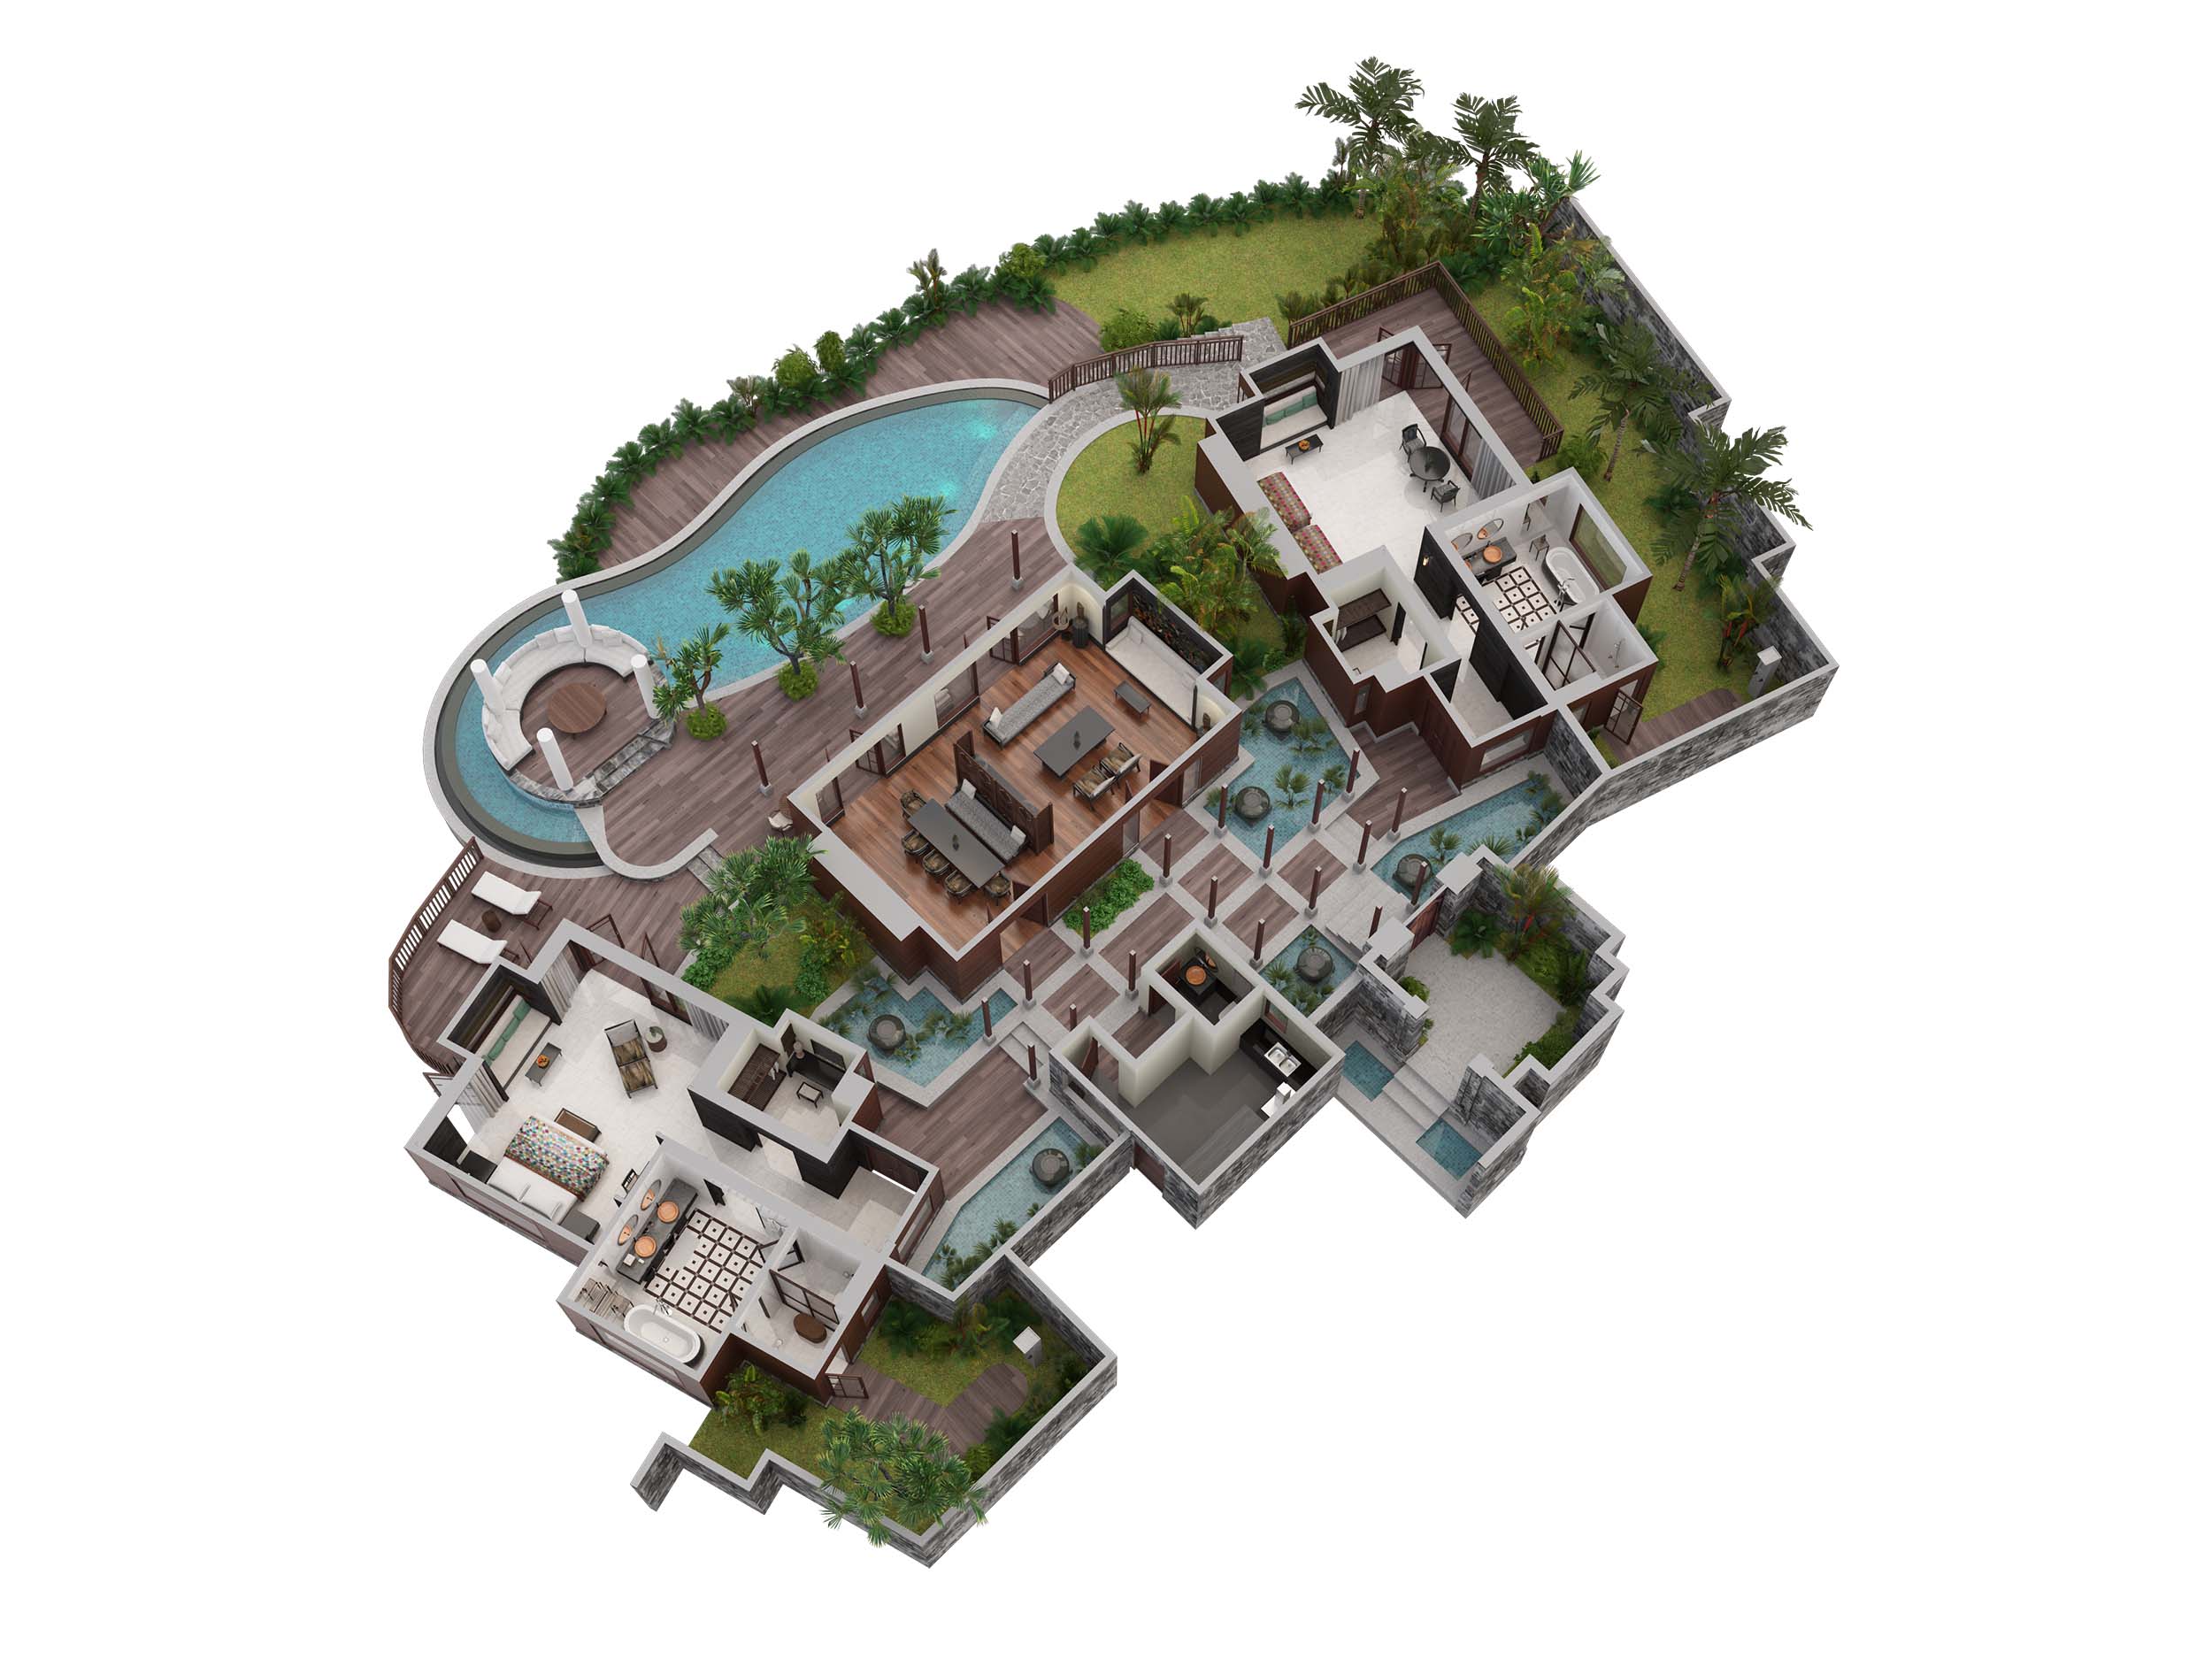
Visrez will replicate the guestrooms and suites with 100% accuracy with as many rounds of revisions as it takes. It is important to provide good quality reference assets and not to get them mixed up so please ensure that assets are uploaded to the correct model. We cannot be held responsible for delays when reference assets are mixed up and difficult to understand. Please be aware that large and complex suites can require additional time and revision rounds due to the scale and additional detail involved. Visrez allows seven days for comments to be added onto models before the plans are automatically approved.
Renovations
Room renovations include soft furnishing and design changes and are covered under the annual license. 3D Floor Plans will be updated to match new designs at no additional cost if a license plan is in place. Please note that if the footprint changes this is not considered a renovation and a new model charge applies.
The Visrez platform allows seven days for comments to be added onto models before the plans are automatically approved by the system. This setting can be switched off on request if your team needs more time to review the models. As per our terms & conditions invoicing will need to be settled within the agreed timeframe regardless of whether the models have been completed or approved.
To create 3D Floor Plans our team needs reference shots and a diagram with dimensions. Photos do not need to be professional quality and can be taken with a phone. Please include shots of all areas, not just the sleeping and living areas so that Visrez can accurately recreate the spaces. Once the assets are good, drafts will be uploaded to your account within a few days.
For projects which are in pre-opening or in renovation and no photos can be taken Visrez will generate 3D Floor Plans using FF&E materials, DWG, CAD and any interior design boards. Users can upload all the relevant information to their account and it will be reviewed by the team lead assigned to the project. Once the materials provided are sufficient then our team will produce a set of 3D Floor Plans within 5 working days. These can be updated over time if the designs change during pre-opening and construction.
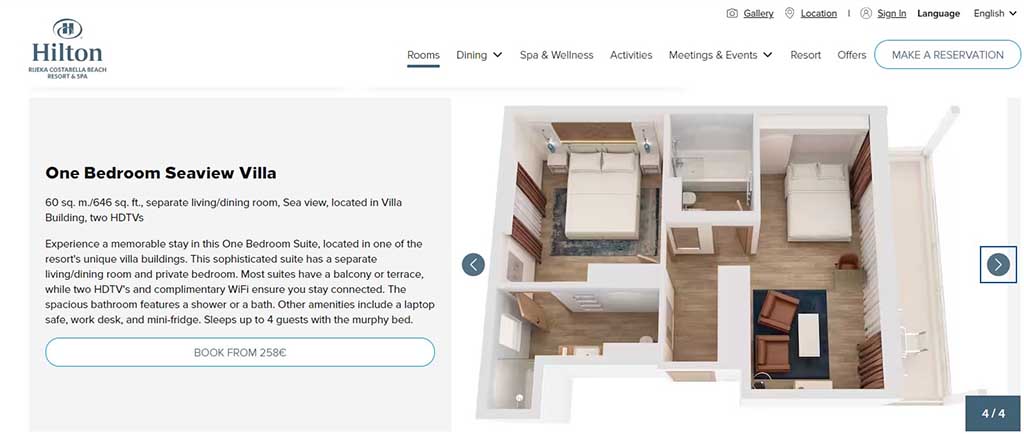
Visrez 3D Floor Plans are not just pretty pictures for your website but can have a meaningful impact on revenue as they help users to understand the bookable spaces much faster than with traditional photos or virtual tours. One of our clients, (a full-service resort) implemented Visrez 3D floorplans to show a detailed view of the room layout for each premium room and suite on their site. More than 22% of all visitors to the “Suites” page interacted with 3D Floorplans and the hotel enjoyed increased revenue and a significantly higher ADR compared to units which did not feature floor plans.
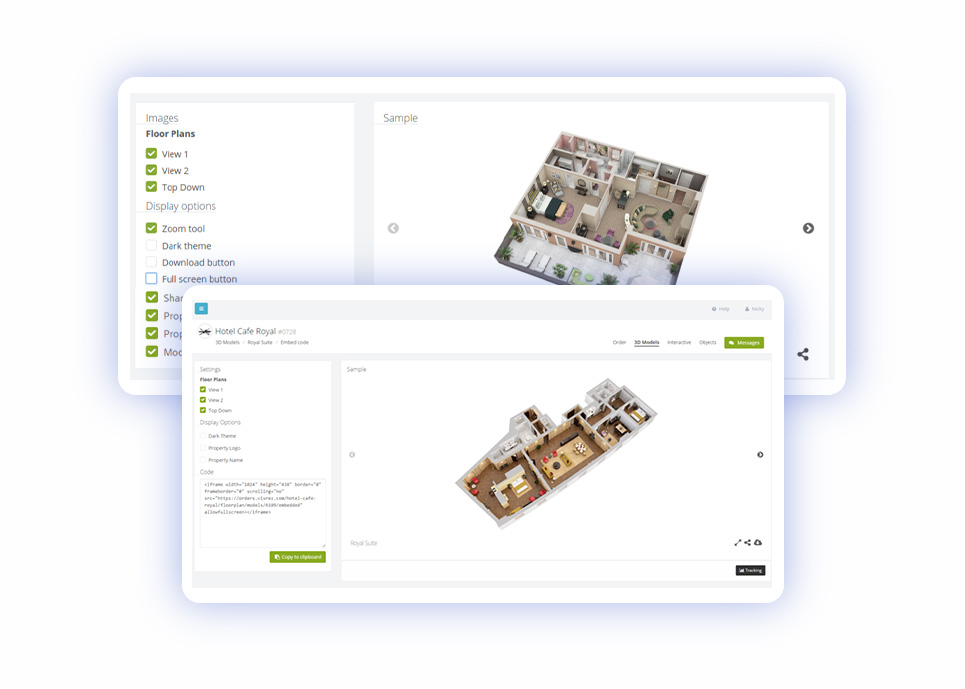
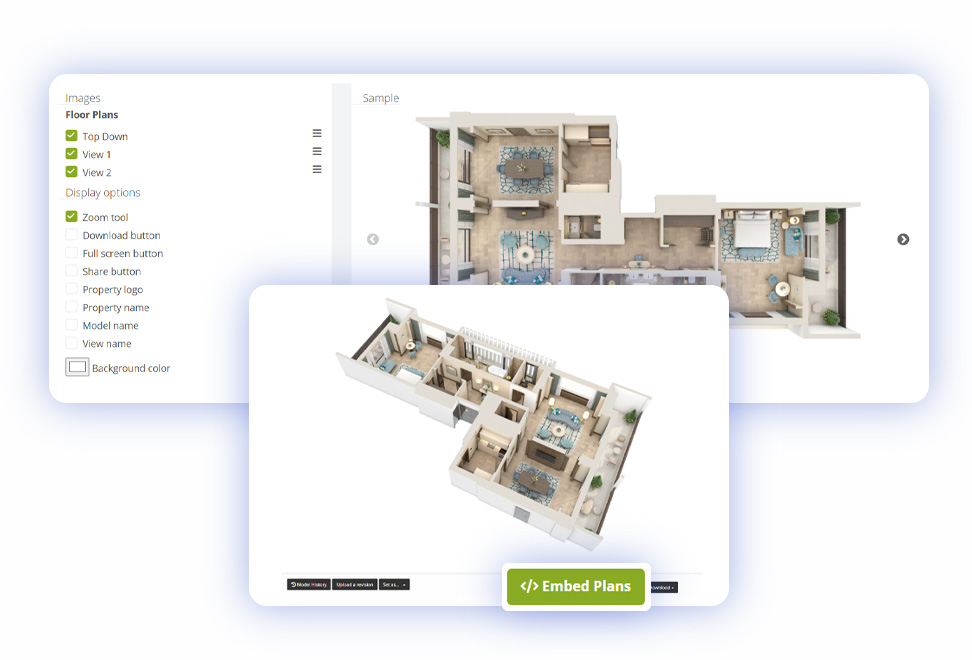
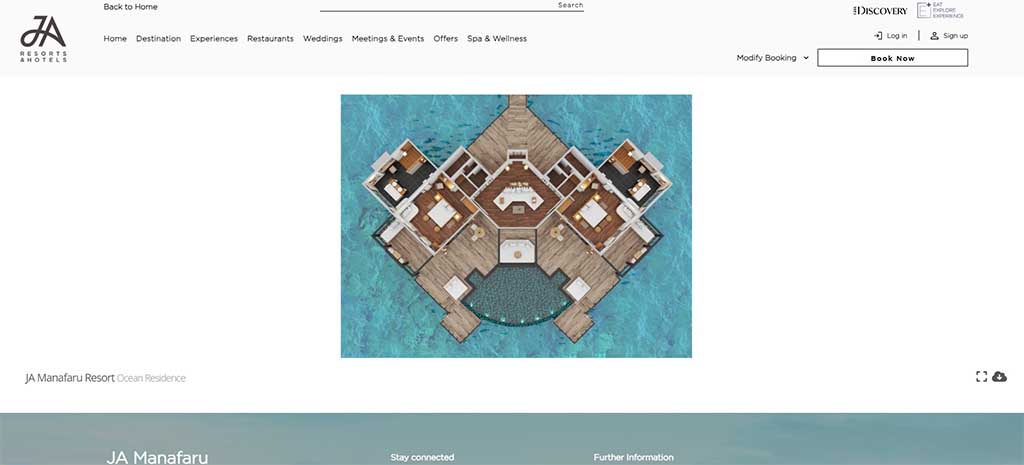
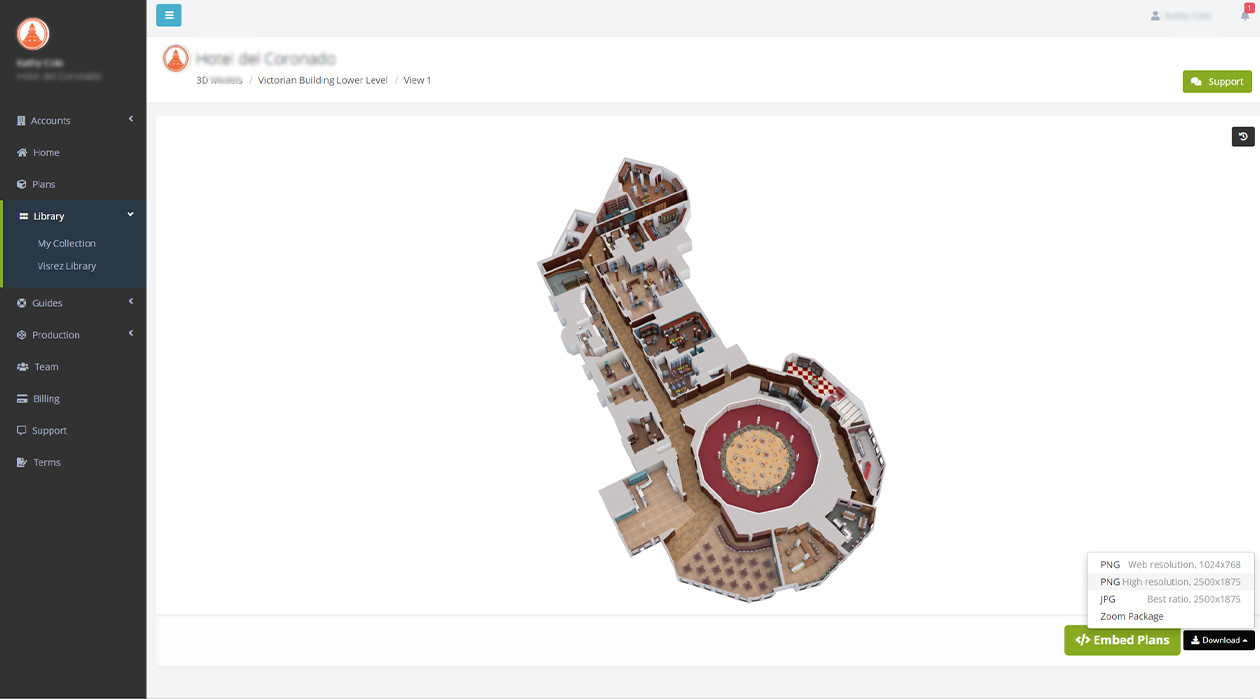
Every room model type in Visrez has an Embed Code page which can be found by clicking the Embed Plans button on any view. This allows you to customize the viewer to your specifications. If the model gets renovated the embed code page will automatically pull the most recent version of the plan. You can switch the order of the views and change the background colors. Select a color (can be RGB, HSL, HEX) or use the color picker.
Visrez 3D Floor Plan viewers are responsive and will expand to match the user’s browser. Plans can be opened full screen, shared and downloaded using the icon menu in the floor plan viewer. Displaying the 3D floor plans promintently using our floor plan viewers means no image resizing or uploading is required and they can be dropped into the page with a single line of code. For best user experience it is recommended to load plans in a modal window in your site.
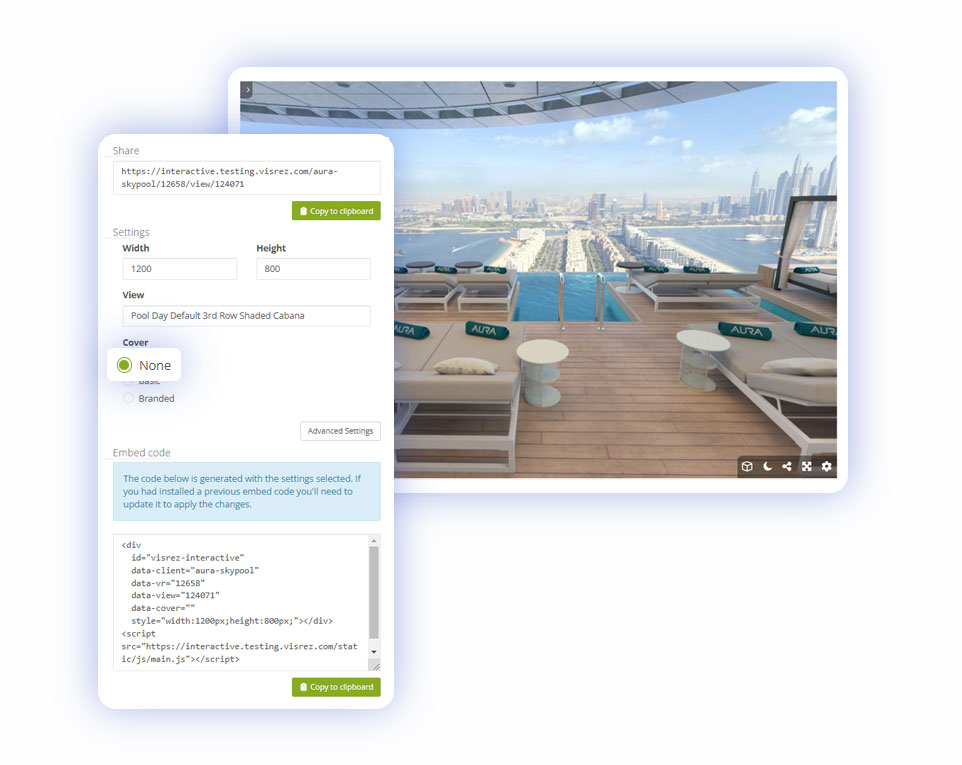
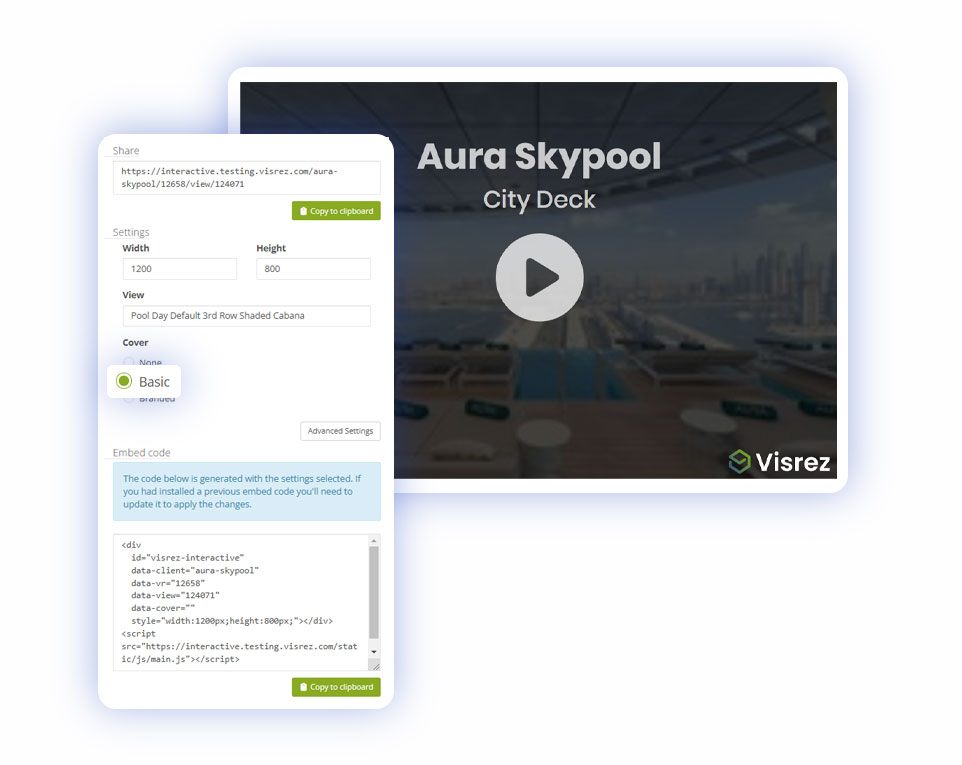
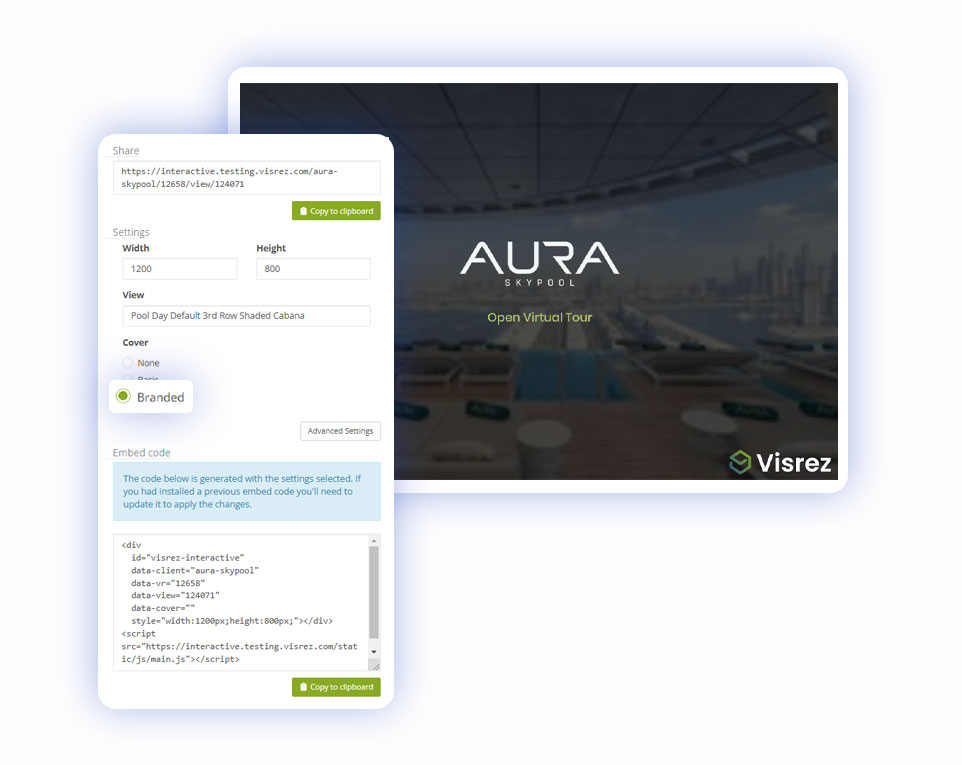
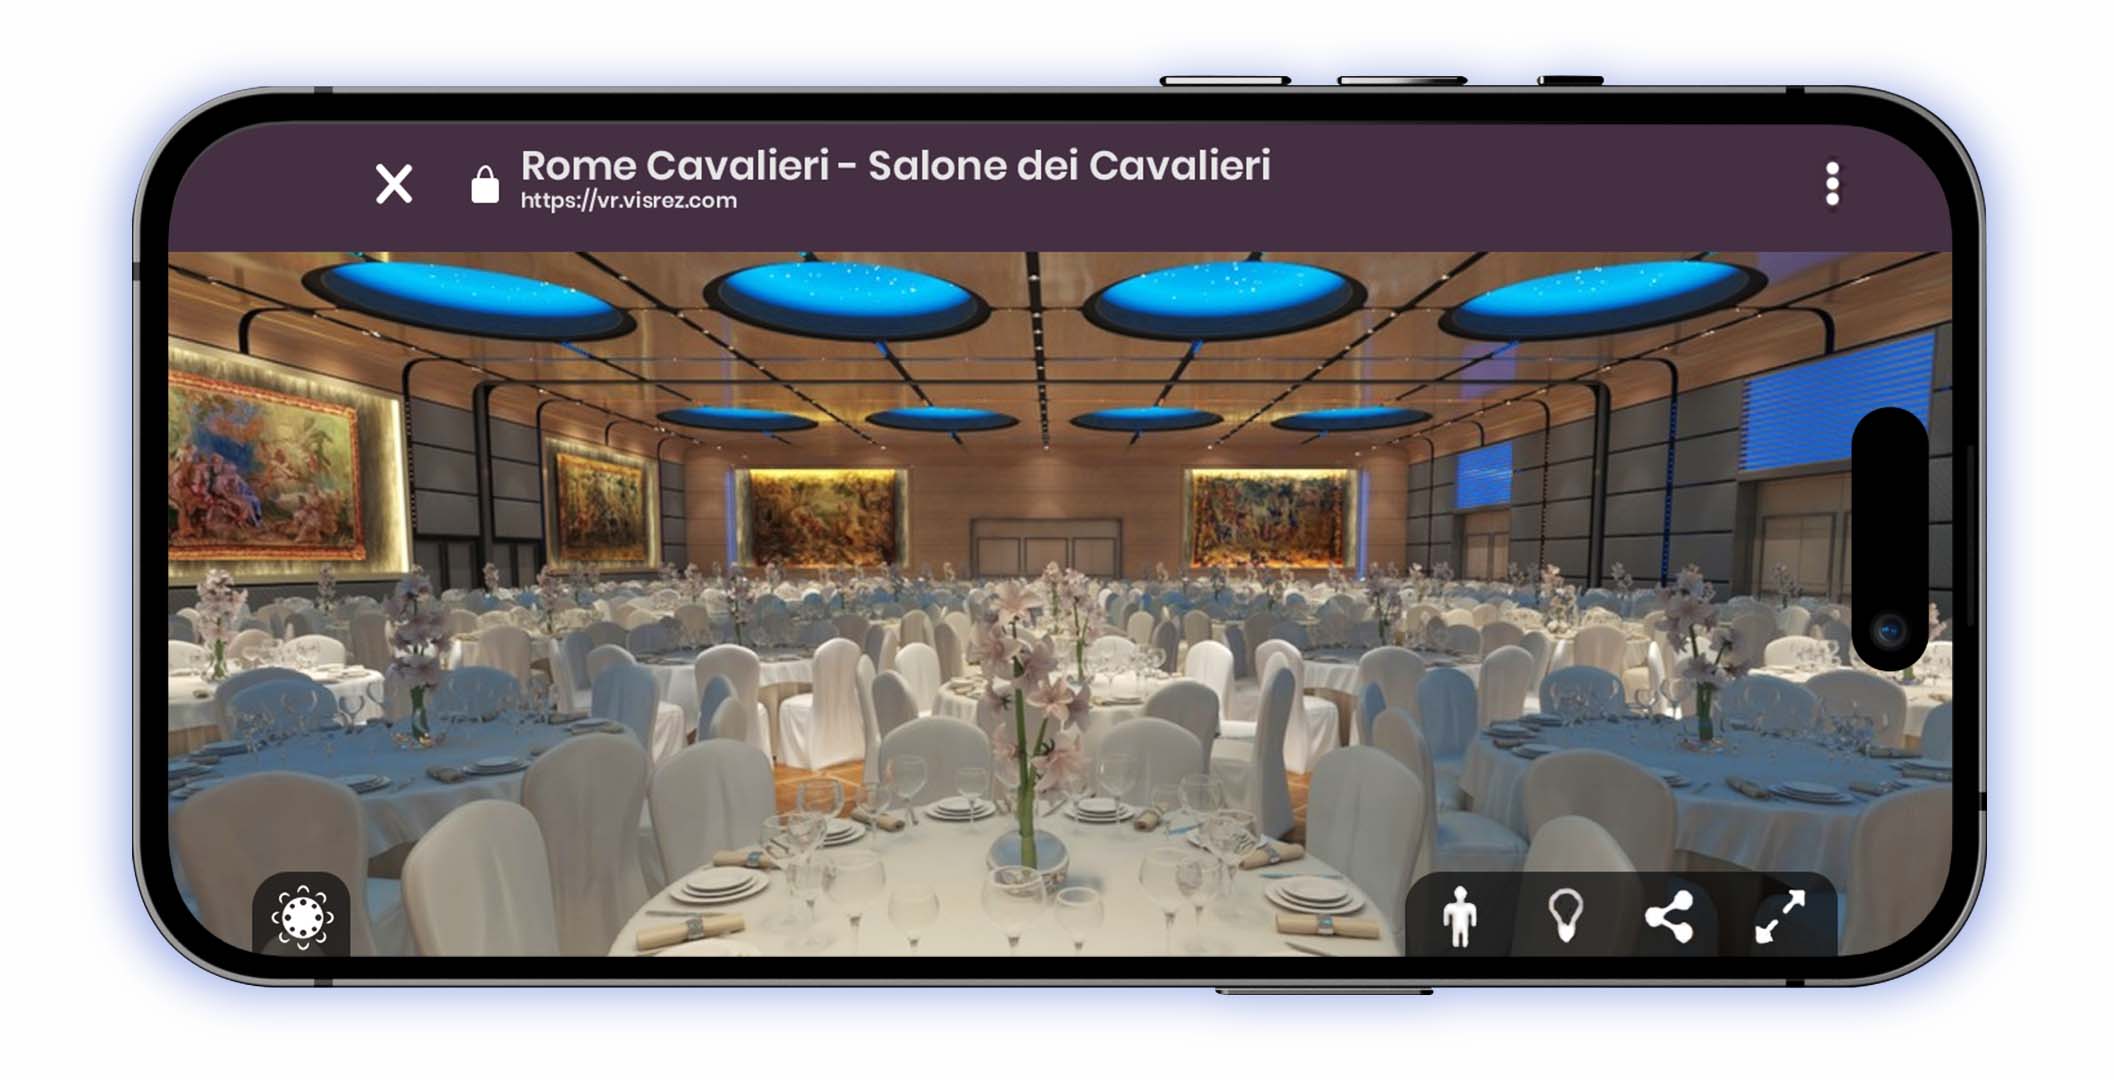
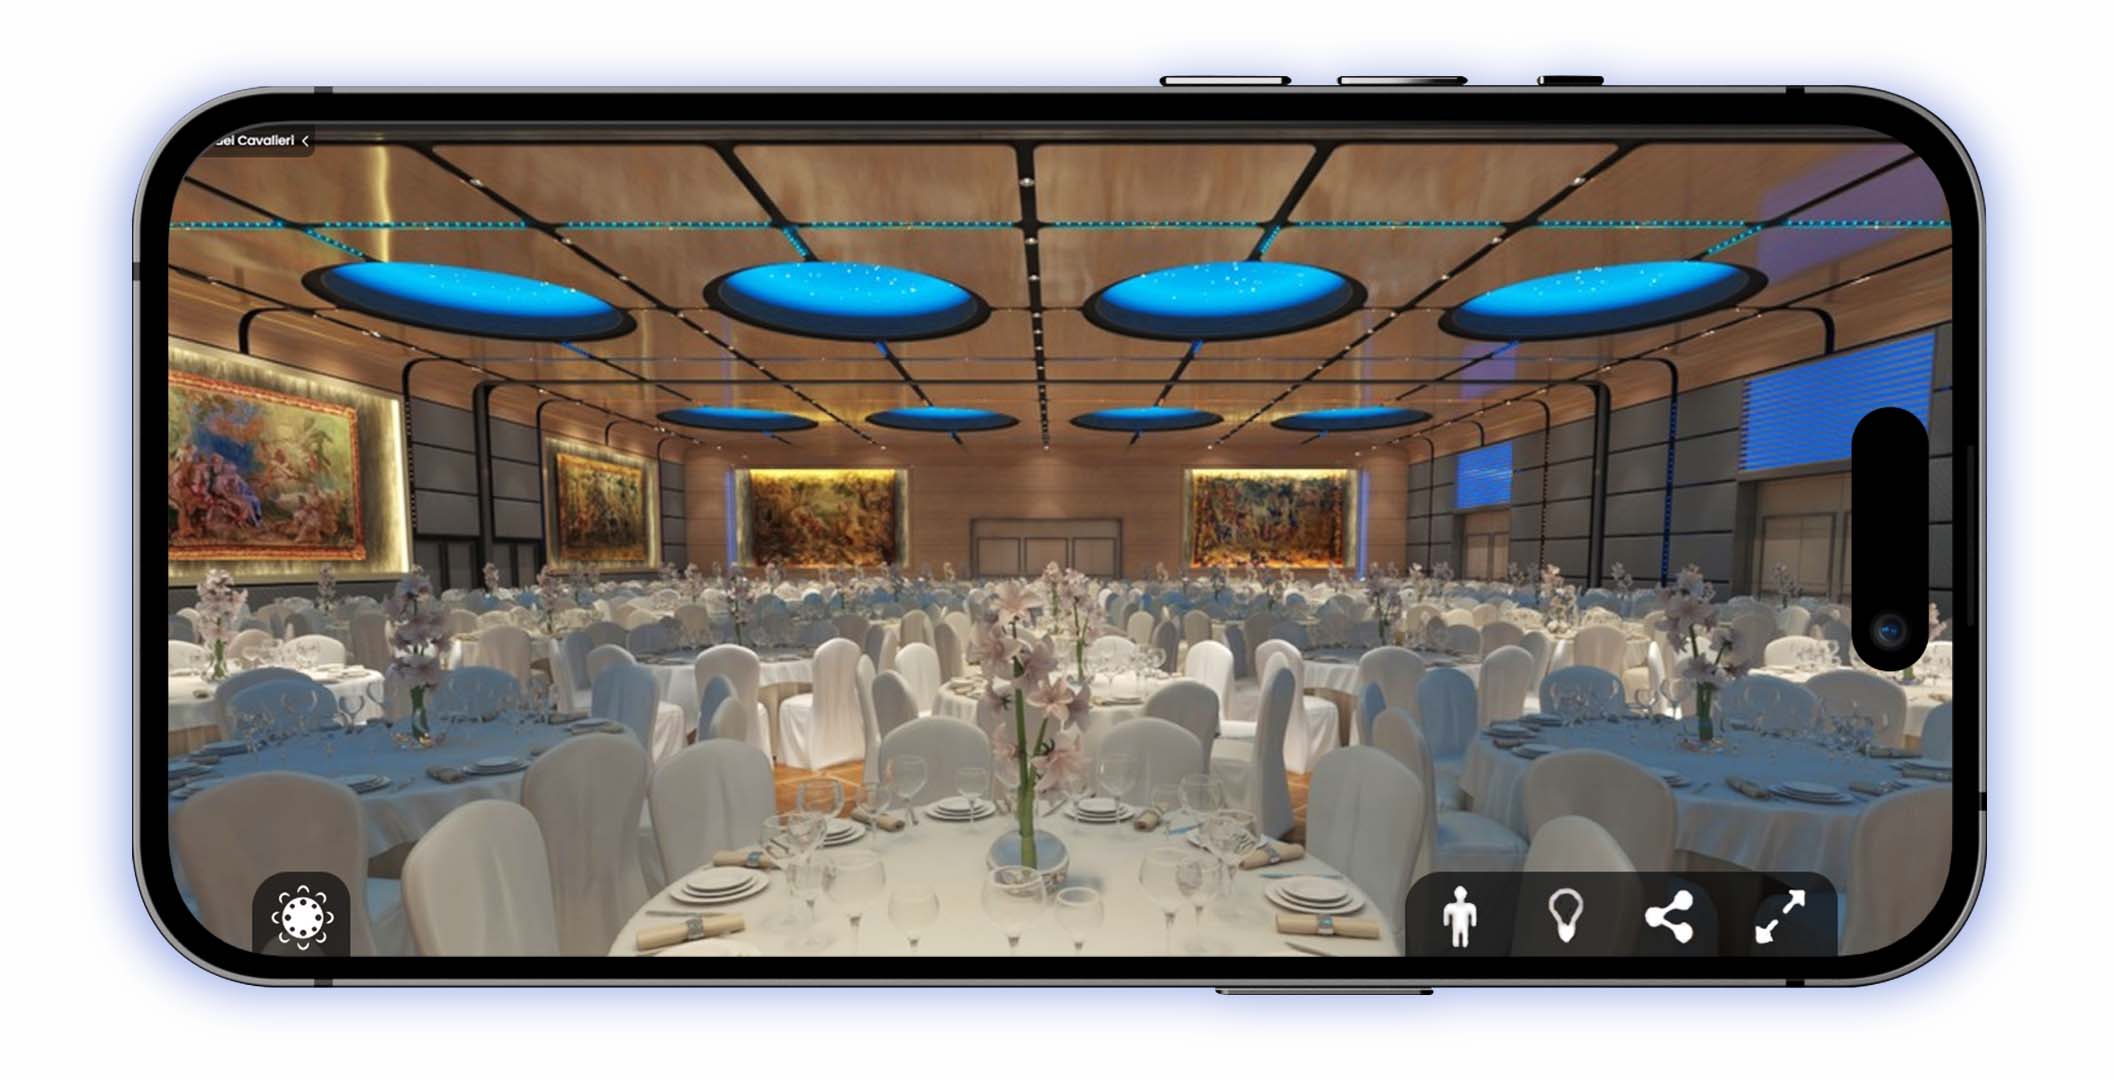
Each Virtual Tour has an embed settings page which allows users to customise how the tour appears. You can adjust the dimensions, branding and title screen on the embed settings page. Virtual Tours can be added to your website just by copying and pasting the code into your page. Visrez Toursare ADA compliant and trusted by the hospitality industry’s leading brands.
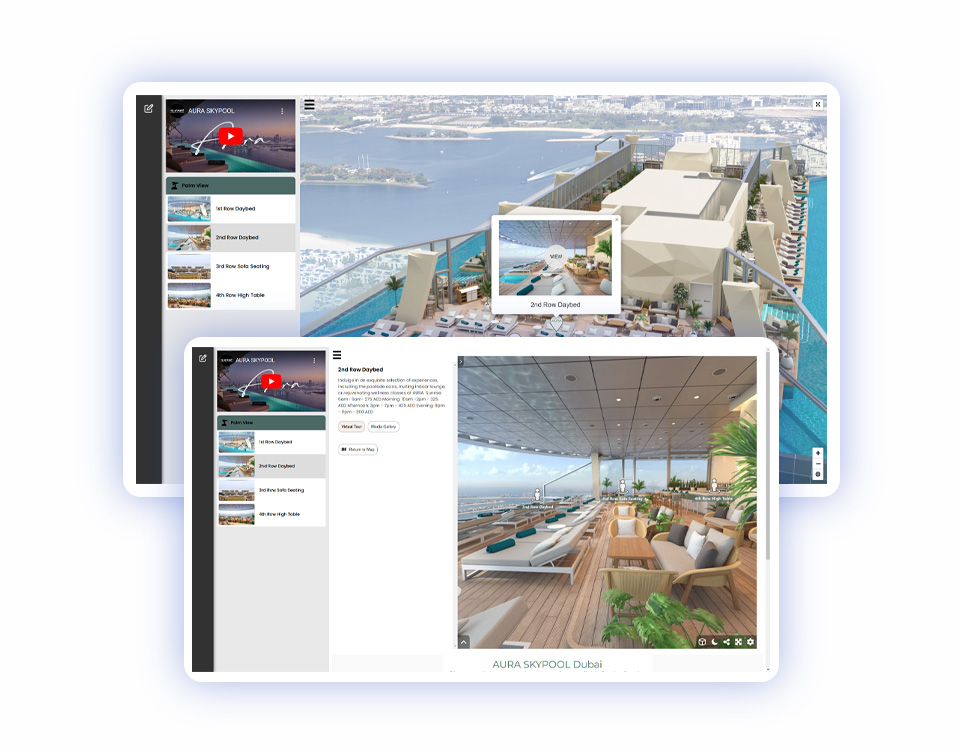
Virtual Tours allow users to change set-up styles, capacities and lighting and can be incorporated with an Interactive Map to provide users with an overview and the ability to view inside the space.
On Mobile Devices
Visrez Virtual Tours can be viewed using a phone or ipad and move just by turning the device as if you are standing in the space. This is idea for demonstrating different set-up styles virtually to clients.
Visrez is the most robust and scaled 3D Visualization platform serving the hospitality industry, generating tens of thousands of photorealistic 3D Floor Plan which are used across online and offline sales channels. This guide is designed to give an indication of budget for Visrez 3D Floor Plans across various different room units.
Visrez is regarded as the very best 3D Visualization provider to the industry and has generated thousands of Virtual Tours for clients Worldwide. We aim to keep pricing as easy to understand as possible for our clients and do not factor in the dimensions or details of a space when it comes to producing Virtual Tours.
A guide to your team’s Visrez account and how permissions work.
On the dashboard, you will see a chronological history of all the activity in your Visrez account.
The plans box displays a breakdown of the plans per event space. Each space is color-coded and the top bar displays the total number of plans created across all spaces. Clicking on the event space brings you to the builder page for that space.
The plans page has several controls available before you open an event plan in the builder.
The Admin Contact on each Visrez account can delete or rename plans which have been created by all other users.
You can create a copy of any other users’ plan by clicking on the duplicate button below the event date.
Users can copy plans created by other team members and can rename or delete only their own plans.
With tags, you can share a unique URL with your client showing all the plans across multiple spaces.
So if a group is using multiple spaces you can create a tag for that group and share a page featuring all their plans outside of your Visrez account.
The remove tag option is located next to the tag name.
From the shared page the user can open any of the event plans and if they have been set up as a partner they are able to edit any of their plans. Remember anyone accessing the Shared Page Shortcut will be able to view the plans but only partners can edit plans.
Once a plan has been approved it is marked with a green icon on the /plans page so it is clear to the team.
Visrez requires a blueprint or diagram along with reference photos Professional standard photographs are not necessary. Reference photos can be taken with a phone. Event spaces do not need to be set-up. Take photos from each corner or at perimeters of outdoor spaces. Professional Stock Photographs, Virtual Tours & Videos are helpful and can be included.
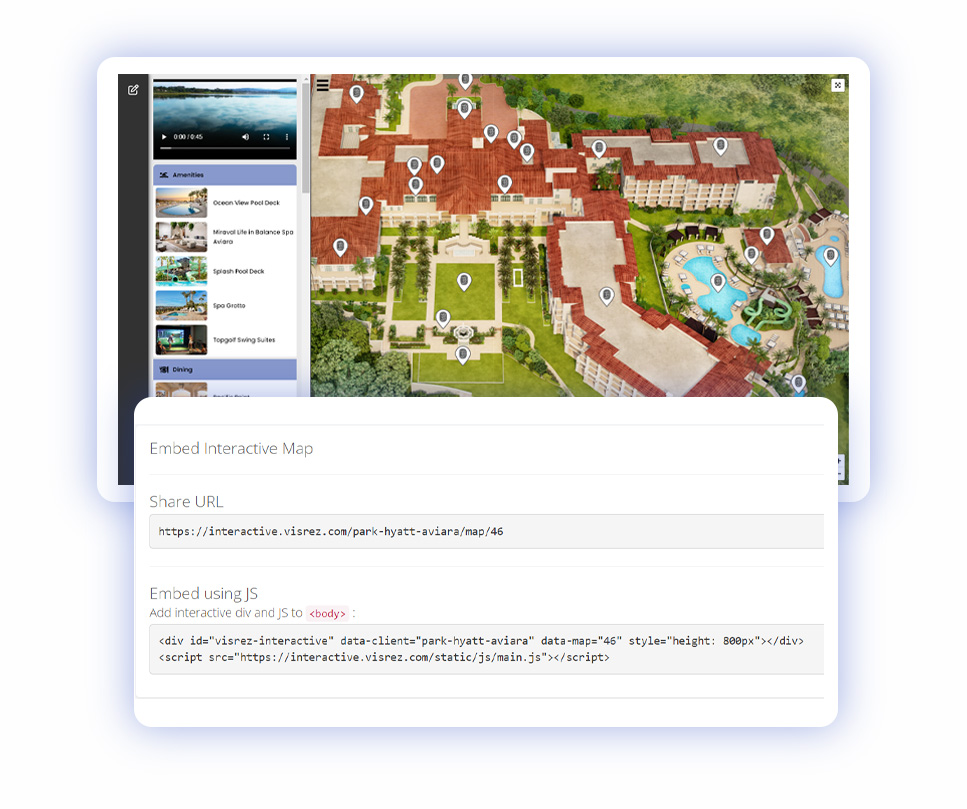
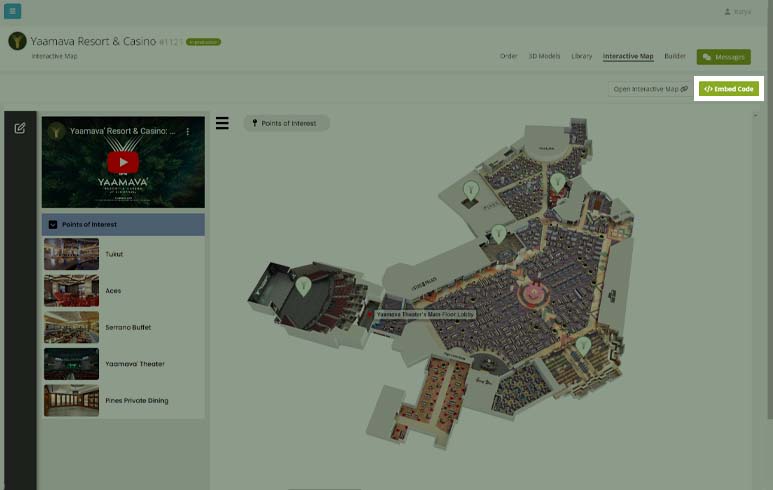
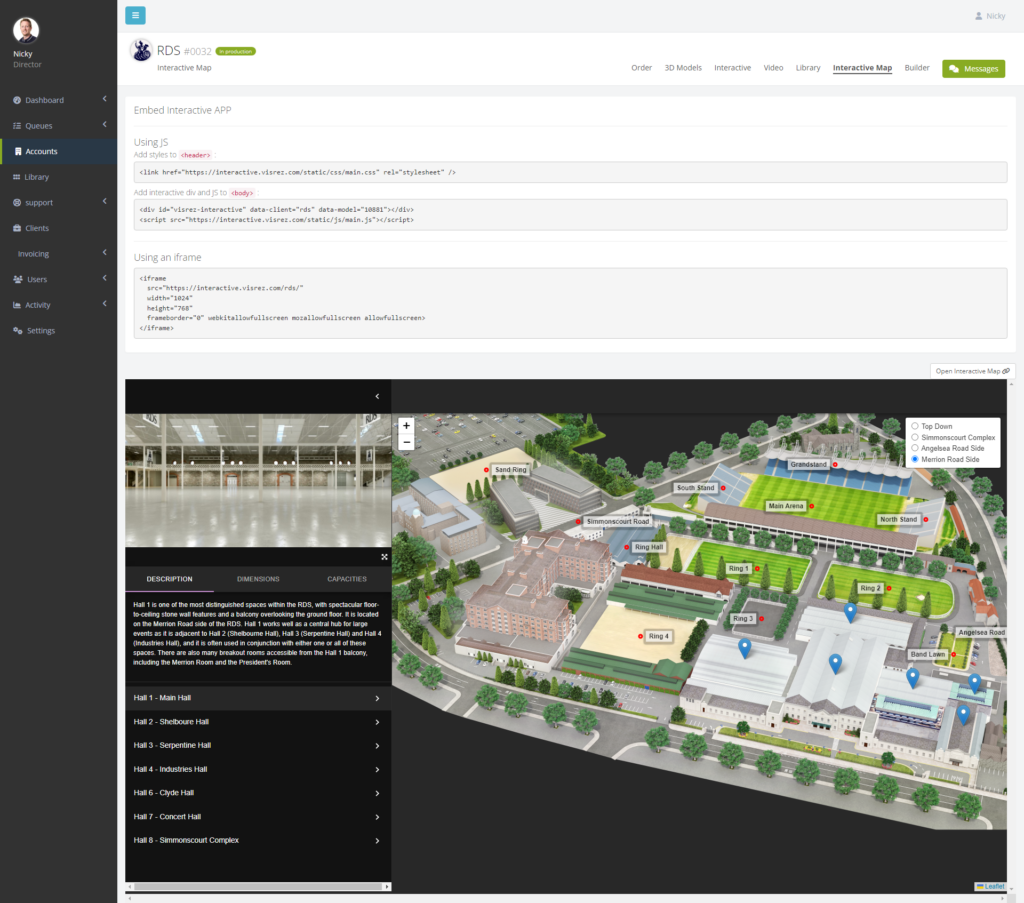
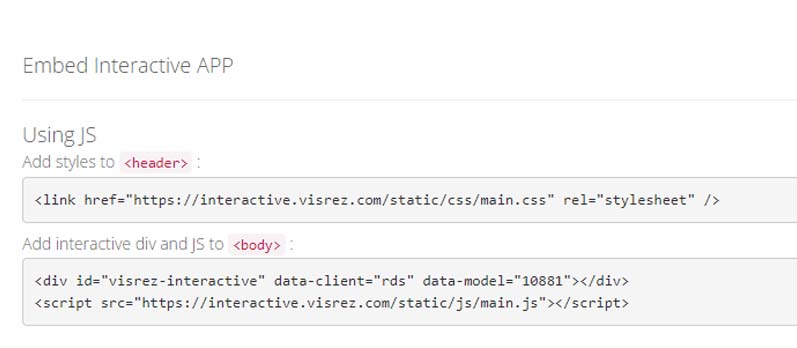
Interactive Maps can be added to a website using a single line of code from your Visrez account from the Embed Code button. The map automatically uses the styling from your website so that fonts, background colours and buttons blend with the site. Most importantly if you switch website vendors the interactive map can go straight into your new site.
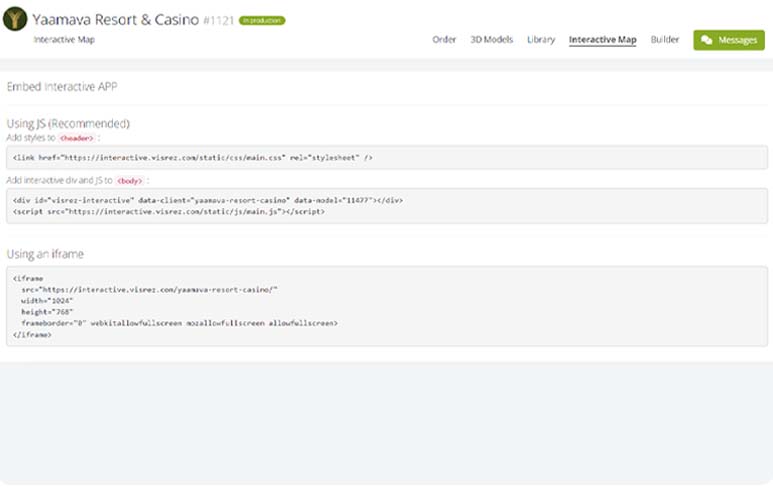
To embed the Interactive Map in the website using JS or using an iframe copy and paste the embed code snippets into your page.
Create 3D event plans using exact replicas of your event spaces and furniture with Visrez Floor Plan Builder
Activating Spaces on Visrez
Learn how to get your event spaces activated on Visrez
Getting Set-Up
Visrez requires a blueprint or diagram along with reference photos Professional standard photographs are not necessary. Reference photos can be taken with a phone. Event spaces do not need to be set-up. Take photos from each corner or at perimeters of outdoor spaces. Professional Stock Photographs, Virtual Tours & Videos are helpful and can be included.
Inside Your Account
A guide to your team’s Visrez account and how permissions work.
Timeline History
On the dashboard you will see a chronological history of all the activity in your Visrez account.
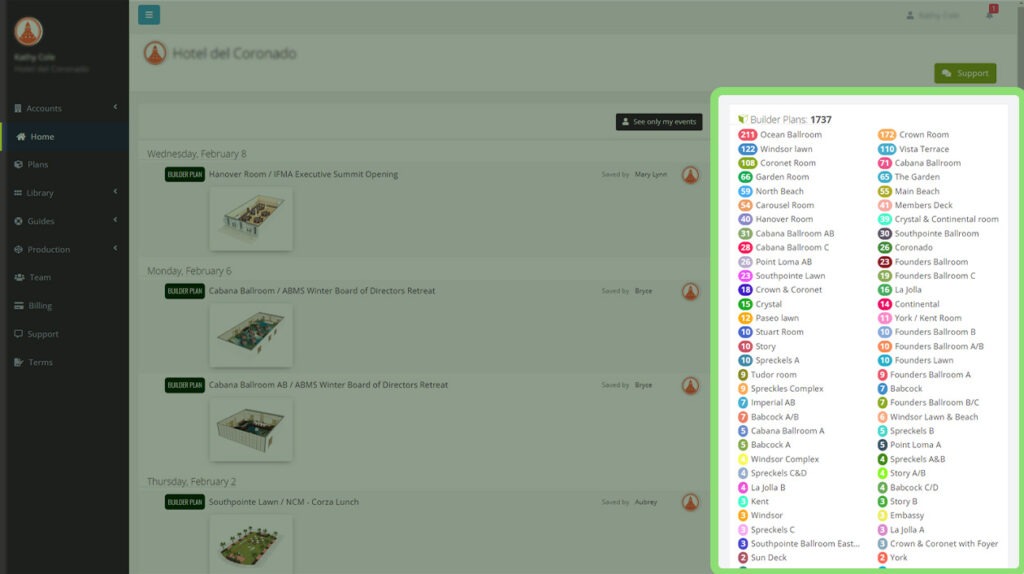
Builder Plans
The plans box displays a breakdown of the plans per event space. Each space is color coded and the top bar displays the total number of plans created across all spaces.Clicking on the event space brings you to the builder page for that space.
Edit Plan Name
On the plans page have a number of controls available before you open an event plan in the builder.
Delete Plan
The Admin Contact on each Visrez account can delete or rename plans which have been created by all other users.
Create a Copy
You can create a copy of any other users’ plan by clicking on the duplicate button below the event date.
Users can copy plans created by other team members and can rename or delete only their own plans.
Edit Tags
With tags you can share a unique URL with your client showing all the plans across multiple spaces.
So if a group is using multiple spaces you can create a tag for that group and share a page featuring all their plans outside of your Visrez account.
The remove tag option is located next to the tag name.
Share Link
From the shared page the user can open any of the event plans and if they have been set up as a partner they are able to edit any of their plans. Remember anyone access to the Shared Page Shortcut will be able to view the plans but only partners can edit plans.
Approve Event Plans
Once a plan has been approved it is marked with a green icon on the /plans page so its is clear to the team.
Managing Teams
Team Admins
Team Admins can manage all users in the account. Only admin contacts on each account can delete user from Visrez.
Visrez accounts can have more than one admin user on the account.
To add a new user to your account just enter their email address and they will receive an email signup immediately.
Personal Account
Users can update their profile in the top right hand corner of their account by clicking on the Profile icon.
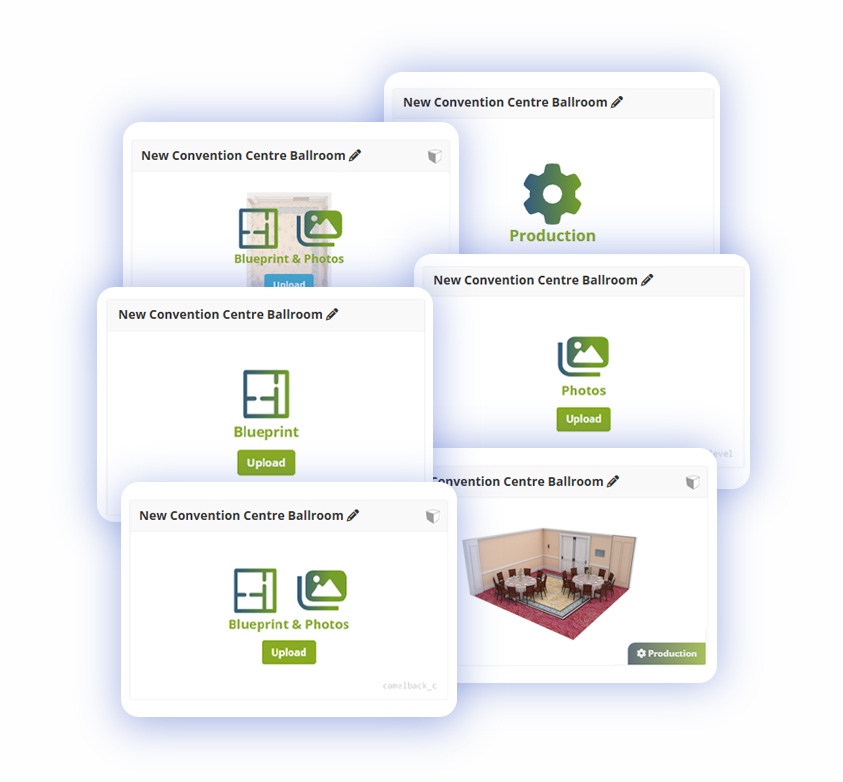
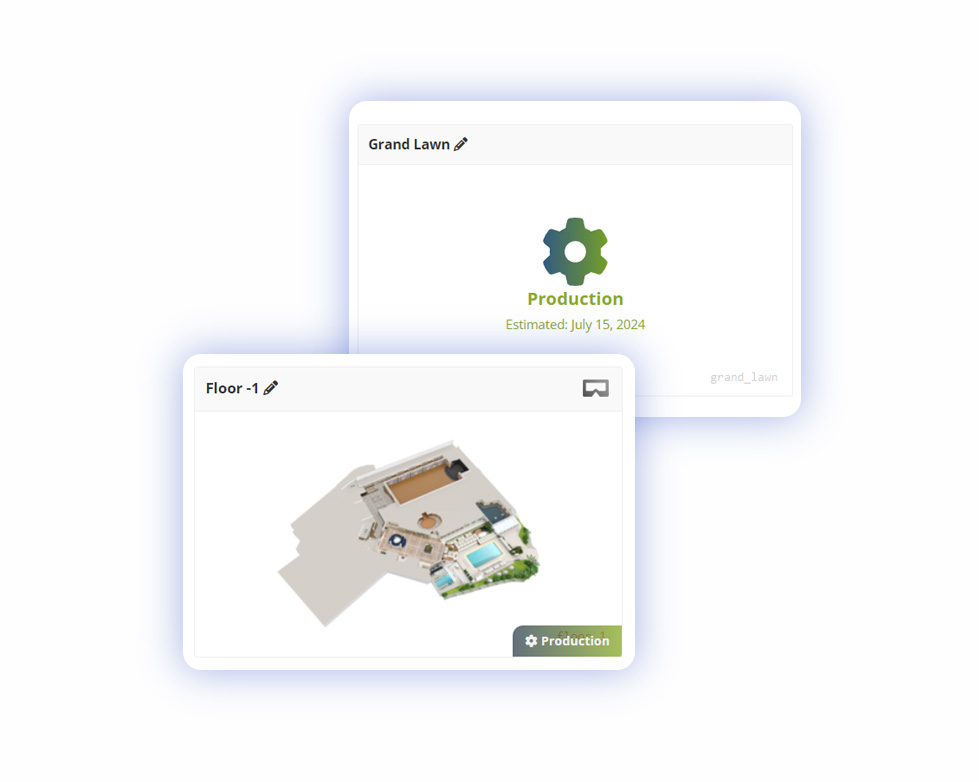
Production Models
Static 3D Models
These are the static event space models which are created during the account set-up.
These can be re-activated if renovations are required or if new event spaces are ordered.
Once the spaces have been approved the static models remain in your account.
Static 3D Models can be downloaded or displayed in your website using the embed code tools.
Download Static 3D Models
Static 3D Models are available for download in multiple formats and resolutions.
These can be added to your website using the embed code option.
Generating Unique Codes
Here you can generate unique codes for each space to add the plans to your site and track once live.
The Visrez Library
How to create a collection of furniture from the Visrez library
The Visrez Library is built into every user account and shared with all team members . Any object from the Visrez library can be used in a client plan. Objects added to the client collection are available to all team members. New objects are added weekly by our team.
When Google maps launched in 2005 it was designed to help users get from point A to point B in the pre-smartphone age and quickly became the standard website mapping tool as it was such a huge step forward. Over the years Google added many new features and provides a significant amount of information to its users. Based on conversations with Visrez clients it was clear they needed a dedicated interactive property map tool rather than relying on Google because displaying competitors and unrelated businesses in their websites is counterproductive.
Reference Assets
Pre-Opening Projects & Renovations
FF&E, Videos, DWG’s / Floorplans, Virtual tours, Dimensions, Design References Design Boards, pictures or other reference materials are required when the project is in production so that our team can produce a correctly scaled model of the resort.
Map Production
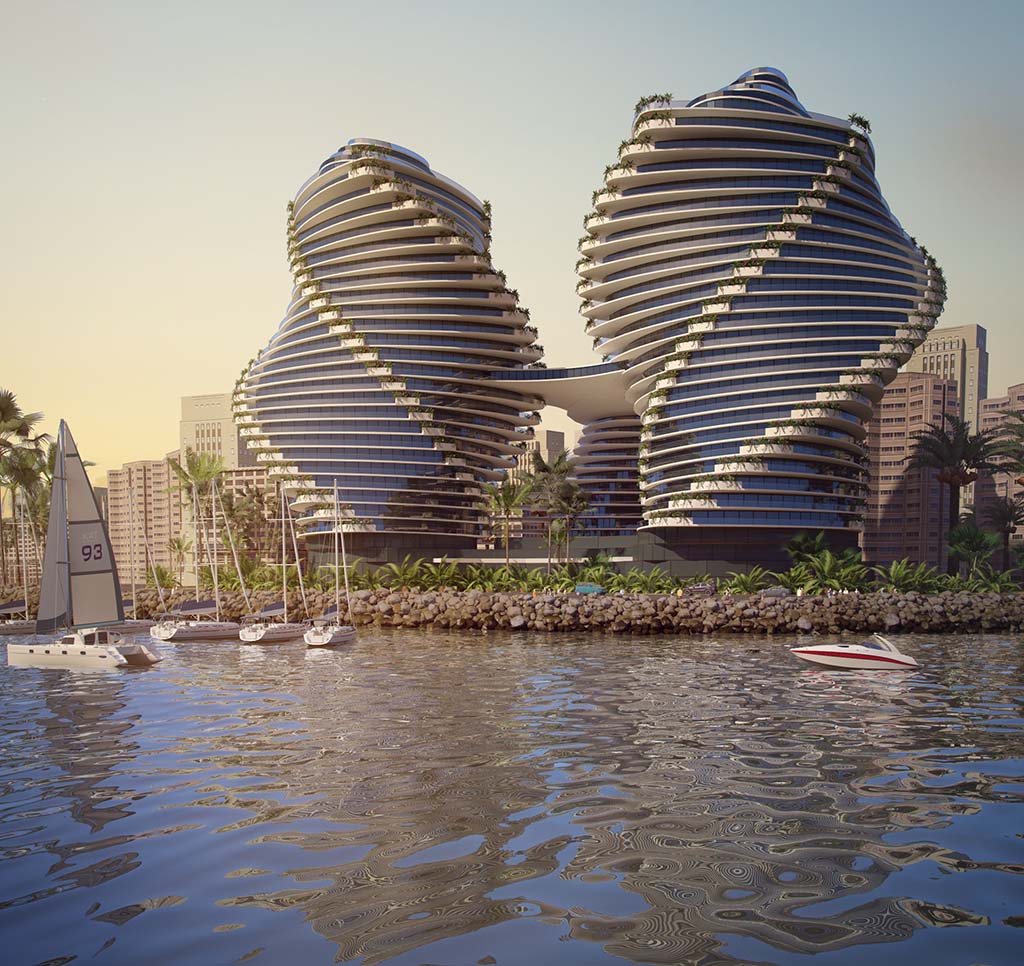
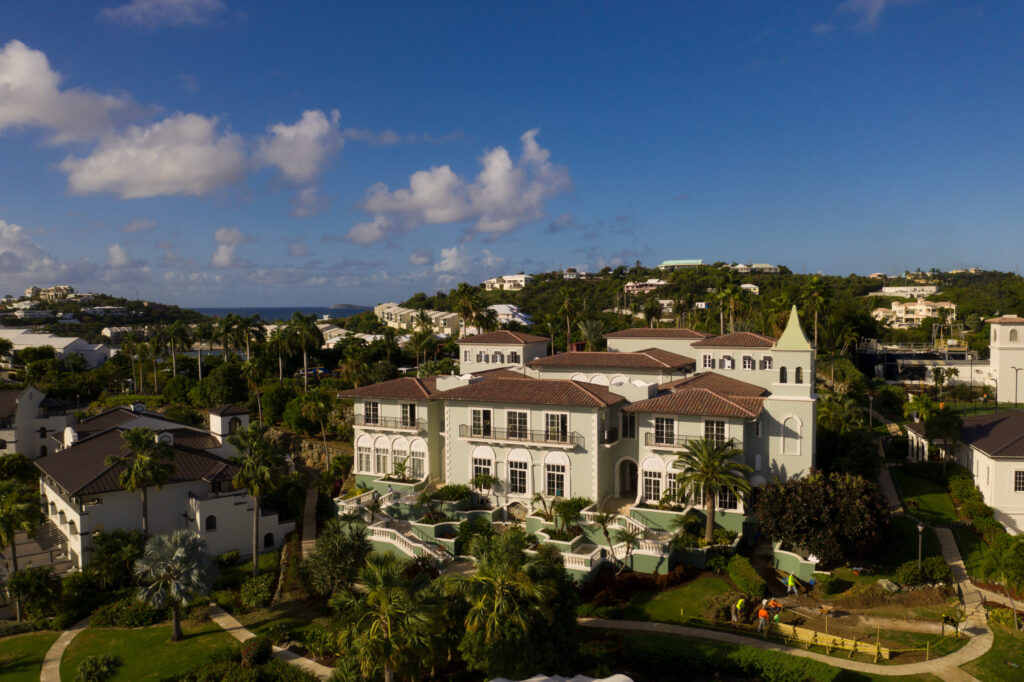
Interactive property maps are one of the most useful tools to research a leisure or conference destination as they can provide users with a visual overview of the amenities along with a list of room types, event spaces, food, beverage and leisure options. For each hotel, we are striving to capture its specific atmosphere and to express its unique character. Visrez maps are created entirely off-site using assets uploaded by clients to their accounts and can be downloaded in multiple formats for use across all digital media and print platforms.
Visrez Resort Maps
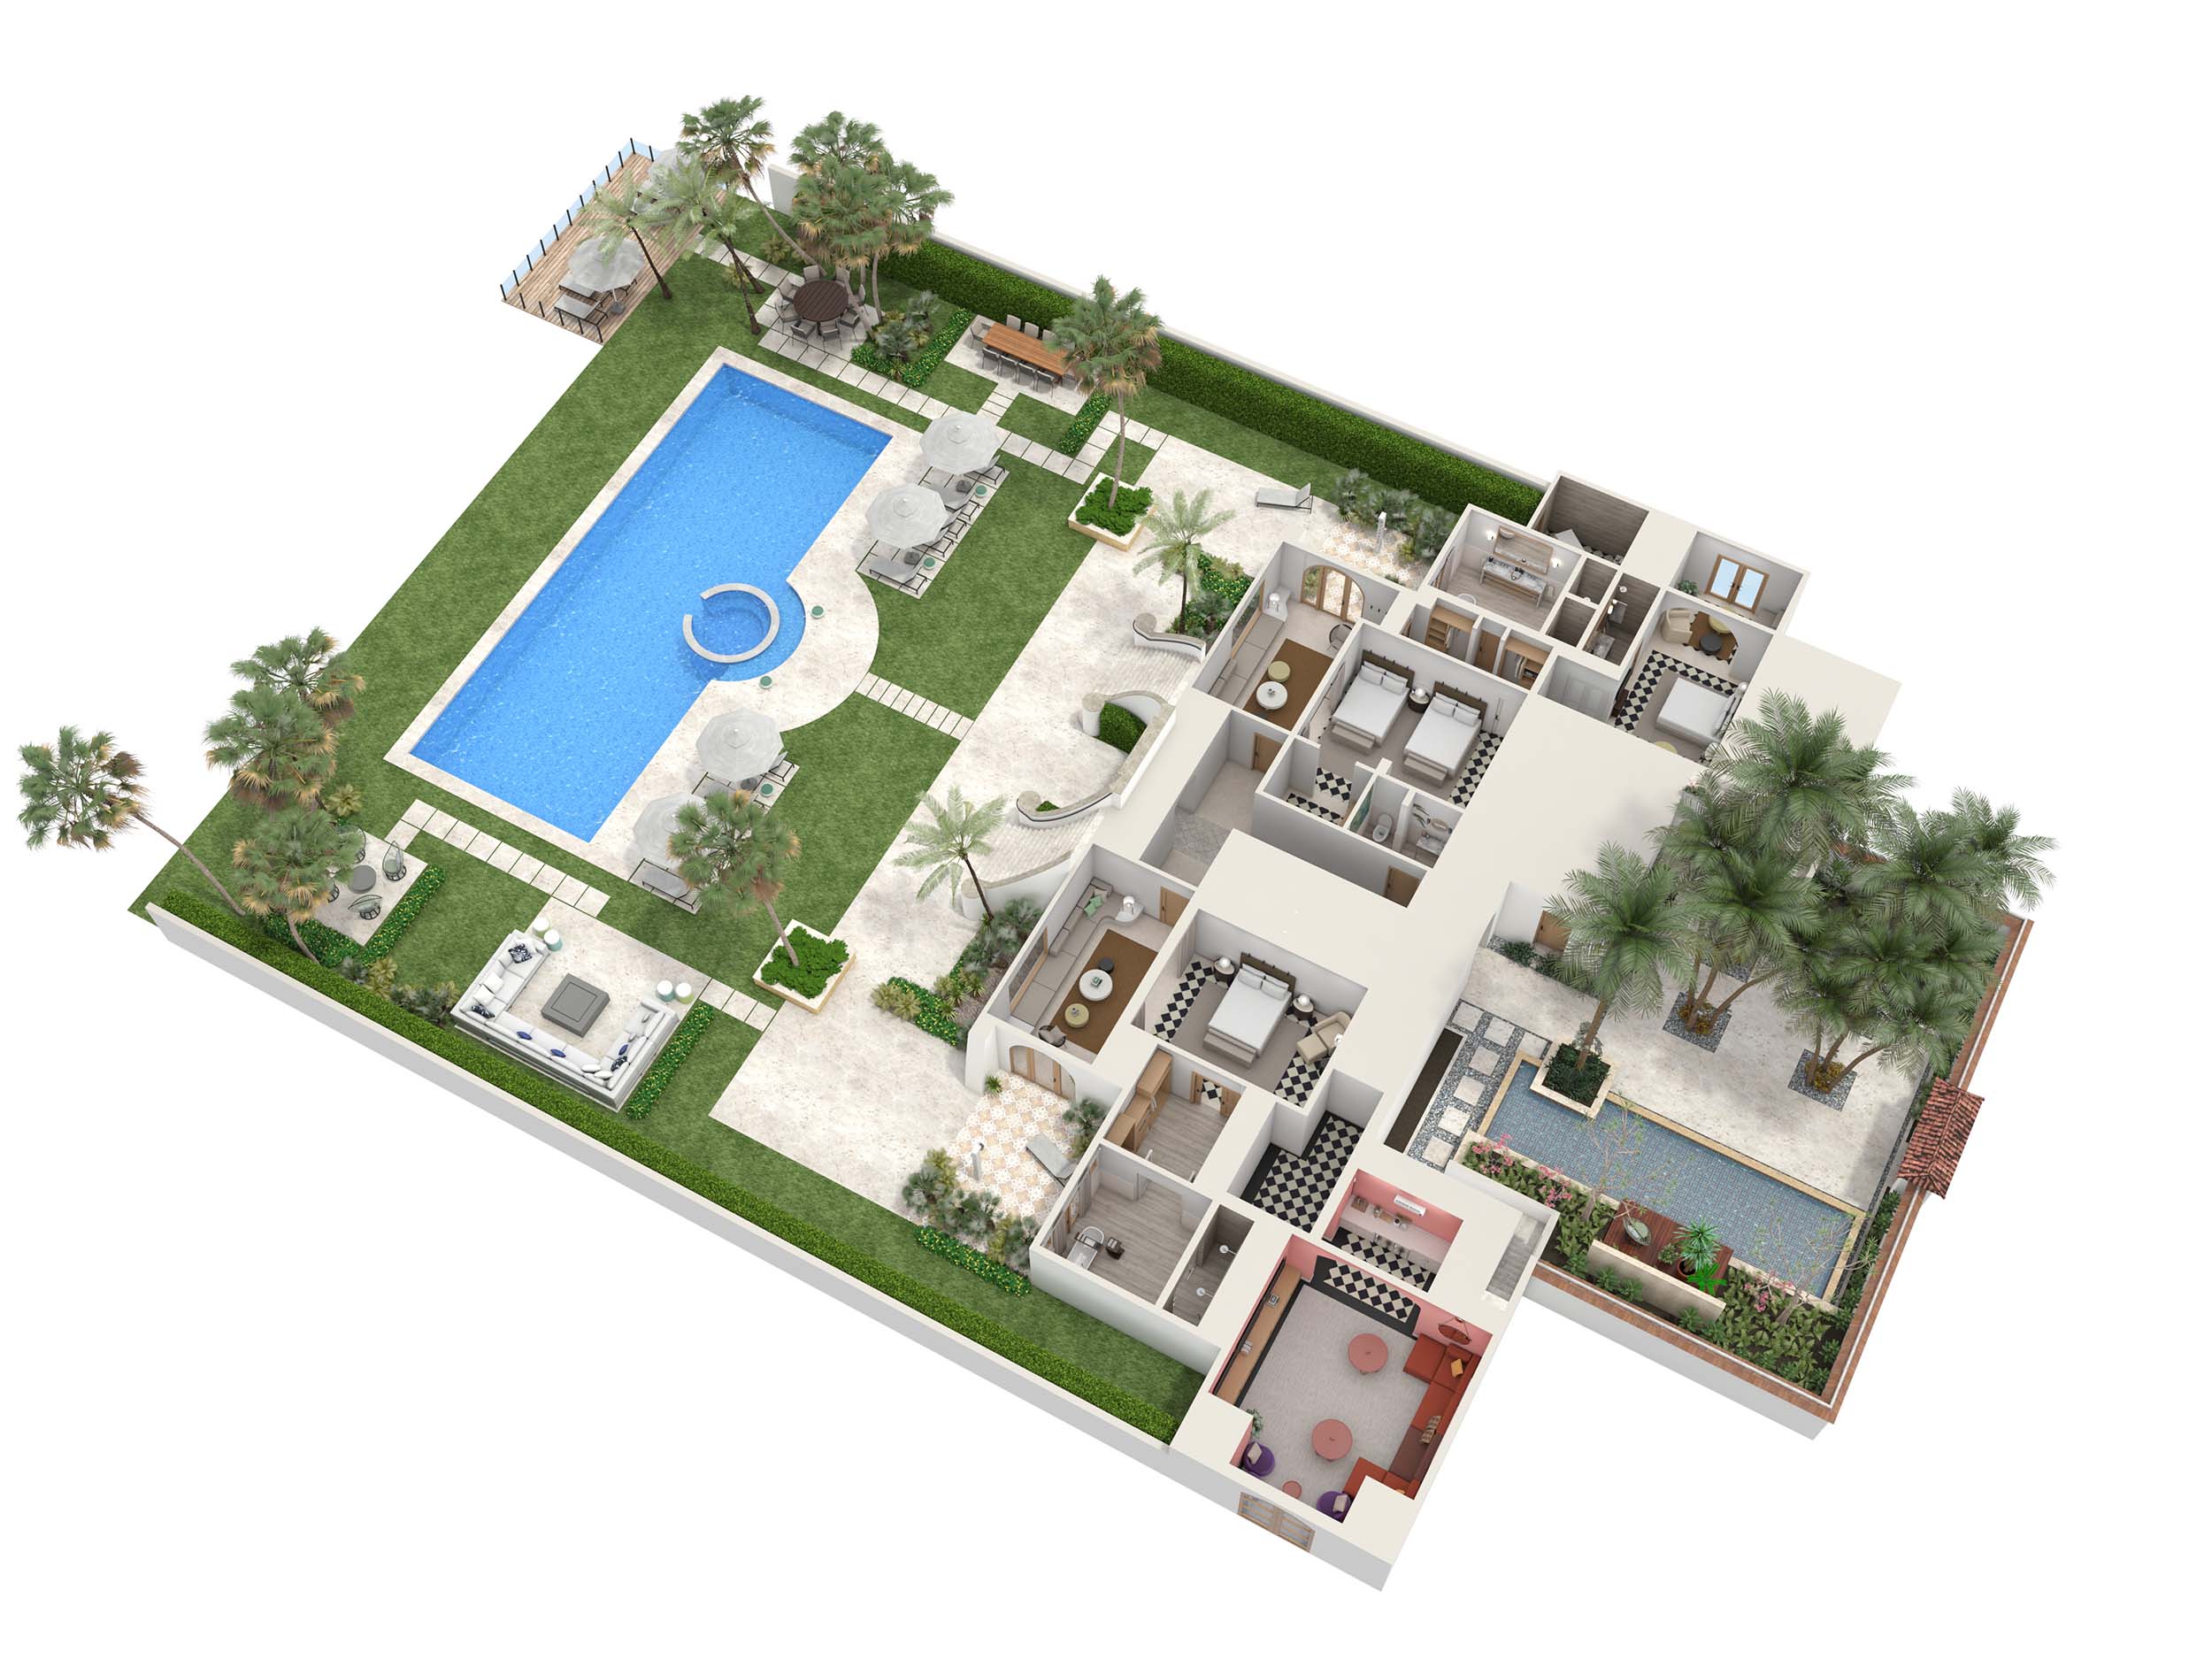
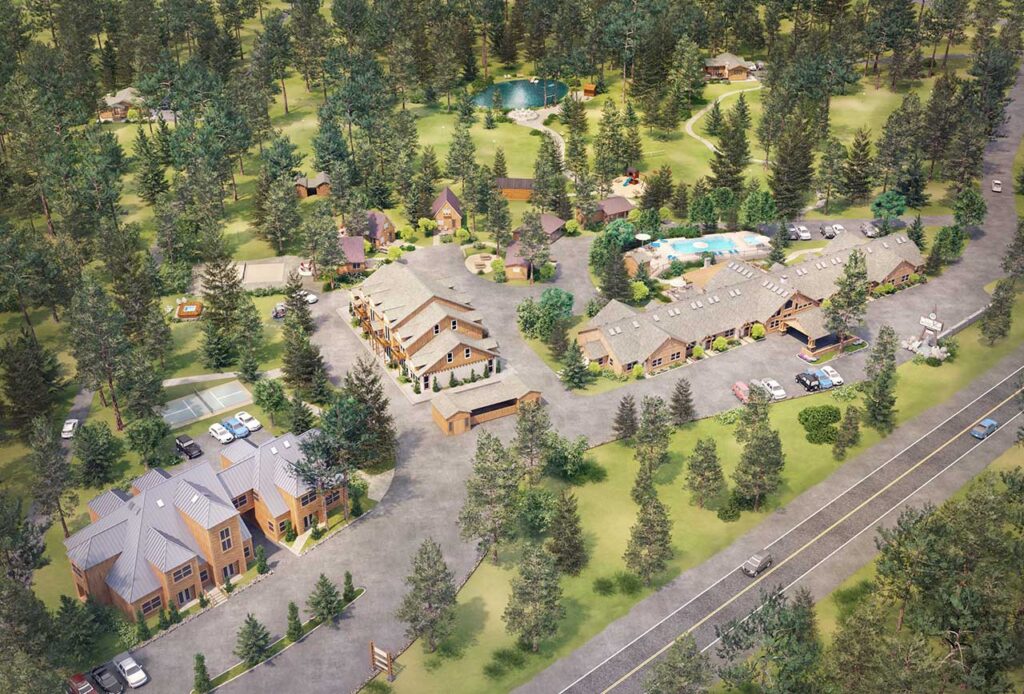
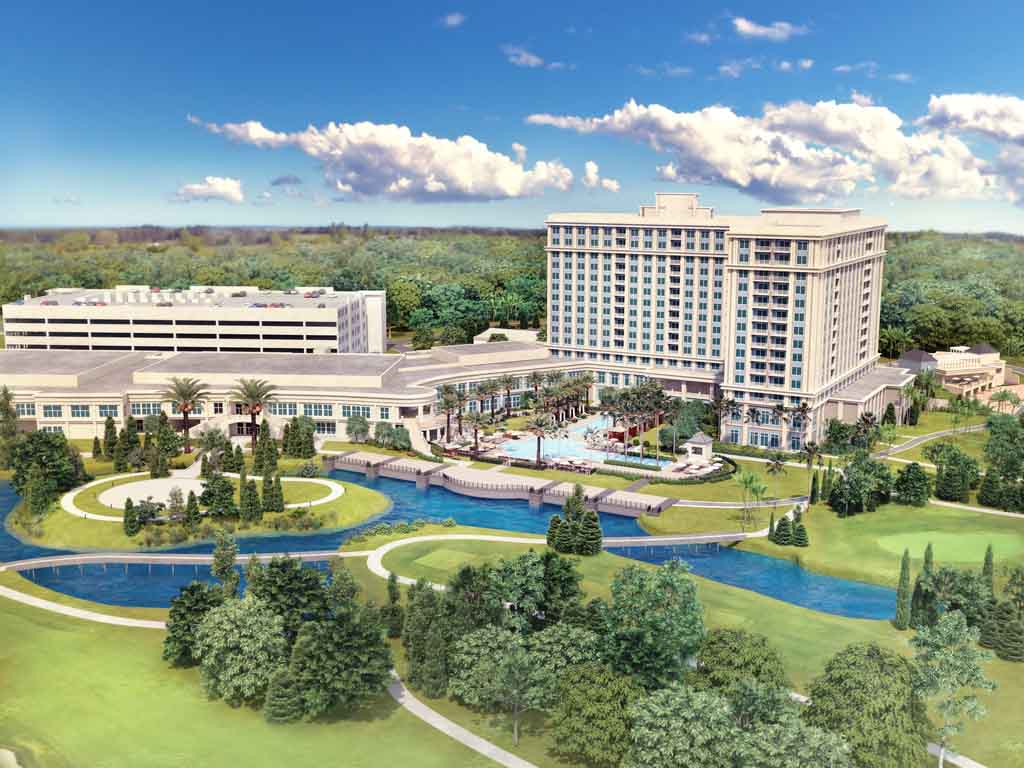
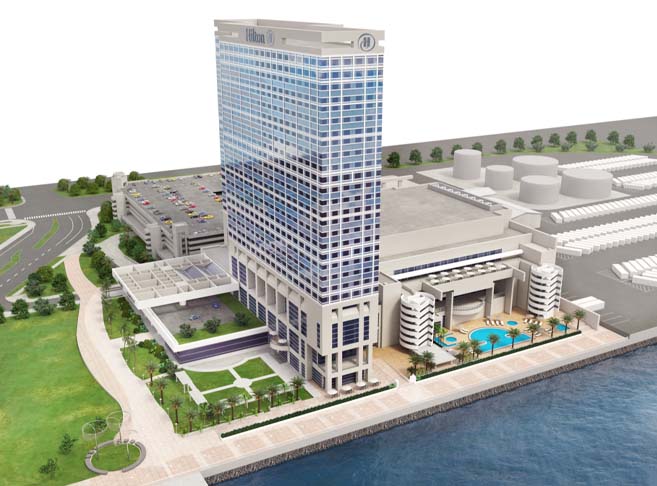
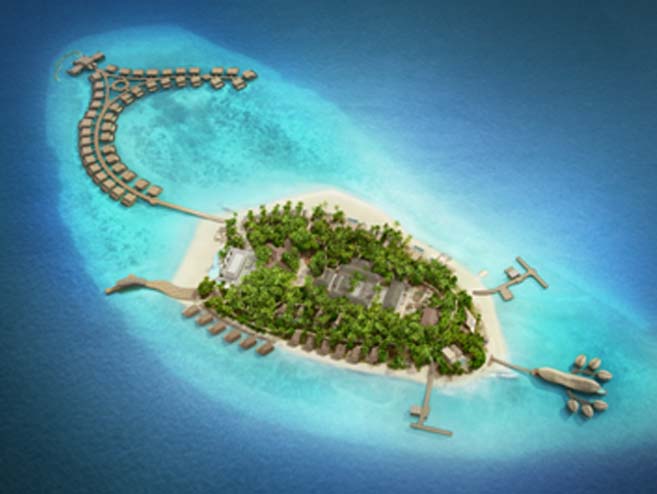
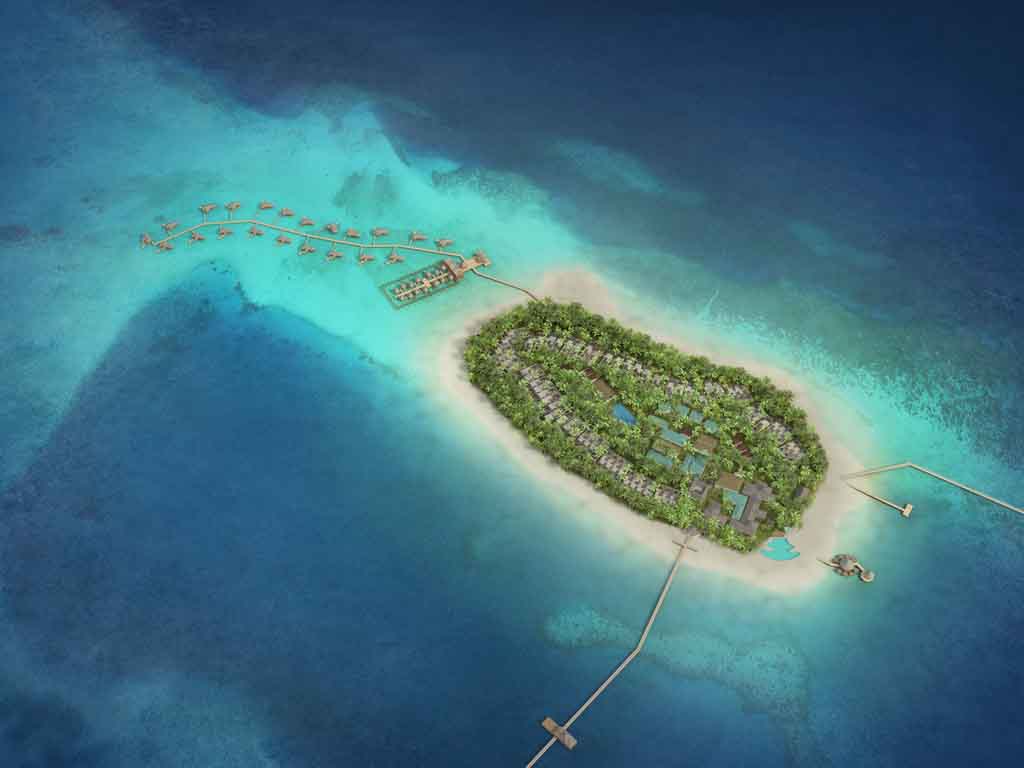
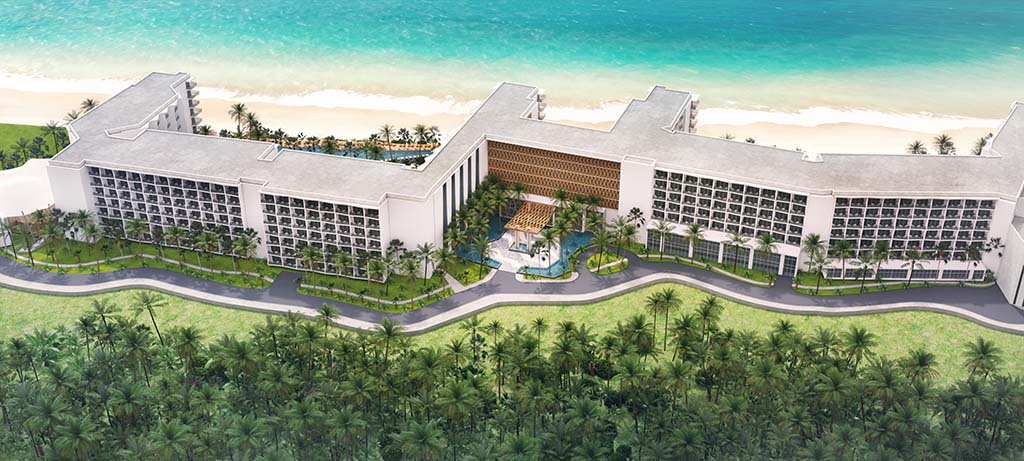
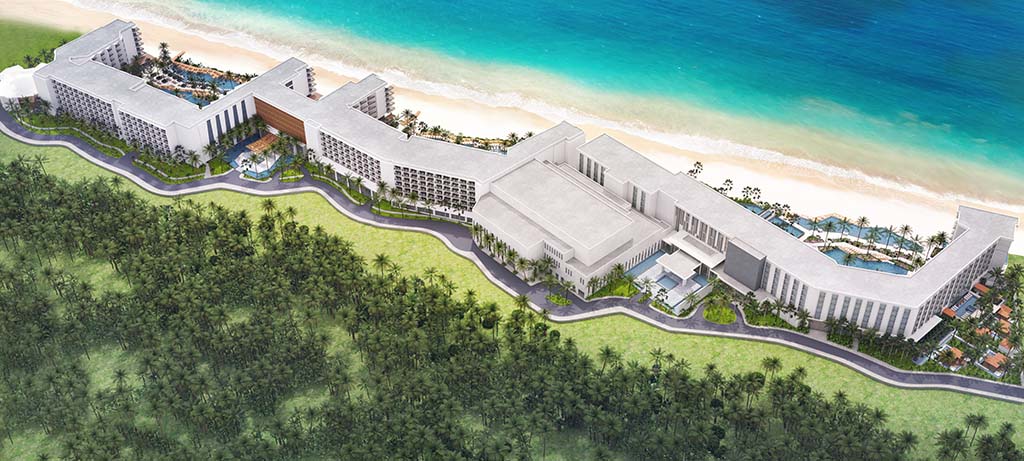
Small Resorts
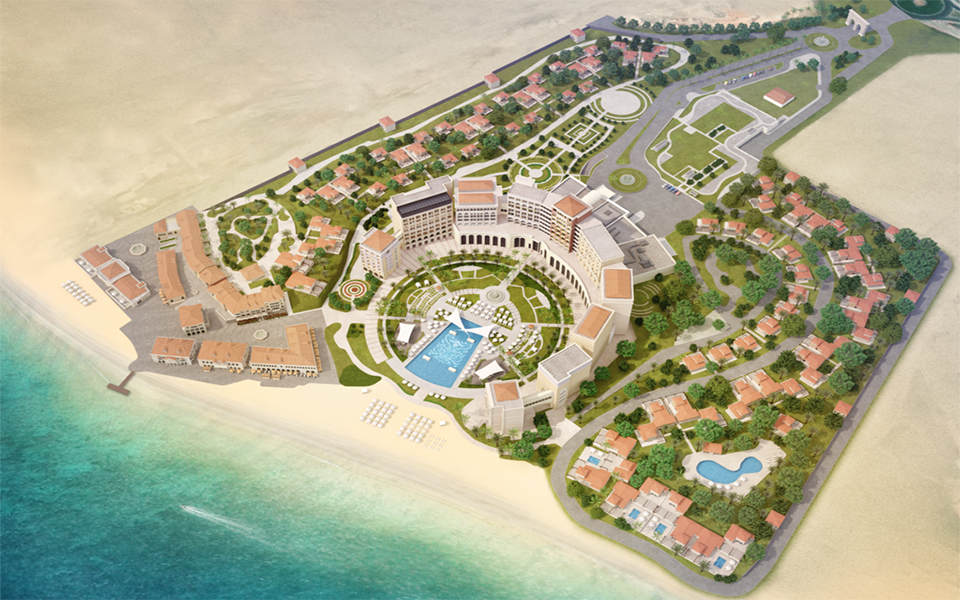
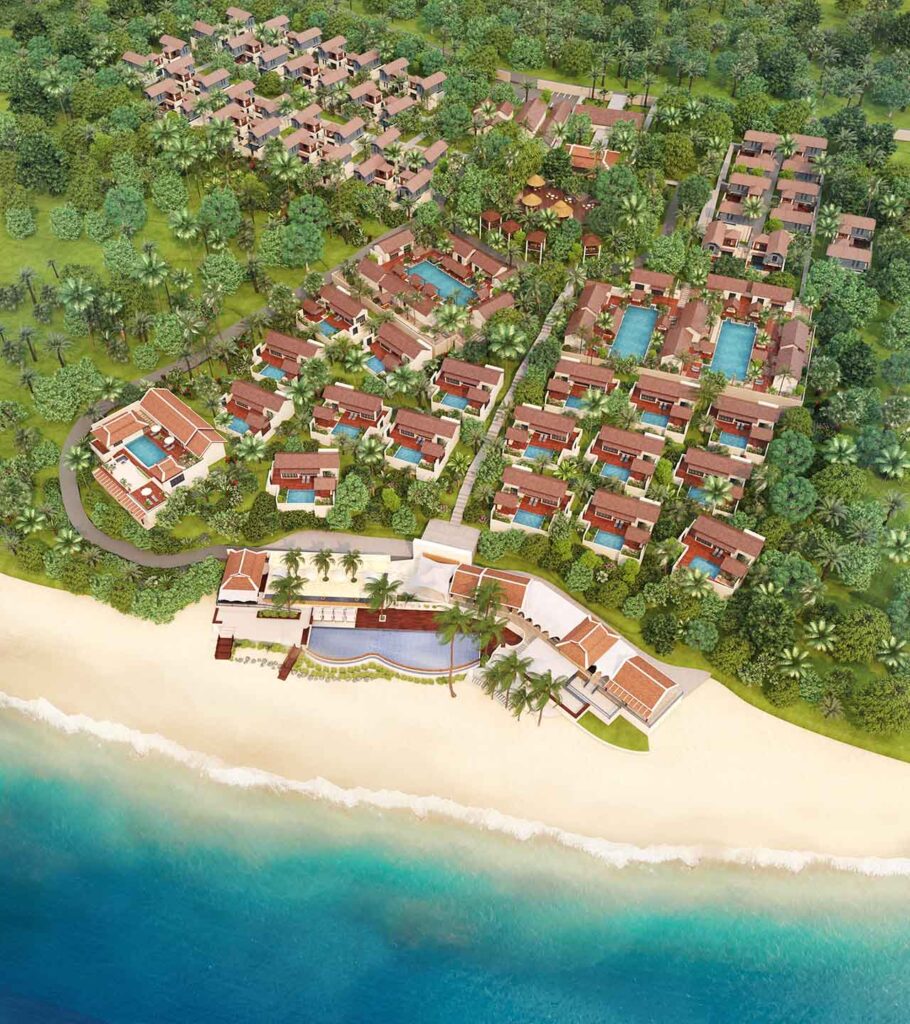
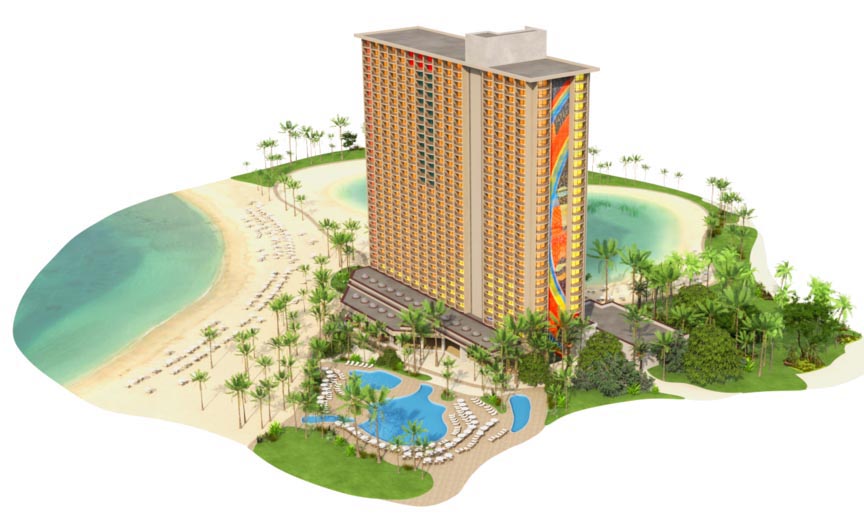
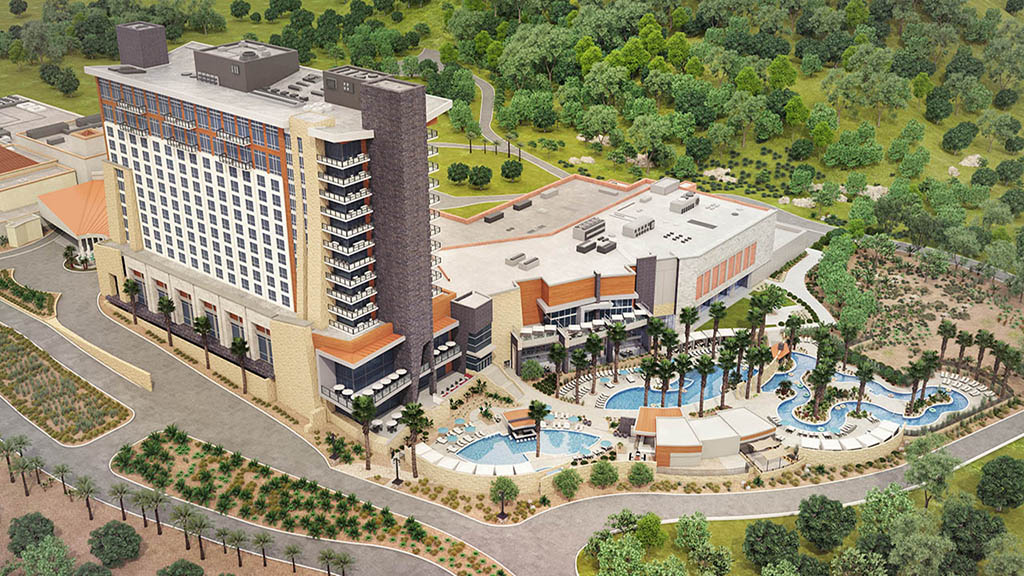
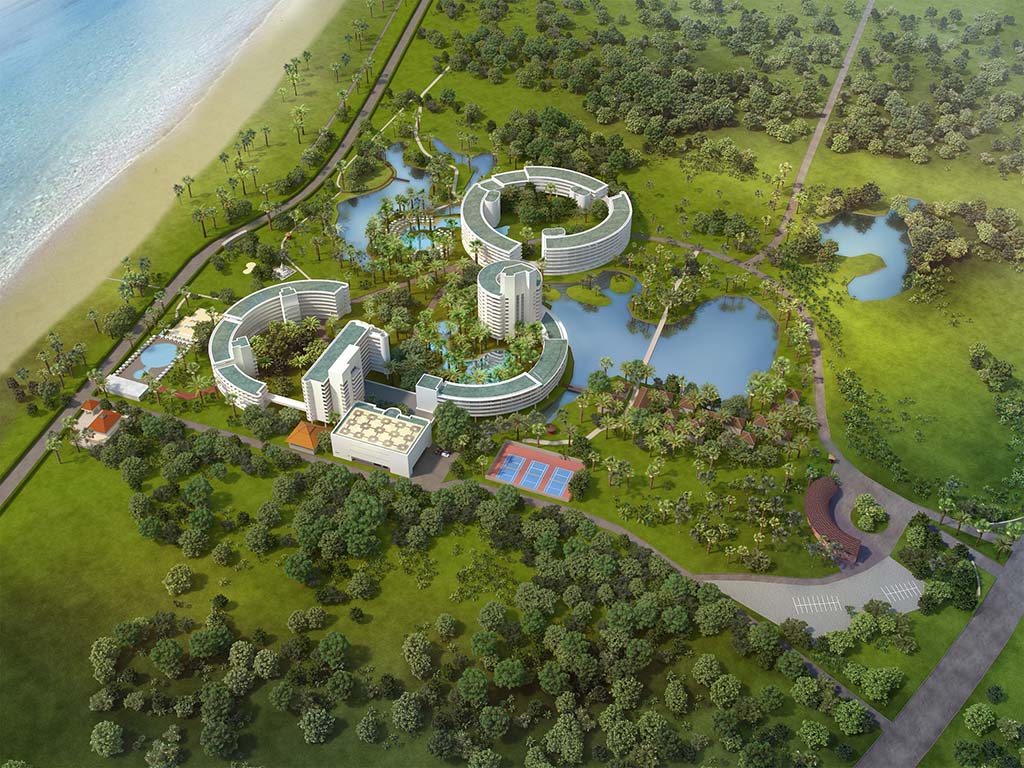
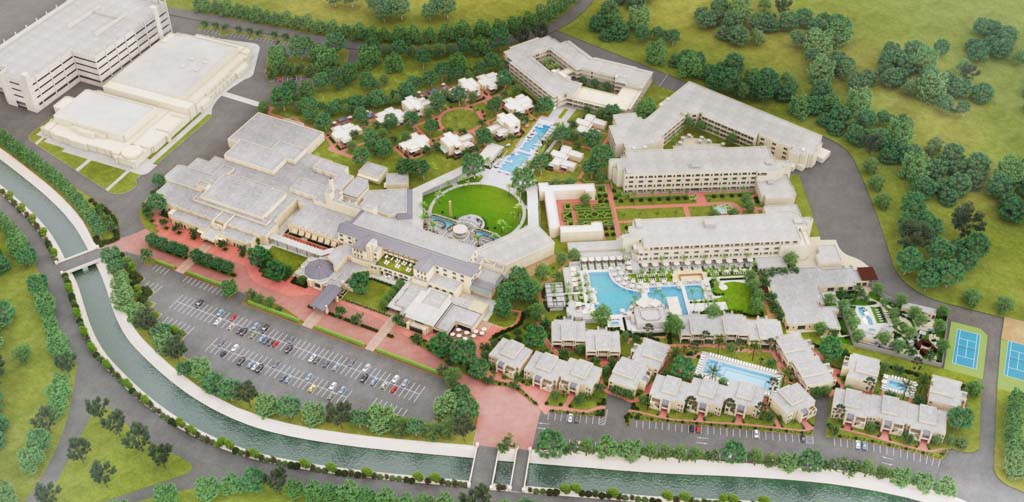
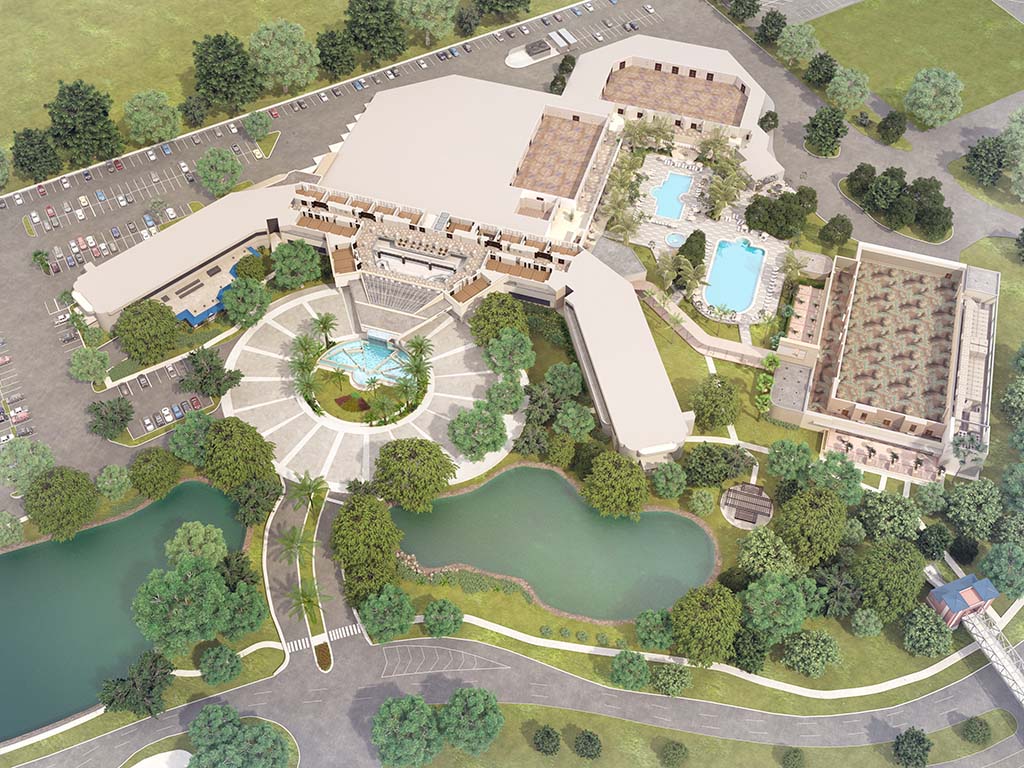
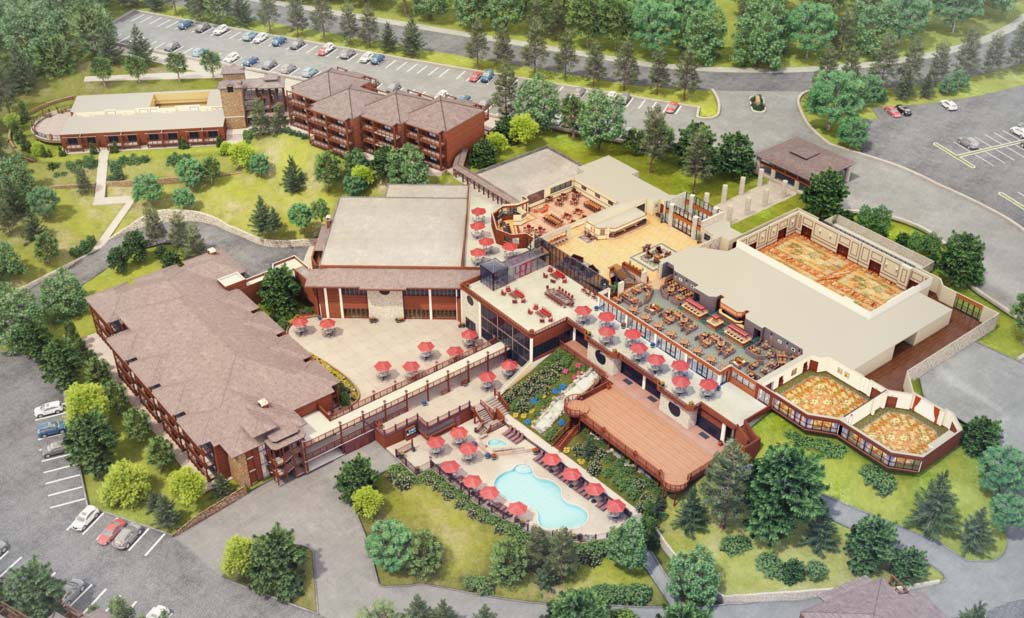
Small resorts are usually single-building resorts, surrounded by pools, outdoor amenities or a few additional smaller buildings.
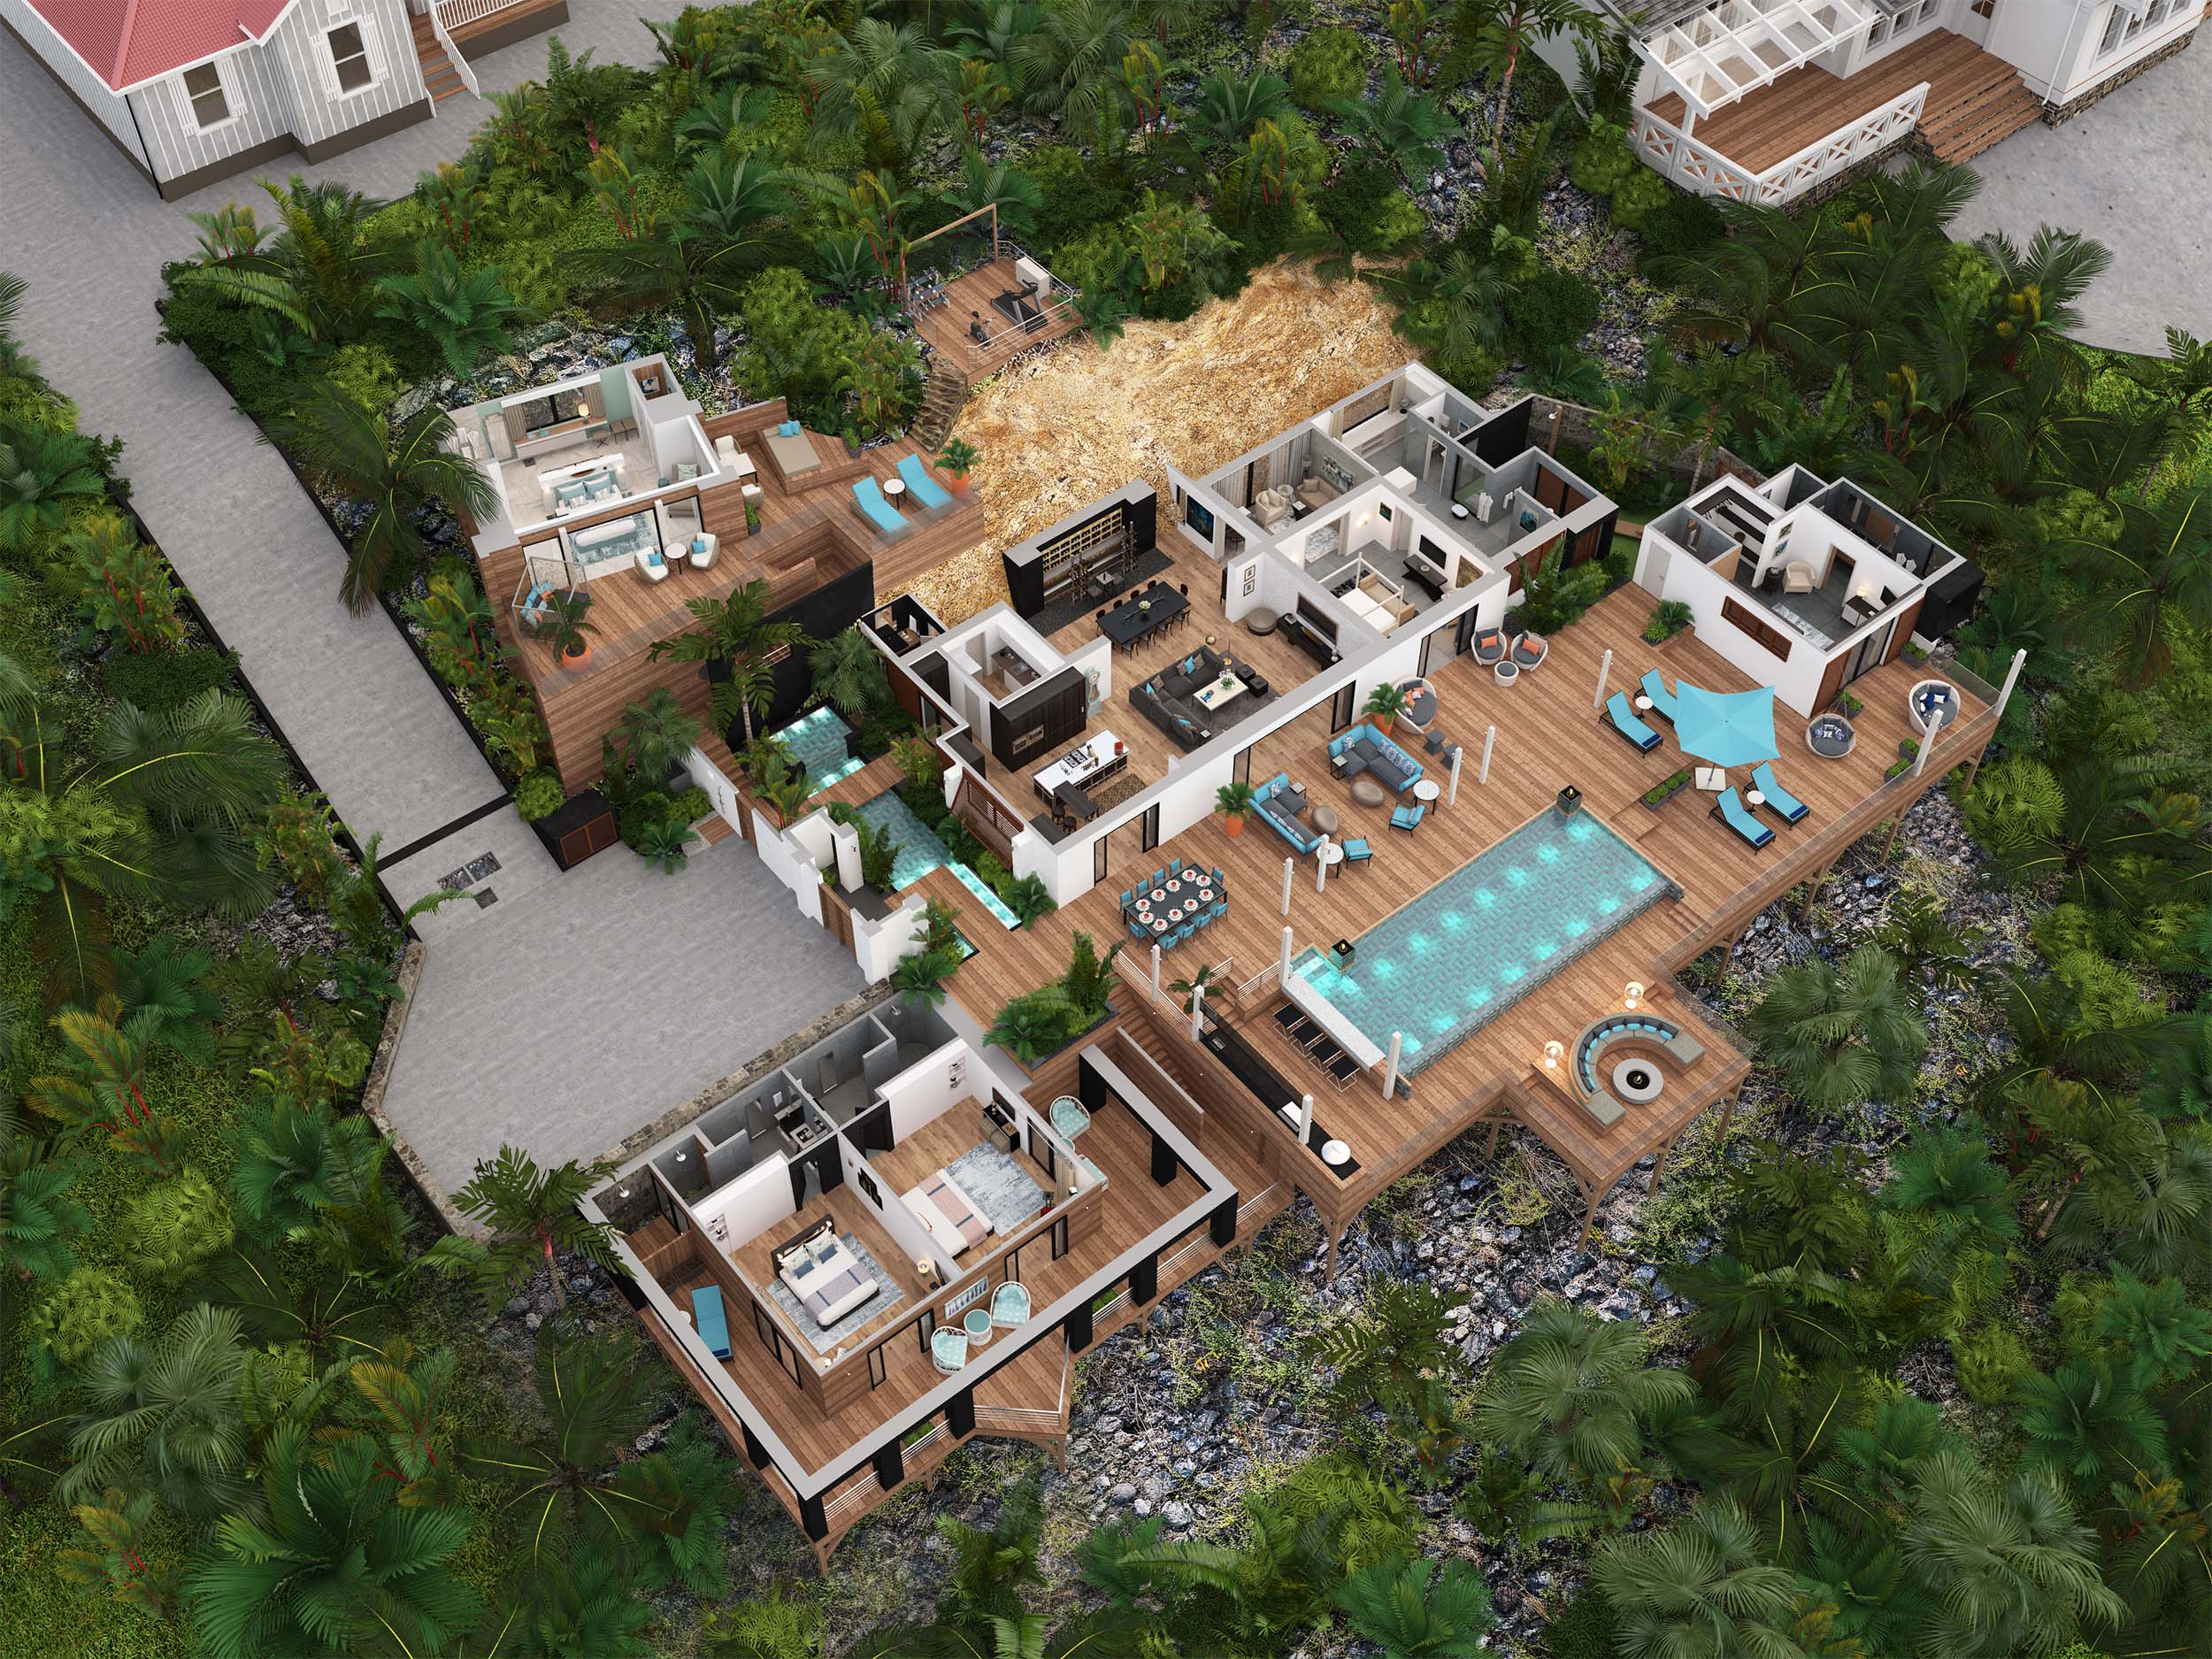
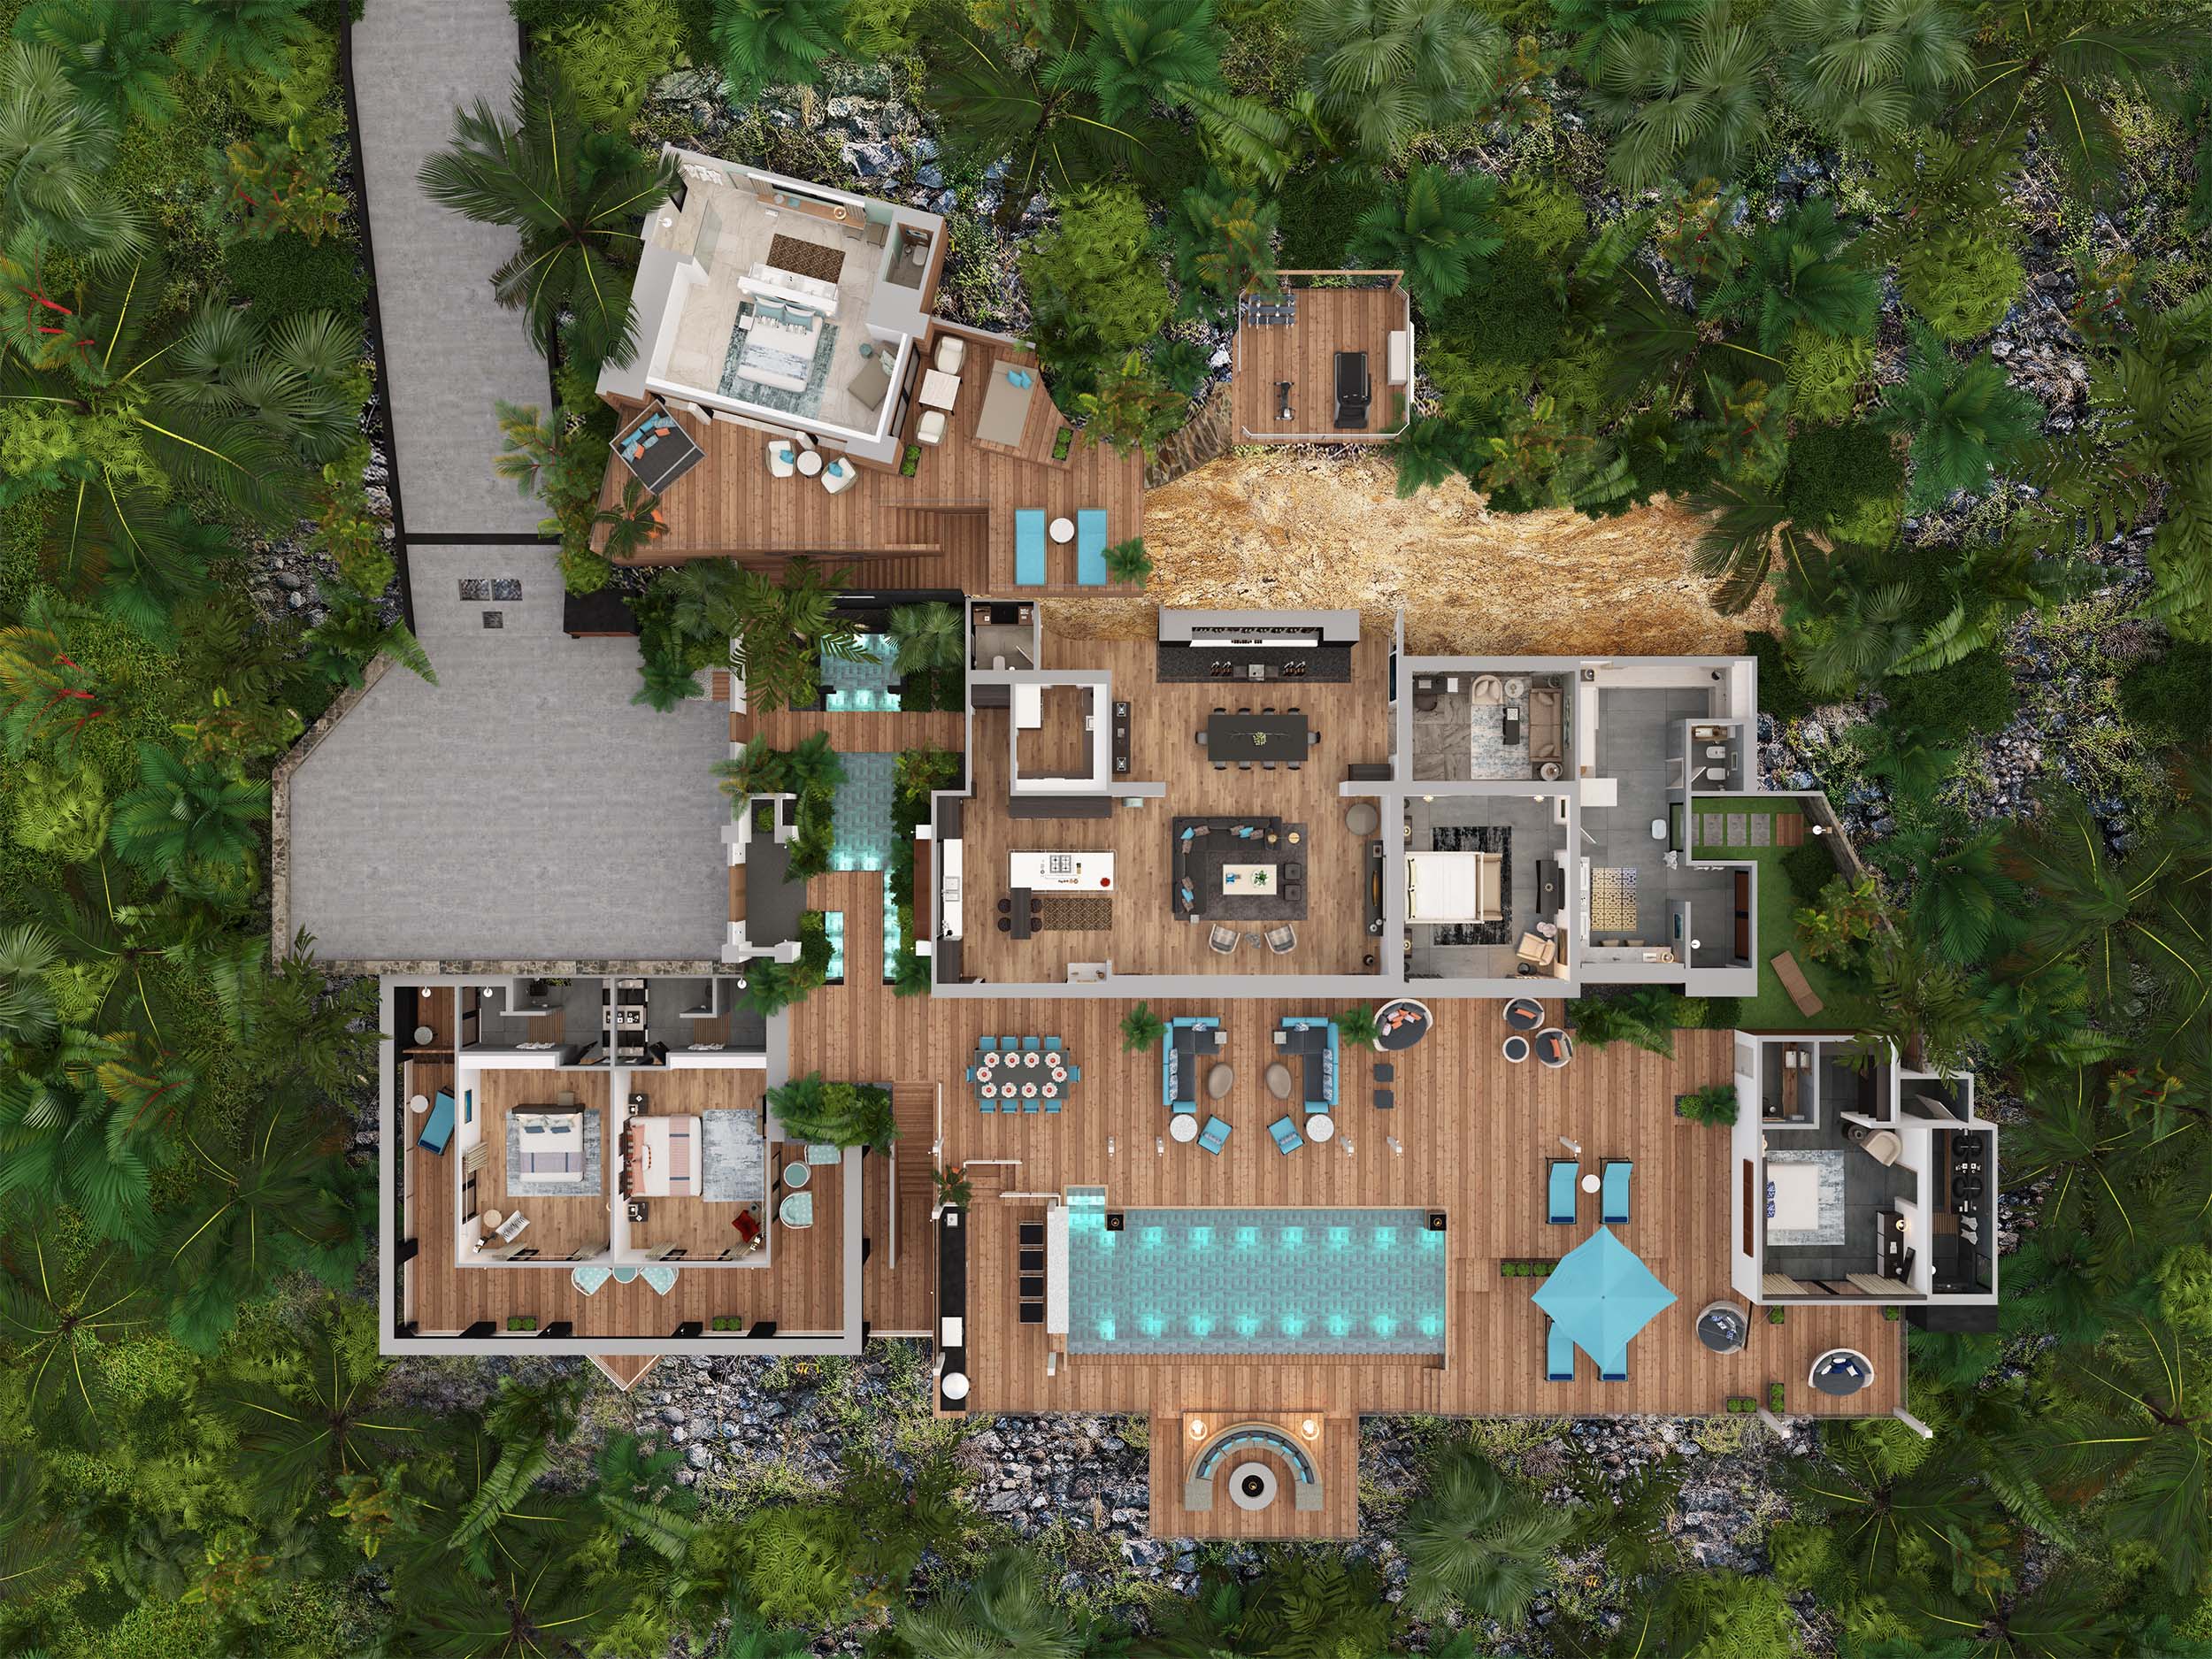
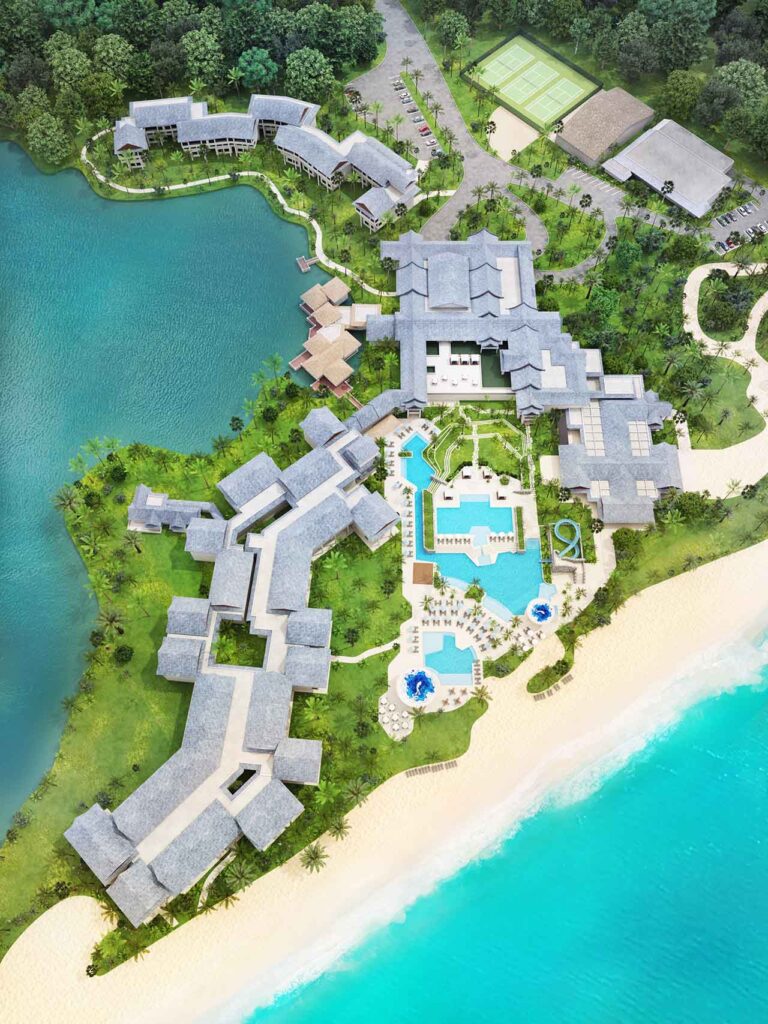
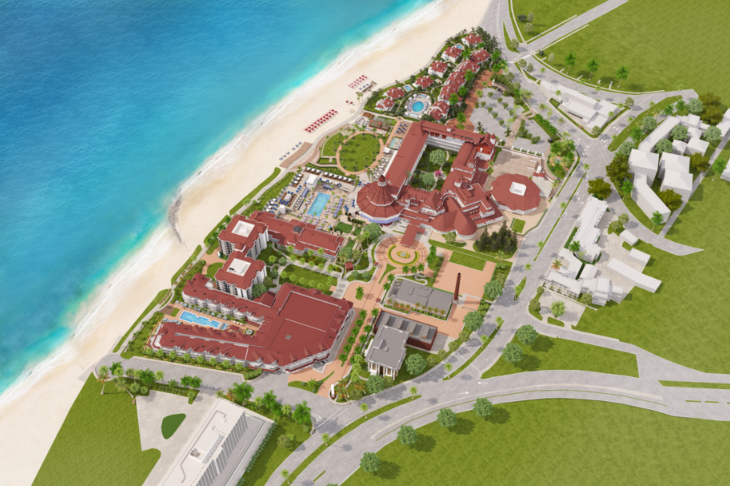
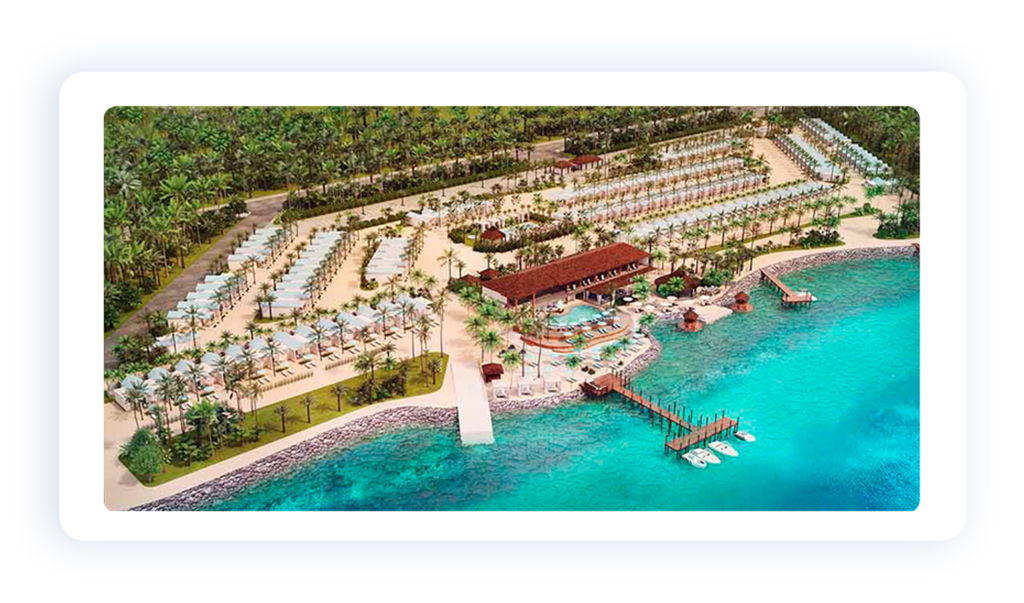
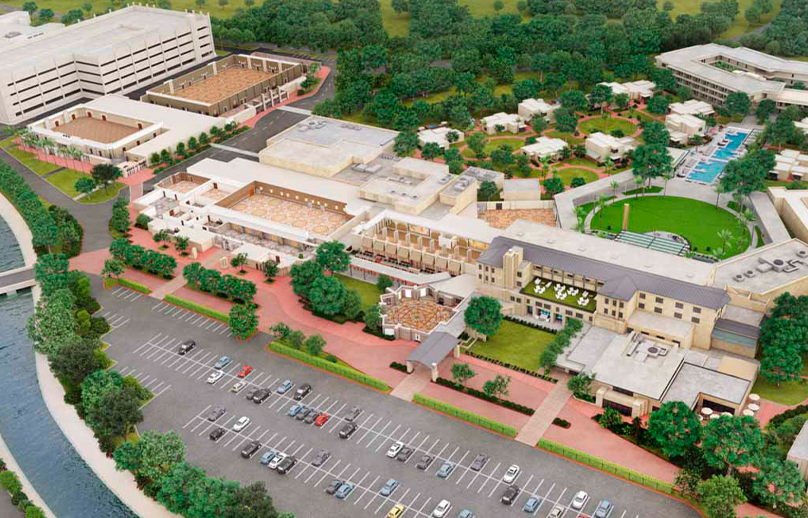
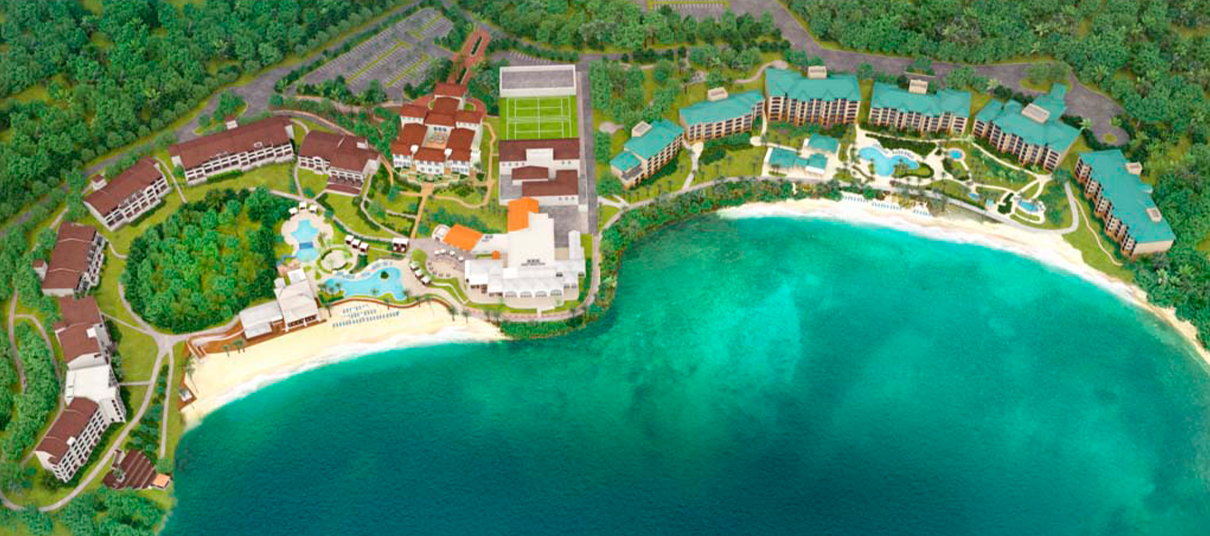
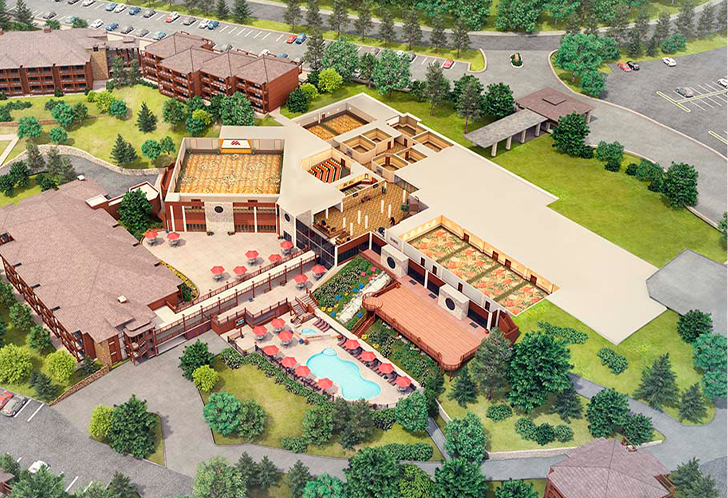
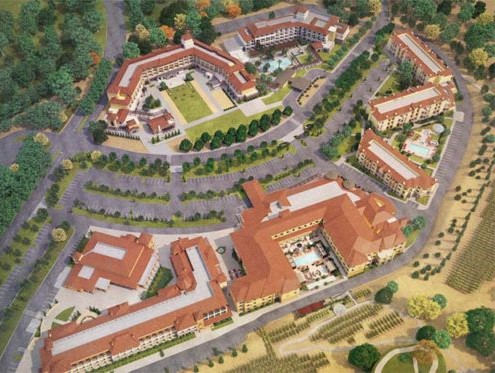
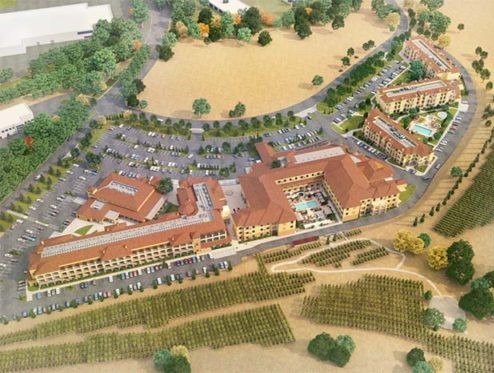
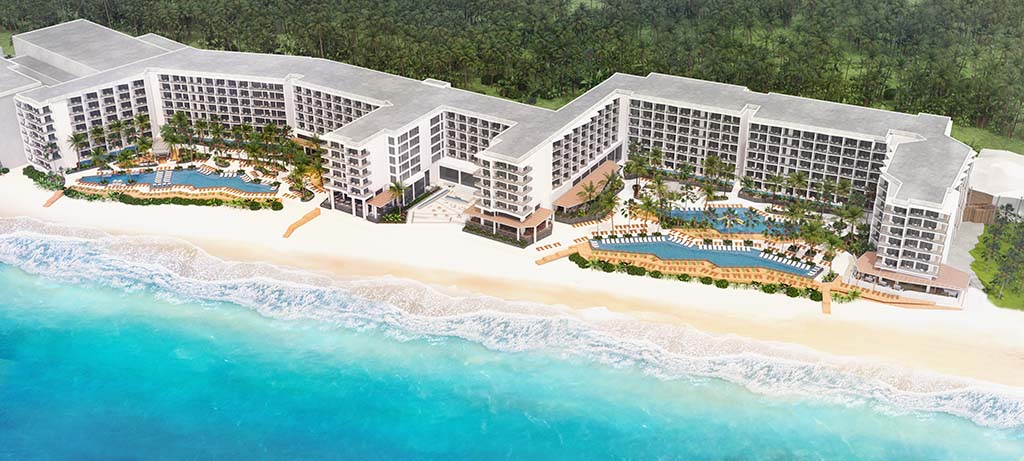
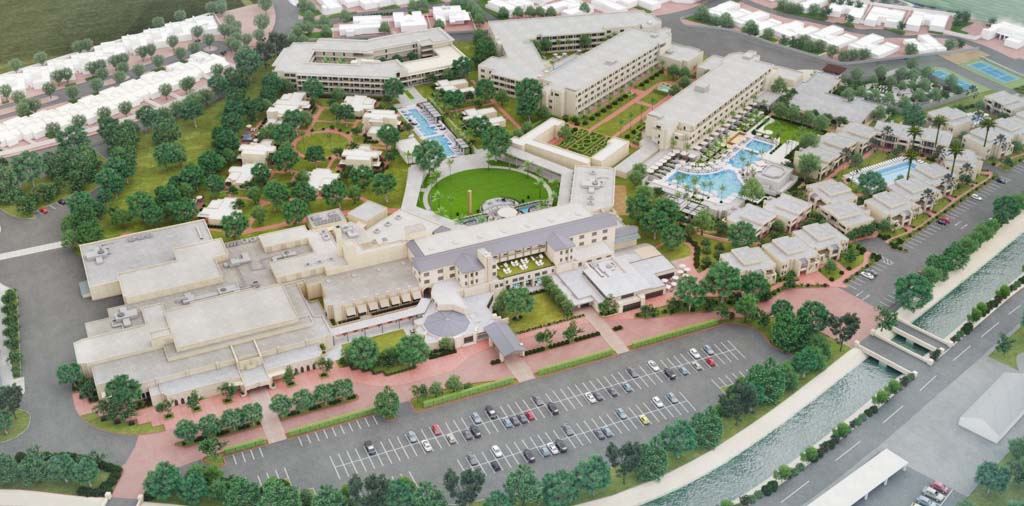
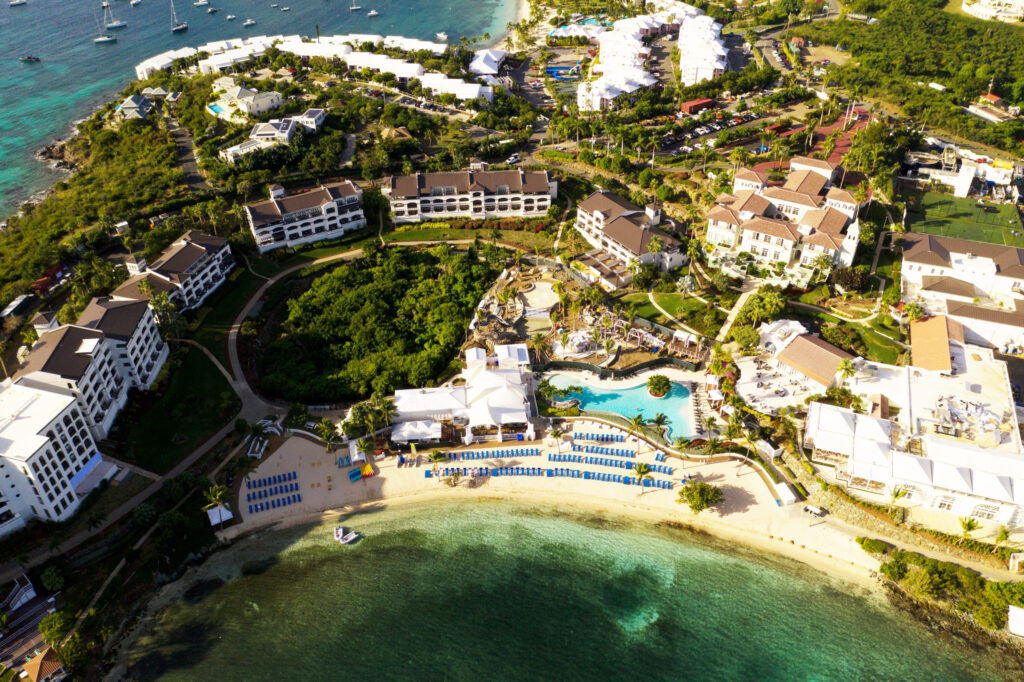
Medium Resorts
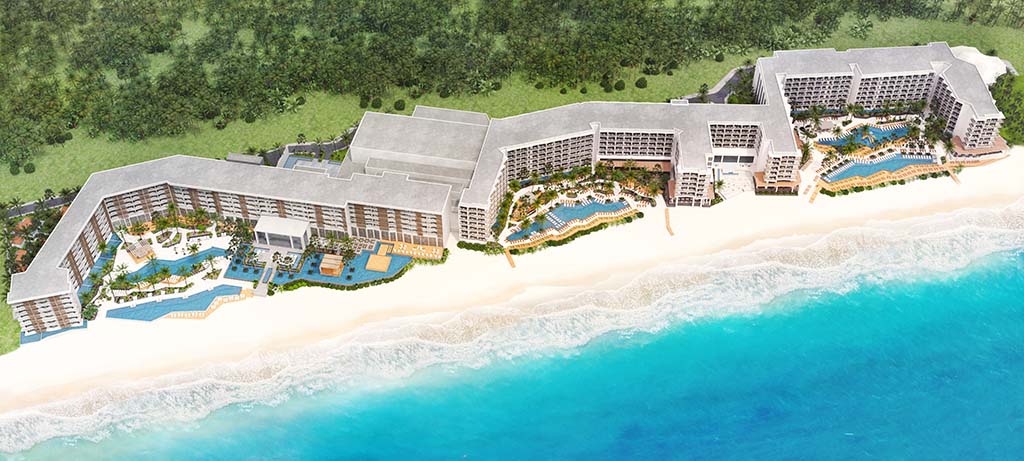
Medium resorts are composed of multiple buildings and facilities. We have created many types of resorts in this scale range.
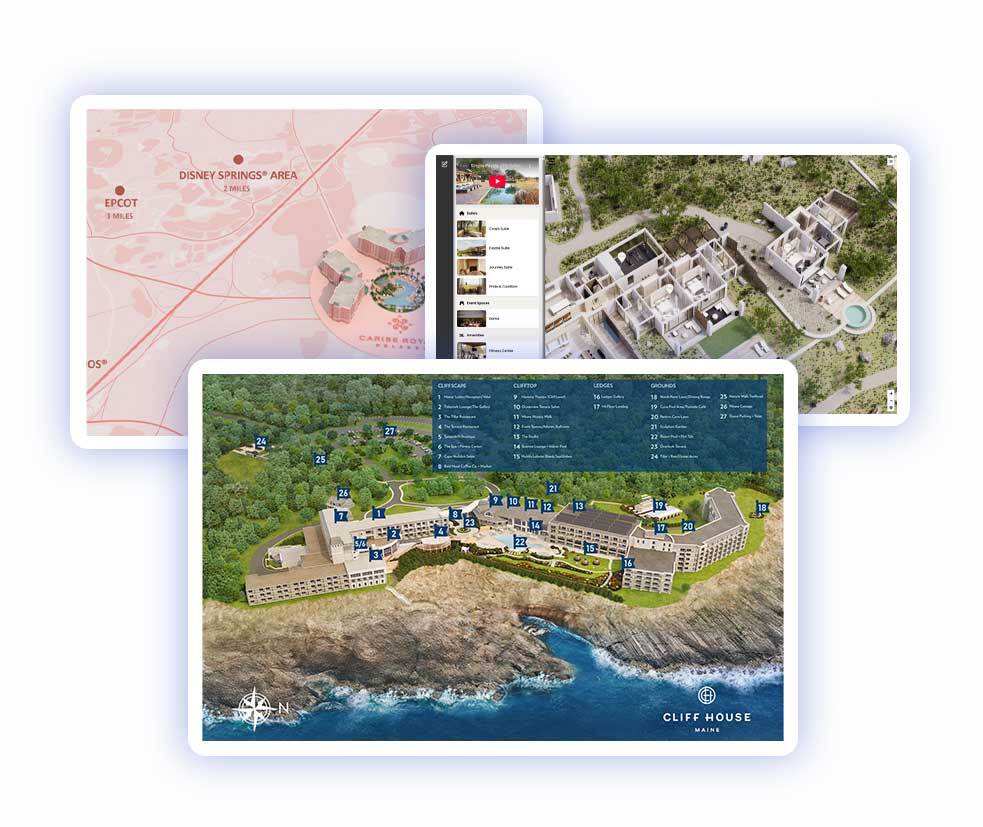
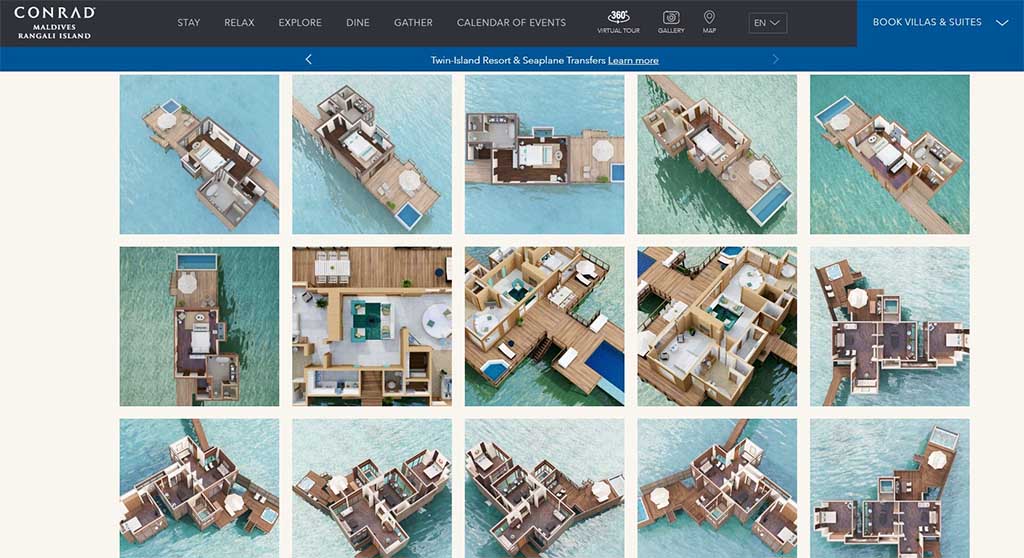
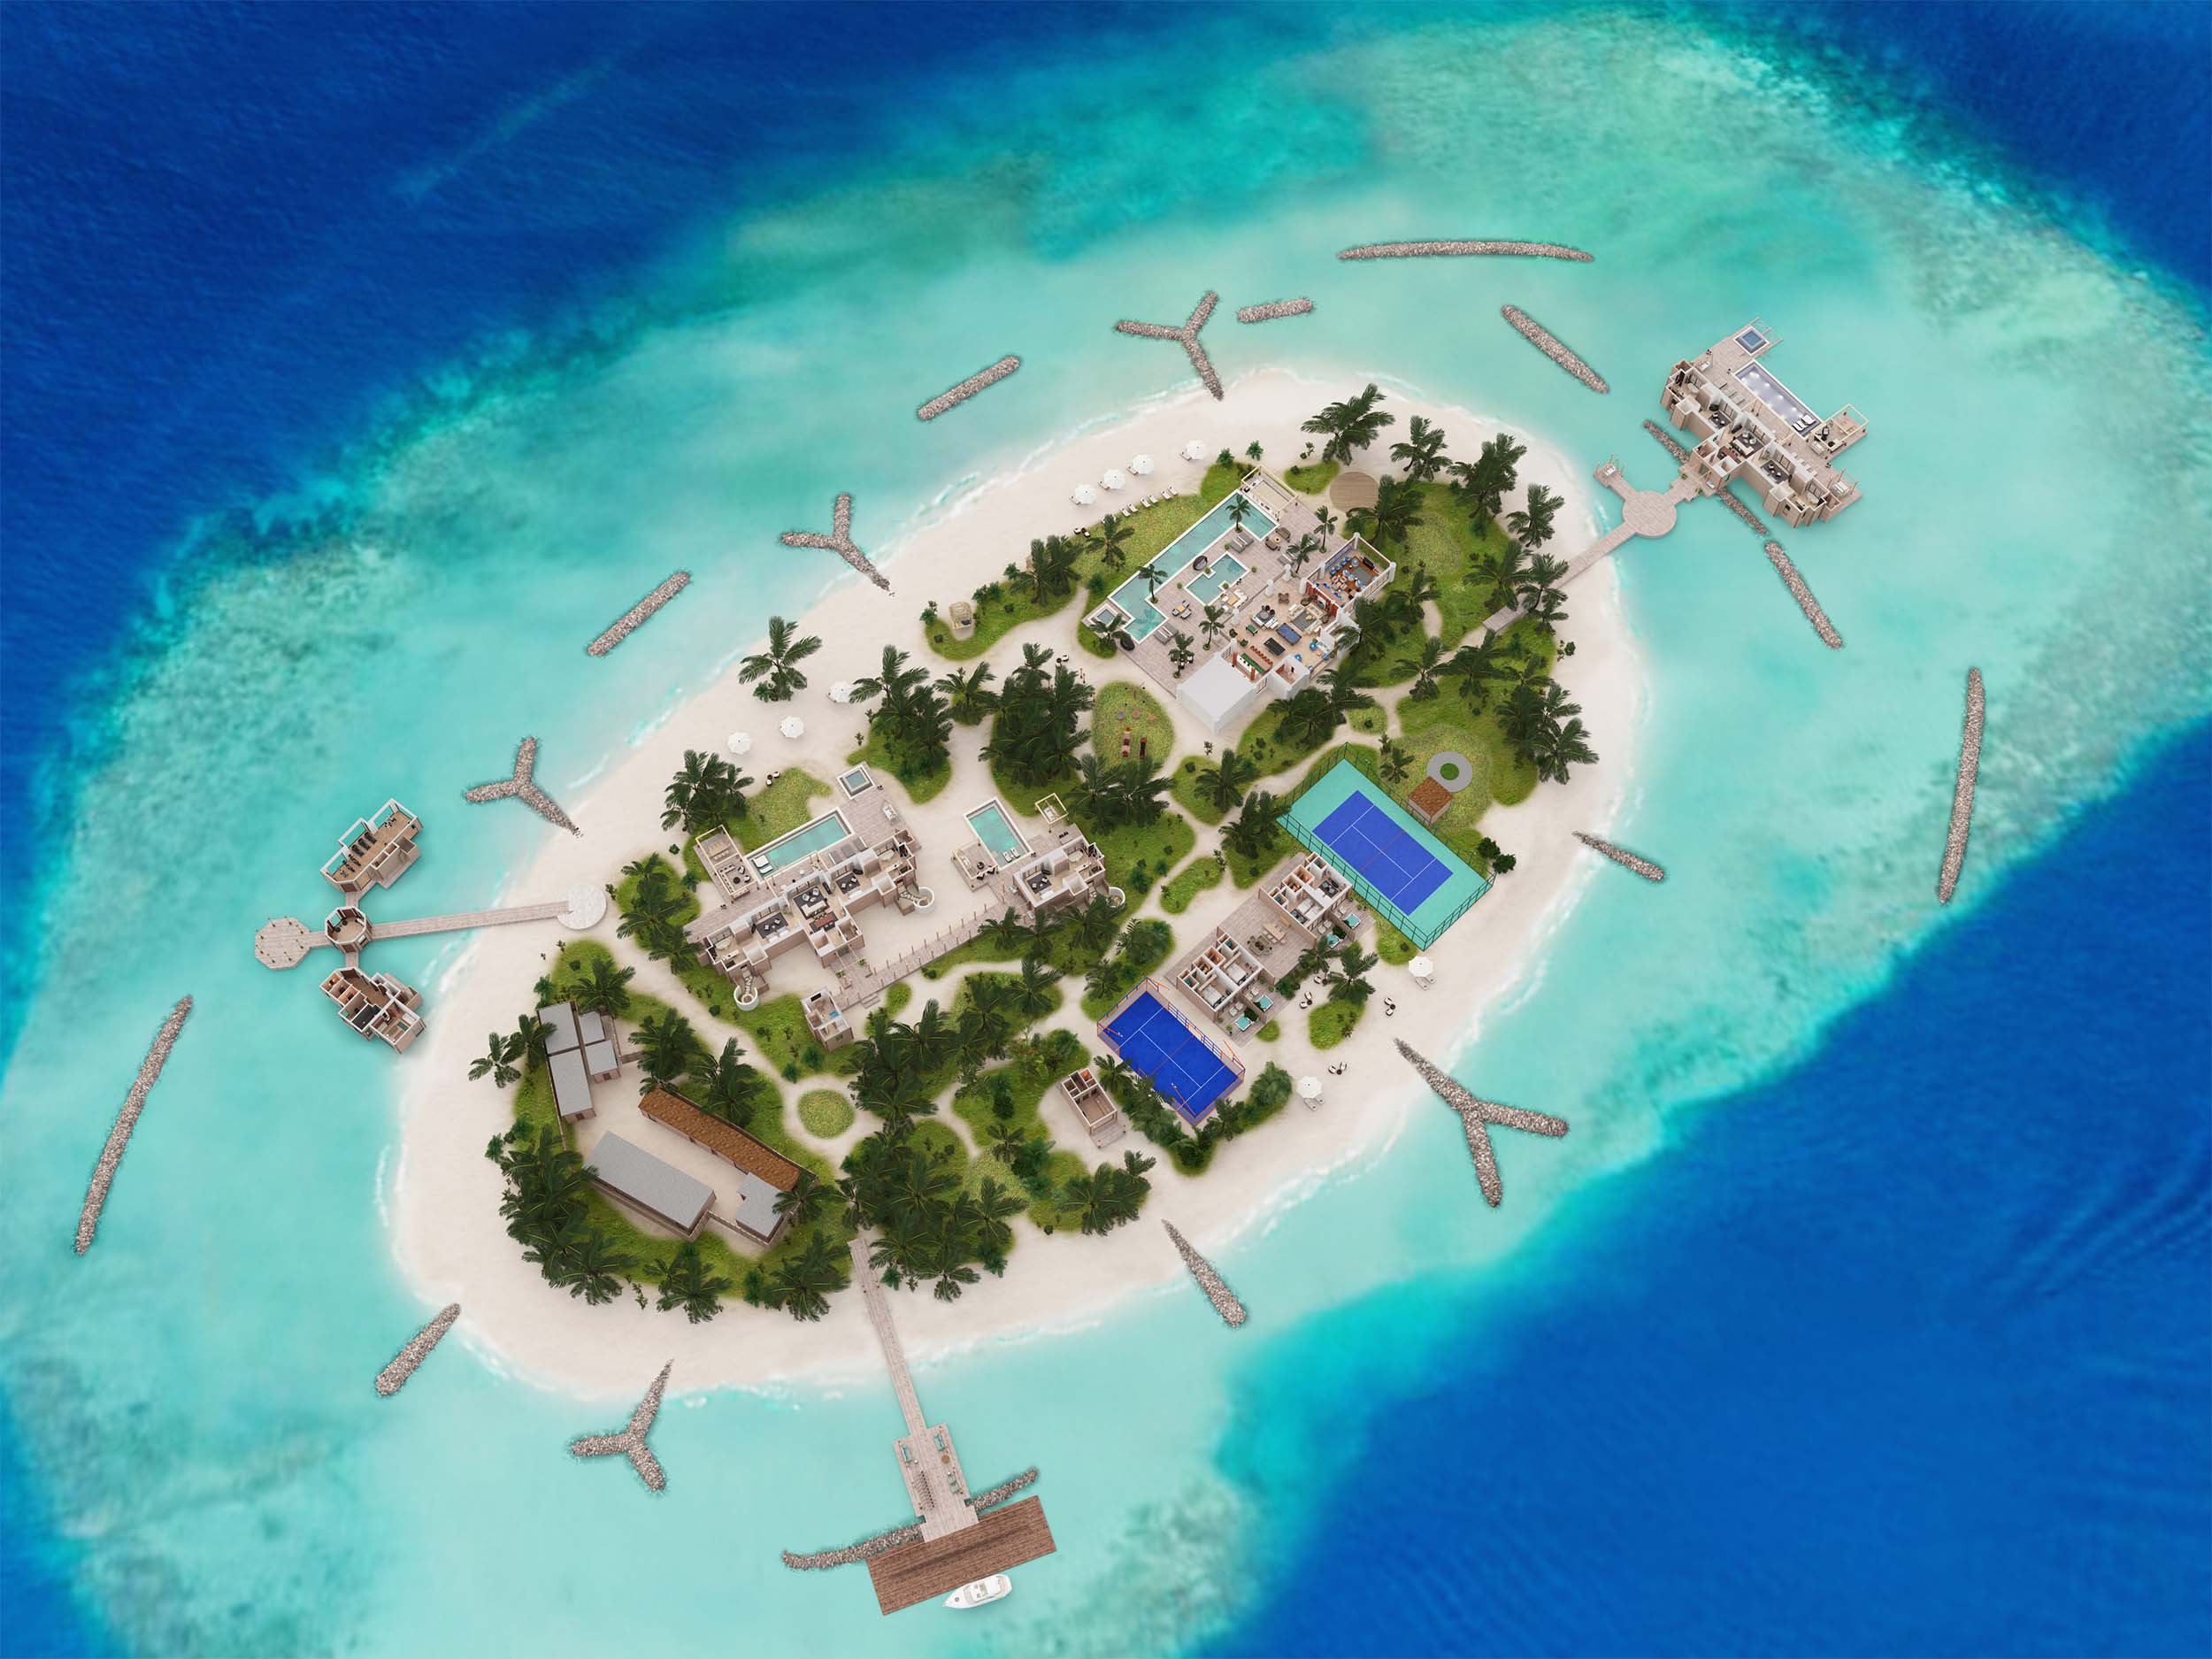
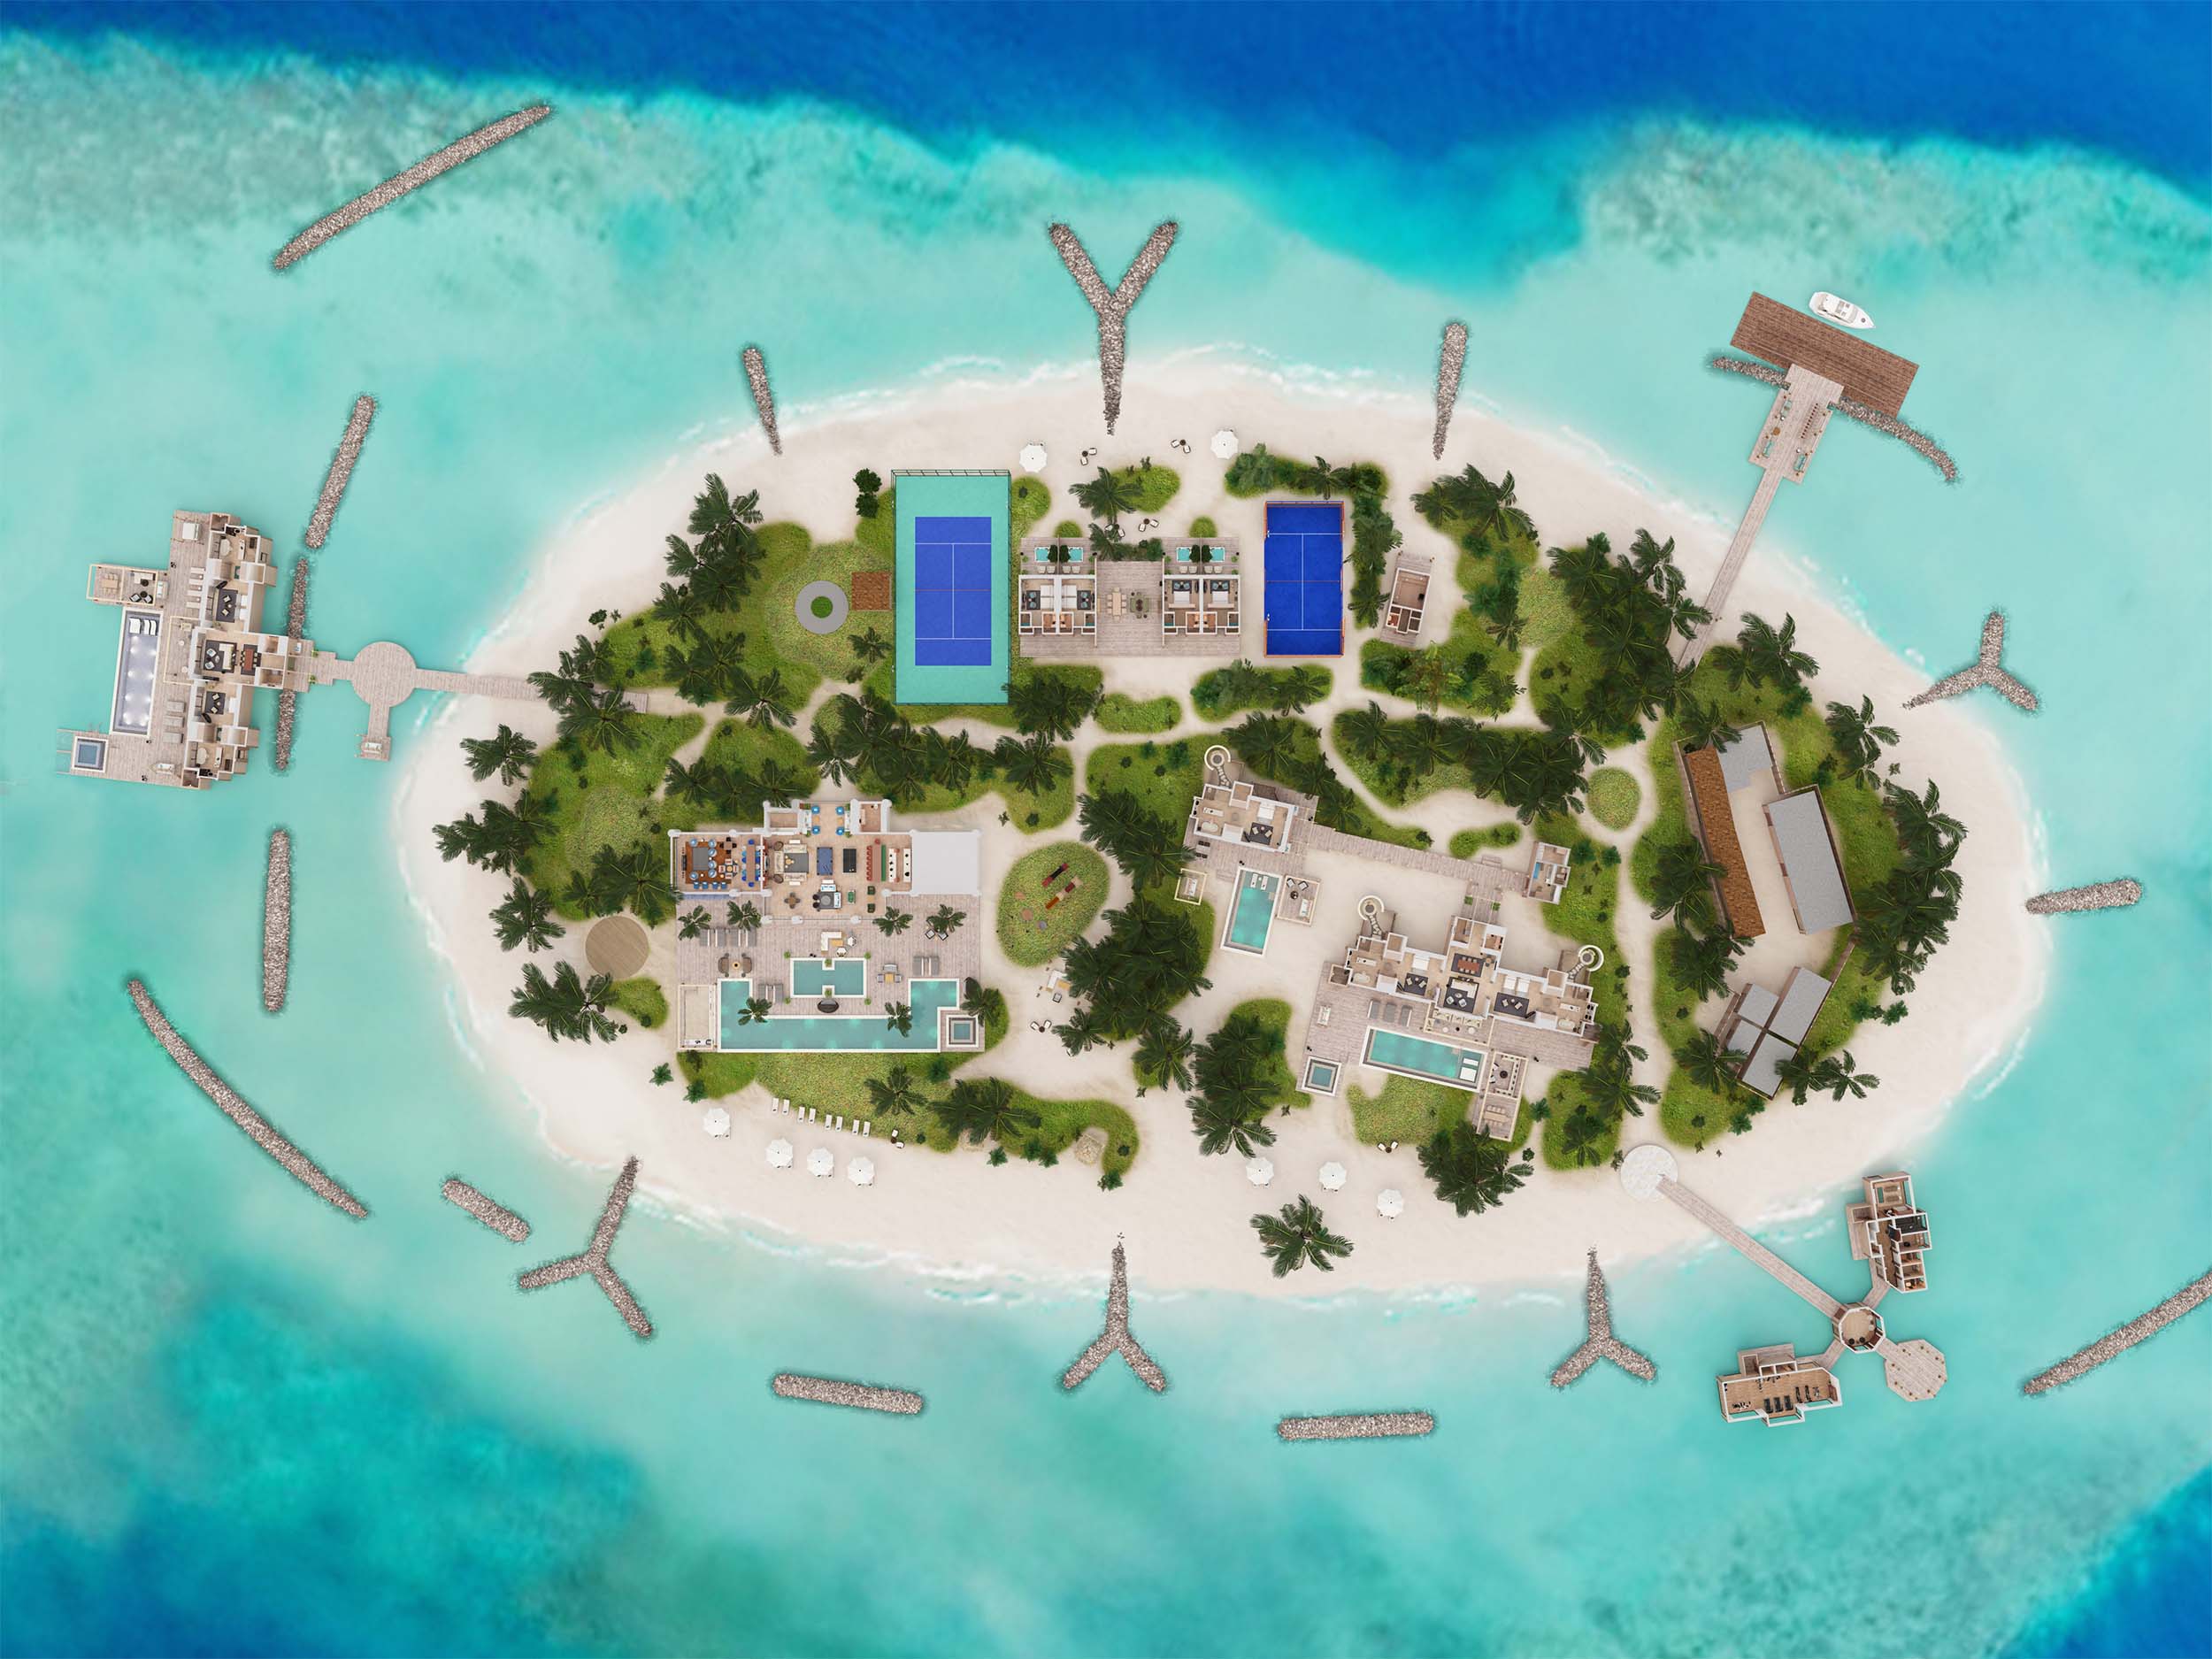
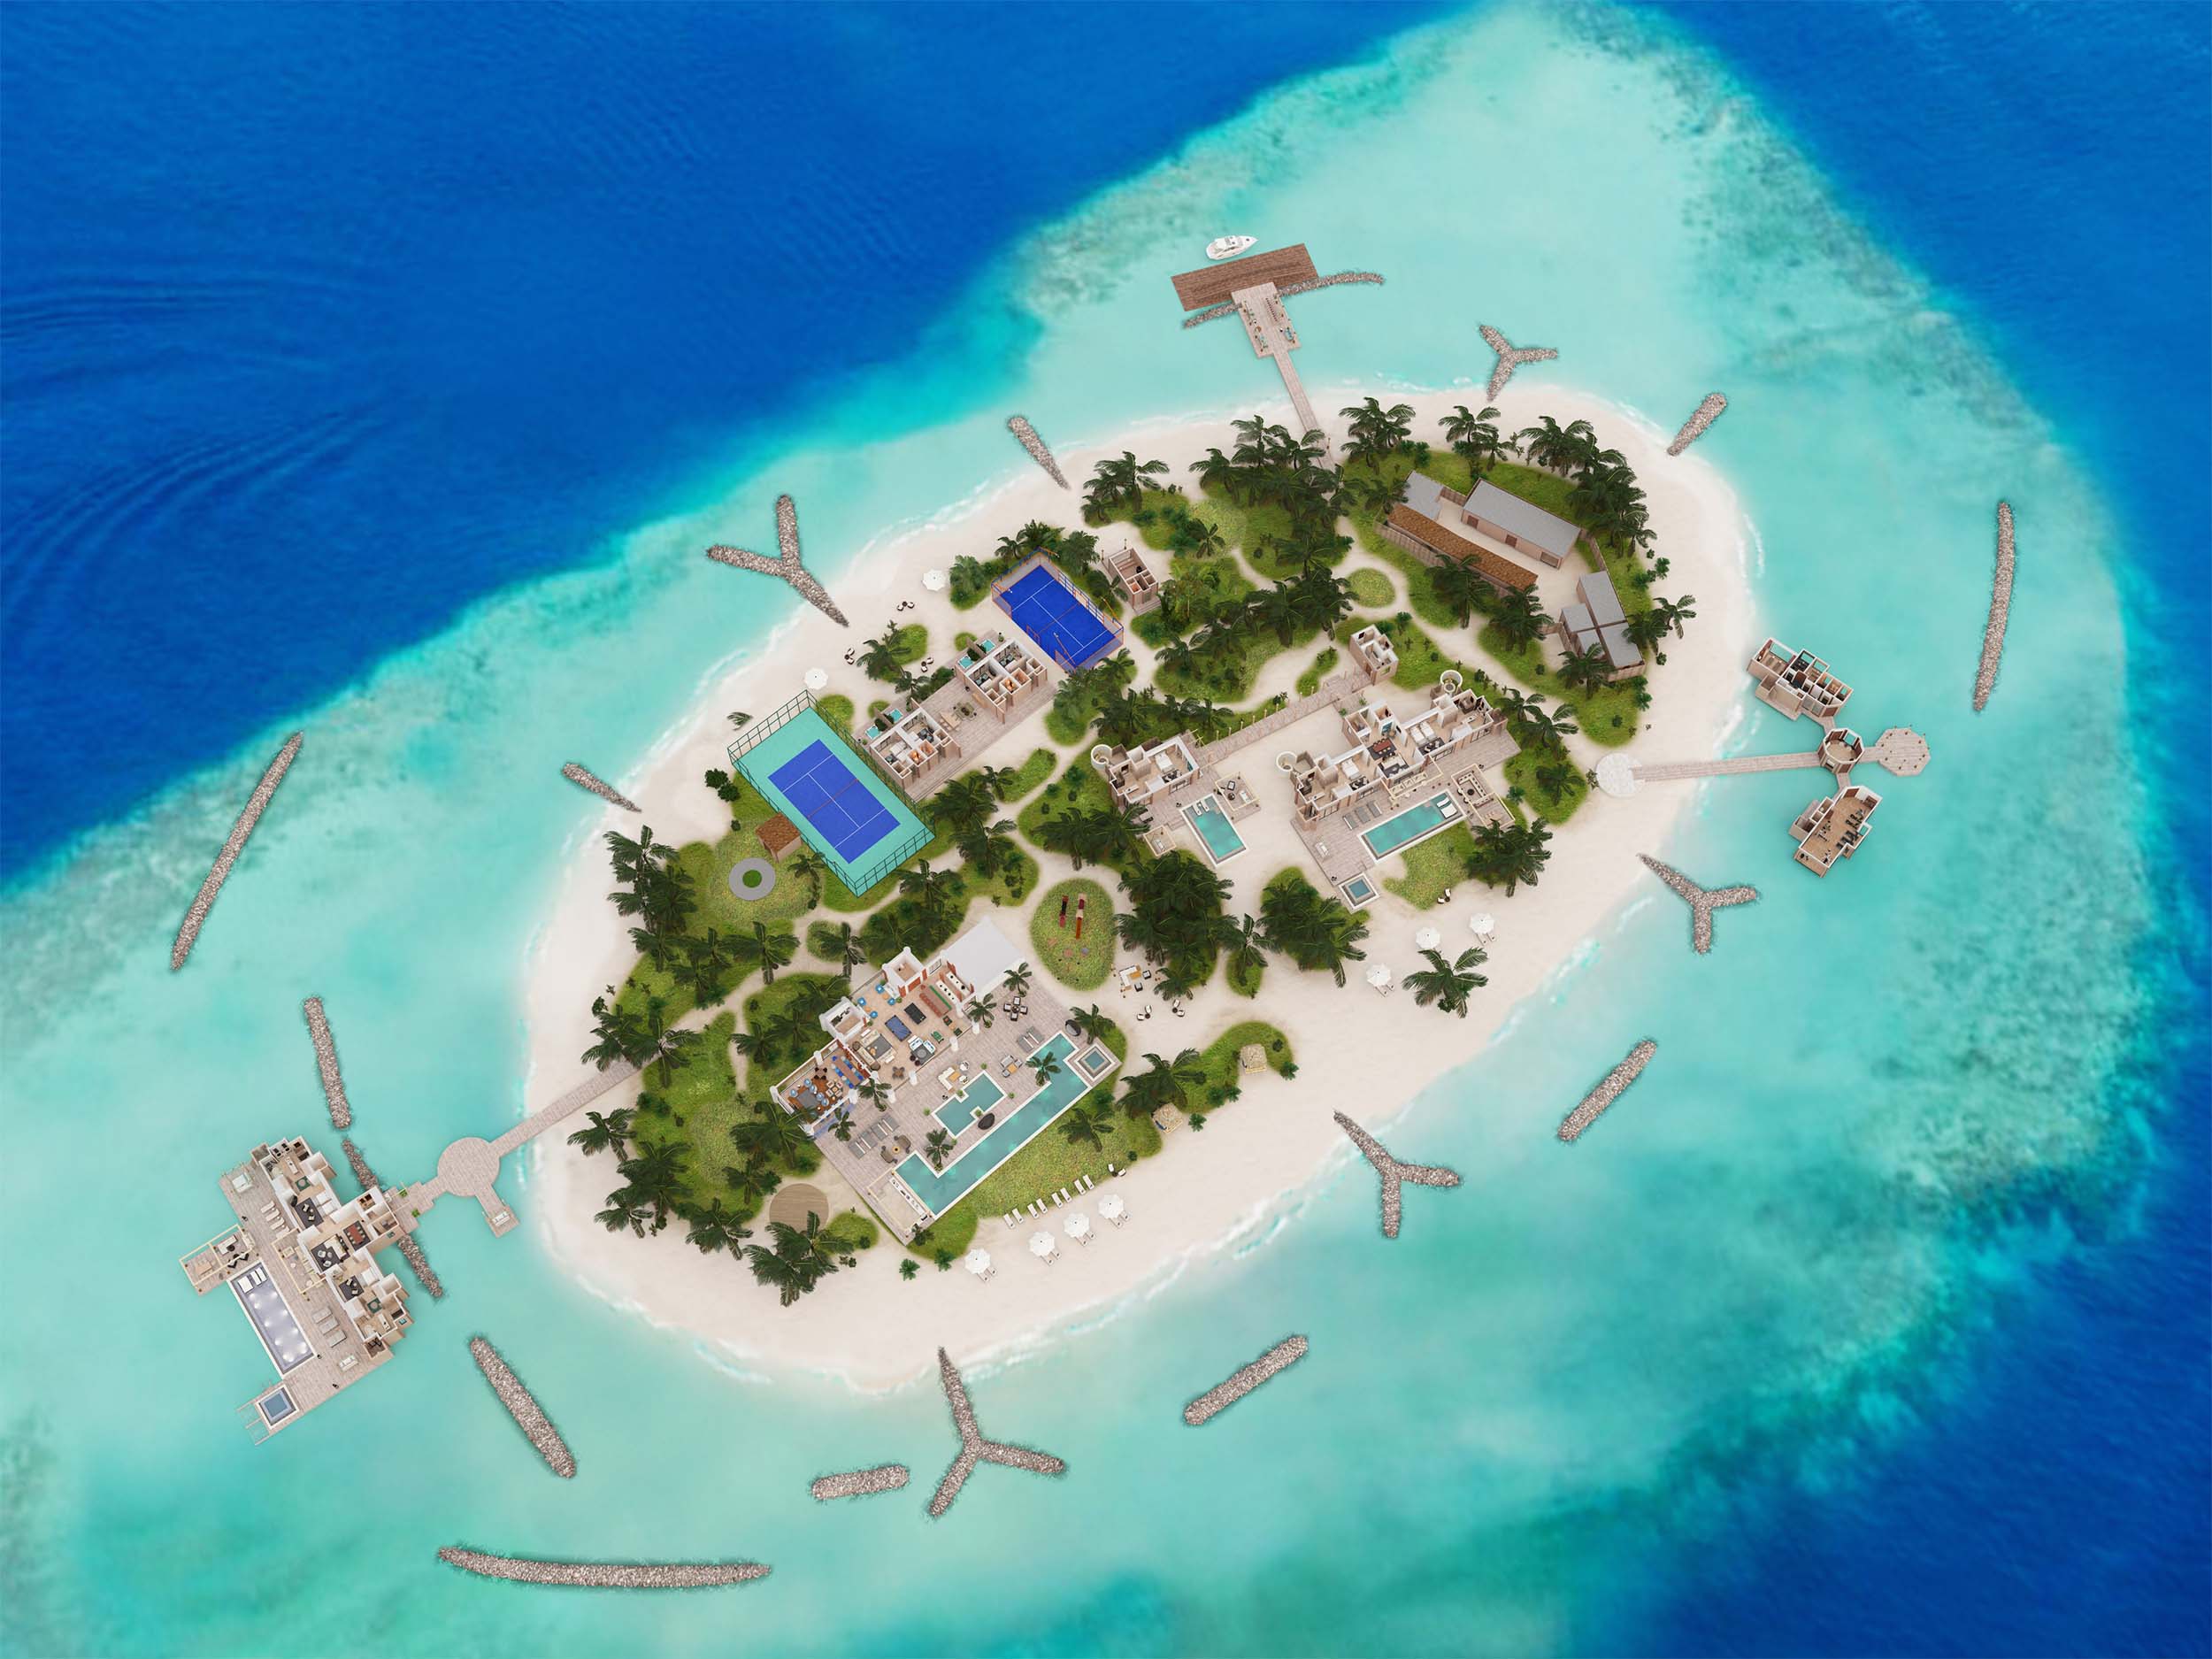
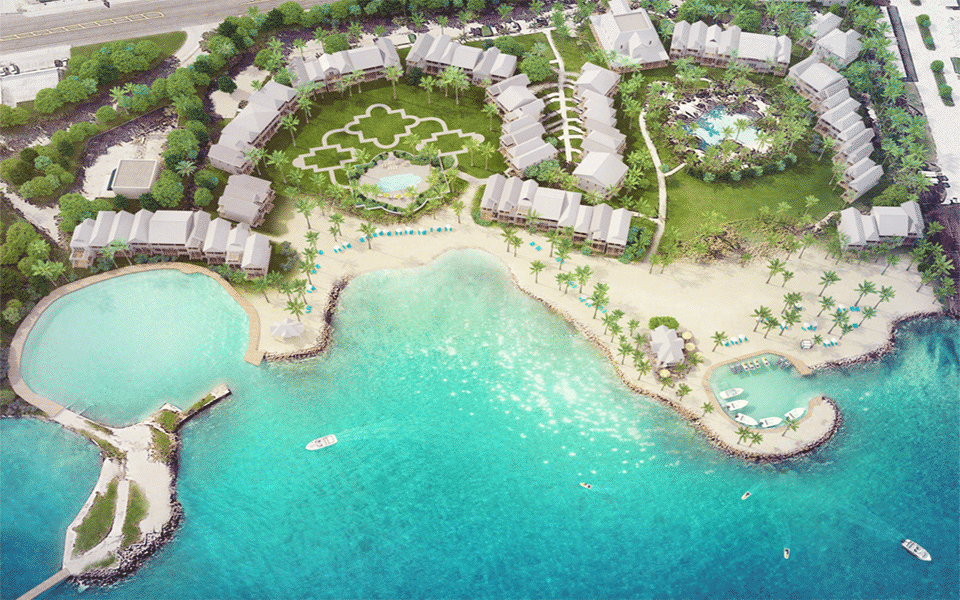
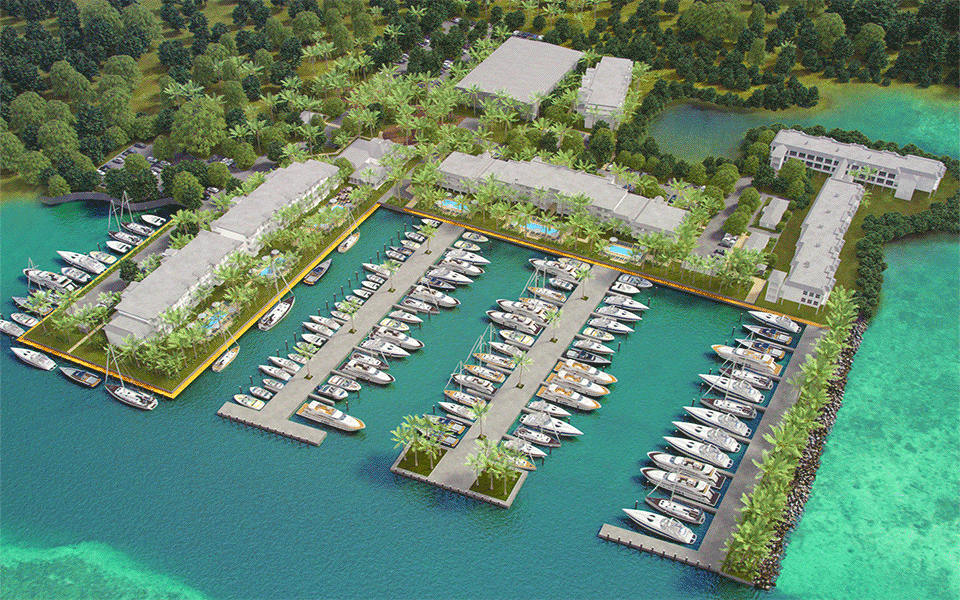
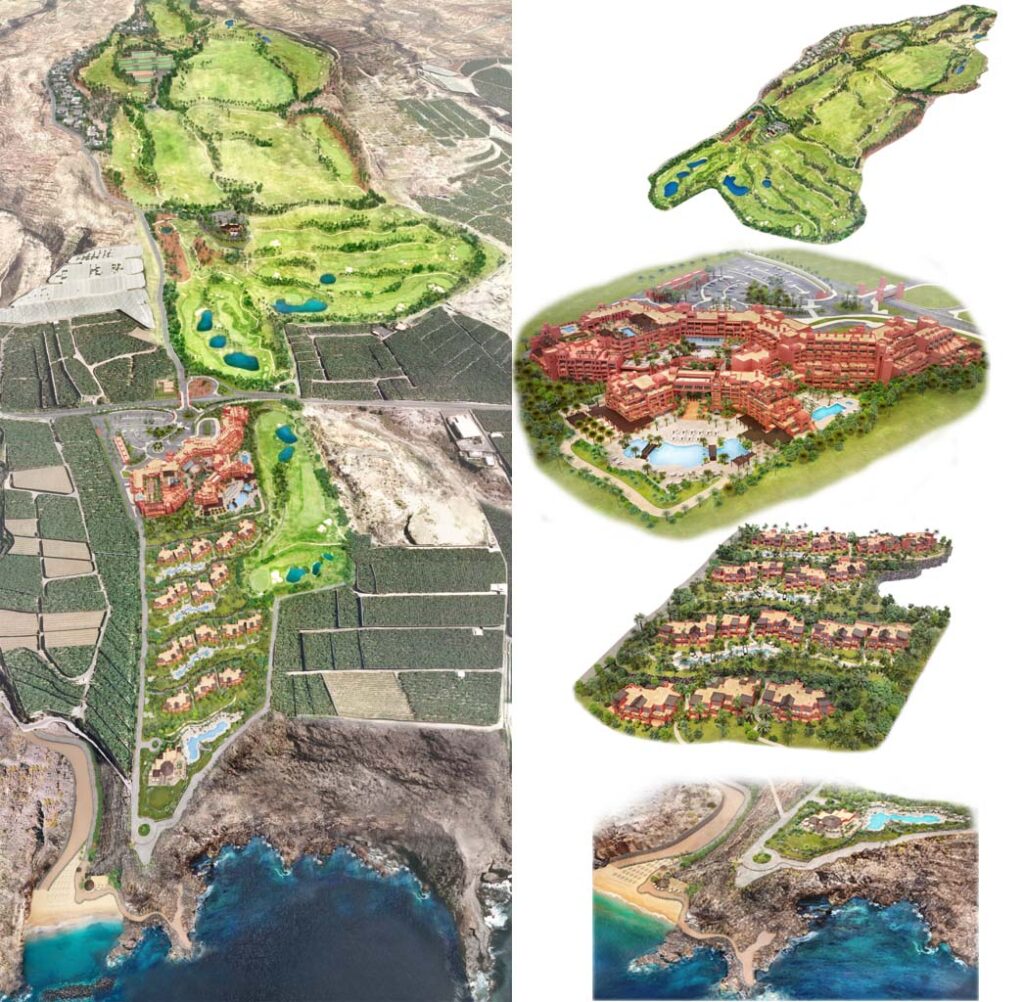
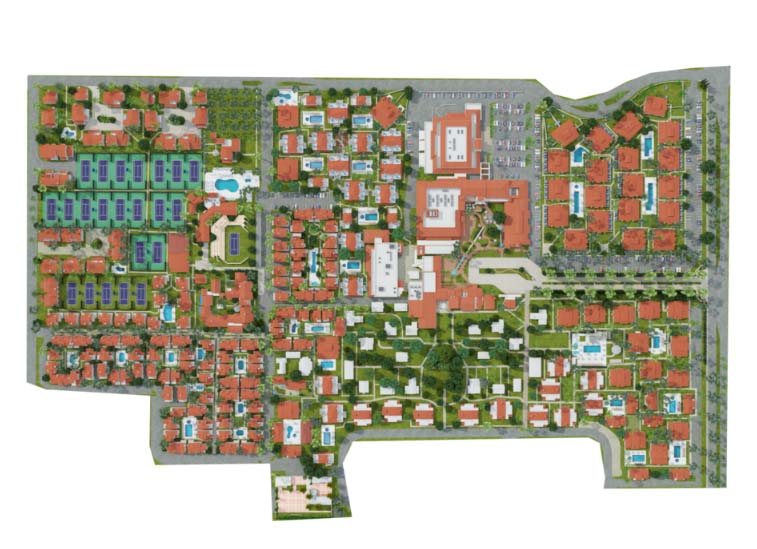
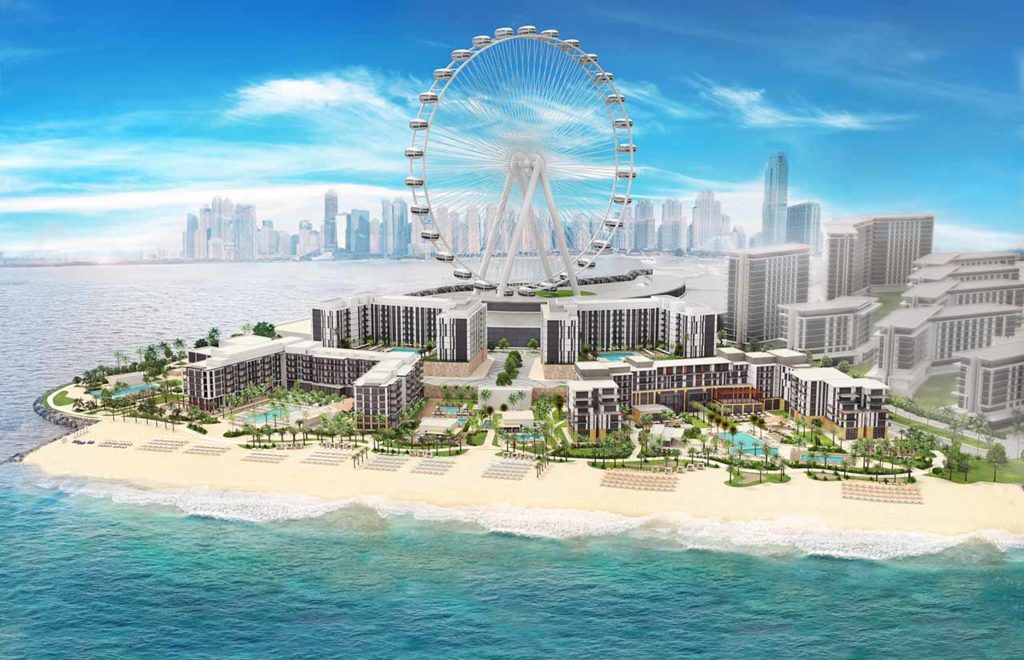
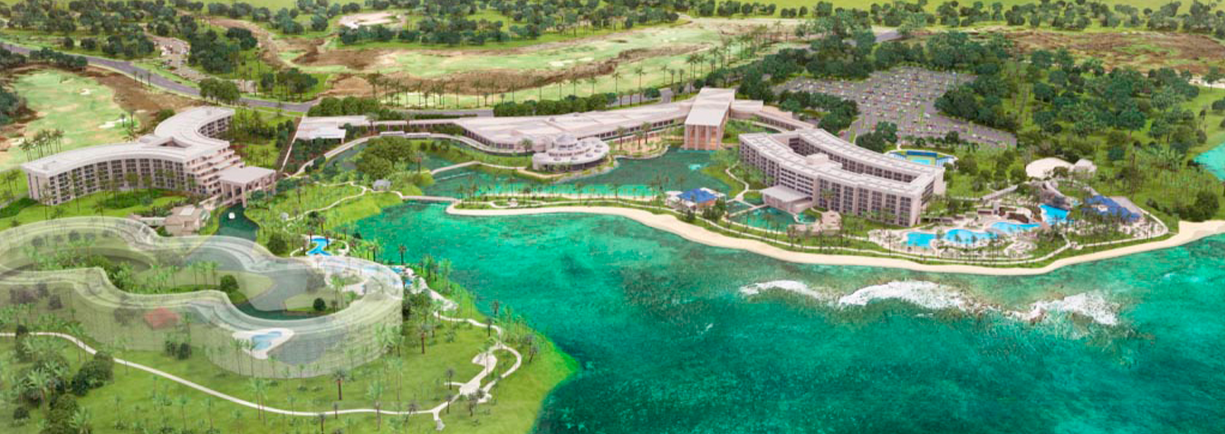
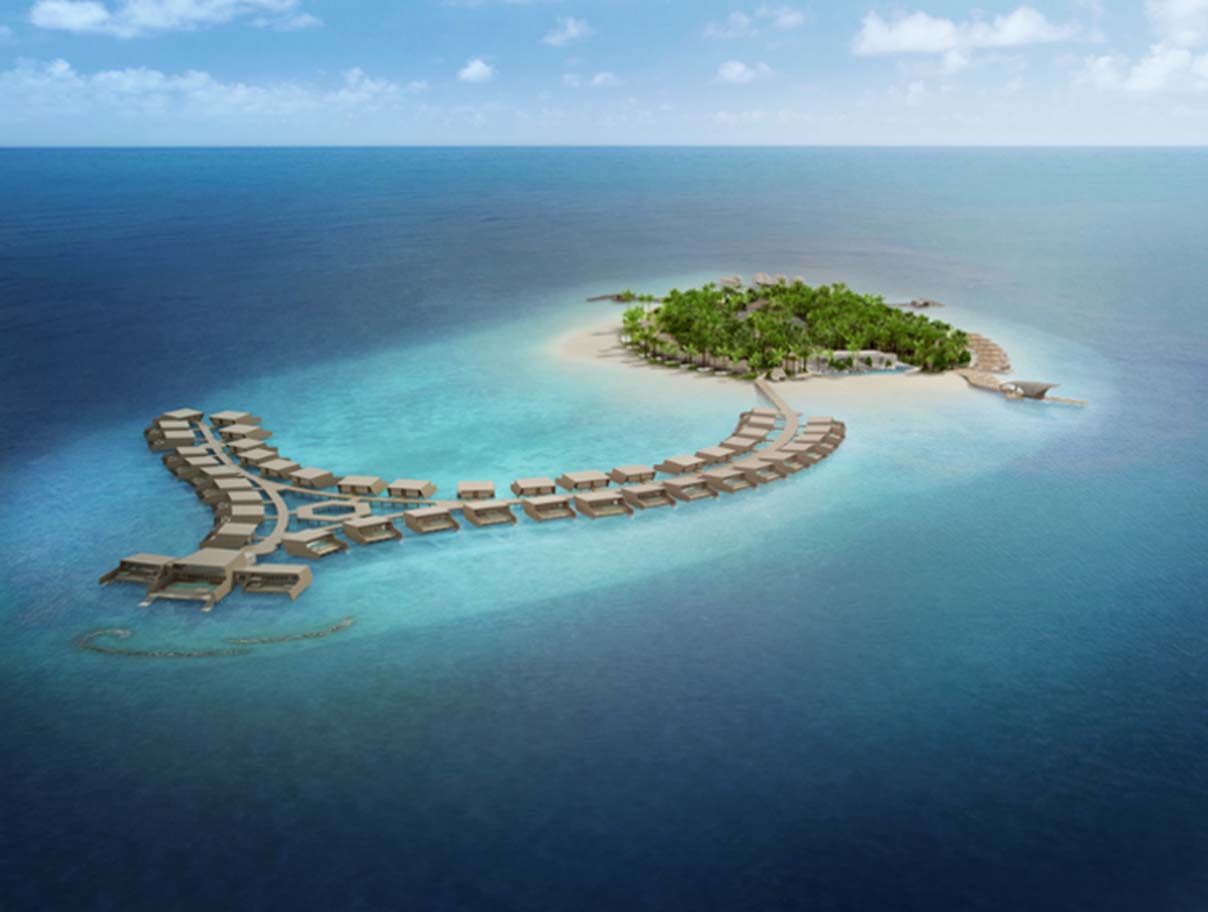
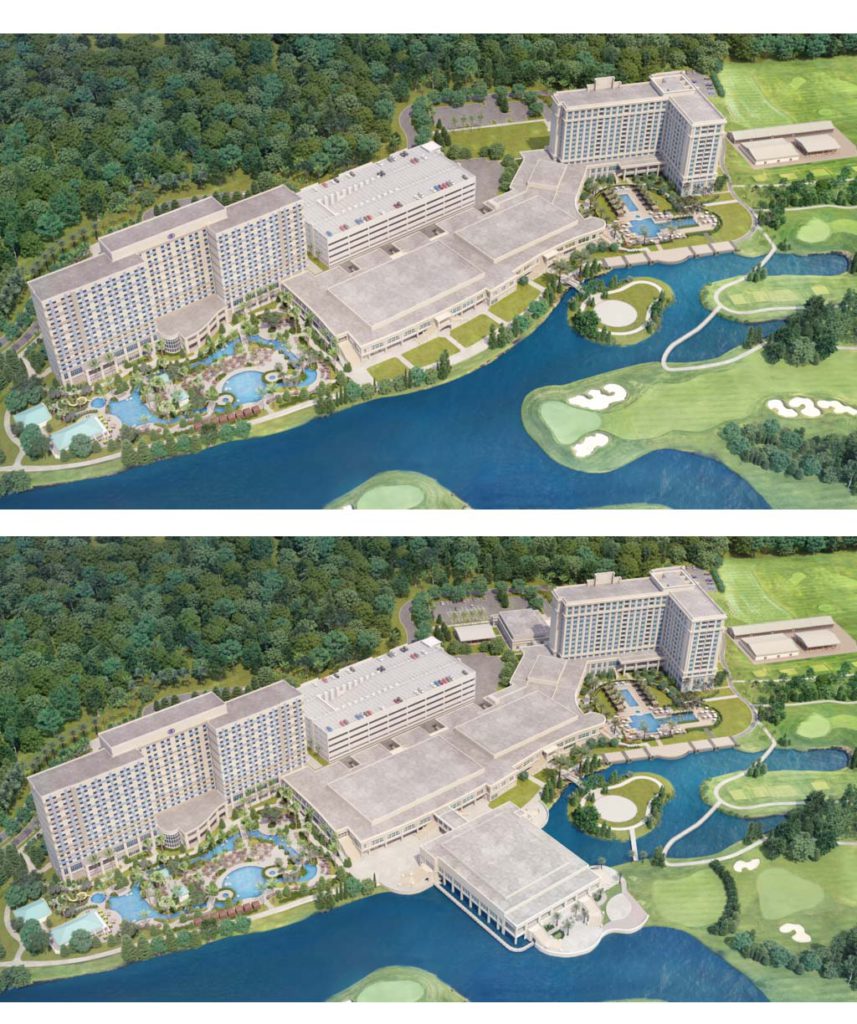
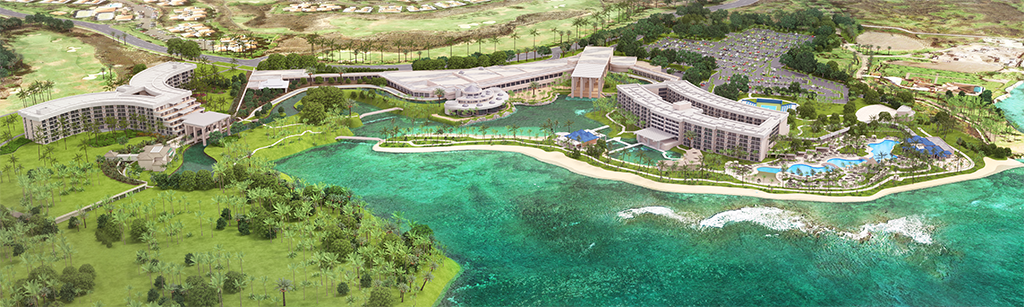
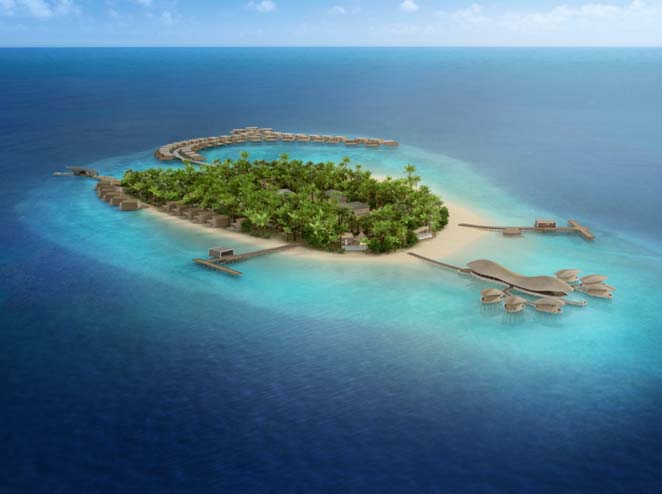
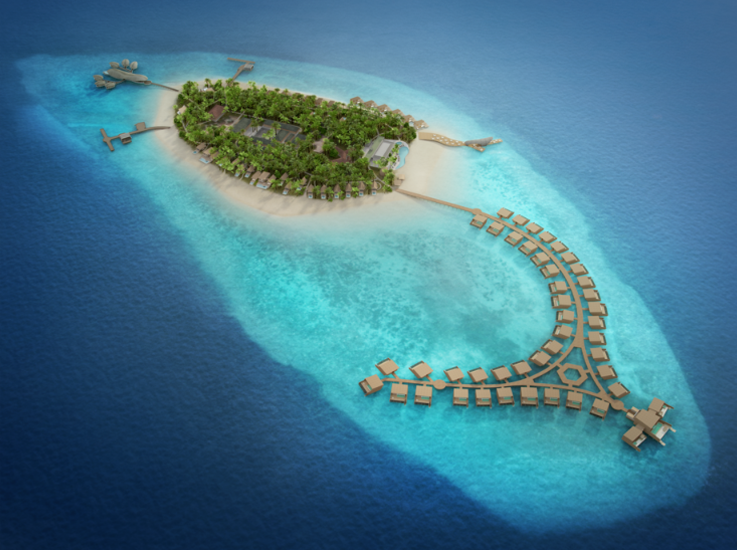
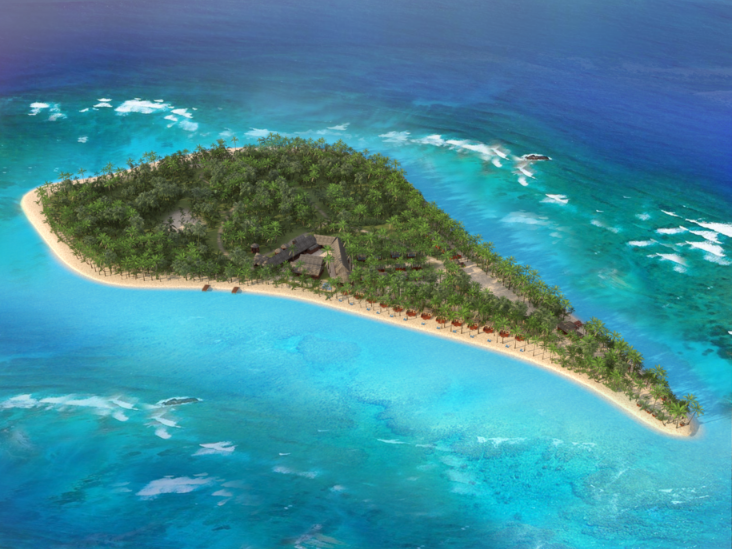
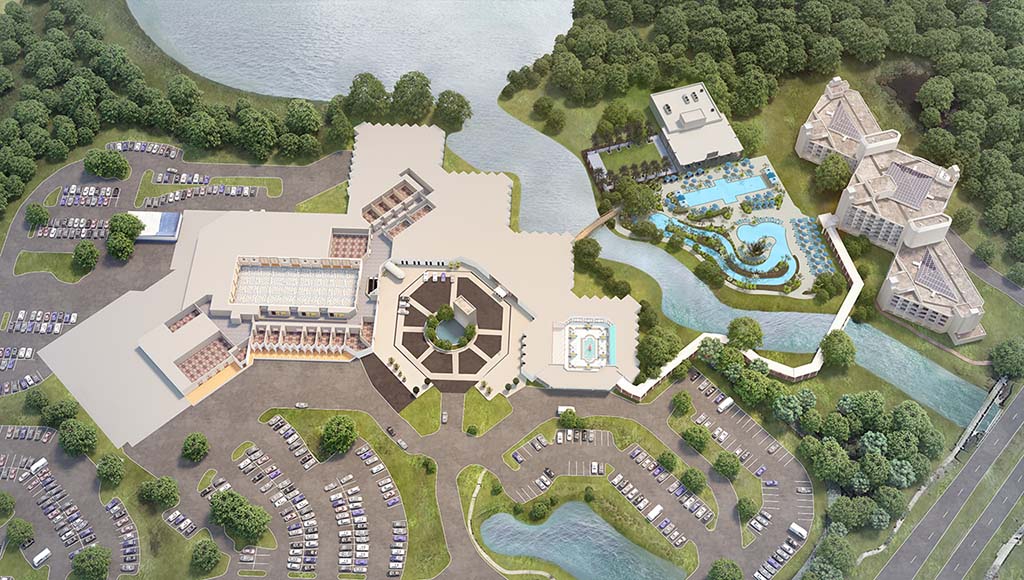
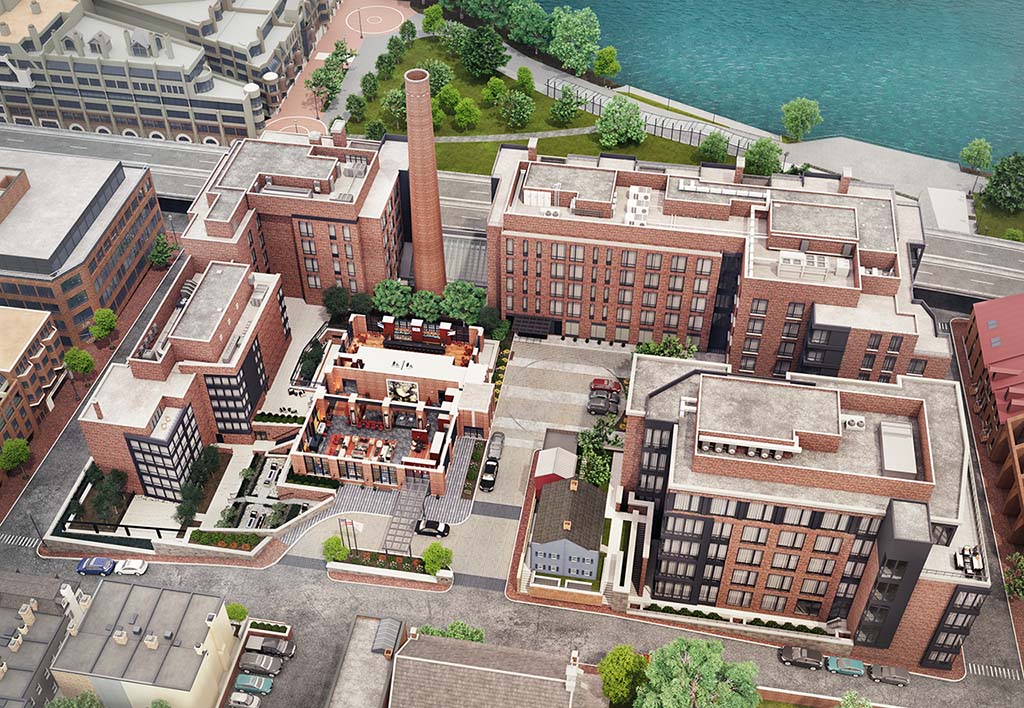
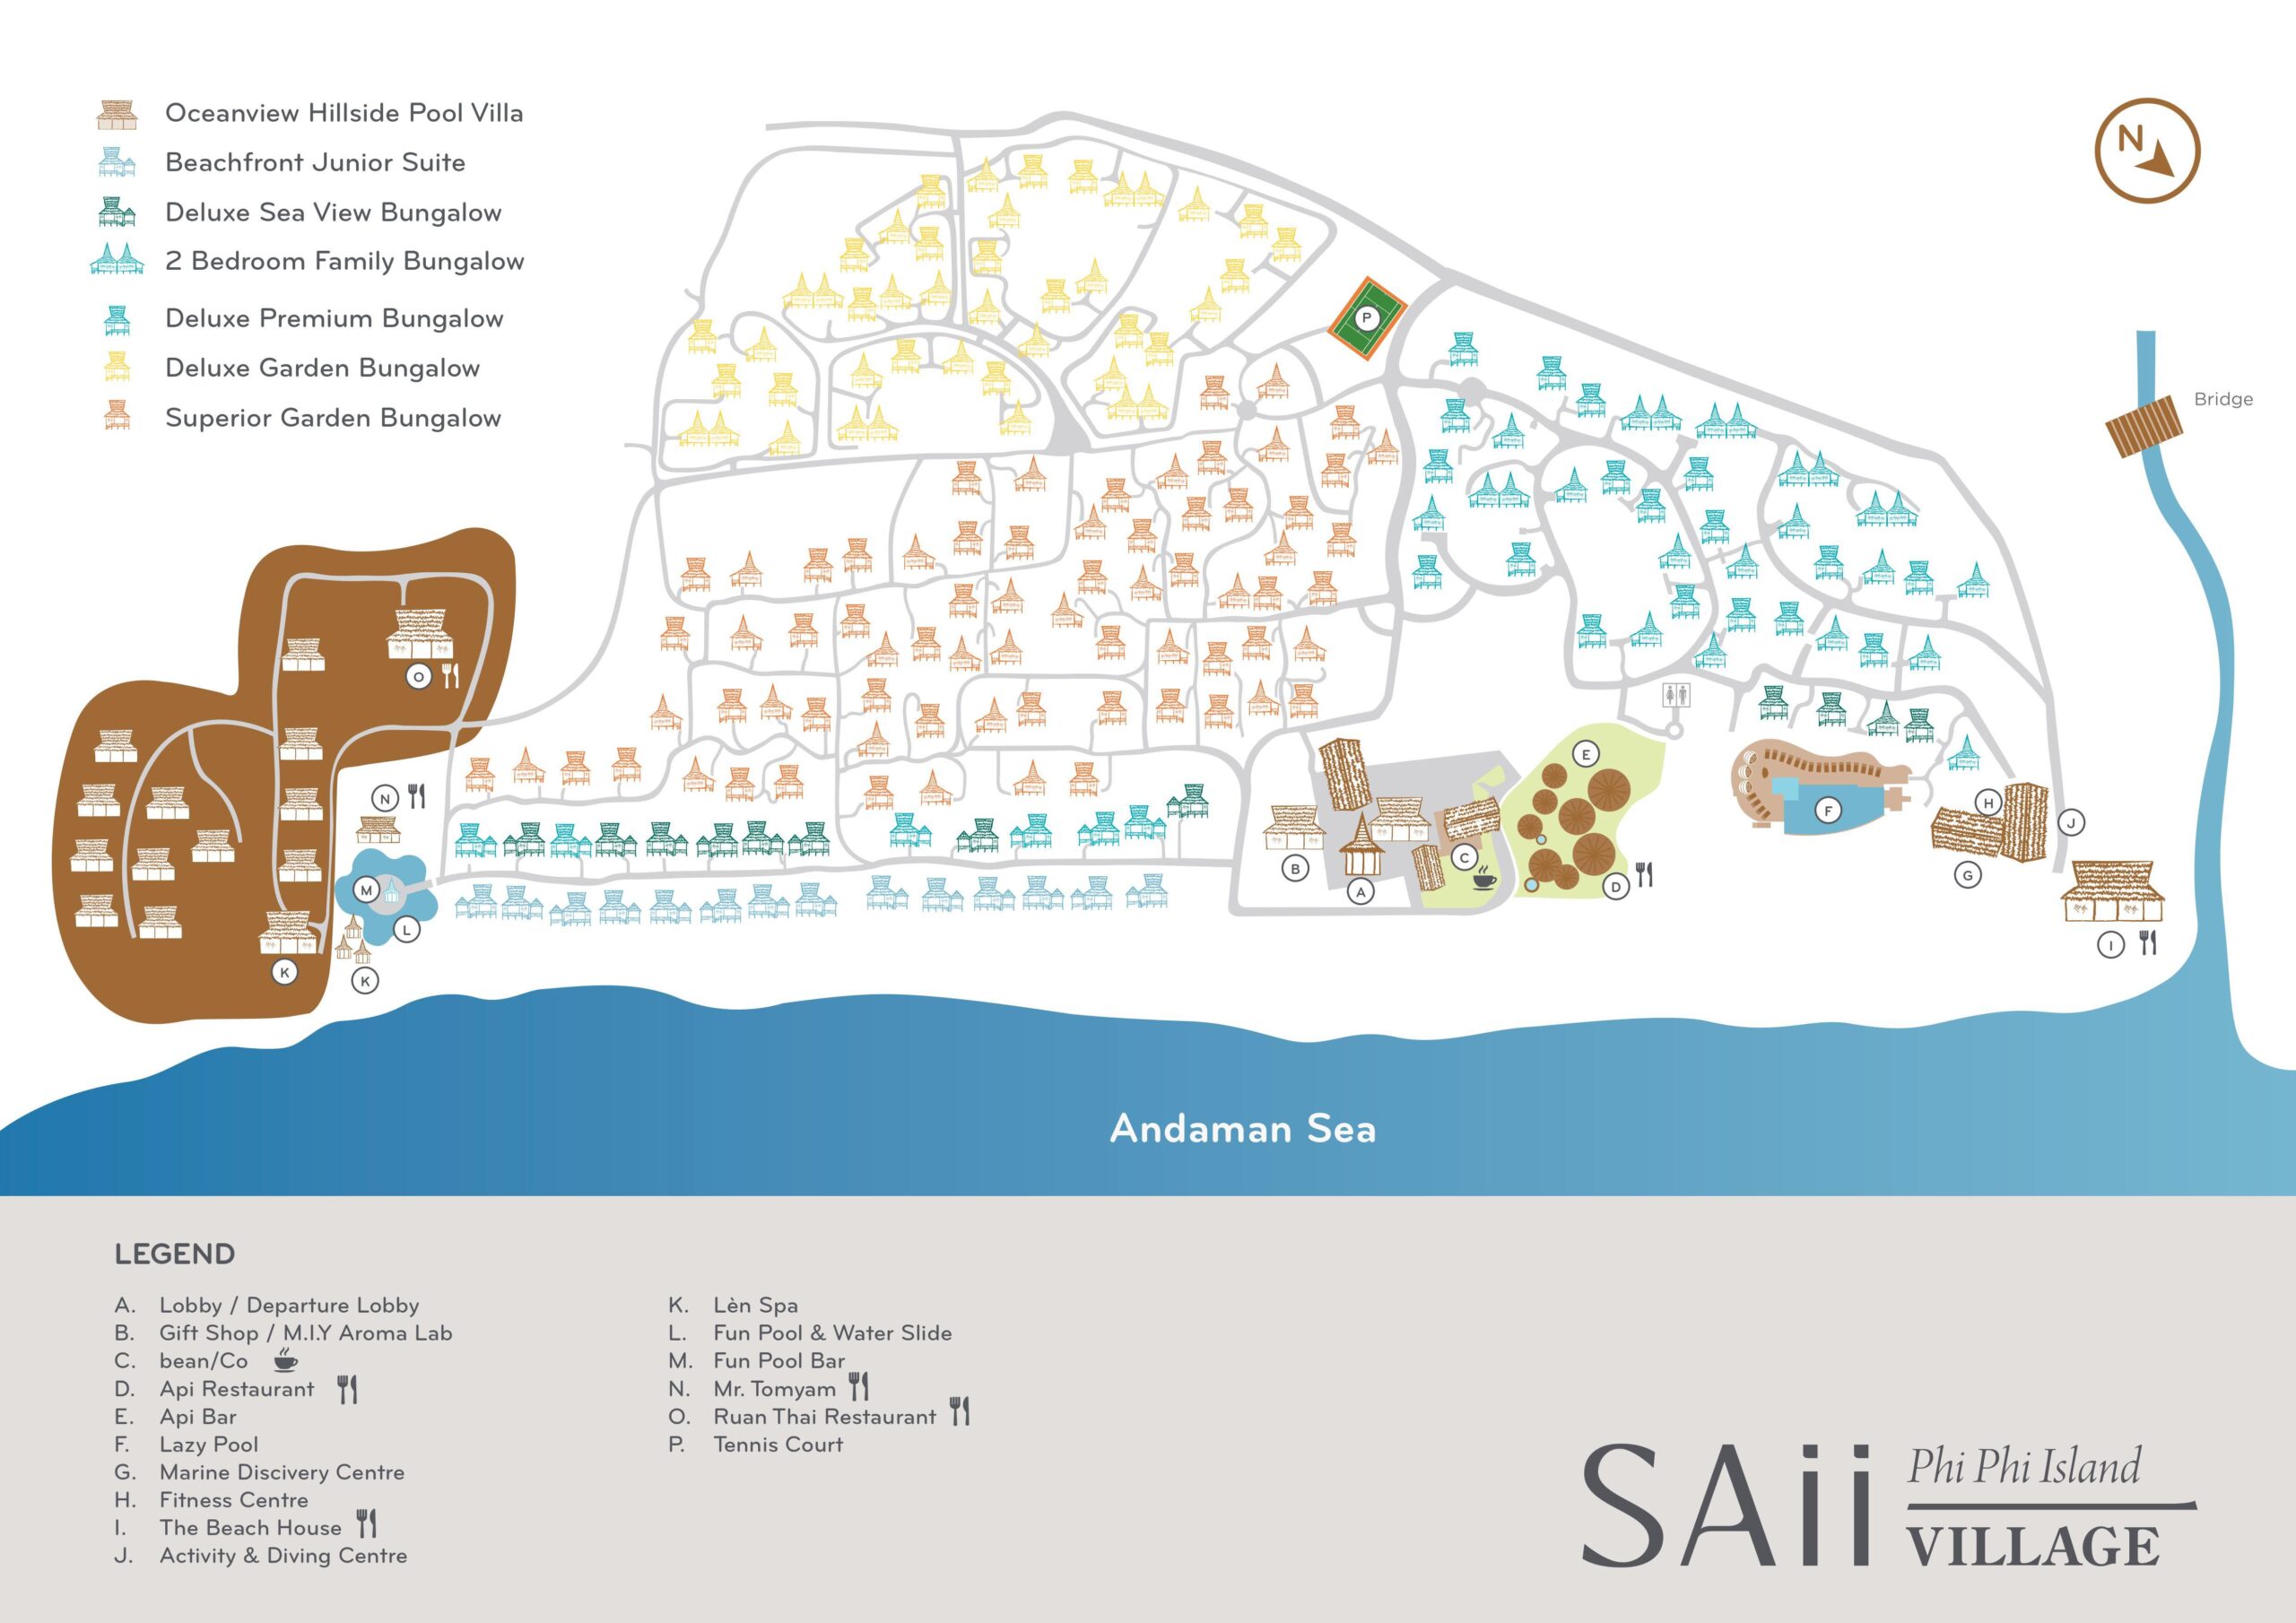
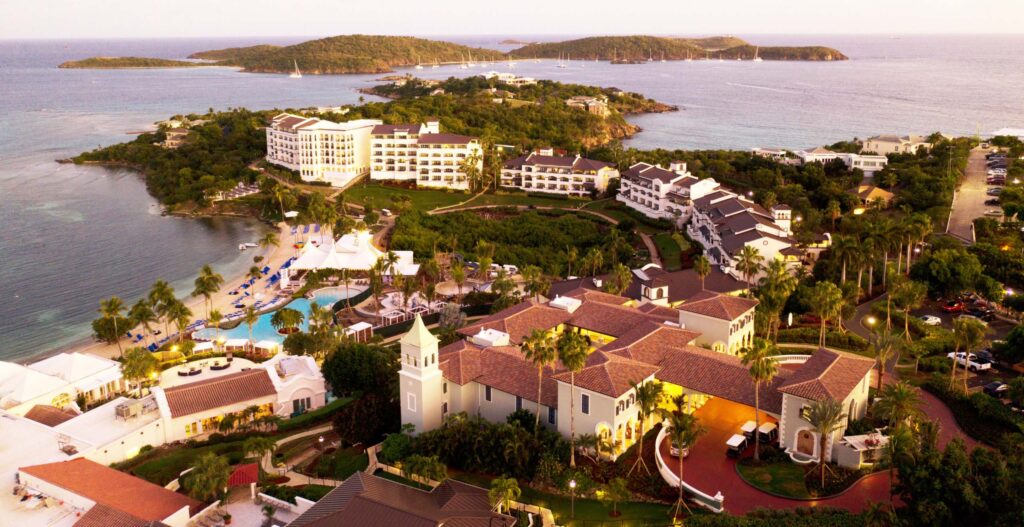
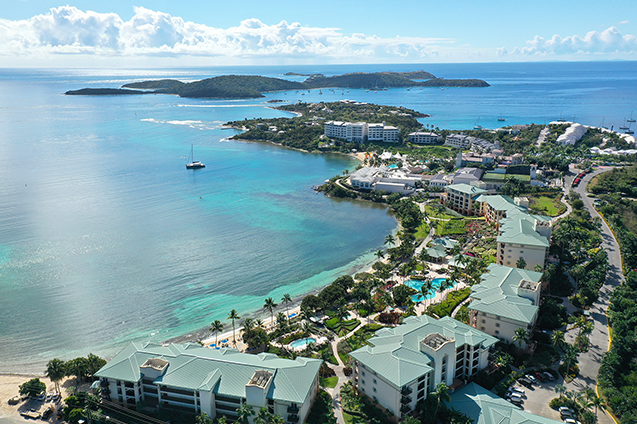
Large Areas Maps
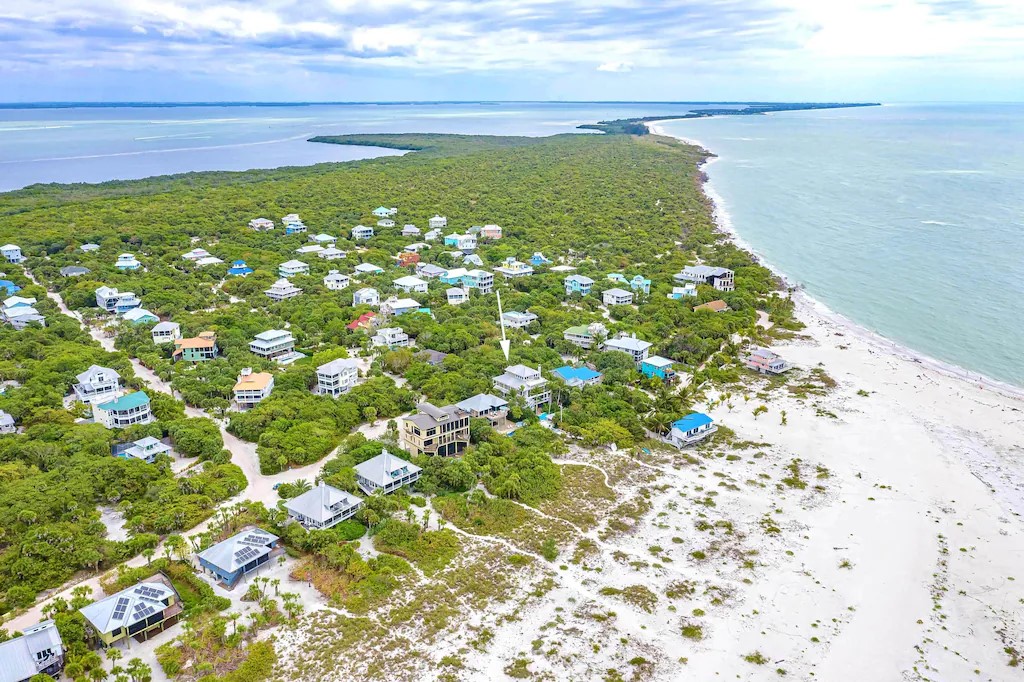
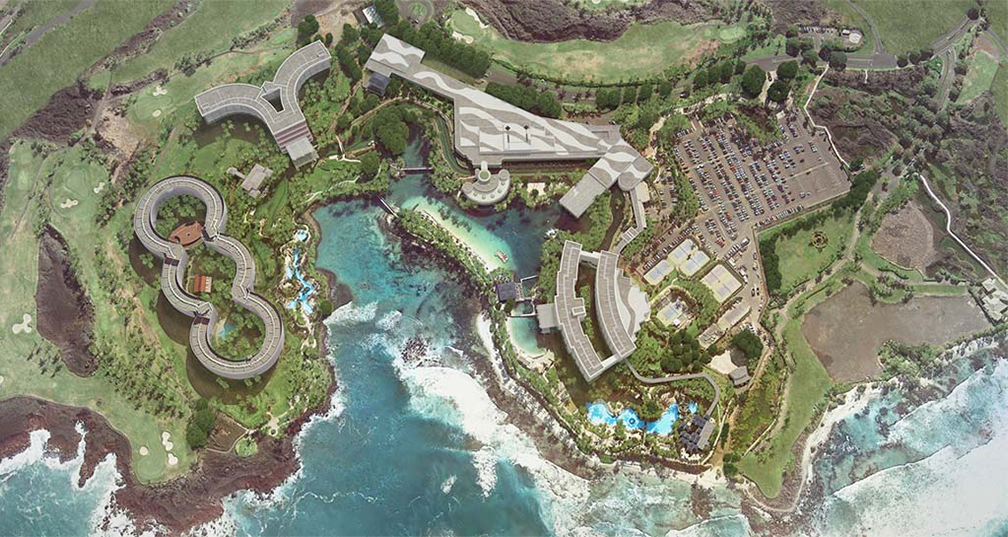
The 3D resort maps allow us to show huge areas that are hard to capture with aerial drone photography. It also allows the client to omit the surrounding structures and just focus on the resort.
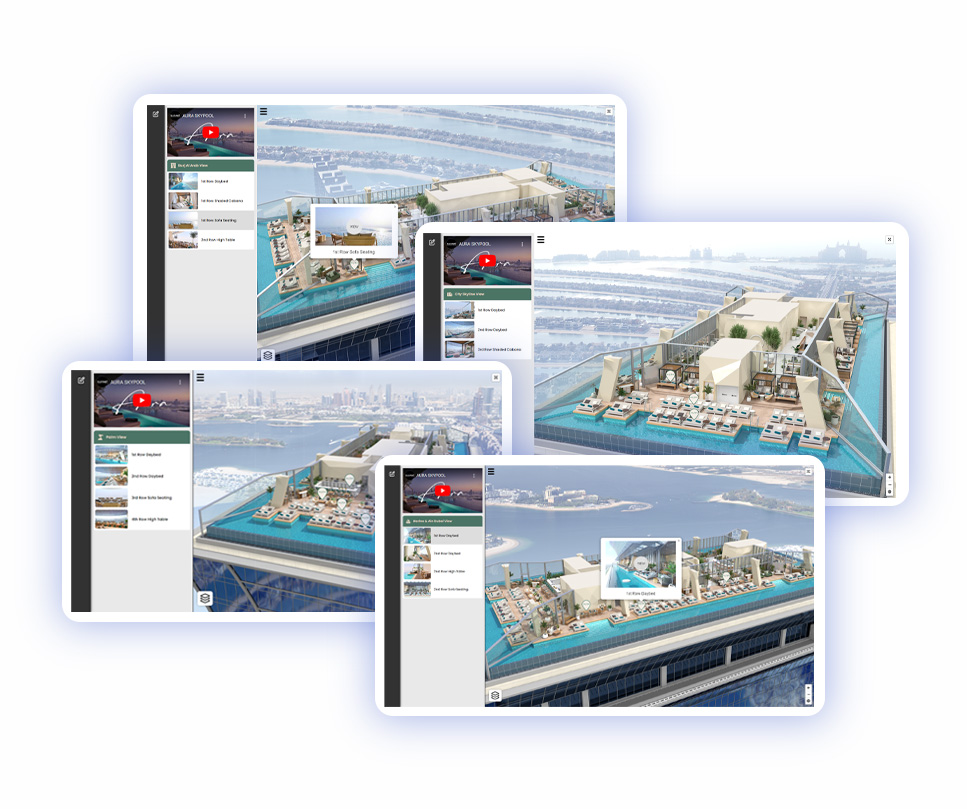
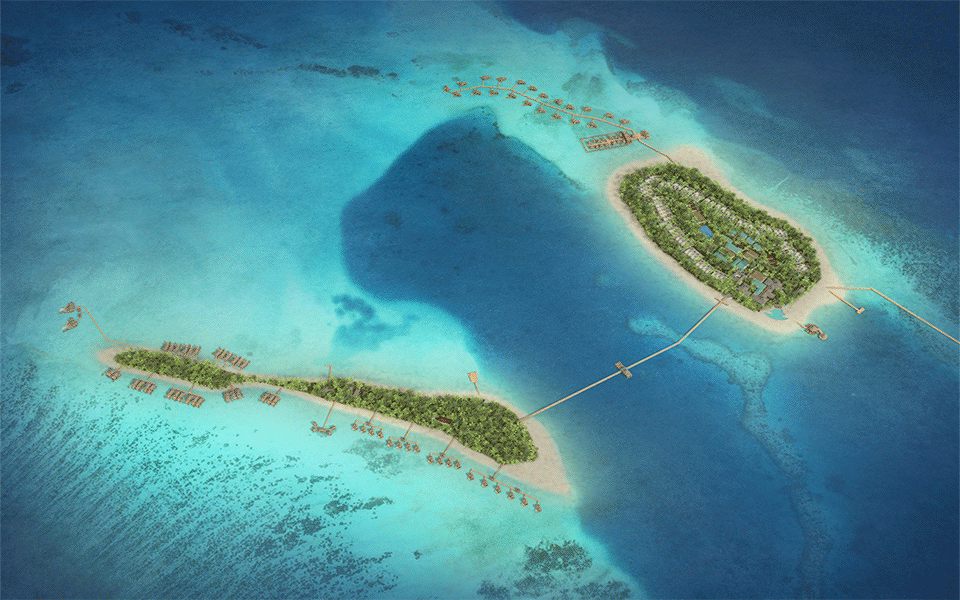
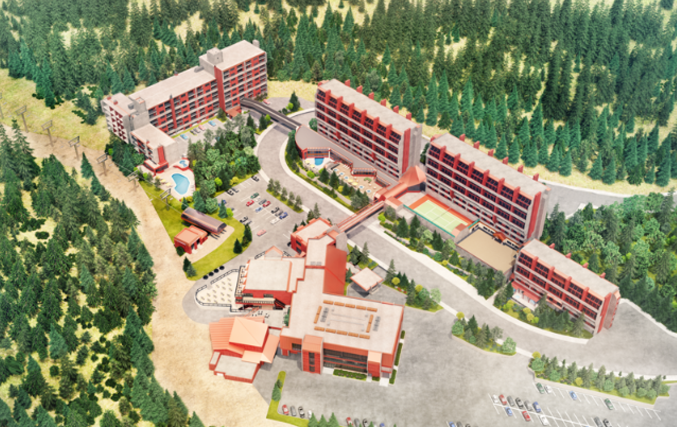
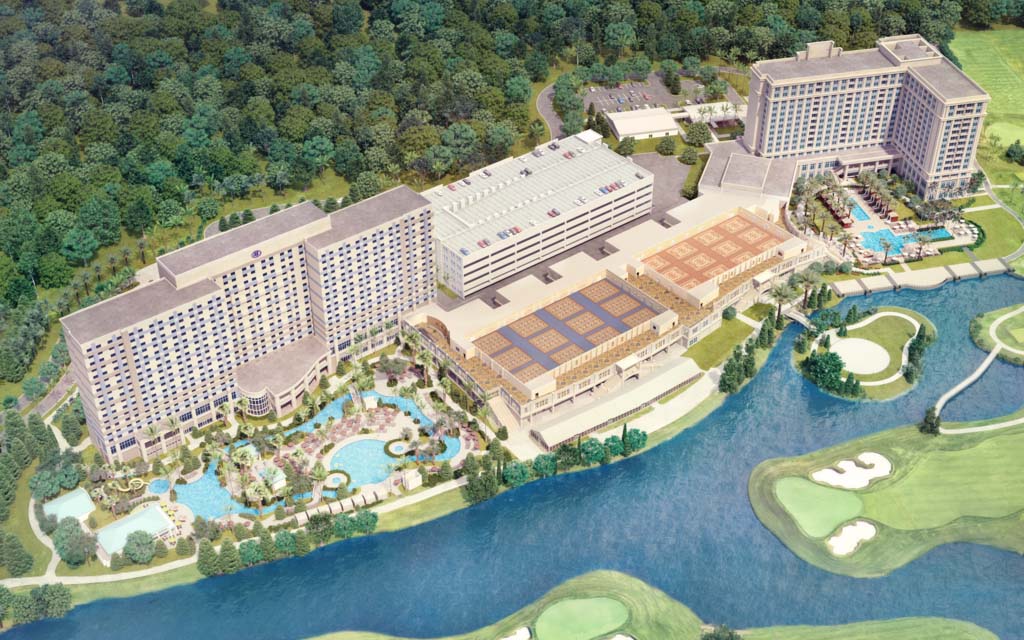
Multiple Camera Angles
Here is an example of a very large resort on a mountainside with the terrain sloping downwards towards the ocean. Due to the scale of the property the camera is very far back so the resort detail appears smaller.
The individual areas are also created as separated assets which can be viewed on their own on the right. We can showcase buildings and resorts from a different point of view.
Color Coded Floors
Colour coding on the room types is used to differentiate between their respective views.
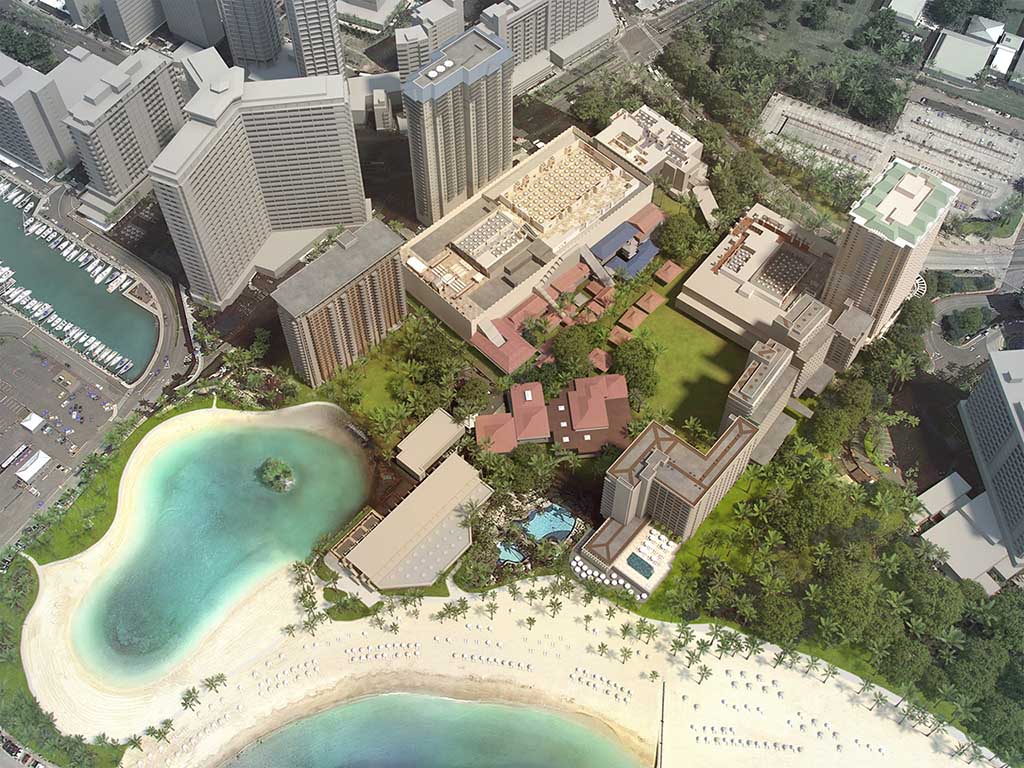
Wayfinding Tools
Visrez 3D Maps can be used in third-party wayfinding software. Our maps can also be rendered in super high-definition formats so they can be printed on billboards or any other on-site structures.
Interactive Map Builder
Camera views can be generated from any position, angle or height. Buildings can be separated to demonstrate internal floors individually or stacked. Most importantly 3D Maps can be updated over time to match future renovations on-site, you can show new developments long before completion.
Adding Branded Markers
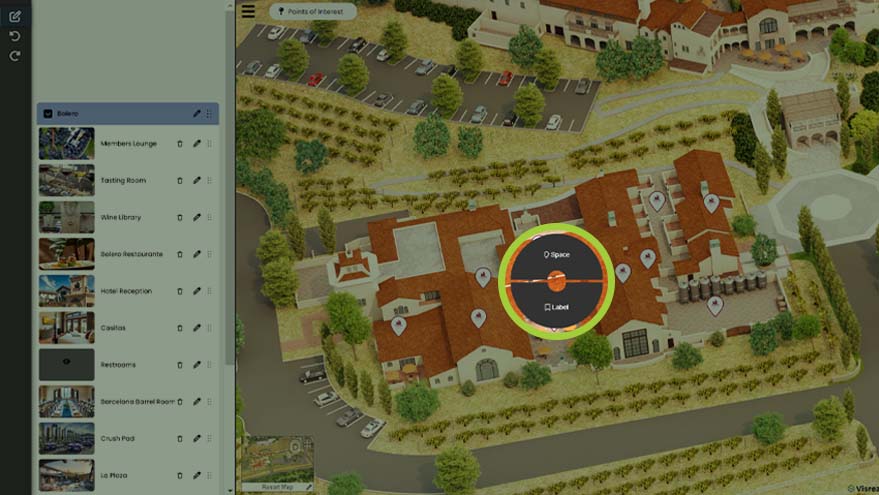
To add a marker Edit Mode has to be activated from the top left corner button. Undo and Redo options are under it.
Then select a point on the map with the left mouse button on the map and choose Space or Label.
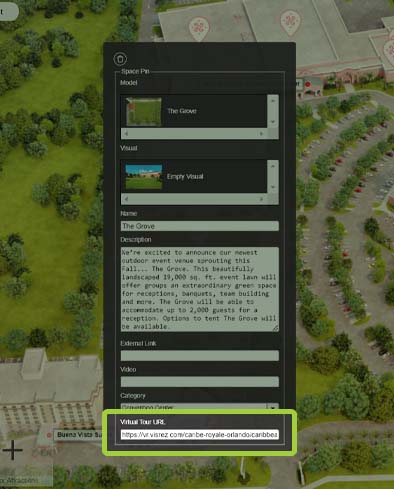
Adding Images & Links
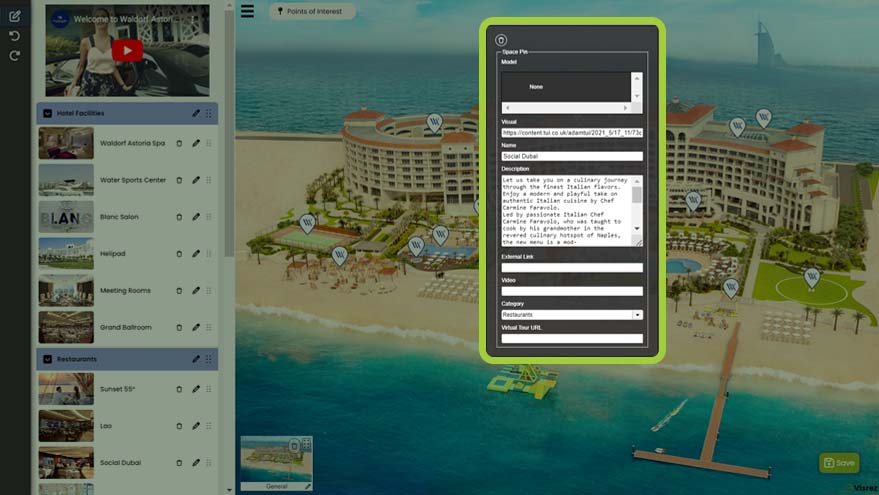
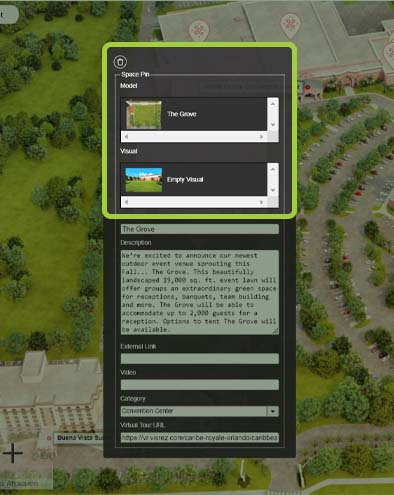
Once a marker has been created click on it to open edit options. You can set a Model, Name, Description, Visual (Thumbnail), and Video link, in Category you can either choose from the dropdown menu or create a new one.
Images can be added copying the URL code of the image and pasting it under Visual.
Users can add YouTube videos, Matterport Virtual Tours or any other media content easily to the interactive maps just by pasting the code into the back end. Why should clients be restricted to only using content created by one supplier as supporting all media formats makes the interactive map an even more valuable resource for our clients.
Organizing the Menus
Categories and Markers previews can be rearranged on the left menu with drag and drop. Also, names can be changed.
Categories and Markers previews can be rearranged on the left menu with drag and drop. Also, names can be changed.
Adding Videos to the Map
To add videos copy the URL code of a video and paste it in Videos.
Website Integration
Interactive Maps can be added to a website using a single line of code from your Visrez account from the Embed Code button.
The map automatically uses the styling from your website so that fonts, background colors and buttons blend with the site. Most importantly if you switch website vendors the interactive map can go into your new site by adding the code.
To embed the Interactive Map in website copy Using JS or Using an iframe and paste it in your page.
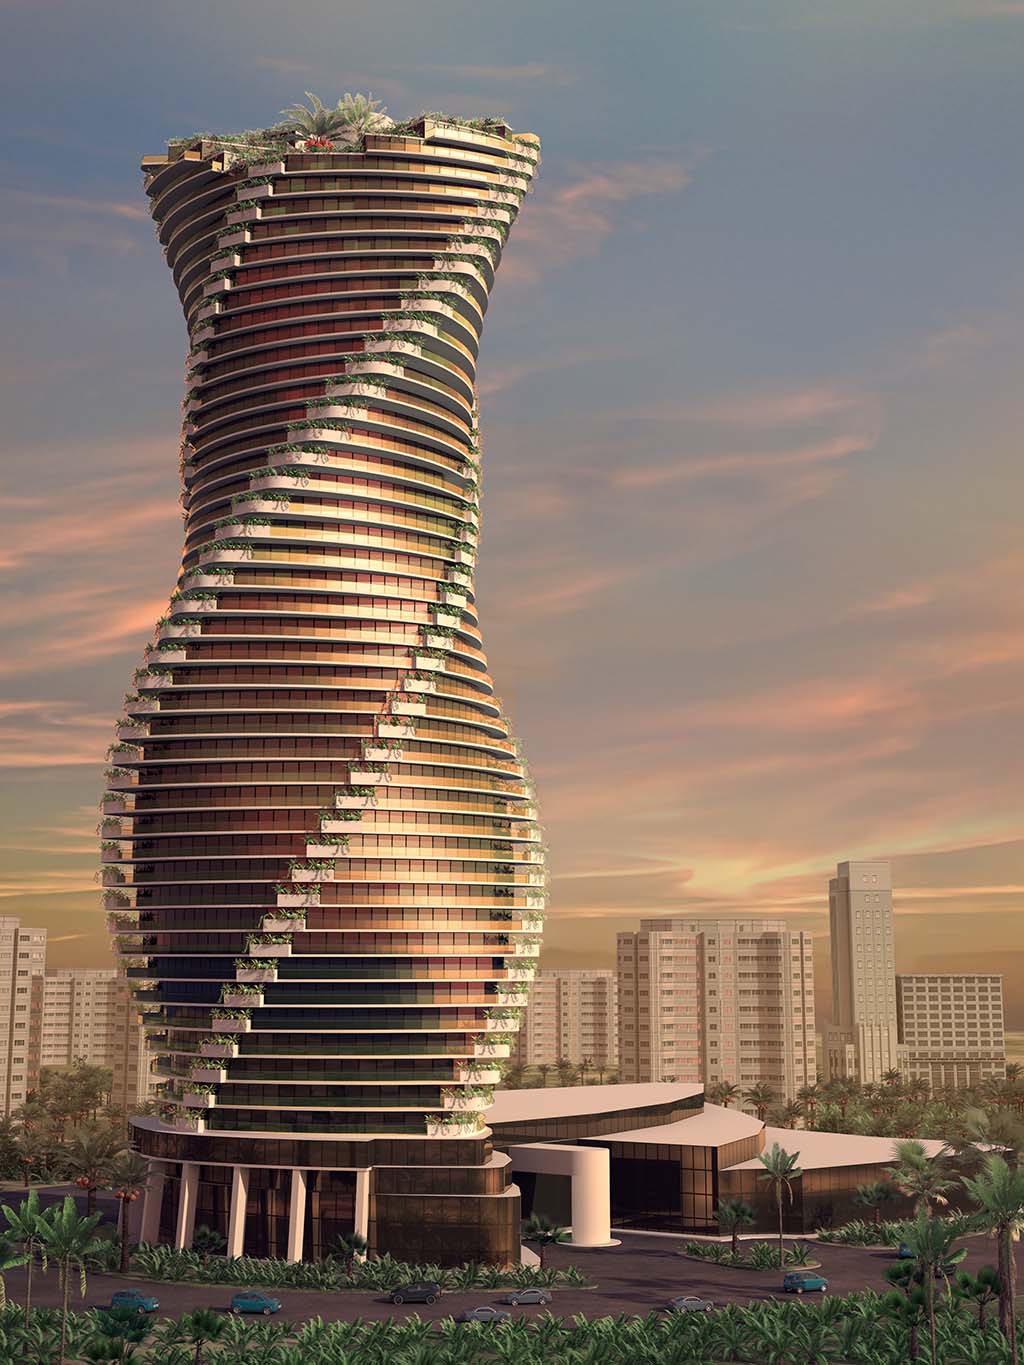
Pre-Opening Projects
Visrez has generated hundreds of resort maps for clients worldwide including projects at concept stage, pre-openings or renovations and upgrades. Once a set of models exist in Visrez they can be modified at any time. This is what makes Visrez such a smart choice for hotels, resorts and convention centers because your team will always have the most up to date visual assets to generate sales.
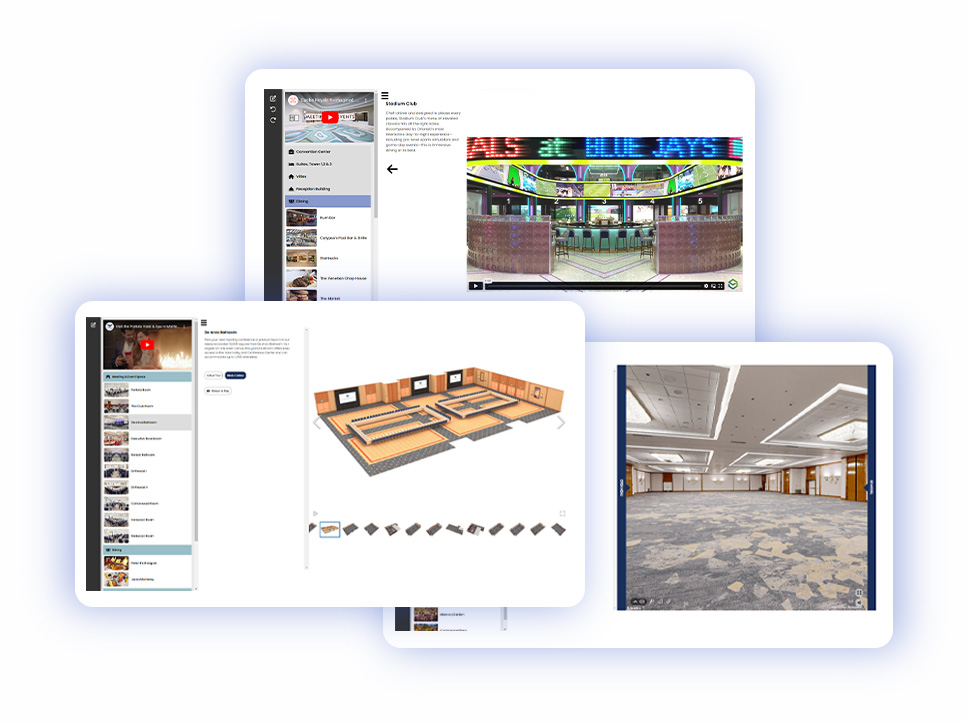
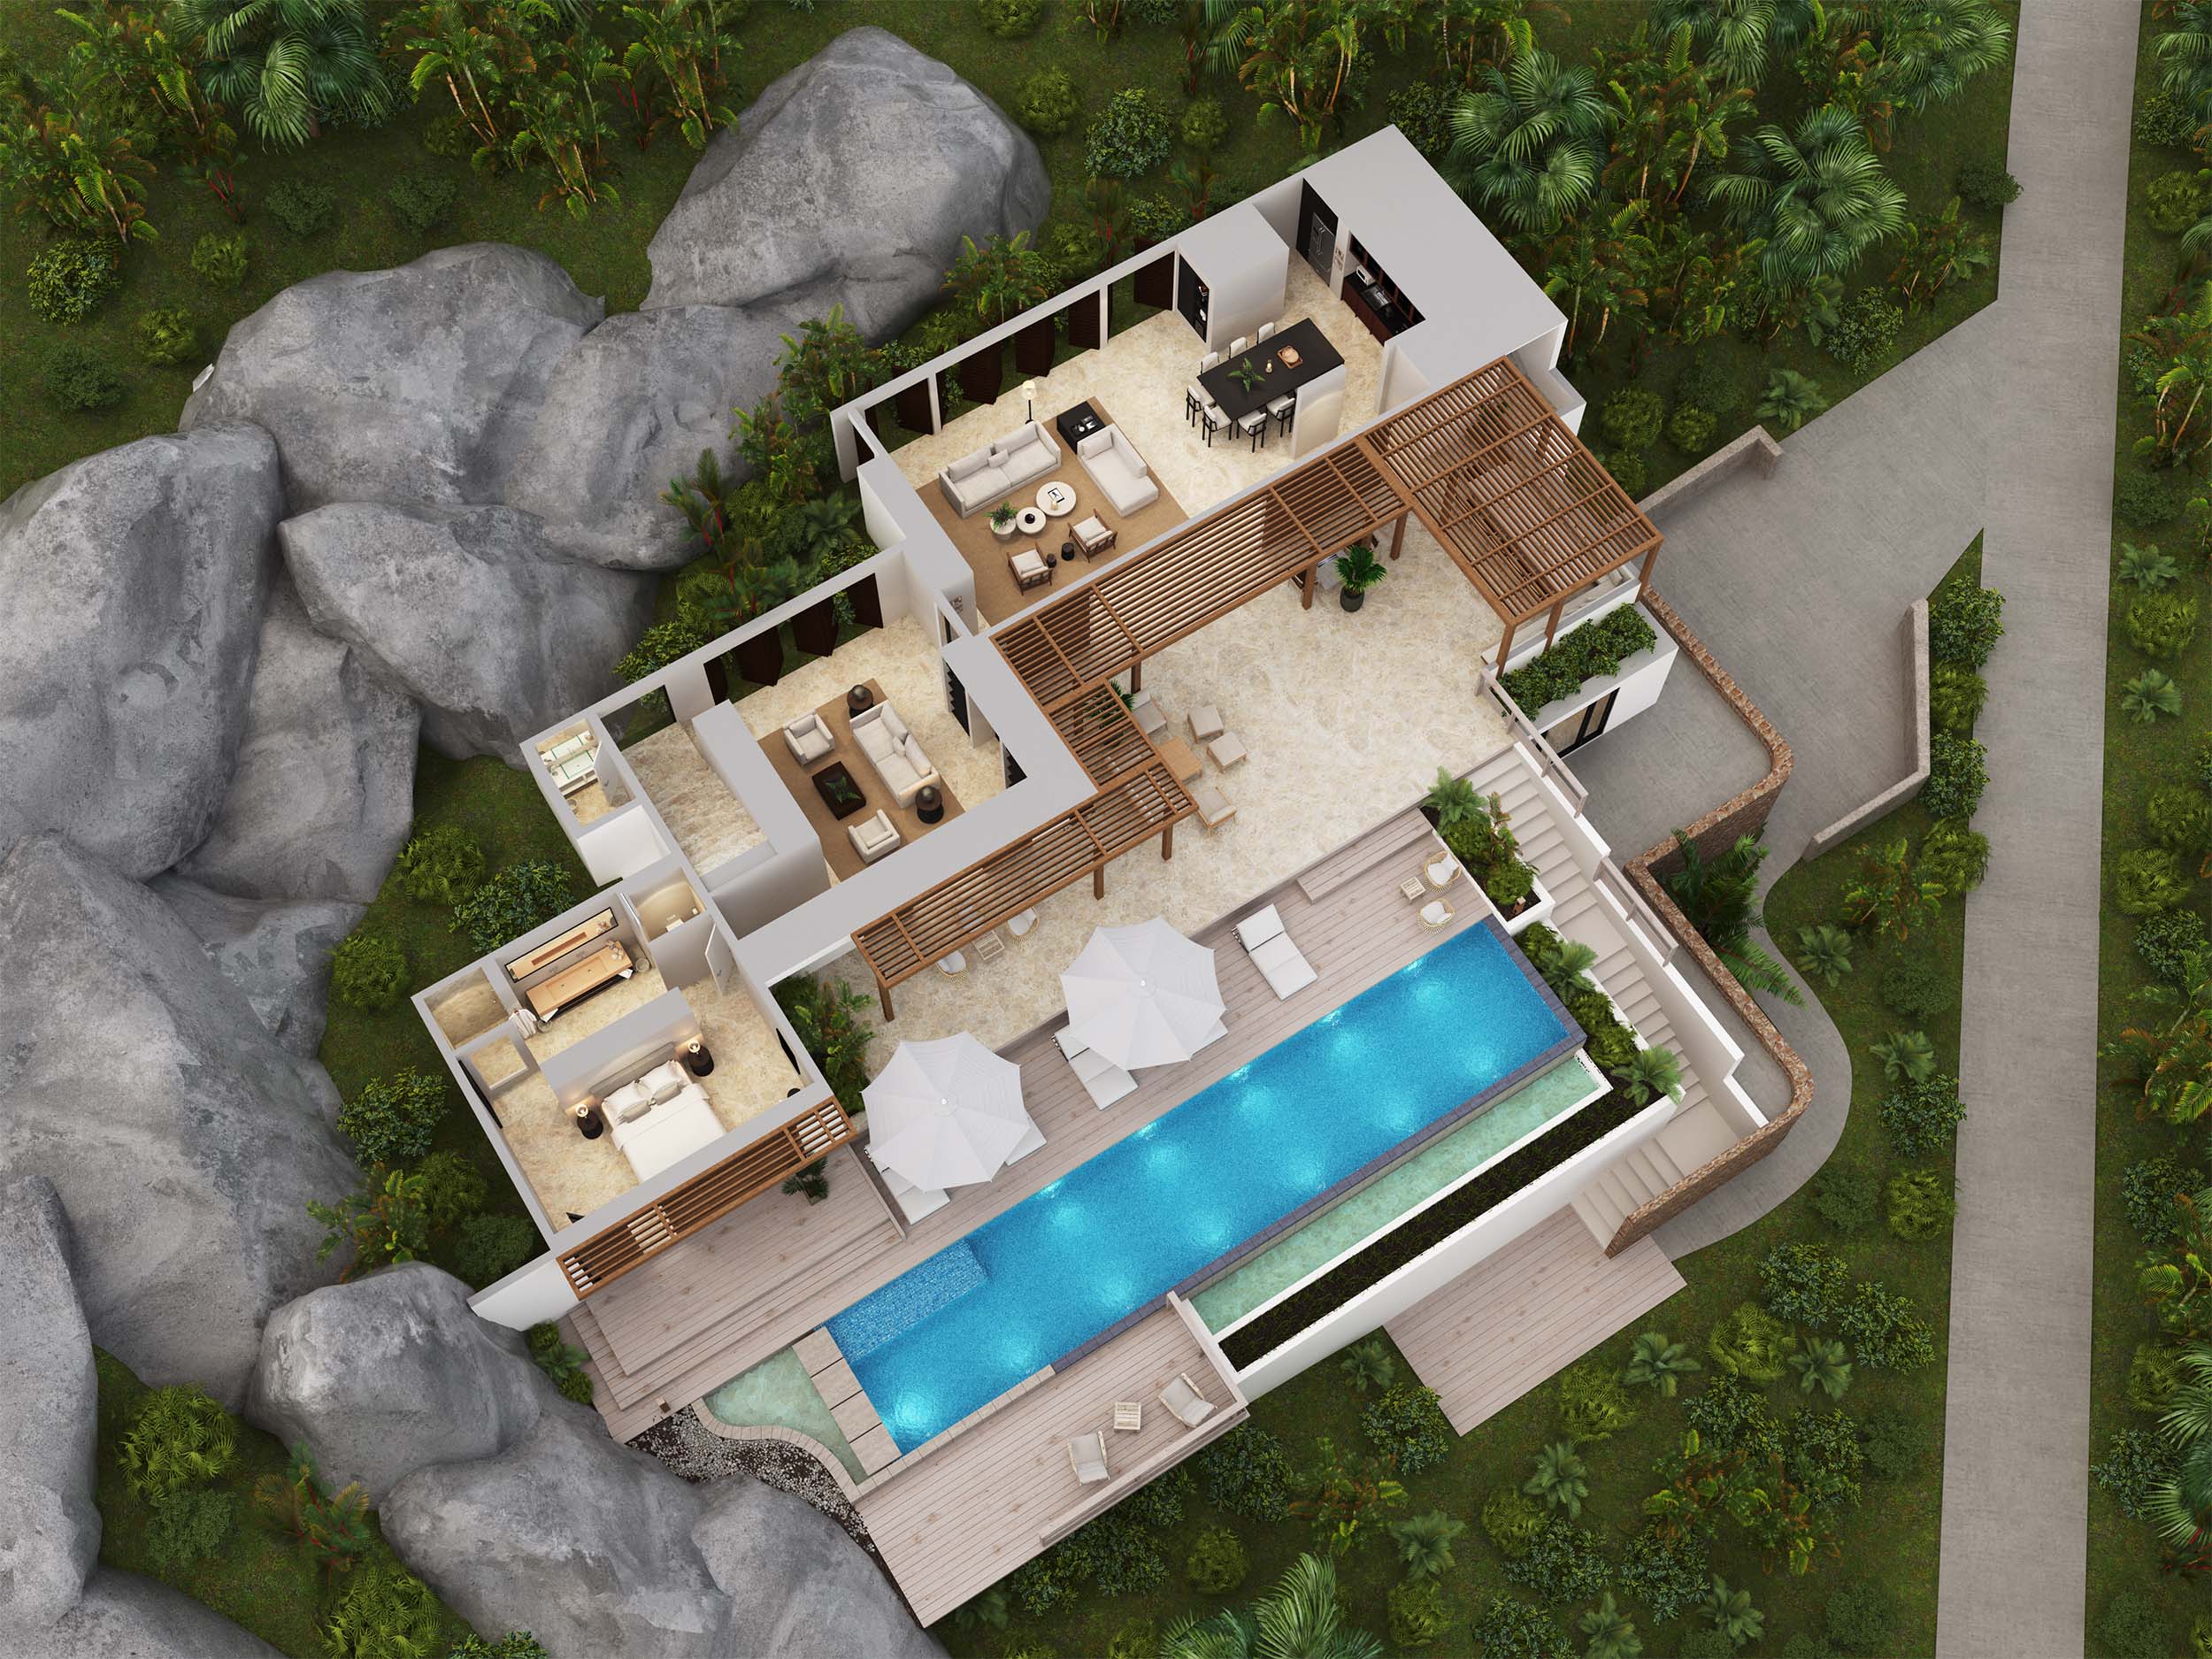
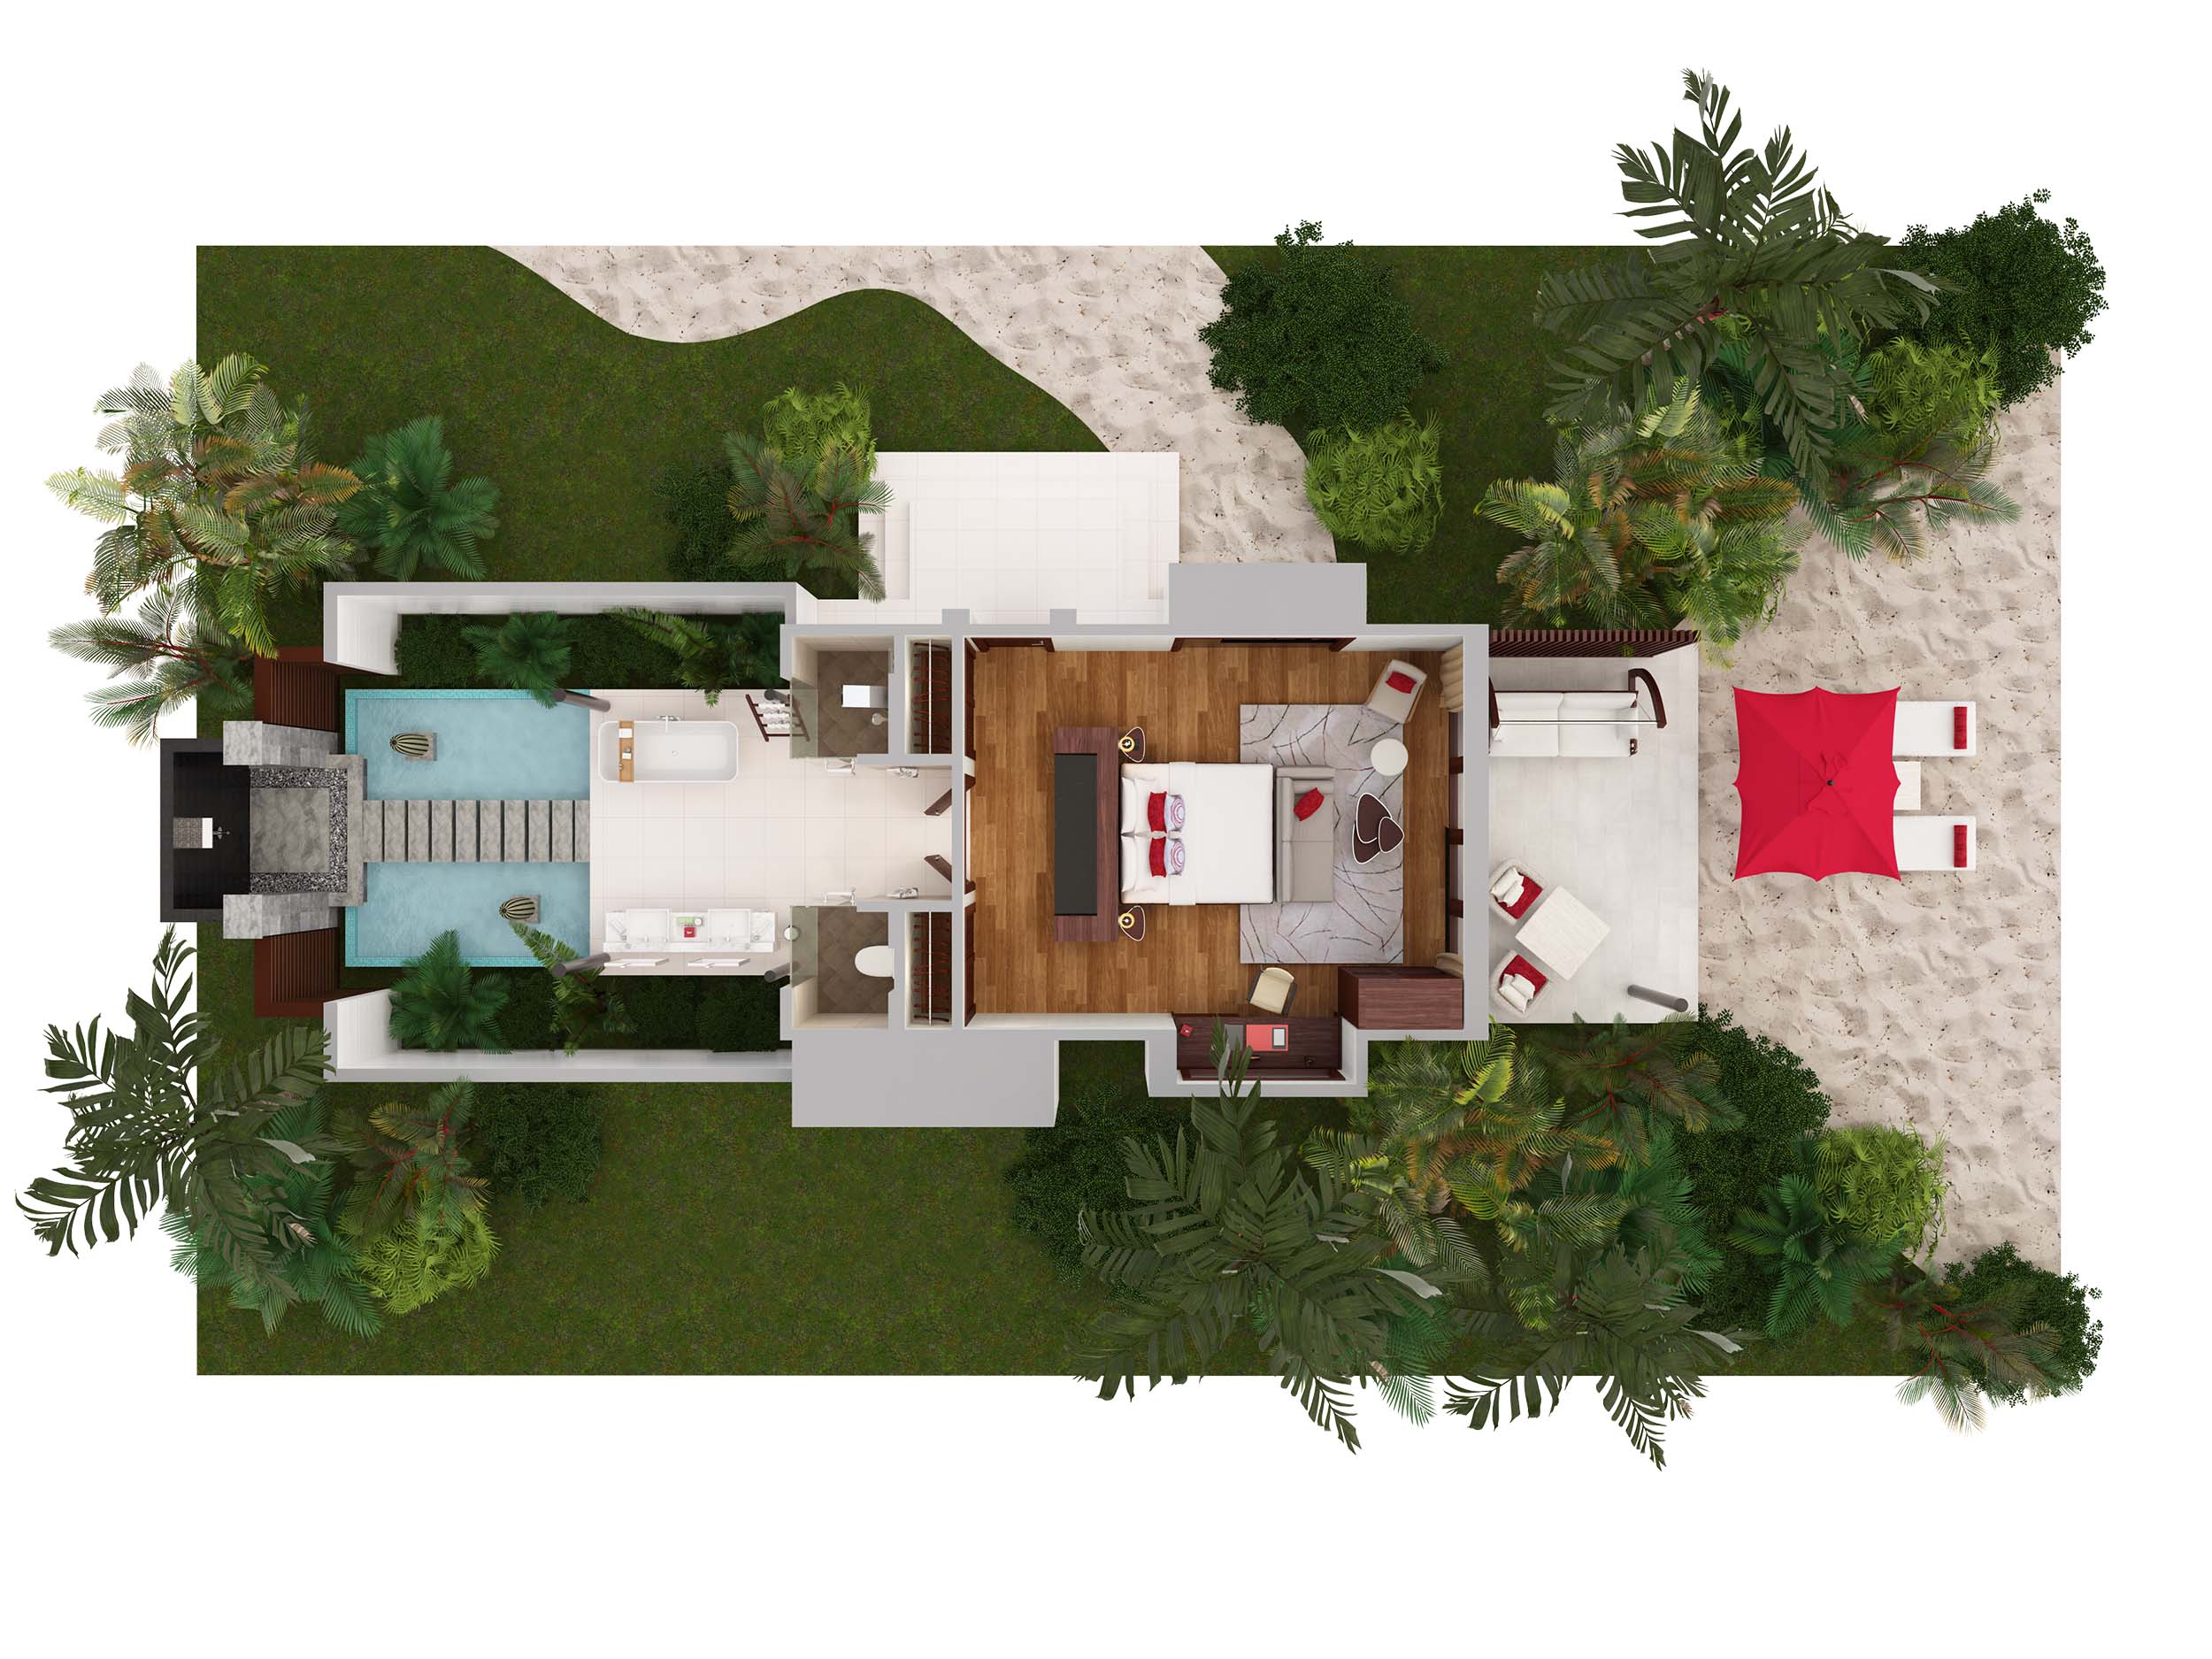
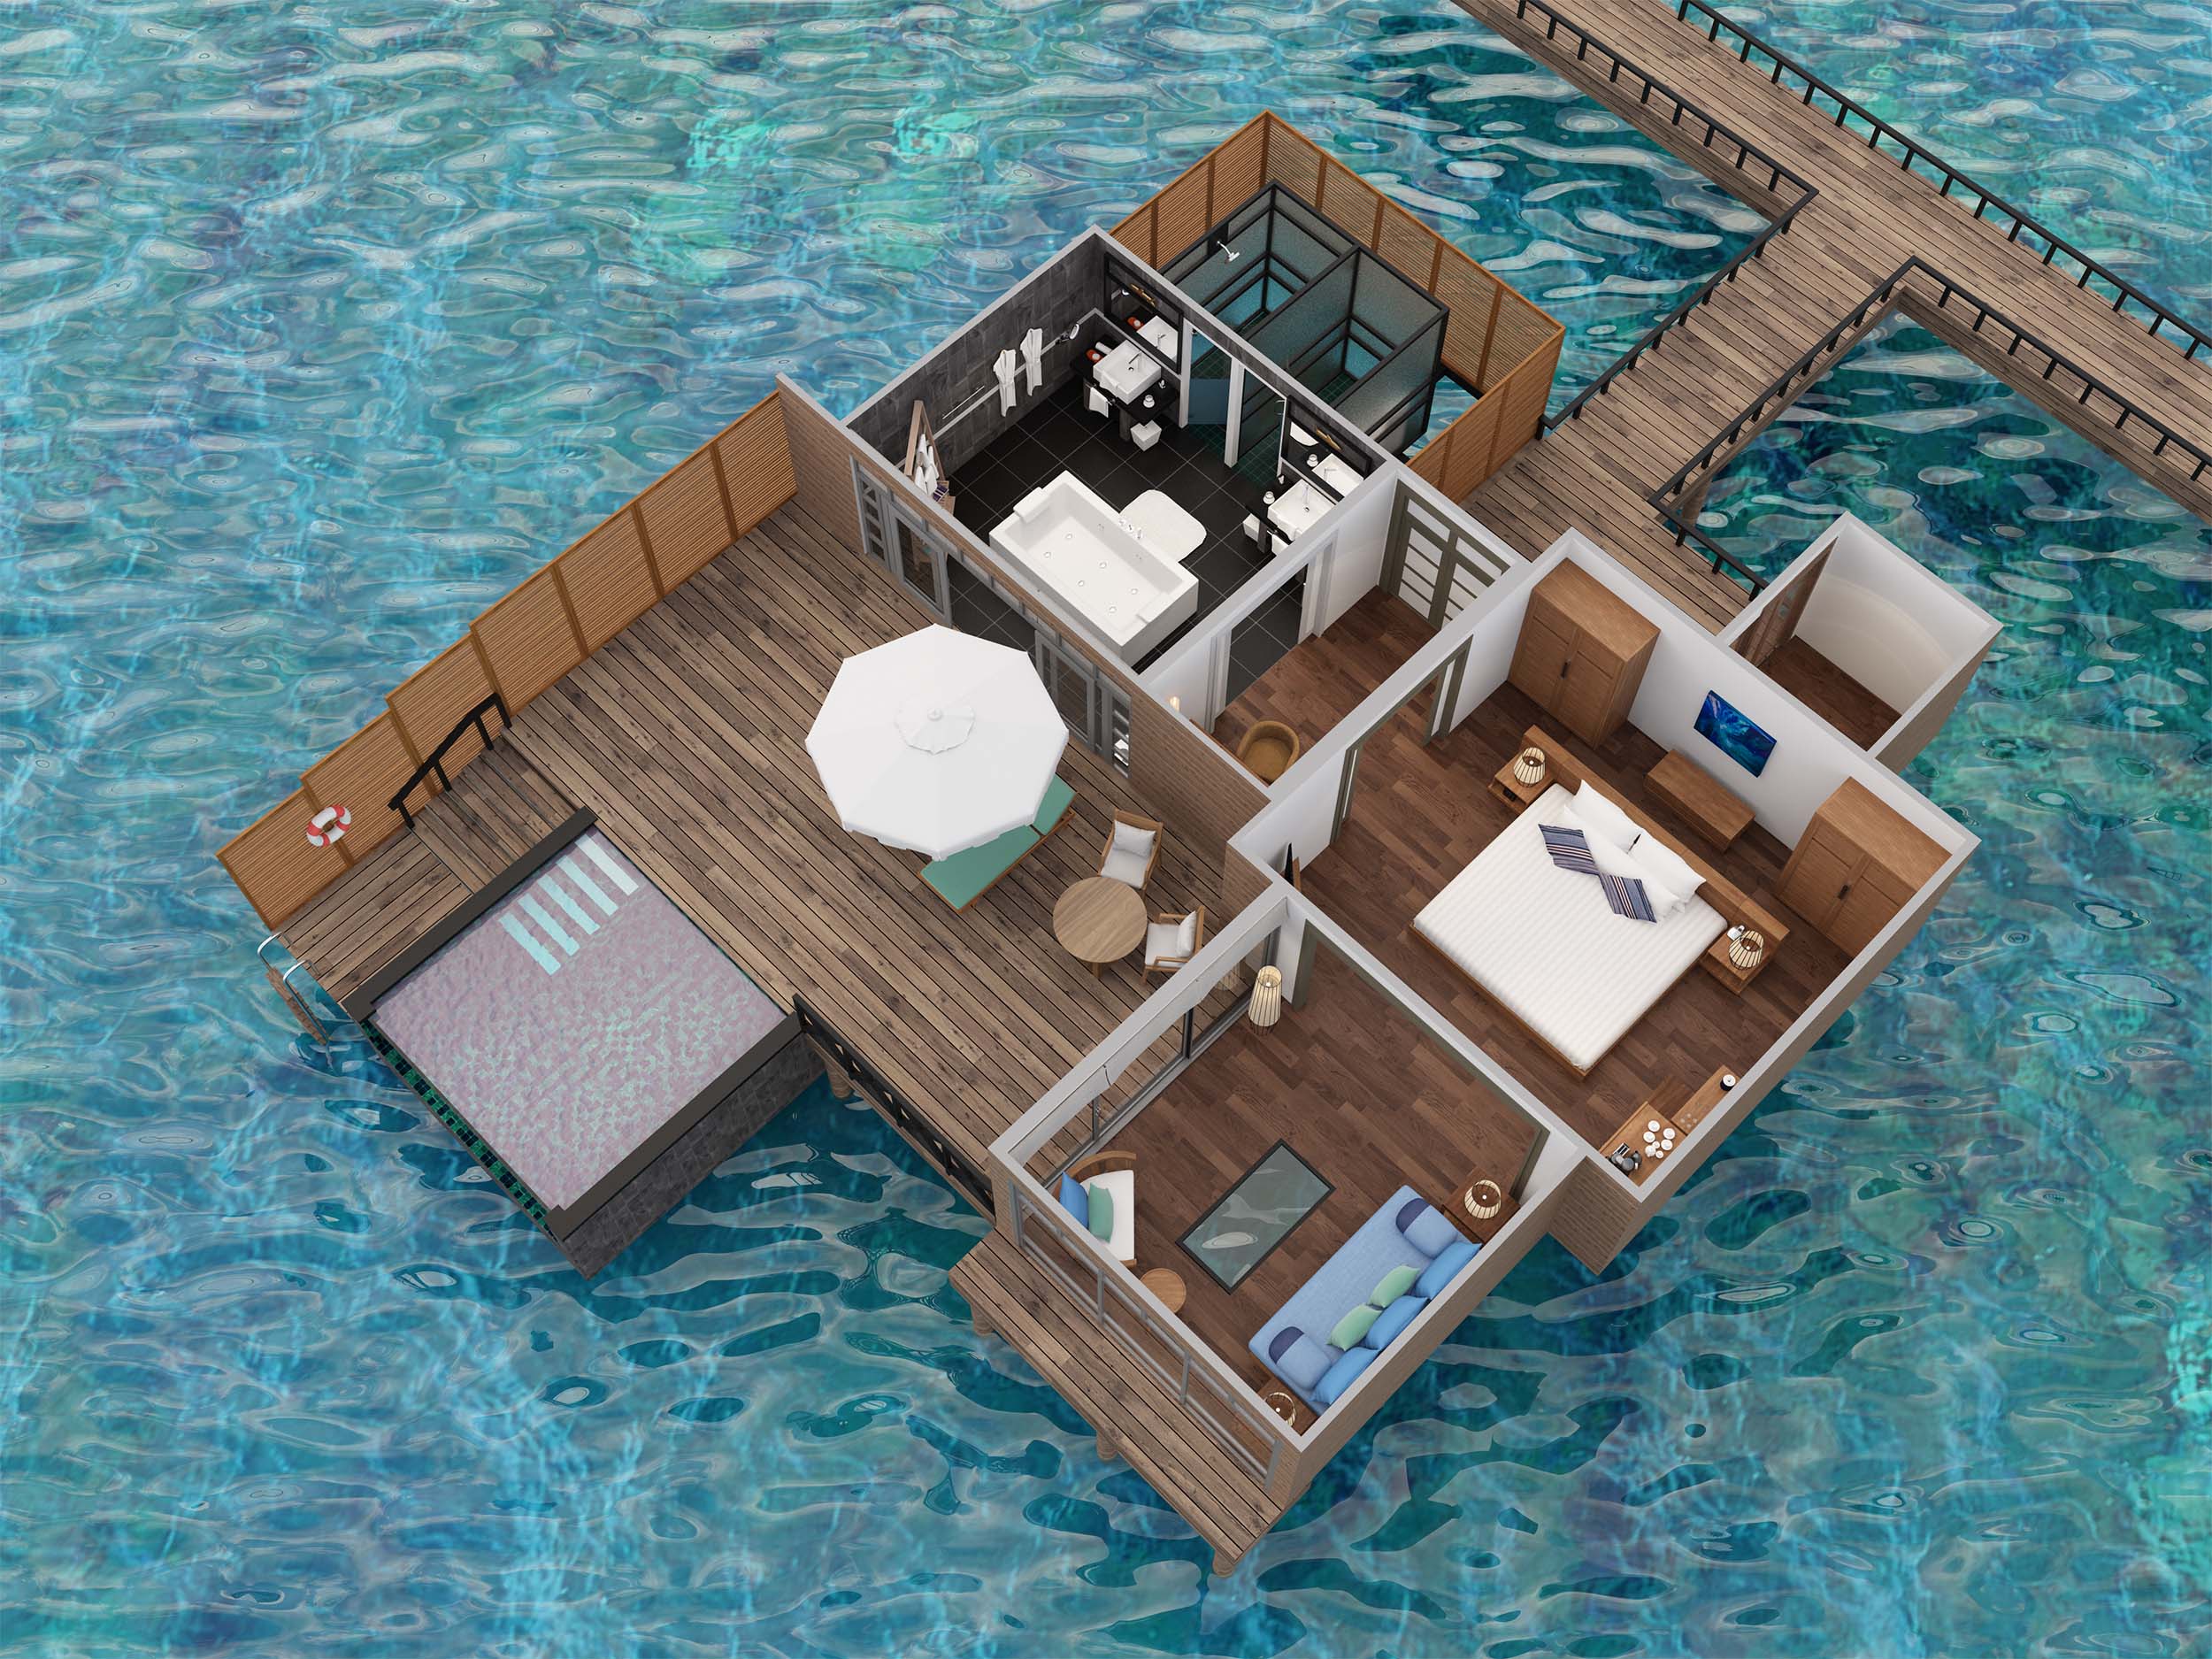
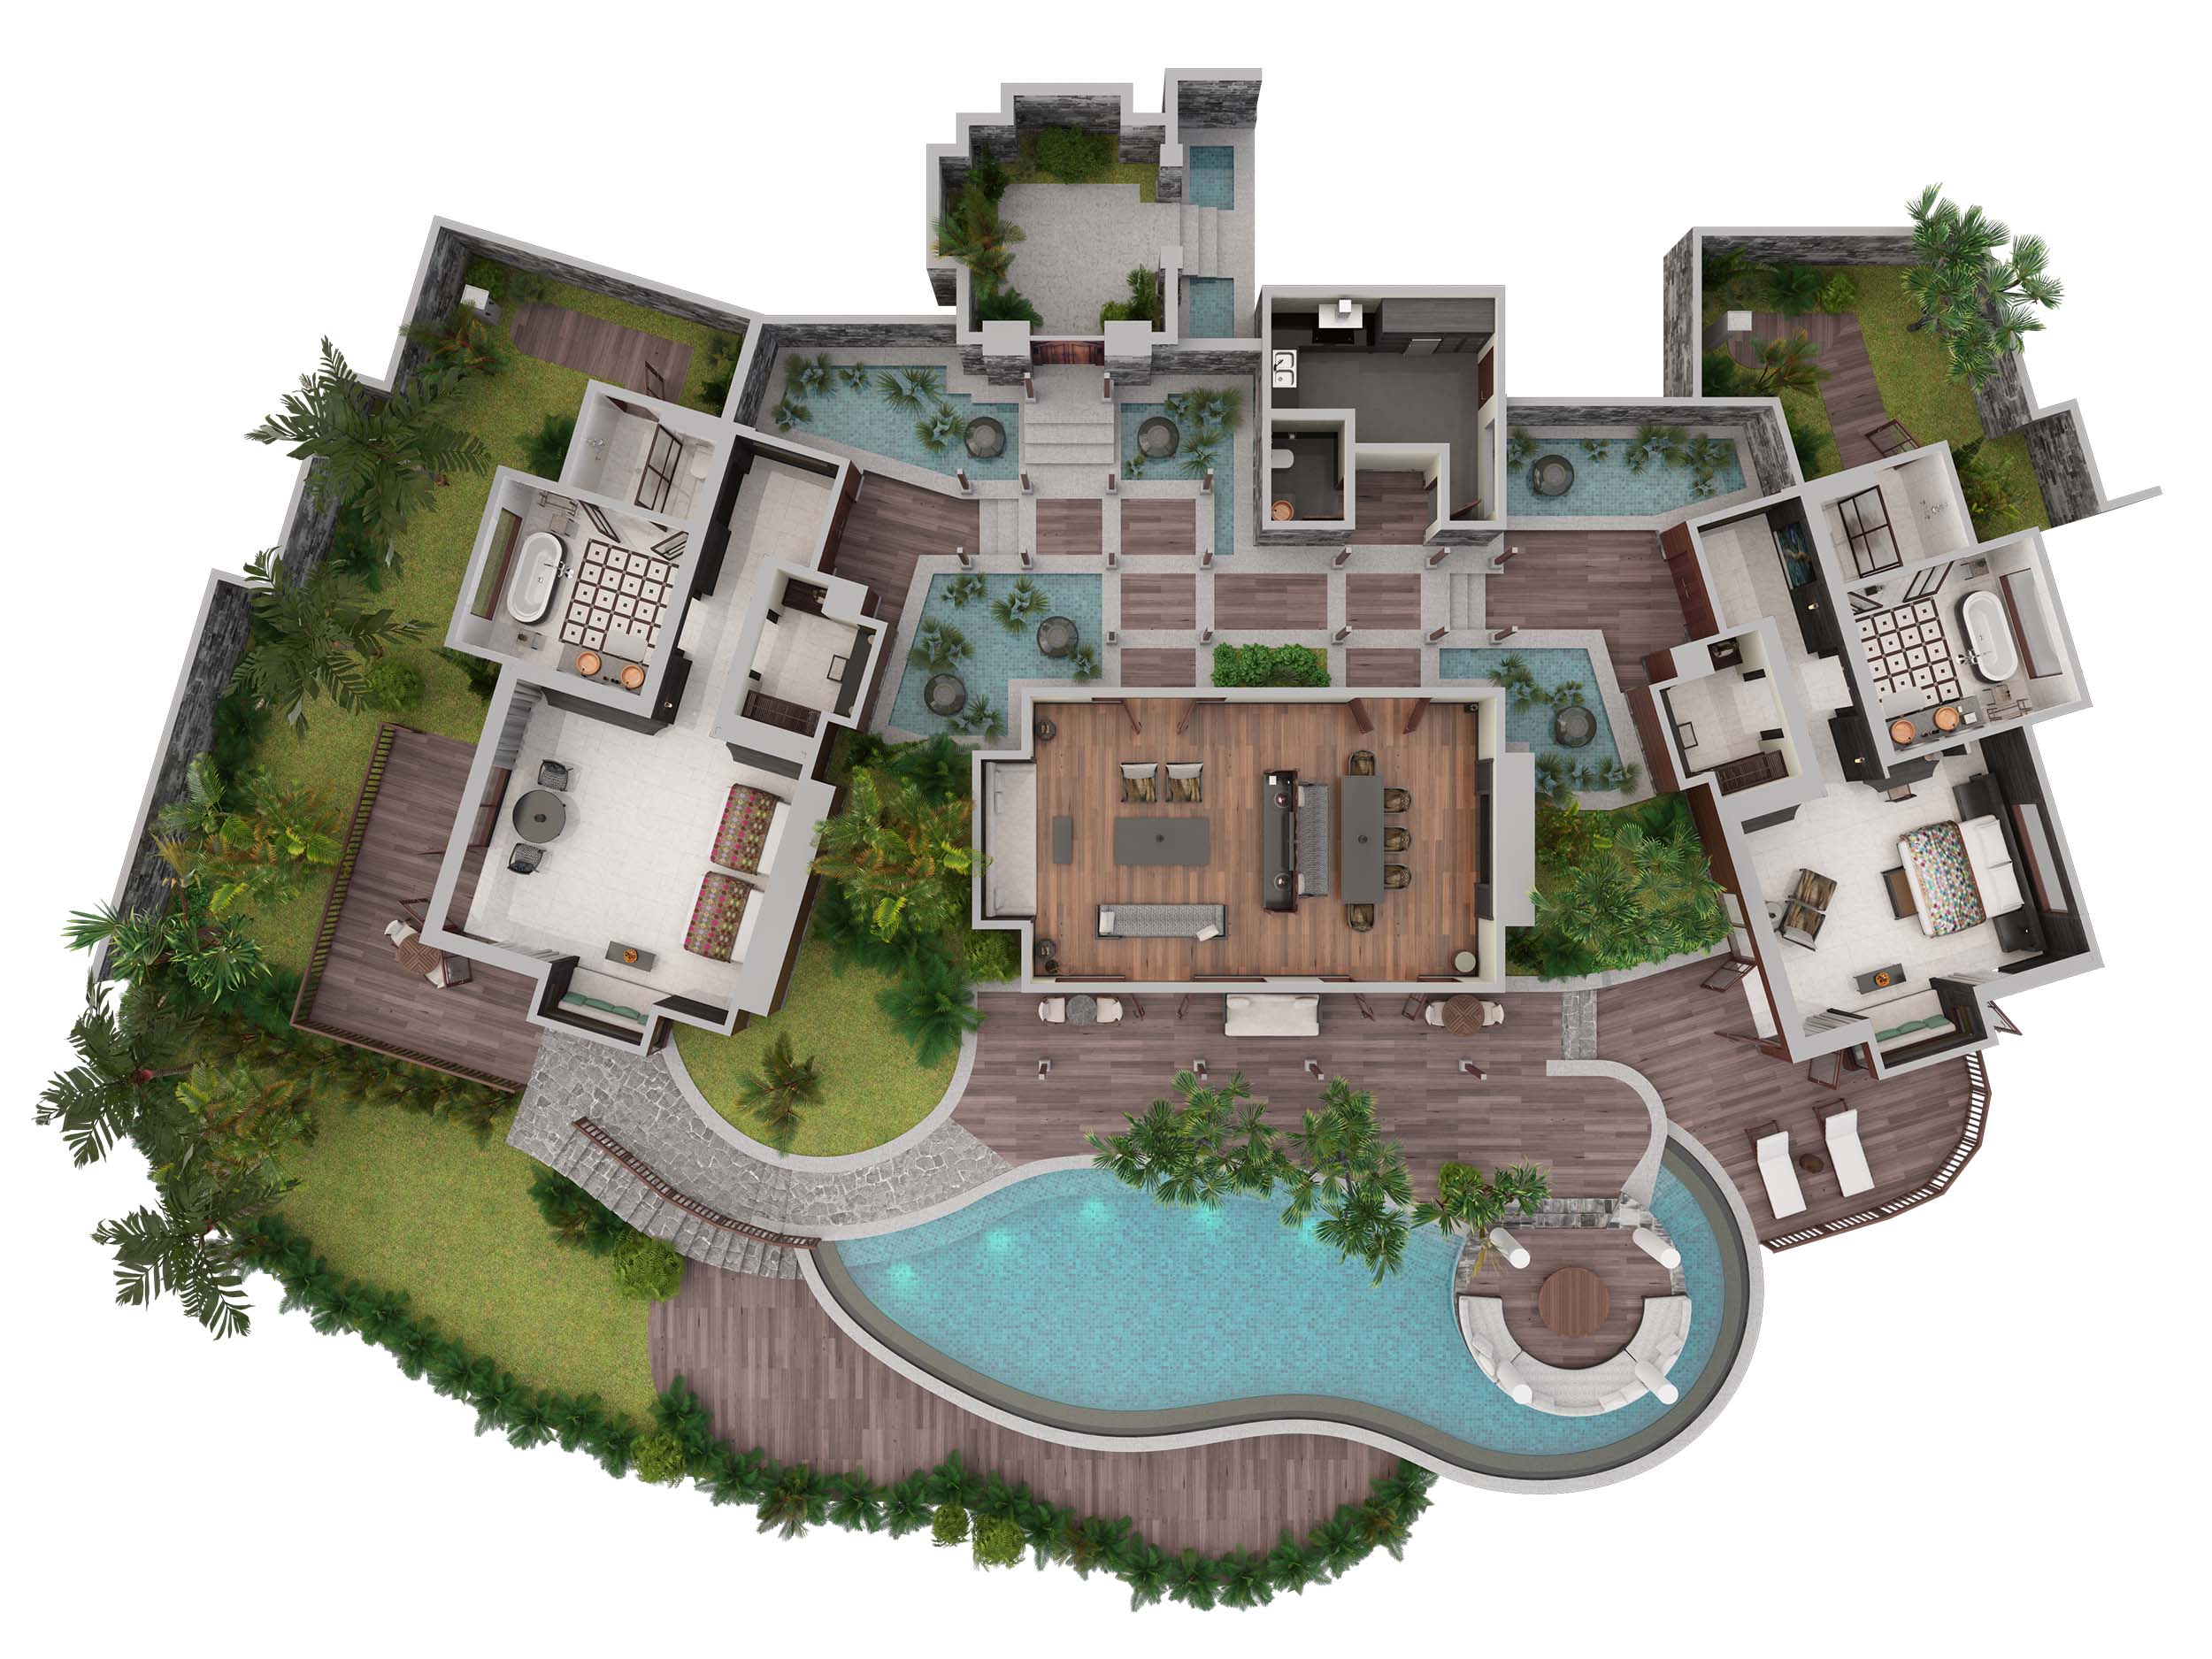
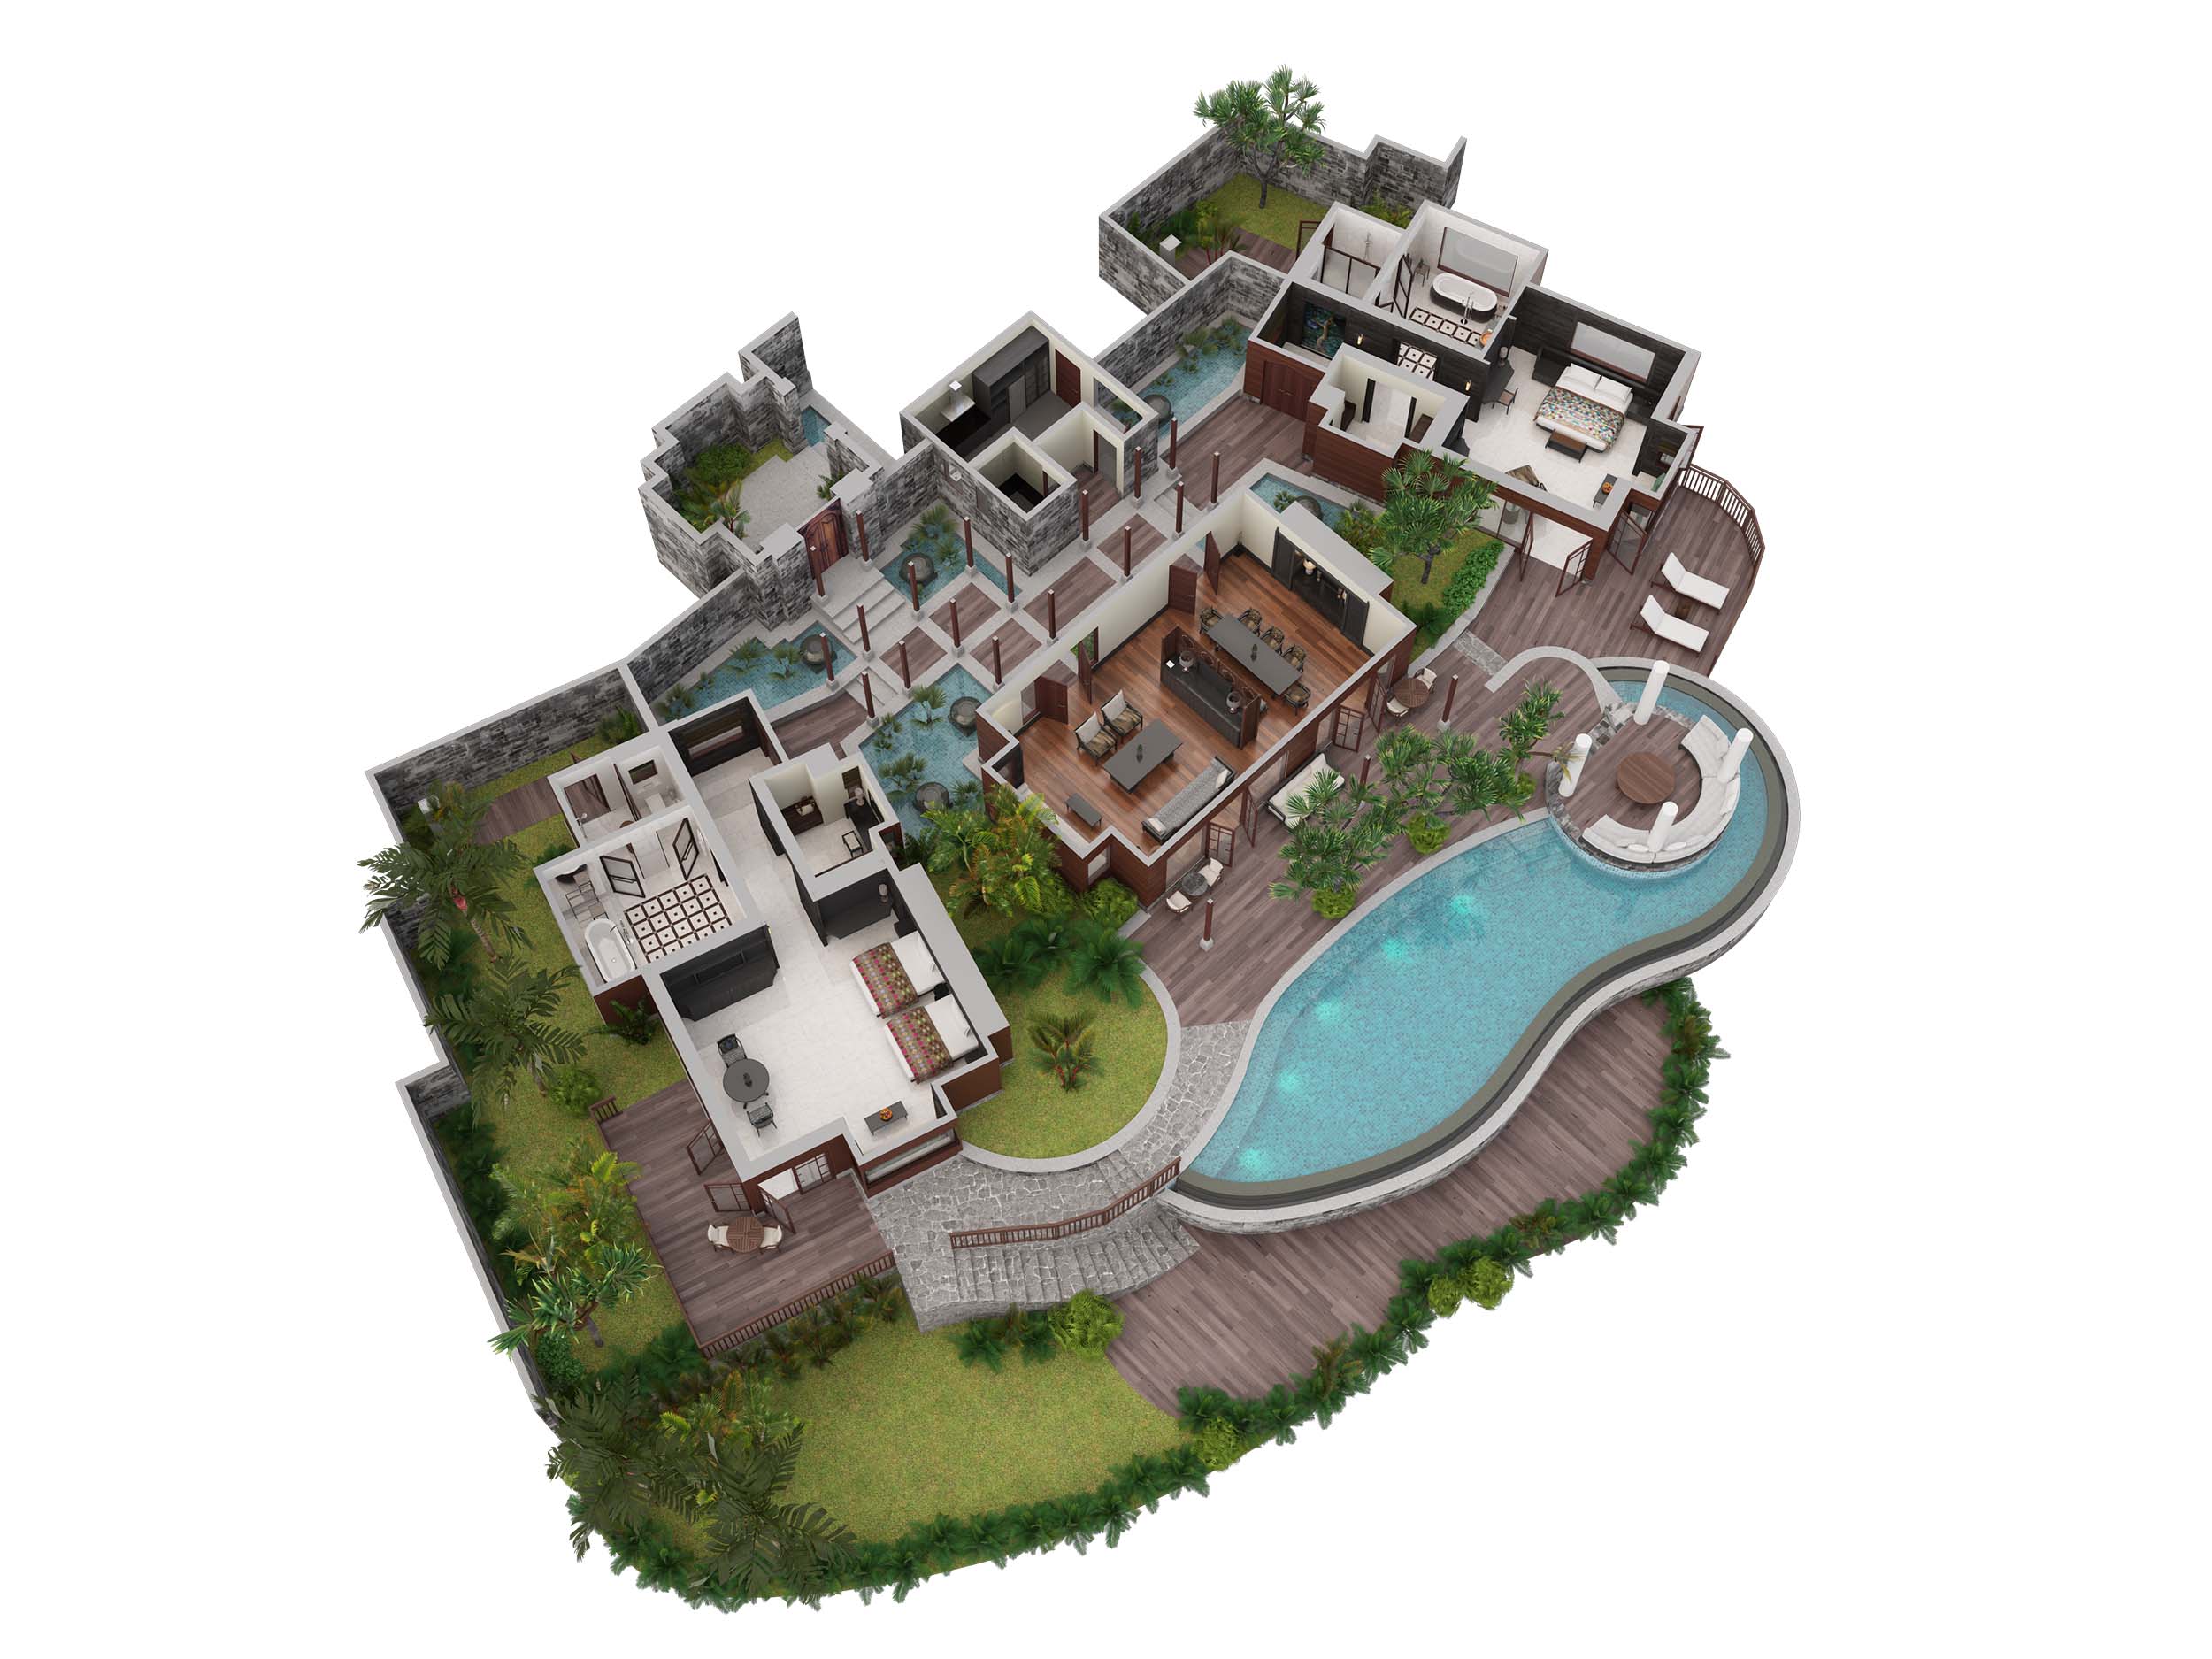
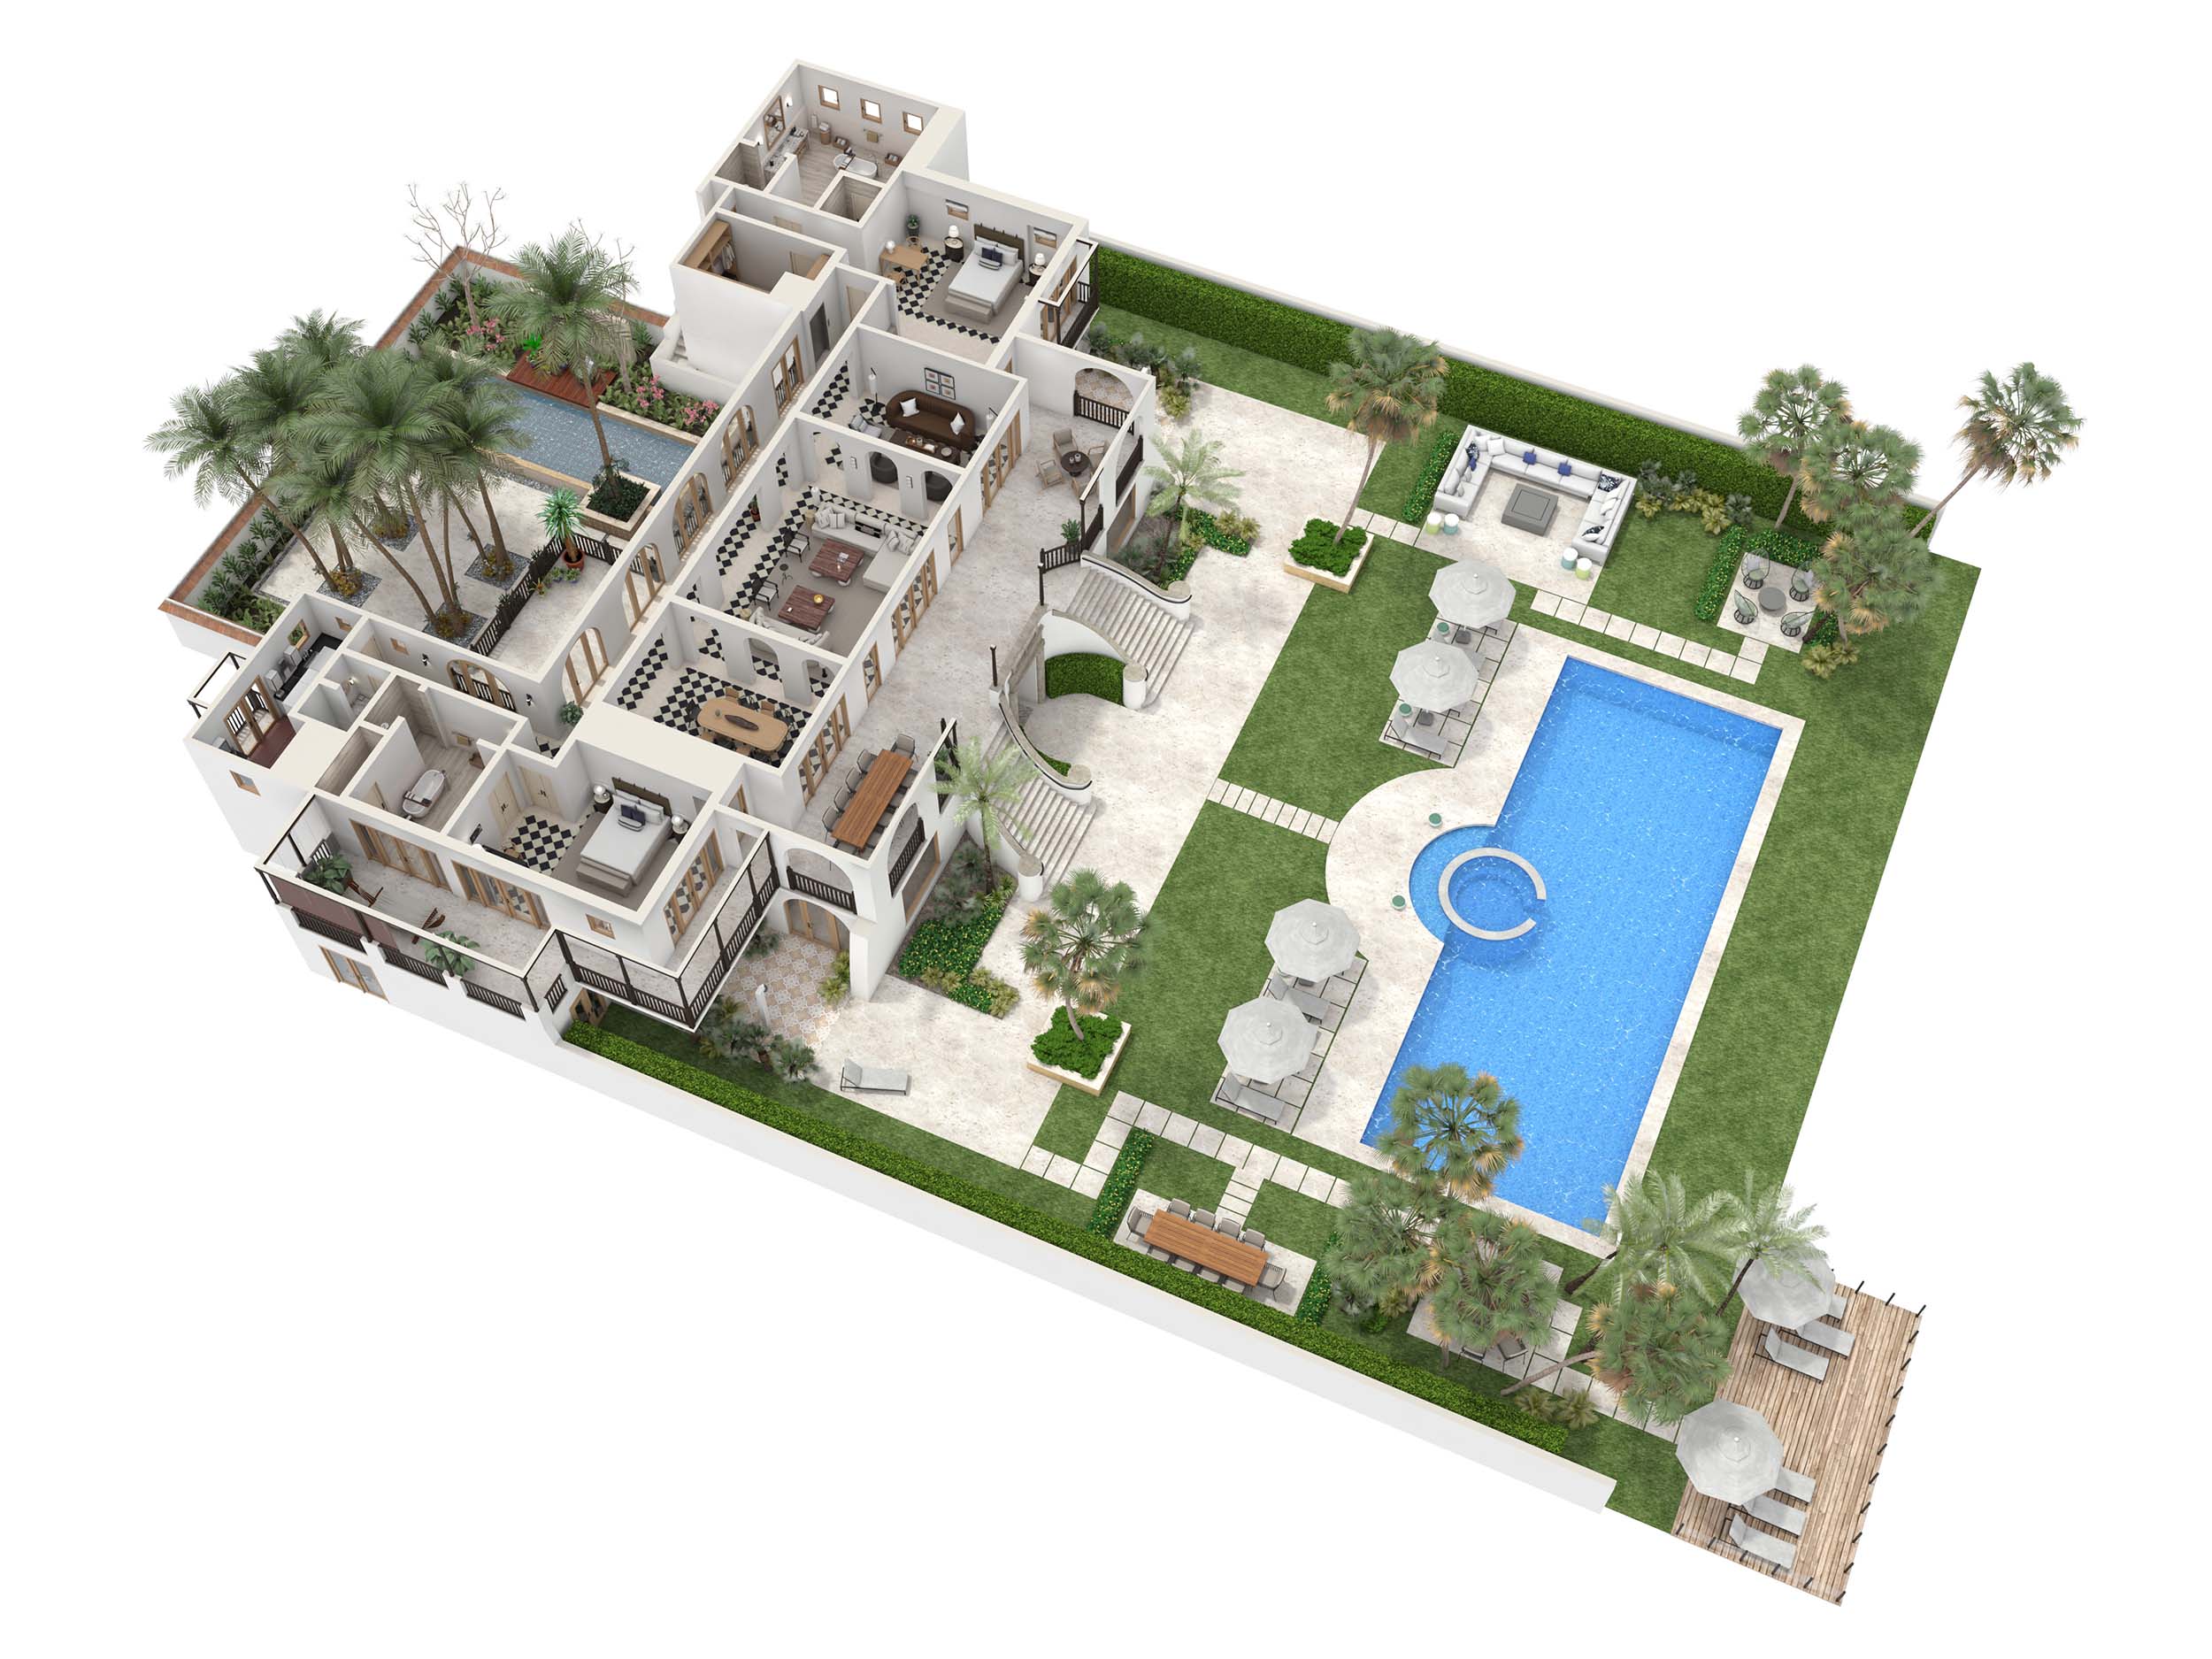
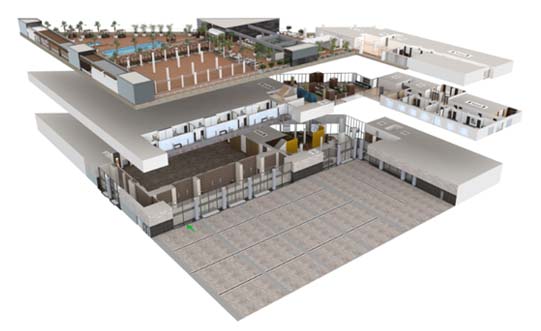
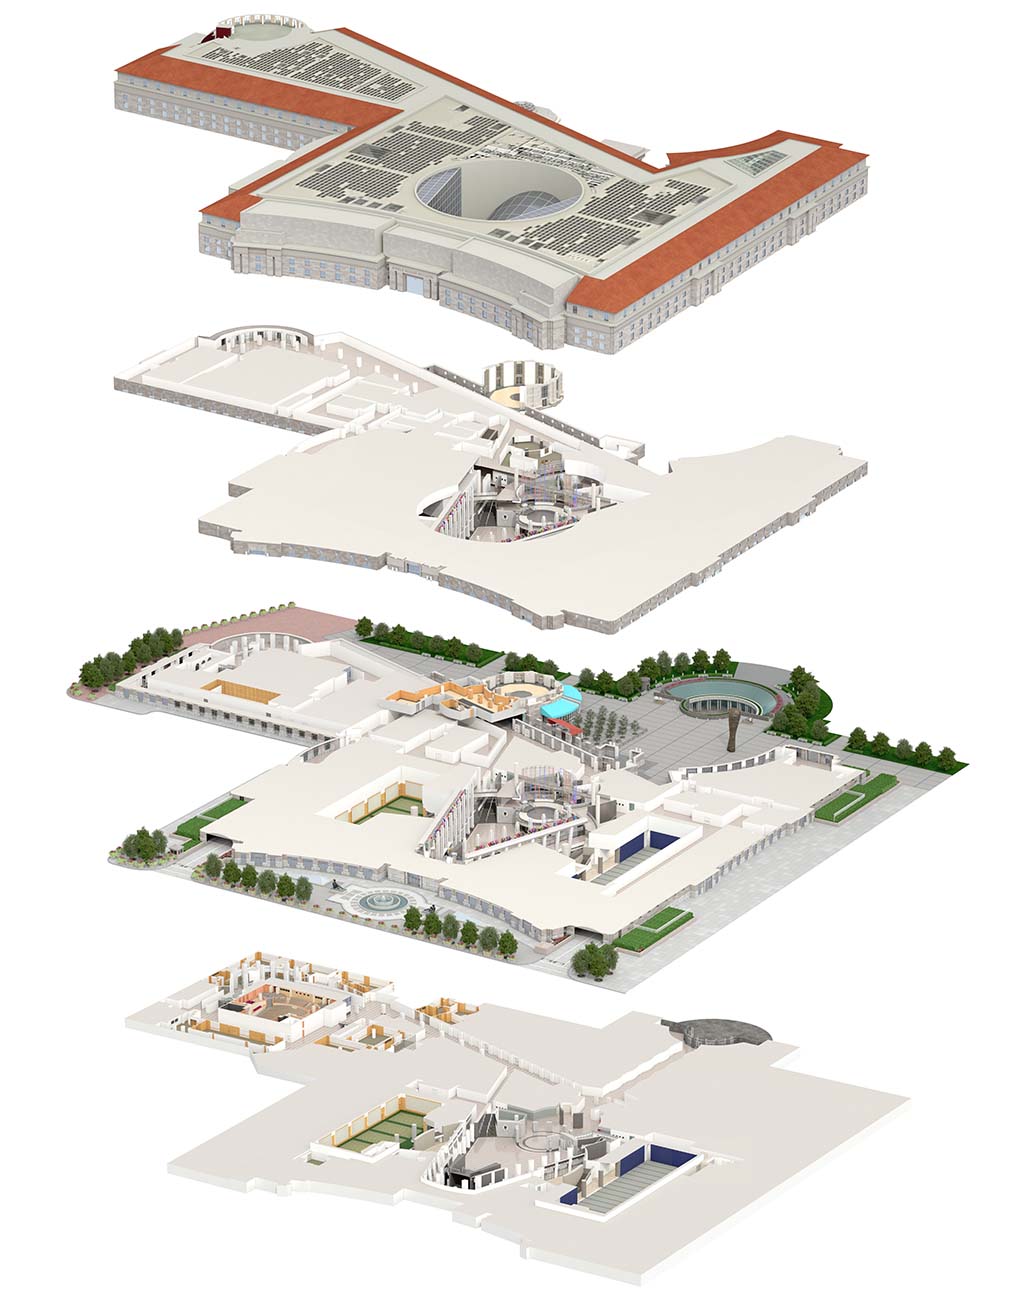
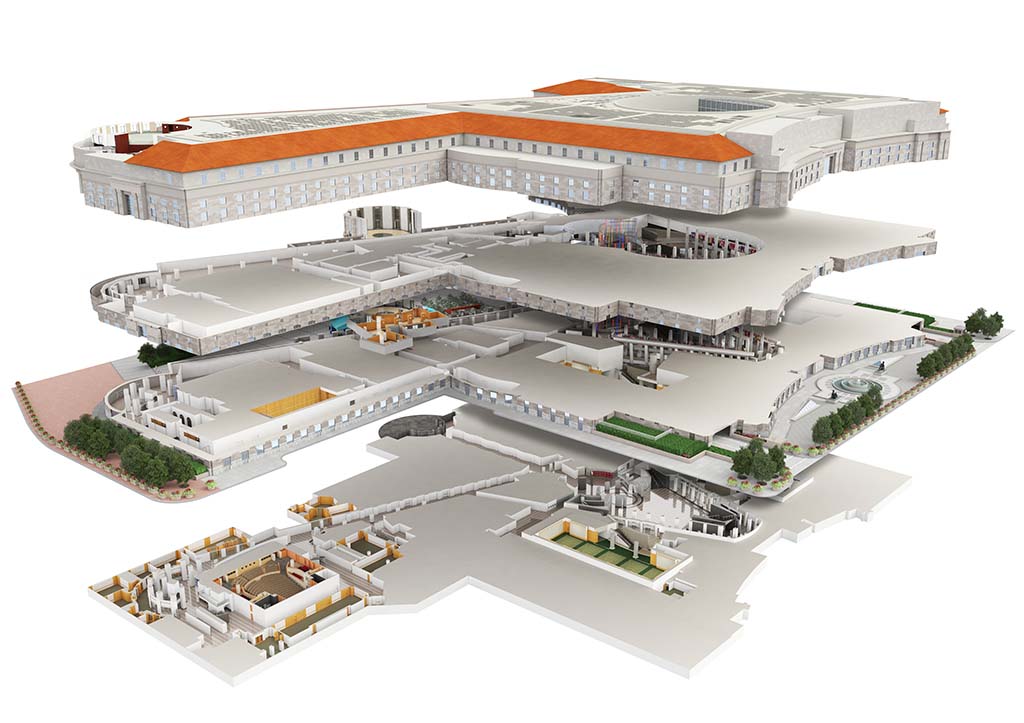
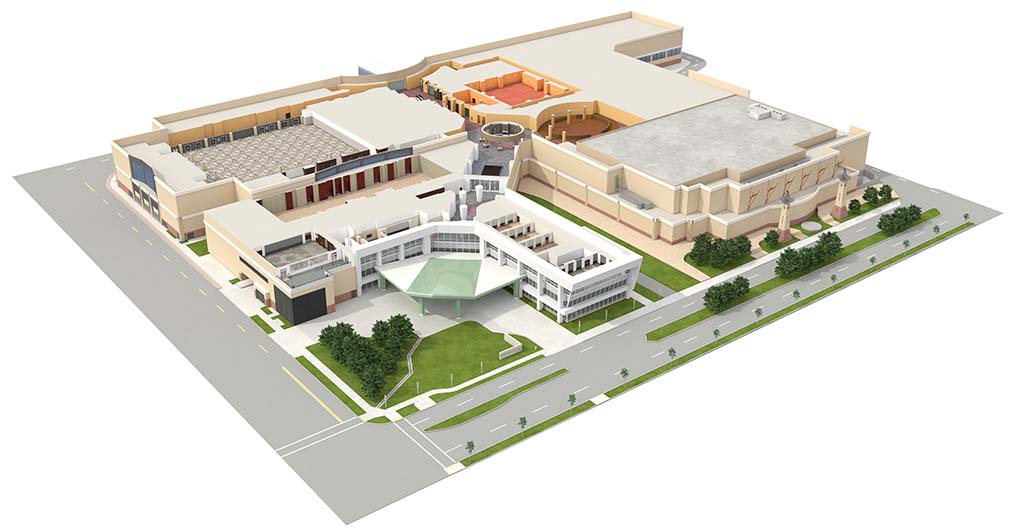
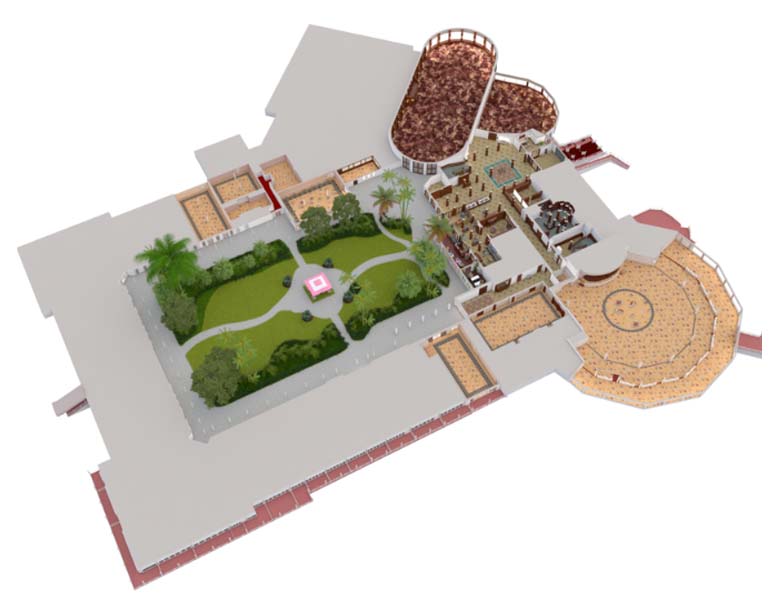
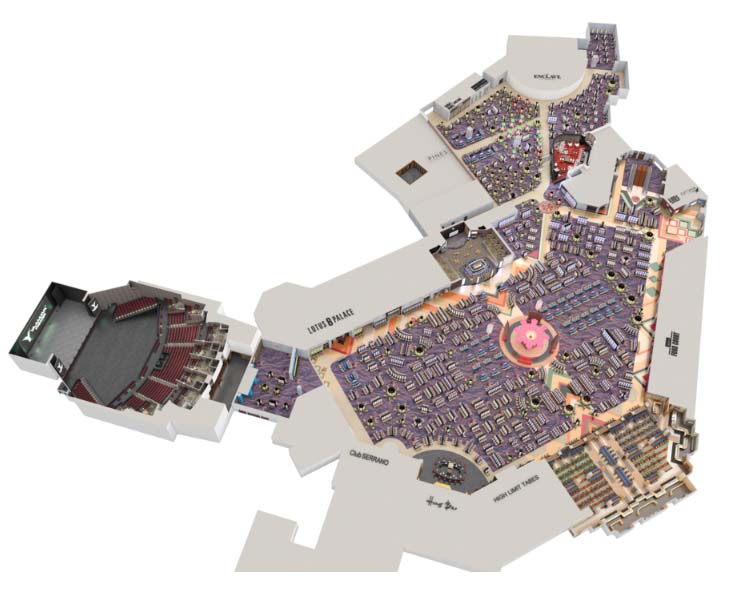
Interiors
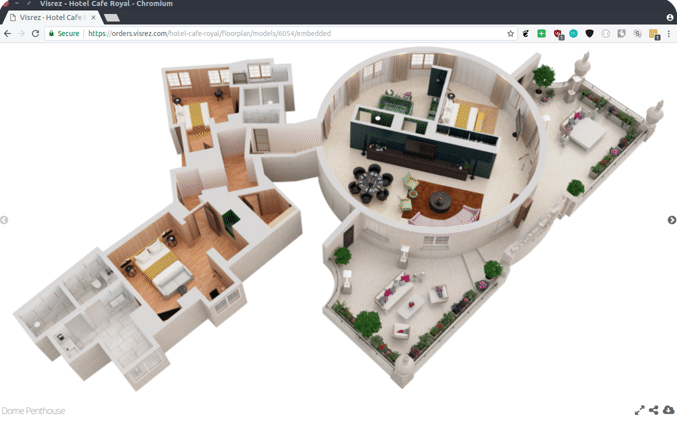
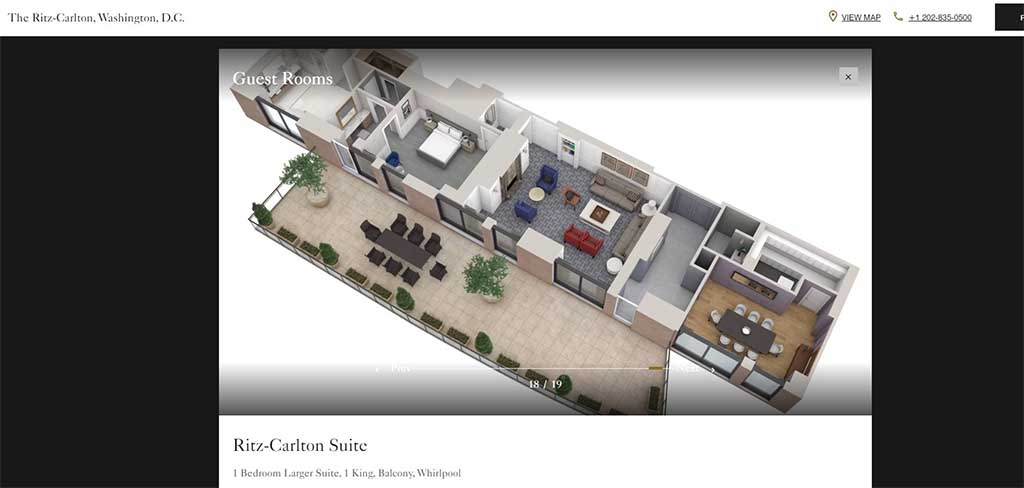
Building models could be used not only to show the exterior of a hotel but also to easily display the interior layout of entire hotel floors.
Interactive Floor Plans
Stacked views demonstrate the flow of the spaces and floors in an impressive way. Full buildings can be be broken into single floor plans and those could be displayed in various arrangements.
Stacked views help planners and clients to understand the layout of a building form a different perspective.
Reference Assets
General Resort Information
Before our team can get started we need to understand the boundaries of the resort and become familiar with all buildings and amenities. A resort scheme or layout diagram is very helpful in this case.
If no such file exists, then a marked up screenshot from google maps will do. In the example from the Ritz-Carlton, Bali on the left we have the basic scheme diagram provided by the client and the completed 3D map on the right.
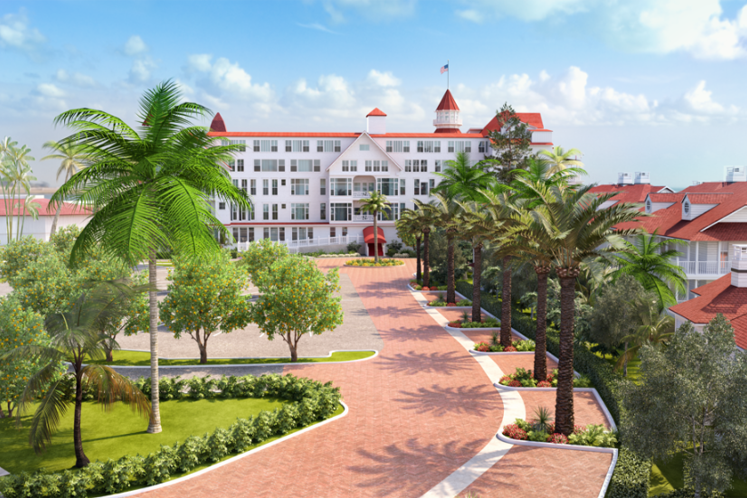
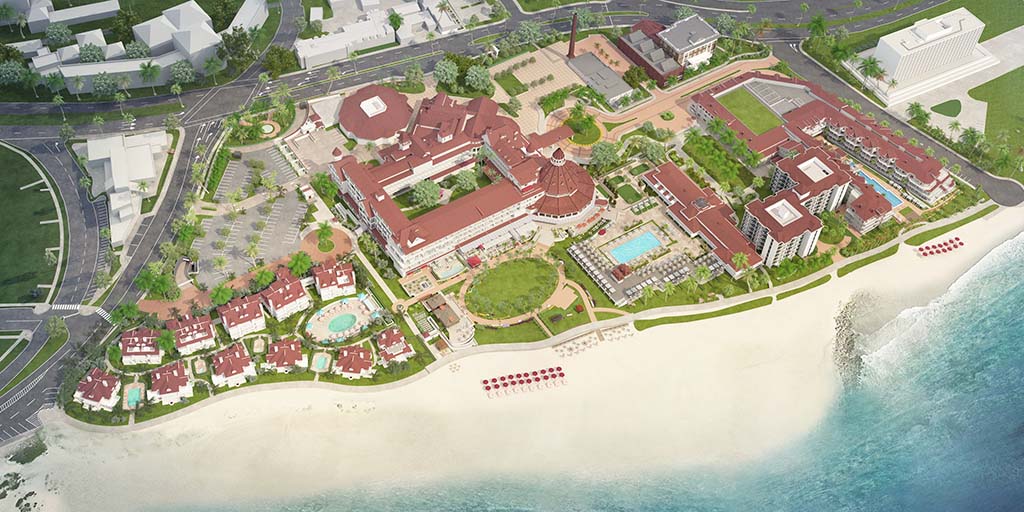
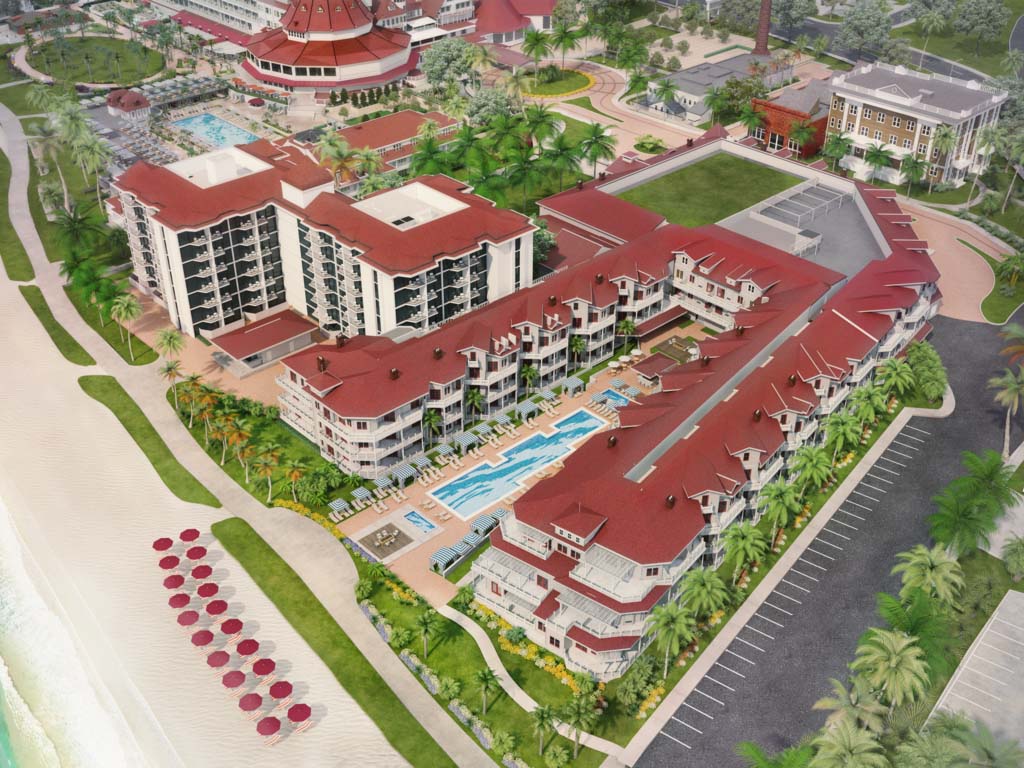
Technical Drawings
Any available blueprints, pdf,cad or revit file of the buildings is useful to correctly create the 3D models. Trees or other buildings often obstruct us from seeing important façade elements and thus slow down our process.
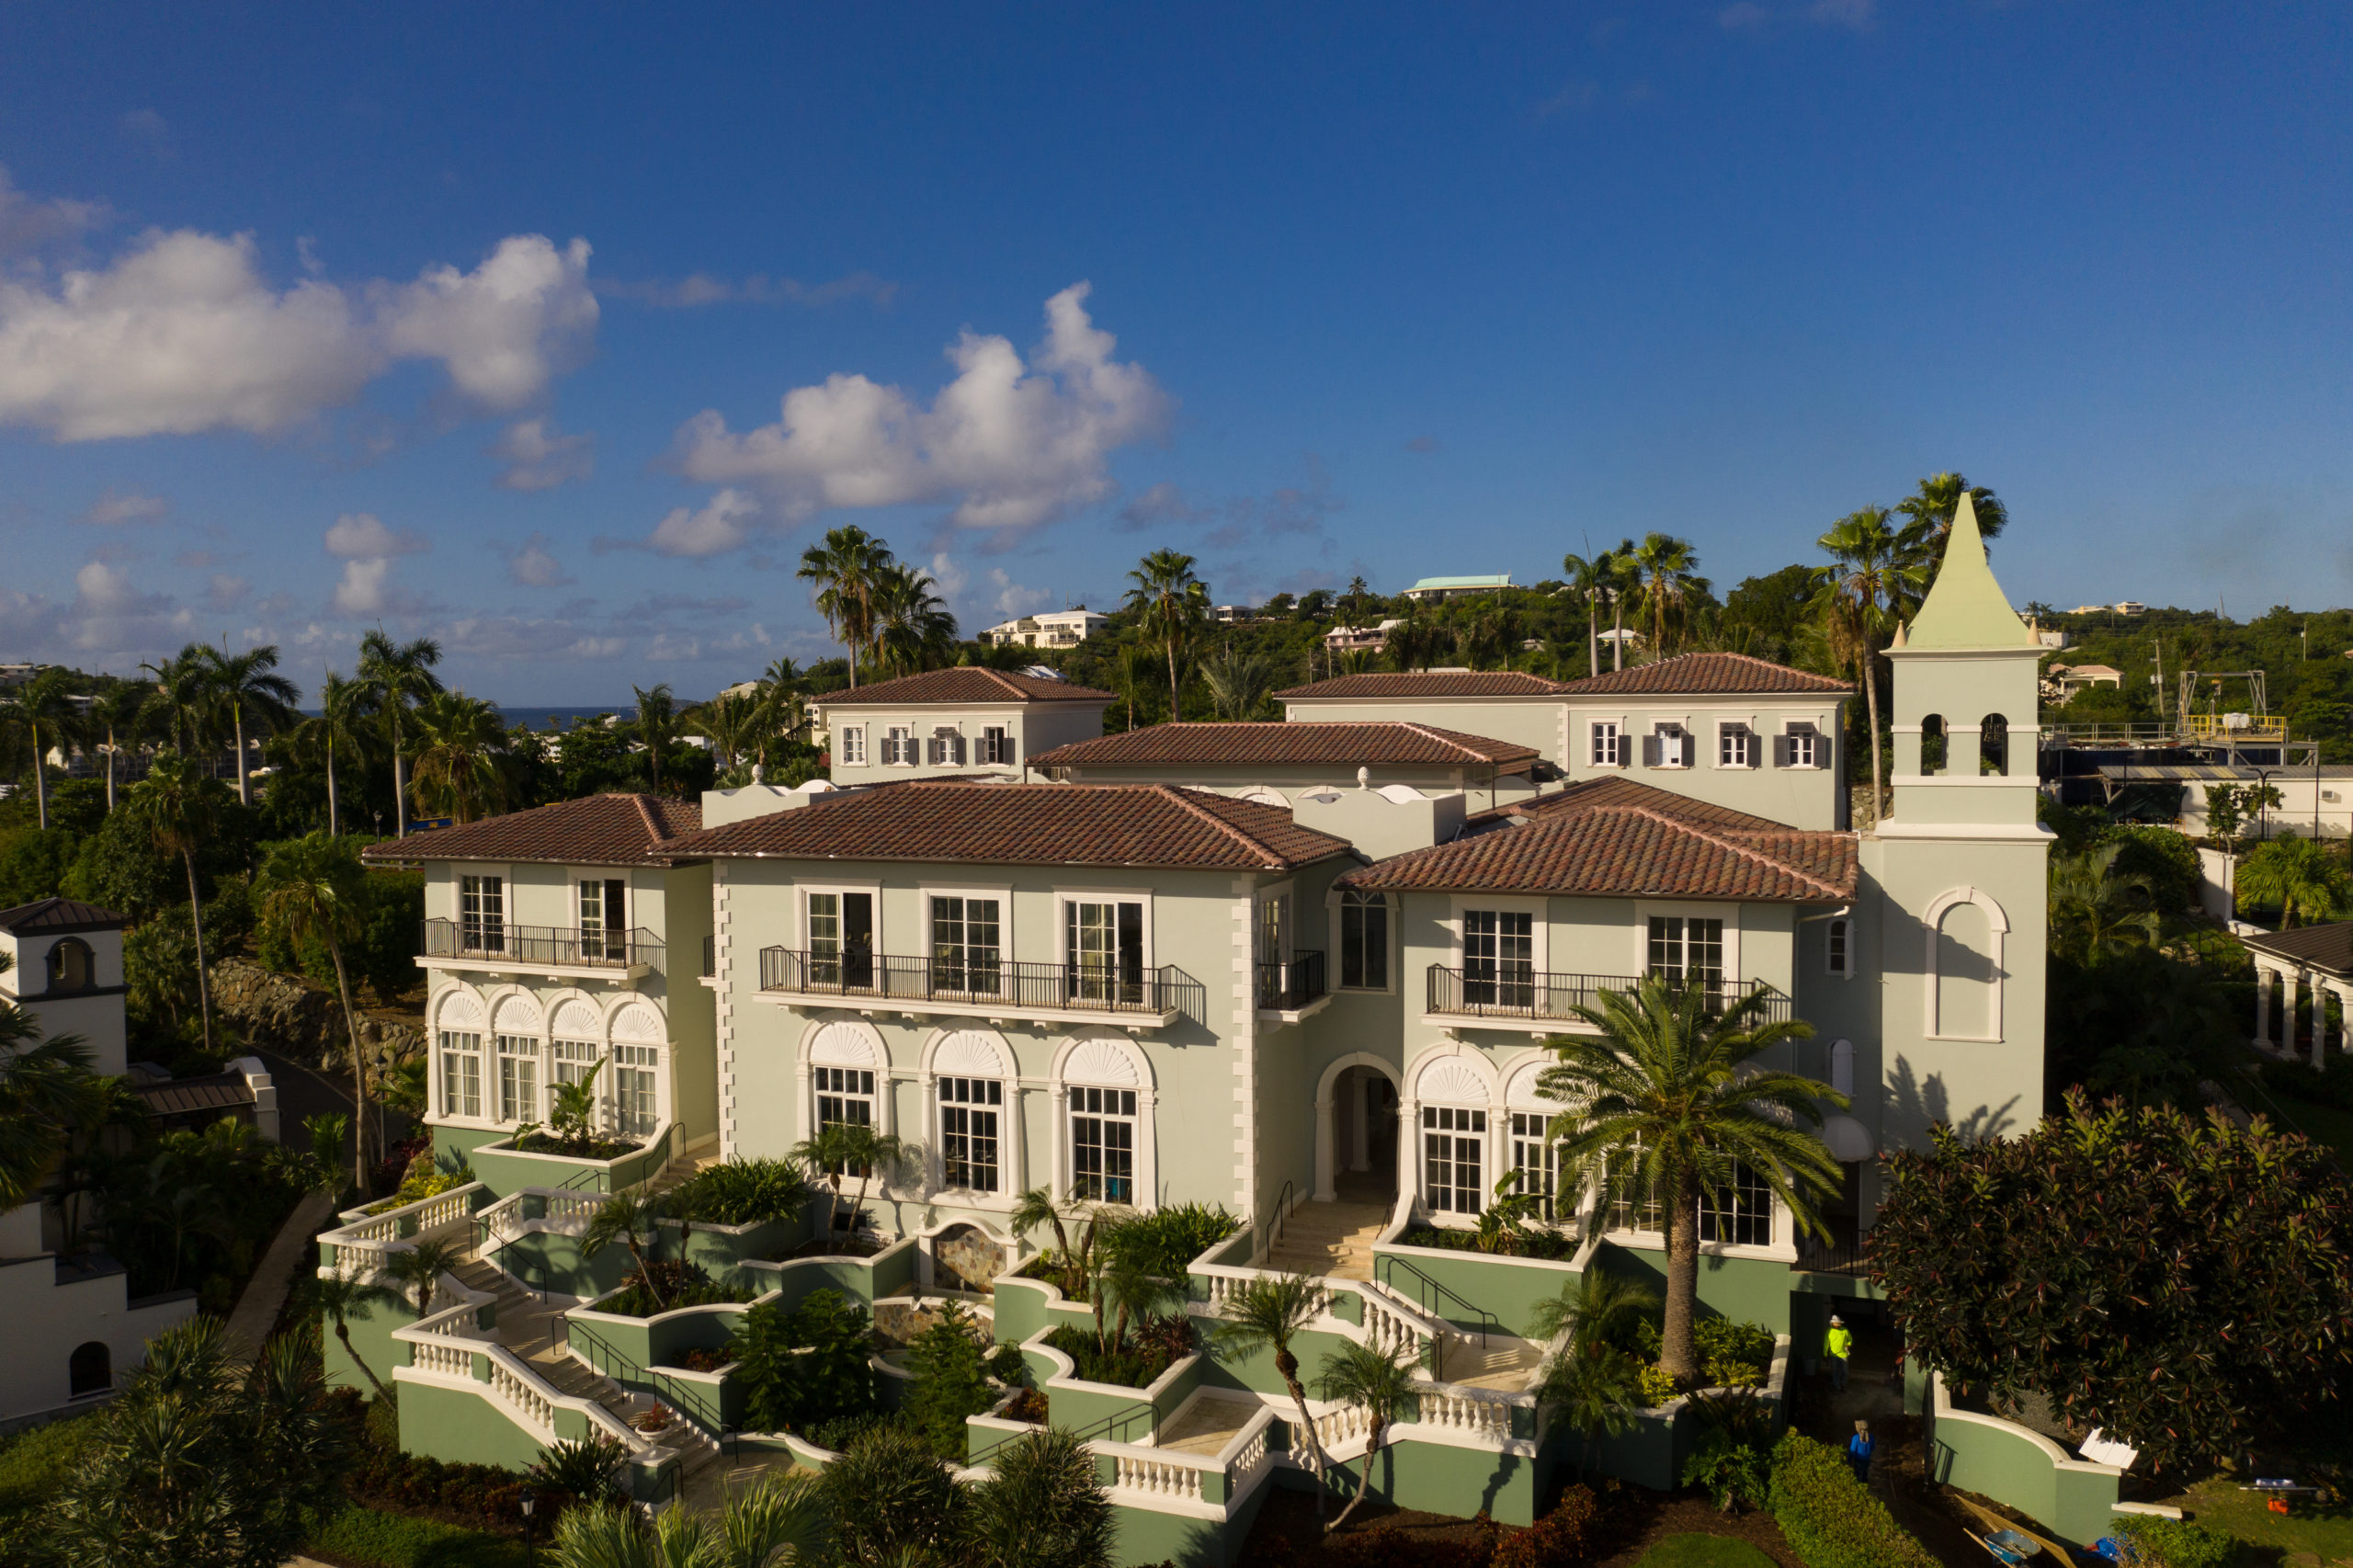
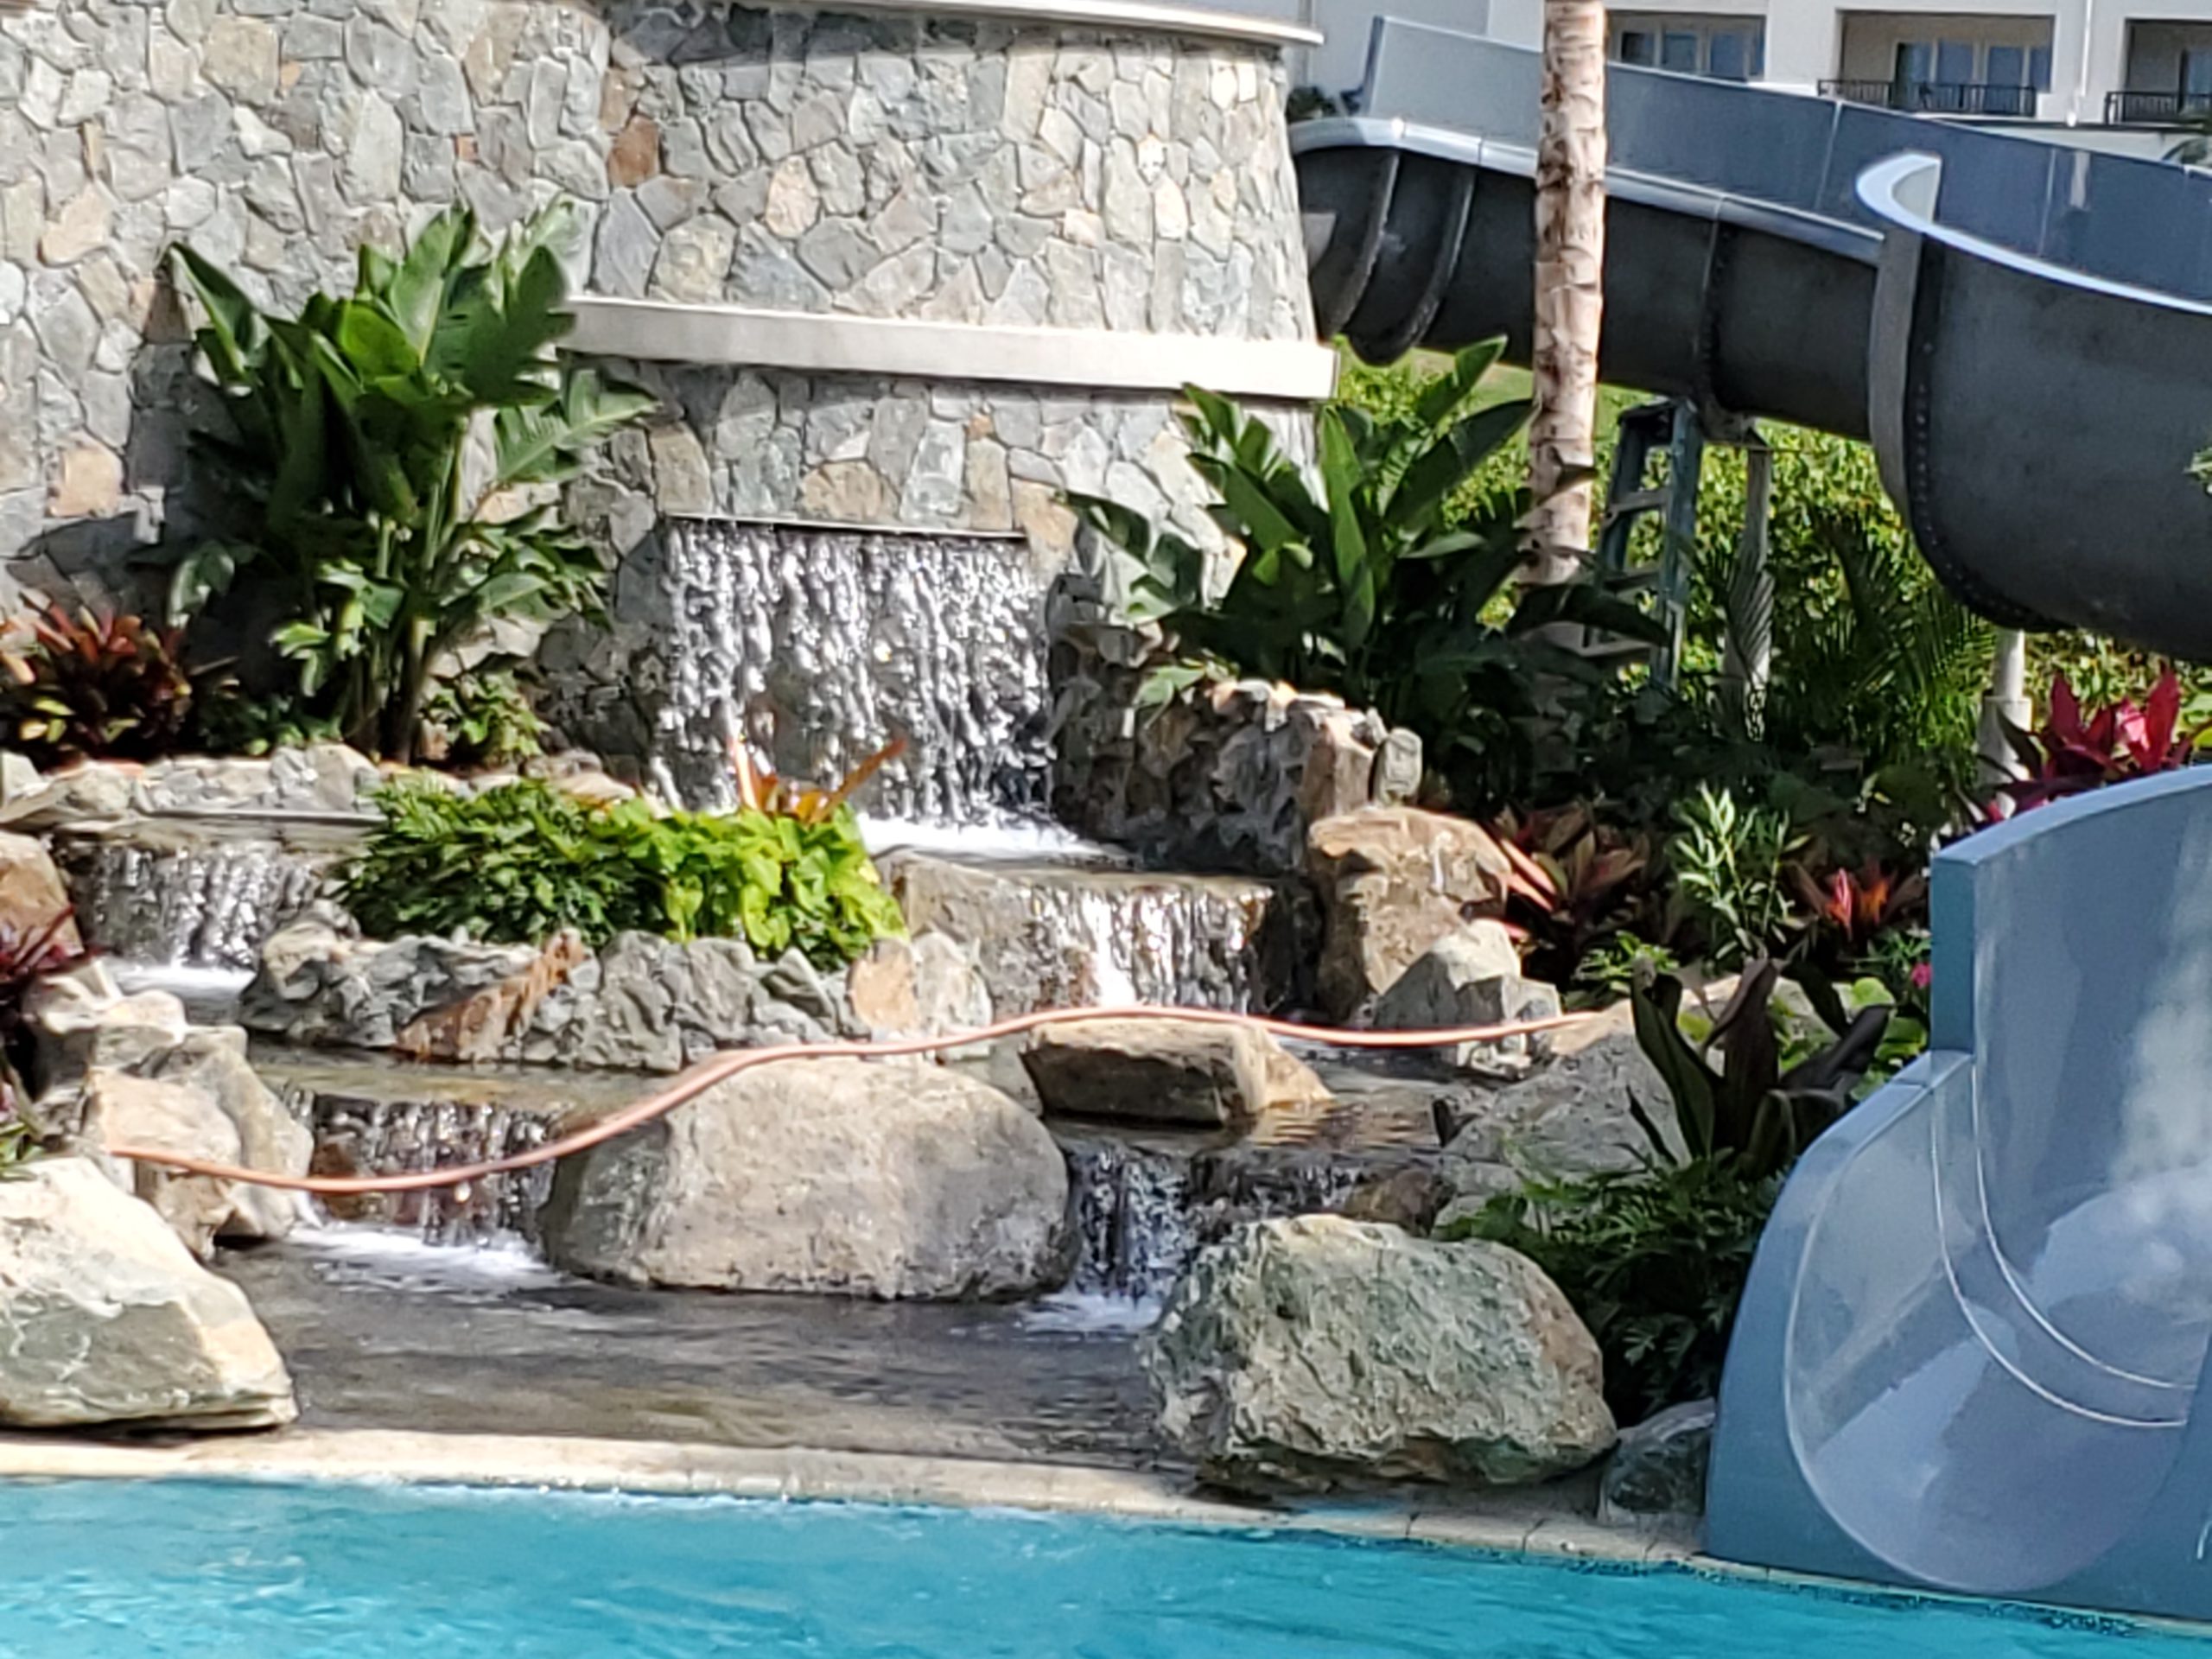
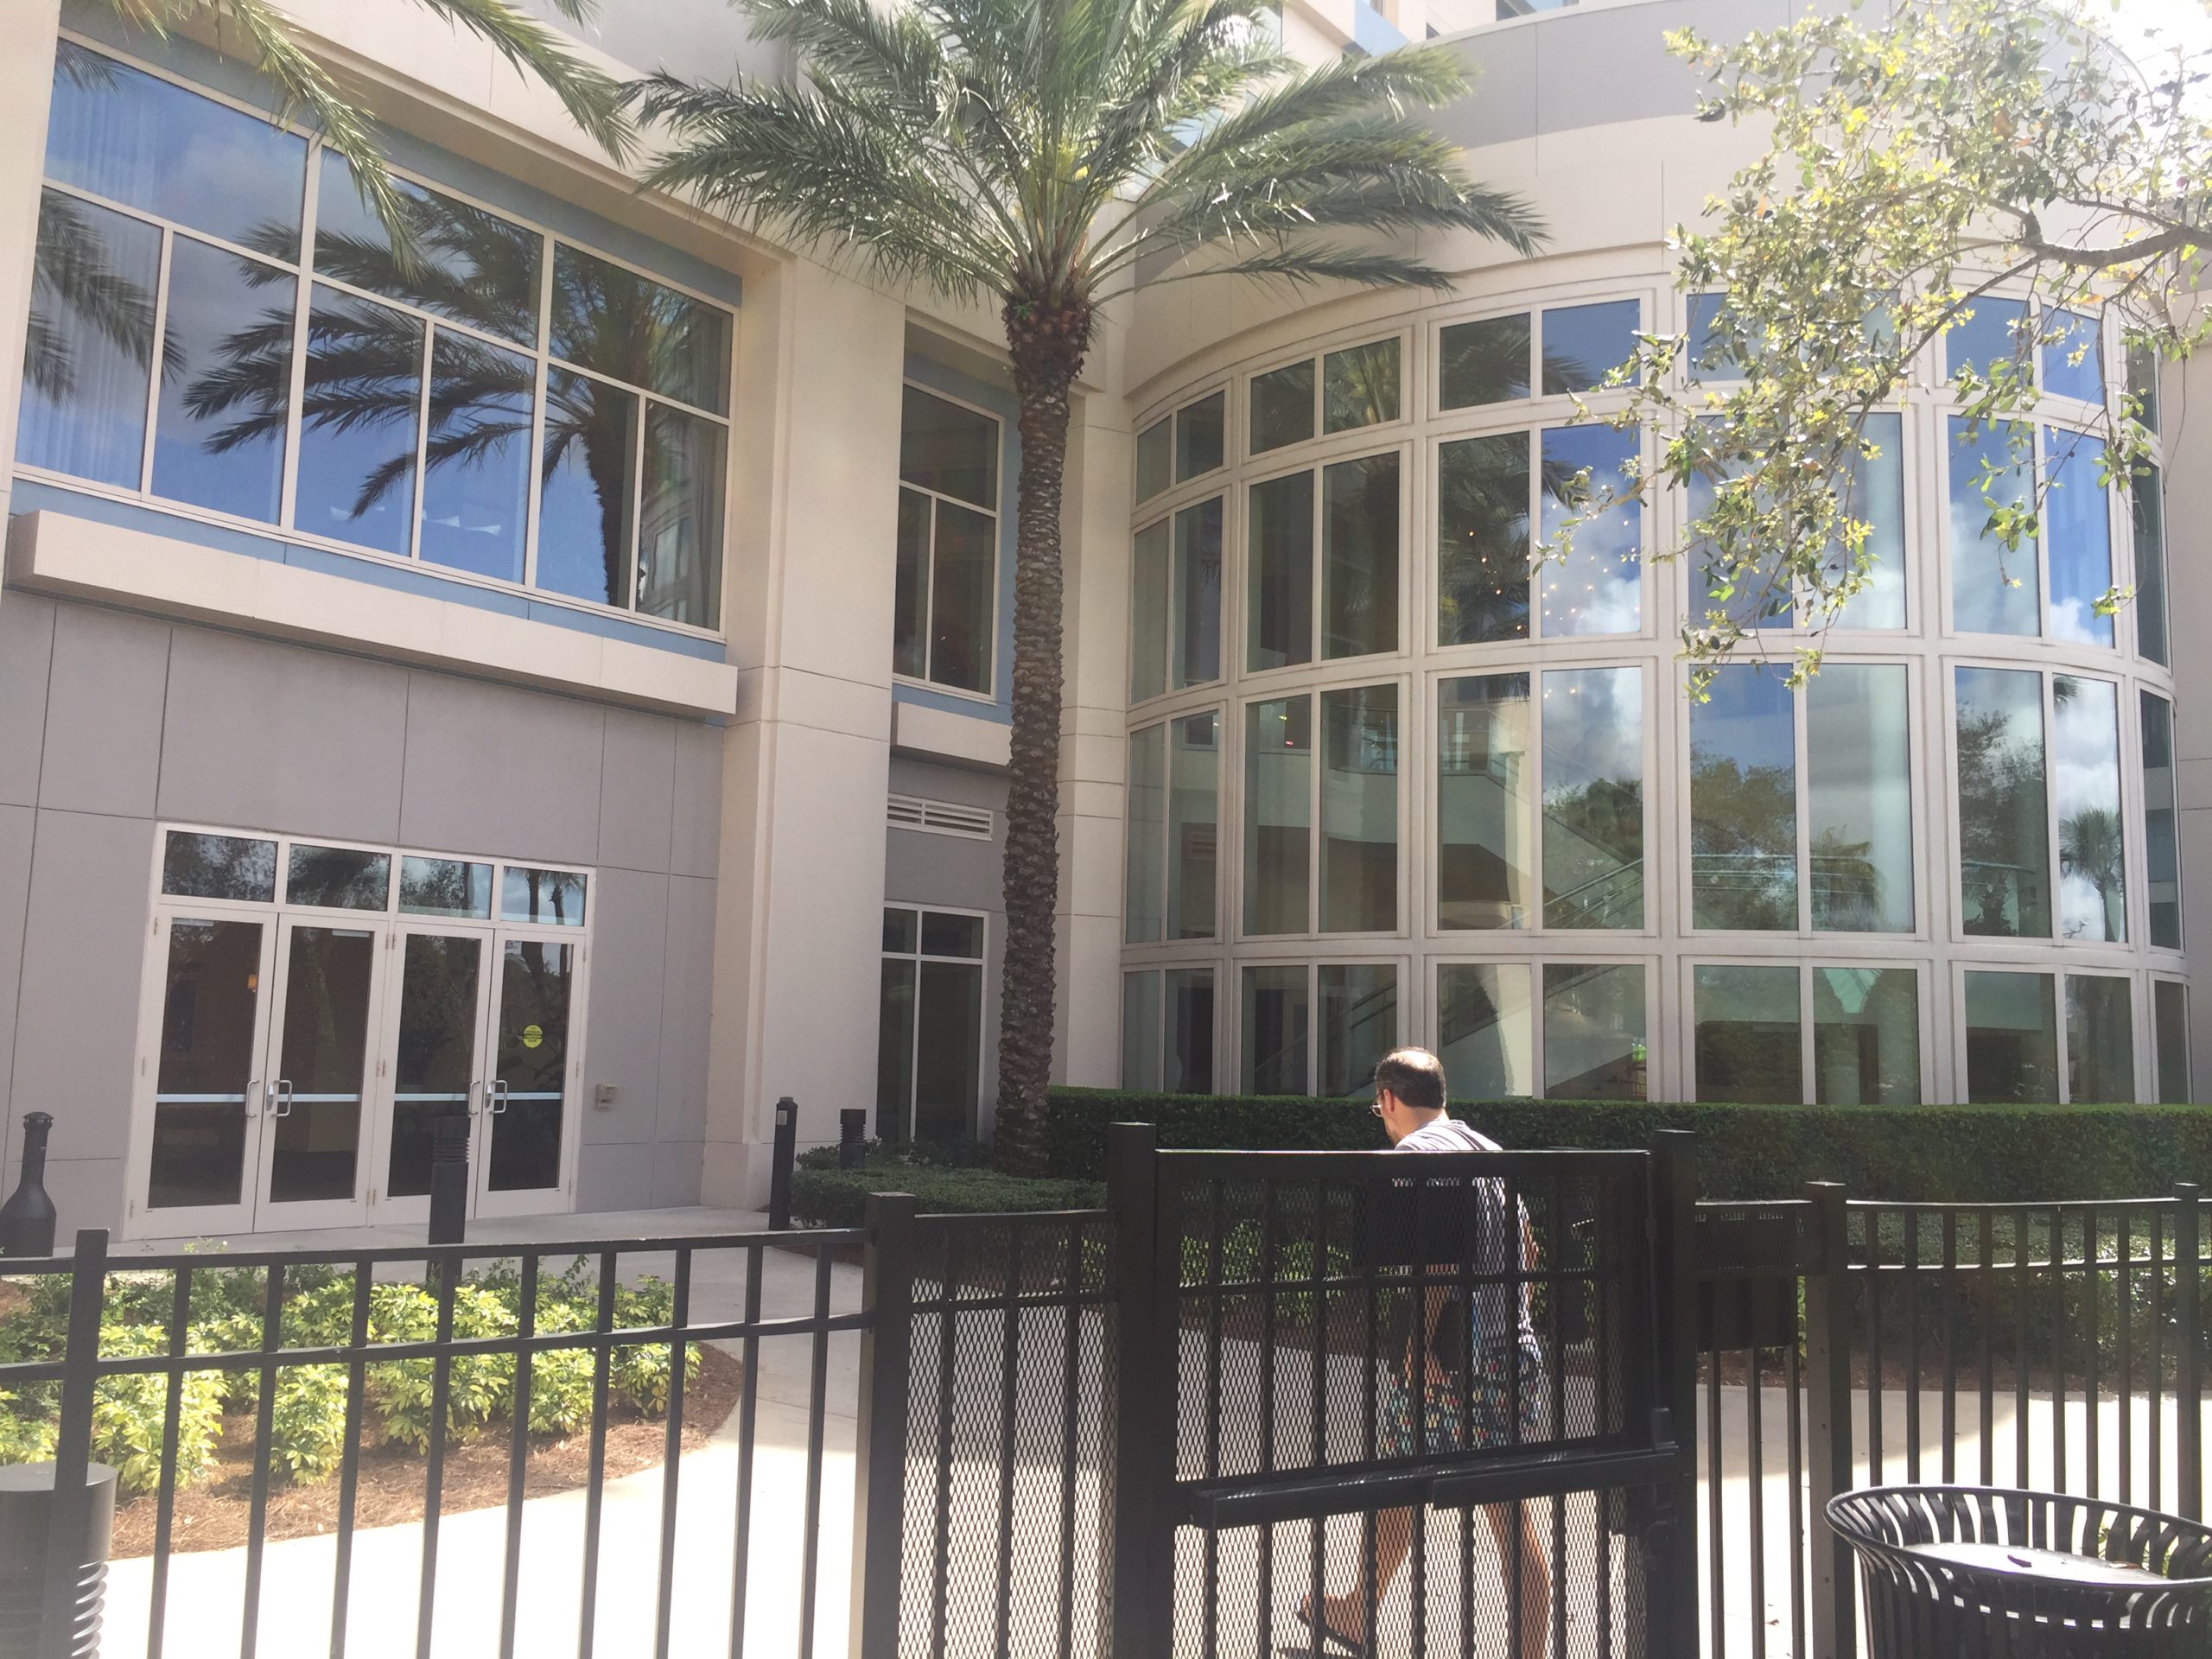
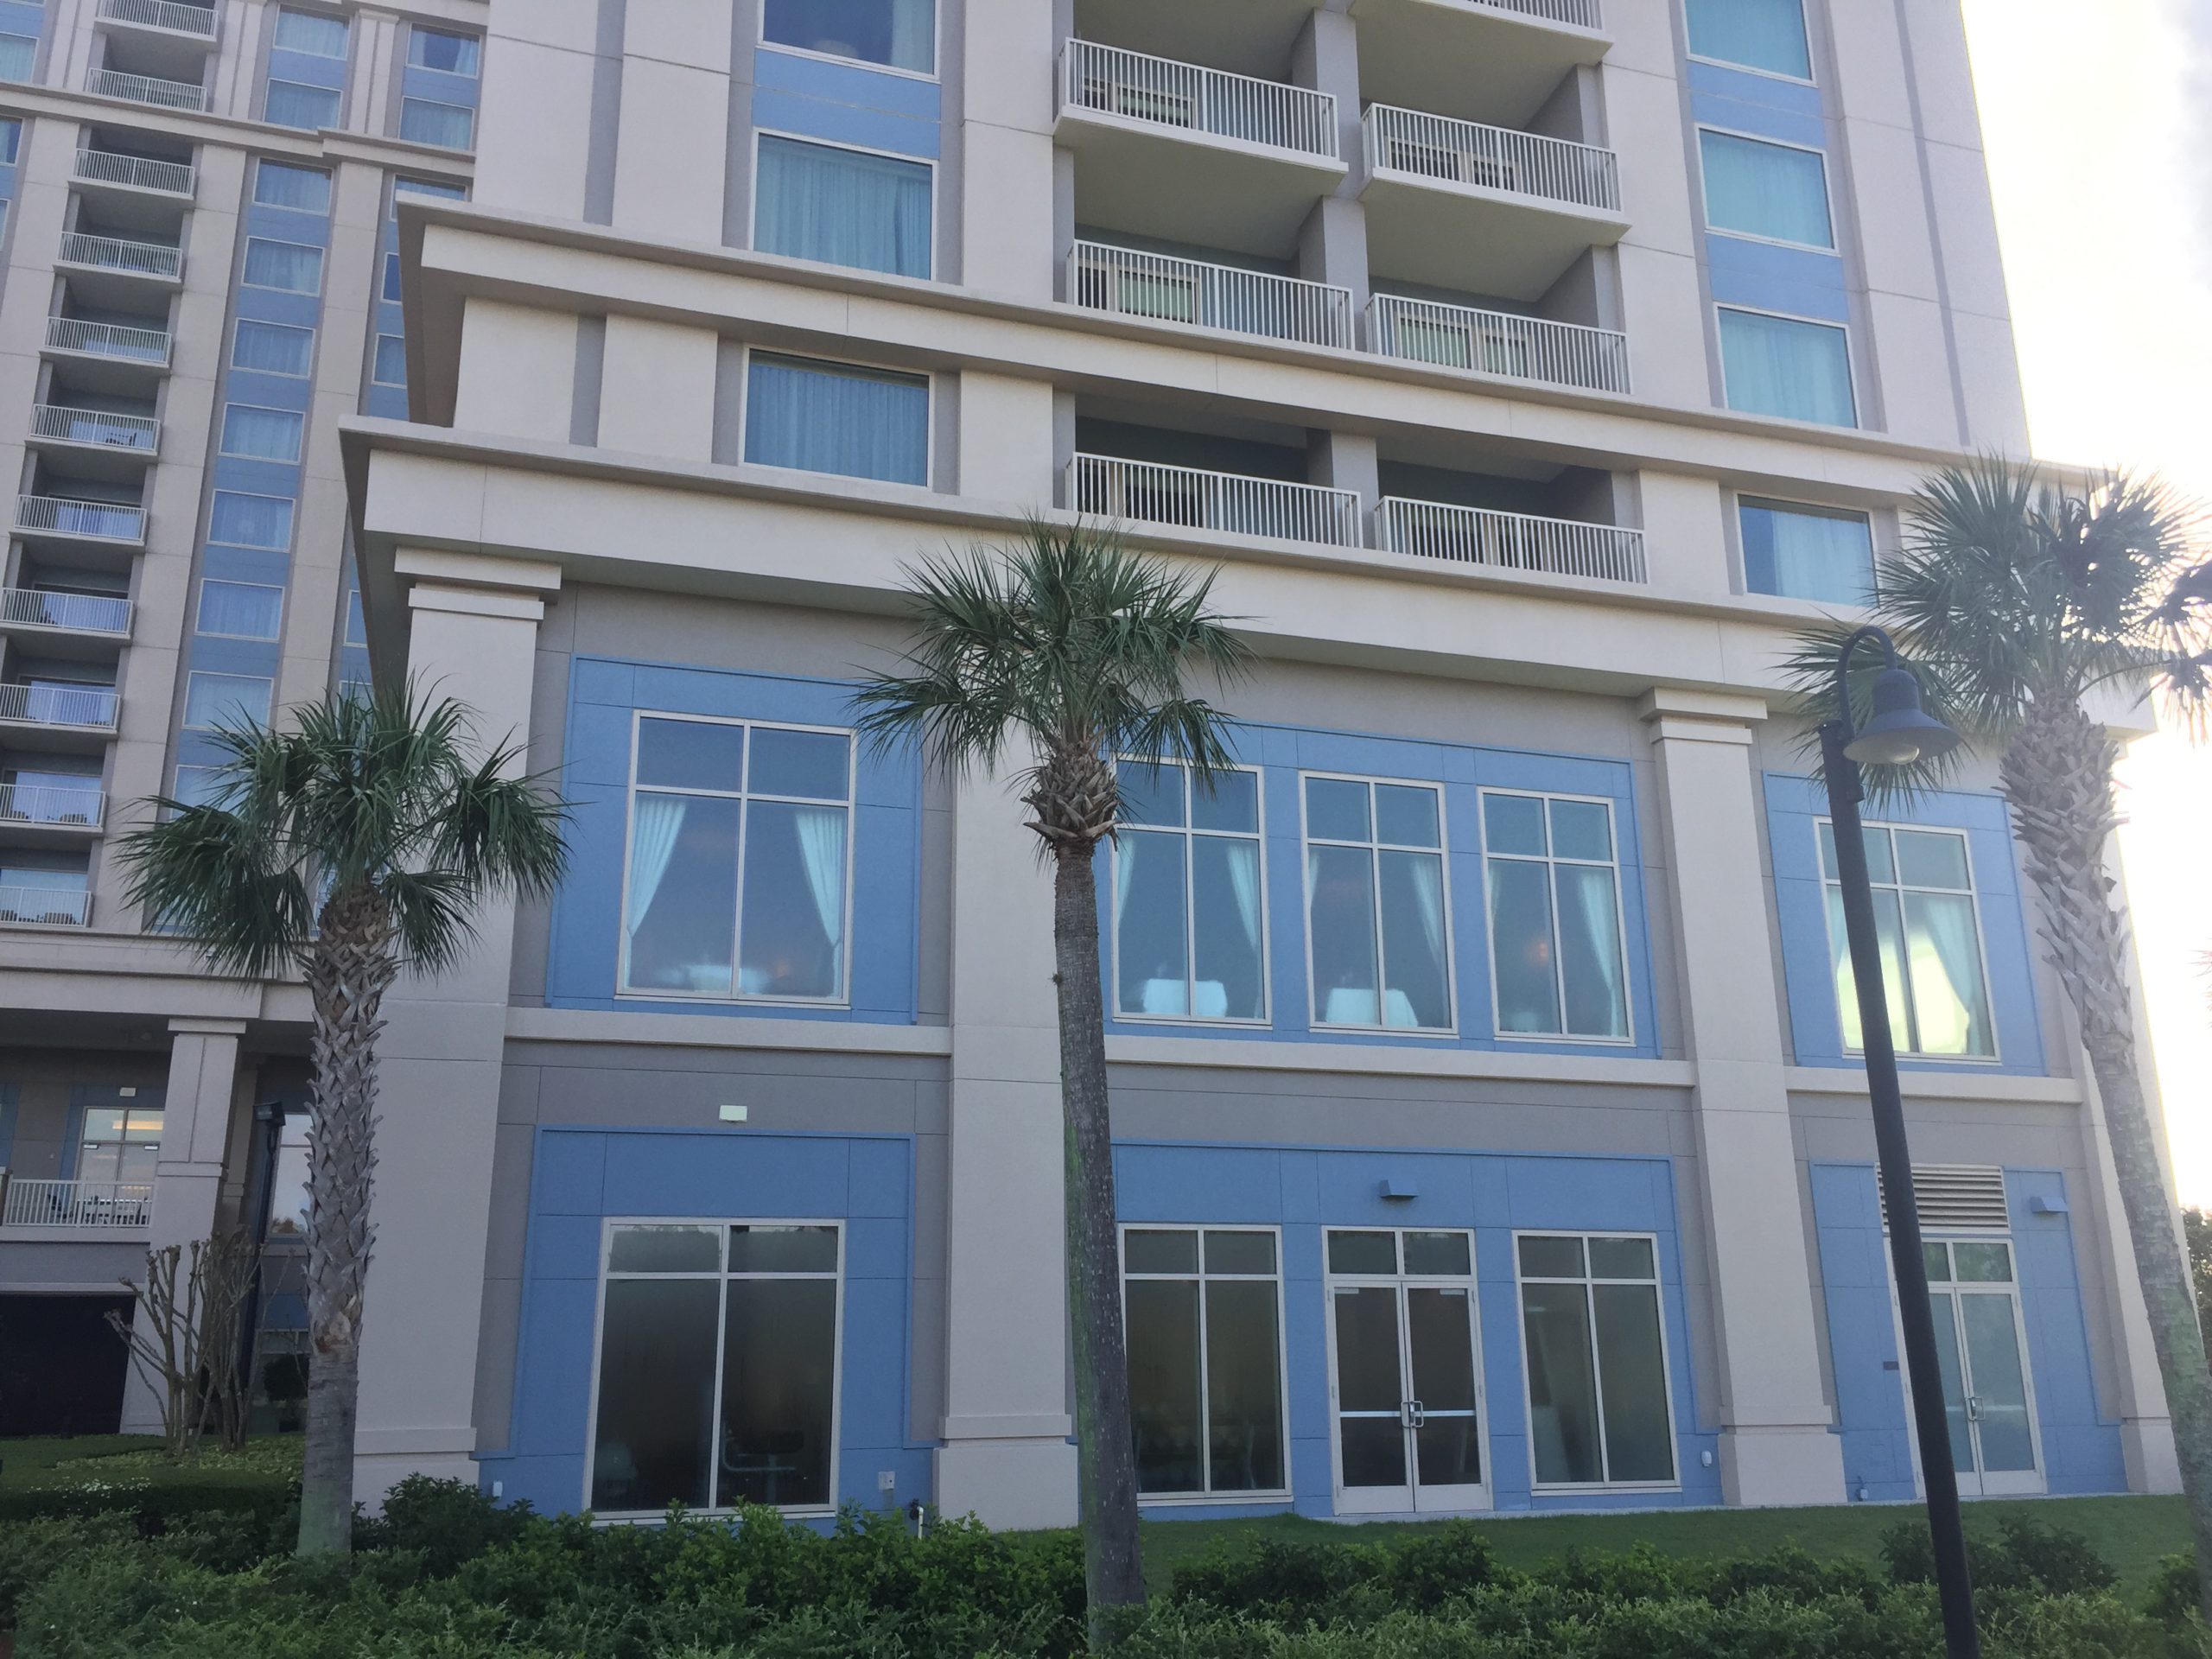
Drawings (floor plans, section or elevations) give us clear information and help us complete the resort much faster. In the example of the Condado Vanderbilt Hotel in Puerto Rico you can see how our team created a photorealistic model using the supplied elevations.
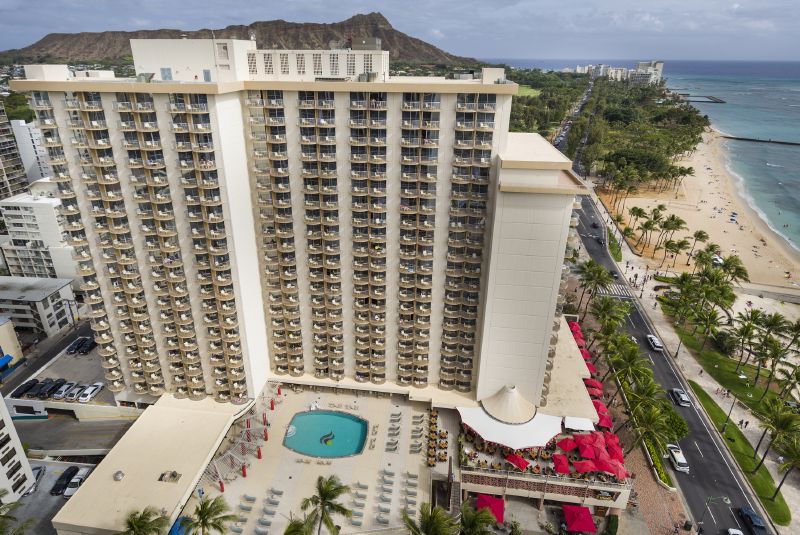
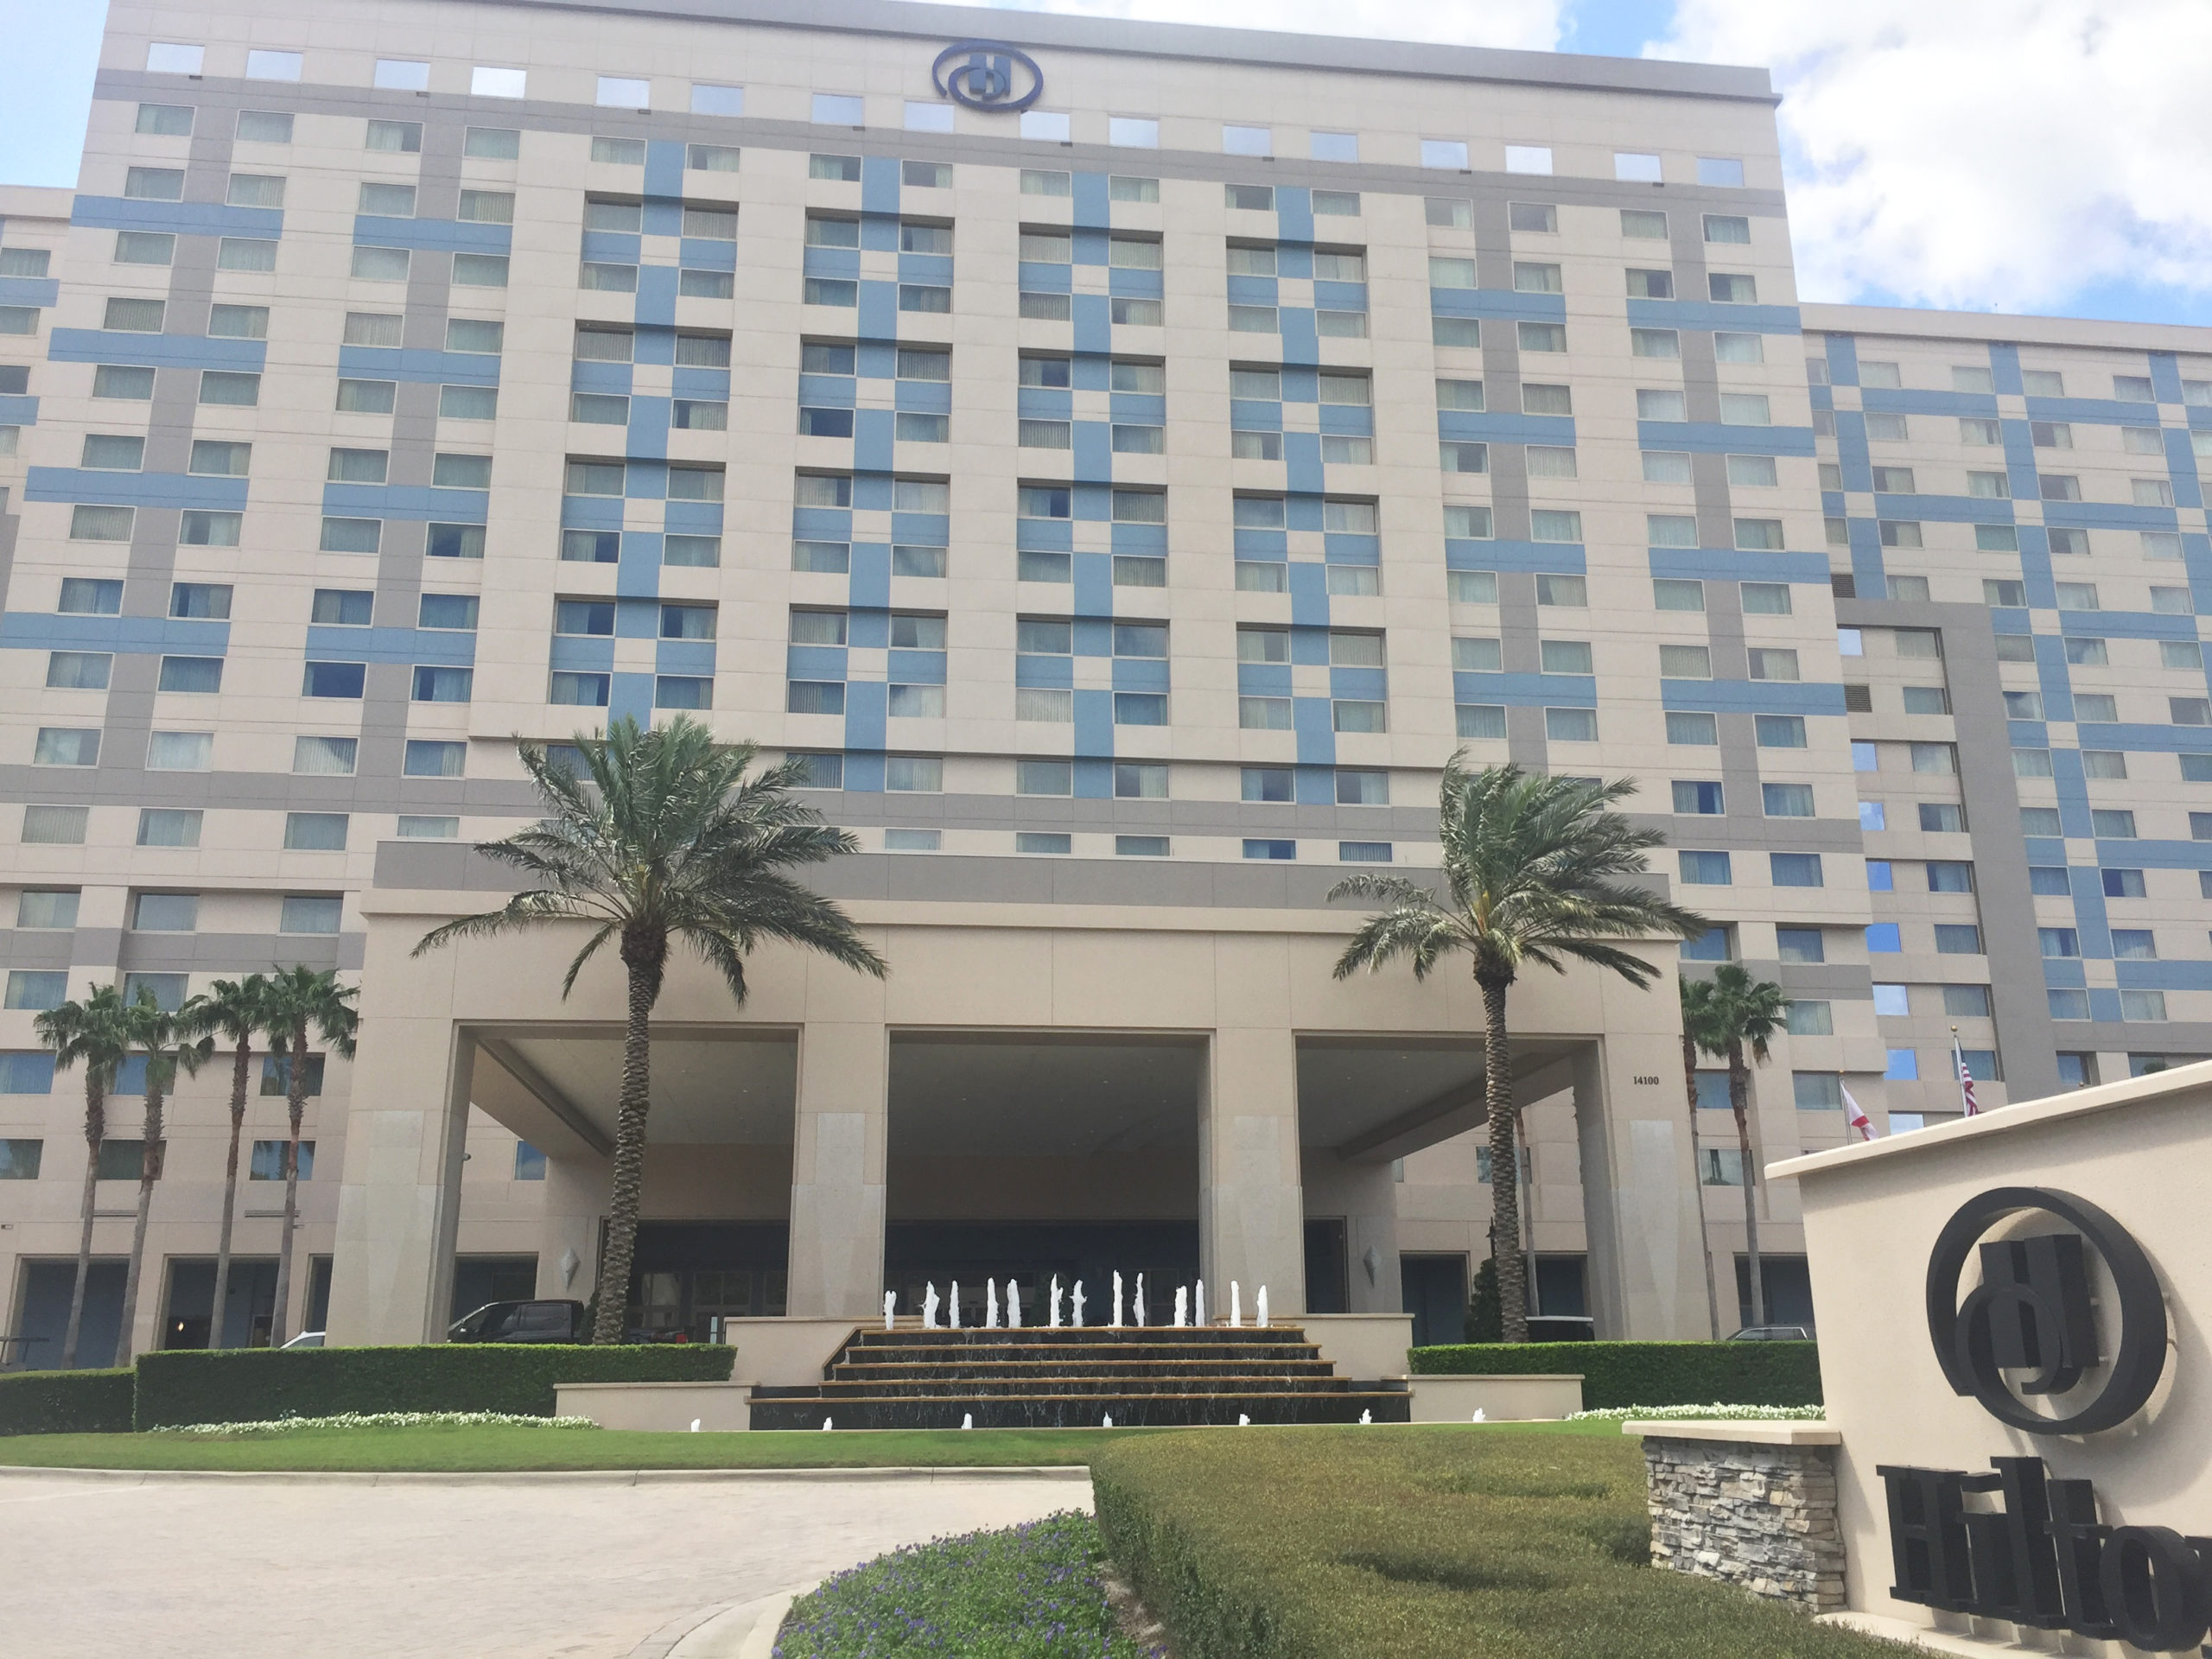
Reference Photos – Establishing photos
Photos that give general information about the location of buildings, pools and other elements. They help us understand buildings as a whole and indicate where the detailed photos are taken from.
Details/ Close-up Photos
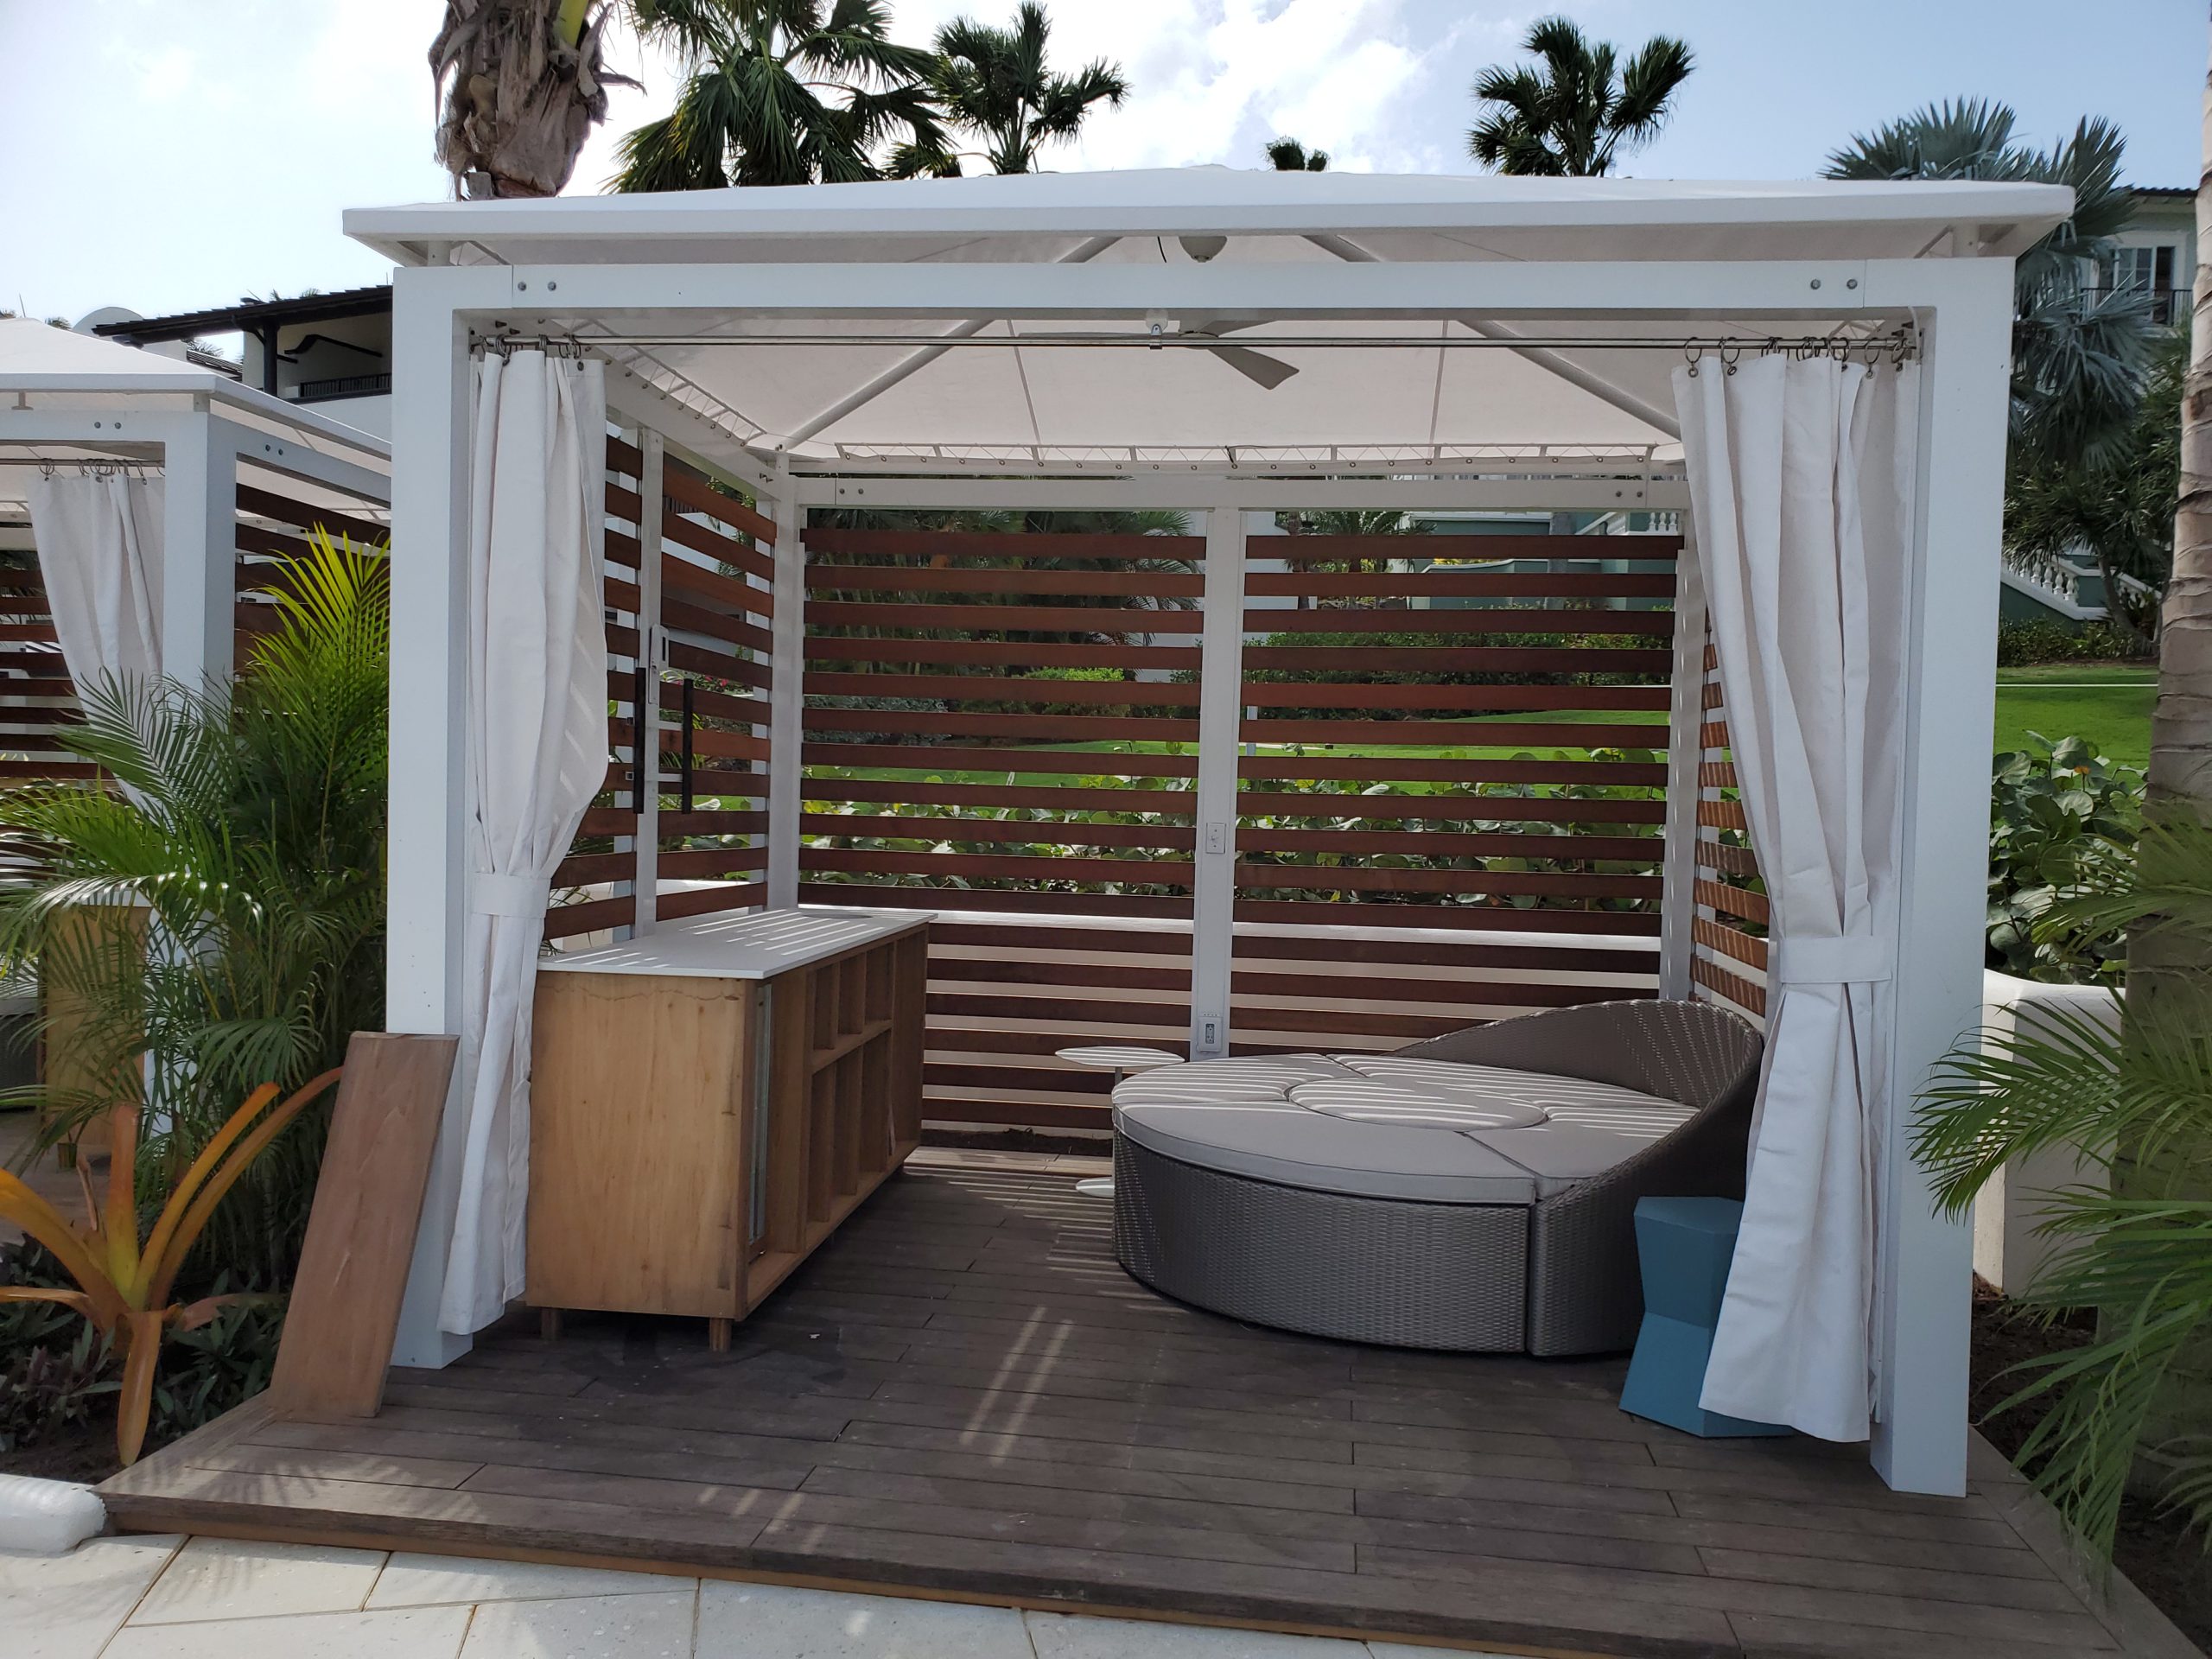
Close-up photos give information about colors, materials and specific building elements, such as entrance points, facade decorations etc. Besides close-ups of the facades, we need photos of the outdoor furniture, fountains, gazebos etc.
Note that it’s important that there is an establishing photo that shows where those close-up elements are positioned in respect to each other.
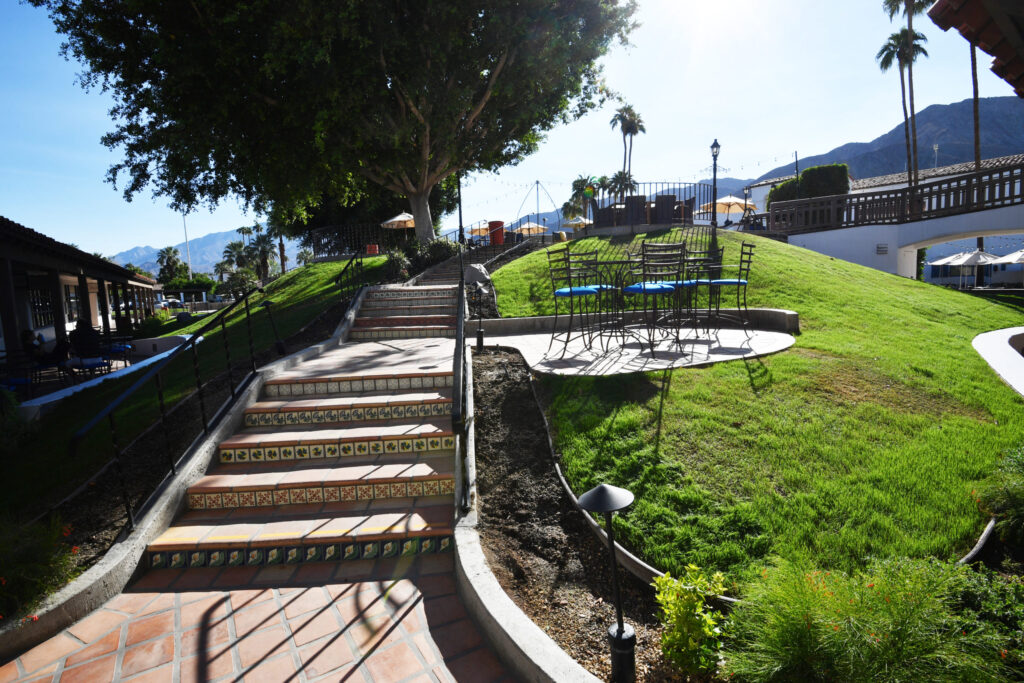
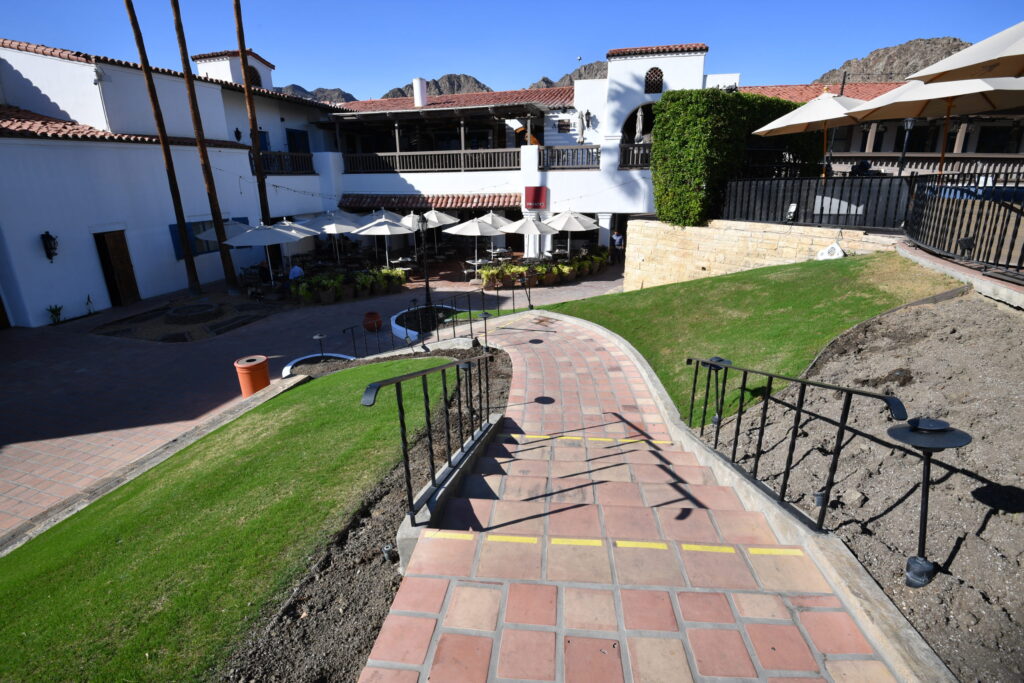
Circulation and access points
In case there are variation of terrain, terraces or various garden levels, we need to understand how big are those variations are and how one goes from one level to the next.
Therefore we need photos of the eventual ramps, stairs, elevators etc.
If available, you can also send us aerial photos, drone photos or videos.
More examples of assets we use and the results we can achieve
Using our Maps Api
Smooth Integration
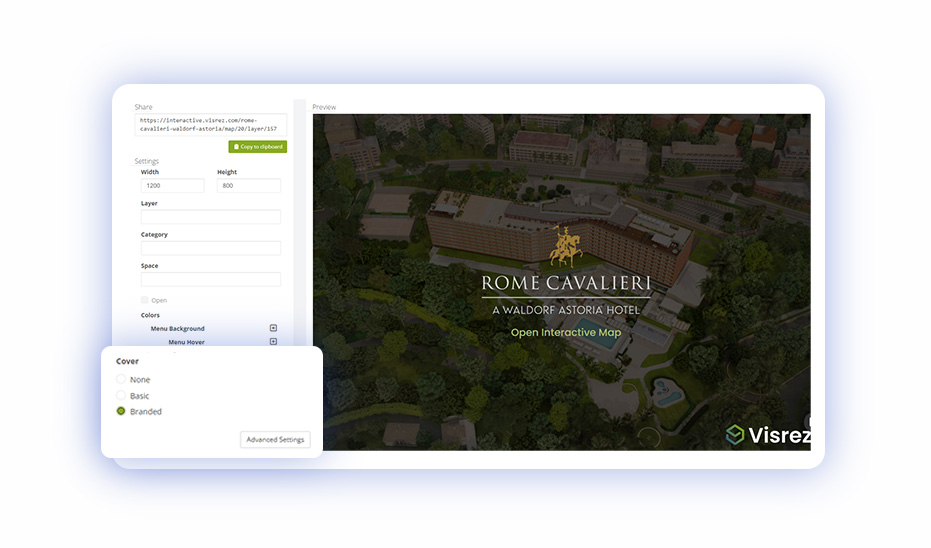
Adding an interactive map to your website should not require technical support from your website vendor. The map can be added by pasting a single line of code into the page. Our API pulls the styling from your site to match fonts, backgrounds and buttons seamlessly.
Under the Interactive Tab you can access the options for adding the interactive map to your site. Your web developer can select their preferred option (JS recommended) and the code just needs to be added to the source of your page to pull in the map.
All future changes saved in Visrez will update automatically in your site once the interactive map tag has been added to the site.
We will use your logo and the colors you prefer to create a custom look for the map that fit the style of your brand. For each resort we create unique markers and graphics.
The Interactive Map Builder‘s simple interface allows it for anyone to start using it without having to go thorough long tutorials or user guides. There are just a few easy to follow steps to start editing your maps.
01. To add a marker activate Edit Mode from the top left corner button. Undo and Redo options are under it.
02. Select a point on the map with the left mouse button on the map and choose Space or Label.
Once a marker has been created click on it to open edit options. You can set a Model, Name, Description, Visual (Thumbnail), and Video link, in Category you can either choose from the dropdown menu or create a new one. Images can be added by copying the URL code of the image and pasting it under Visual. To add videos copy the URL code of a video and paste it into Videos.
Visrez Interactive Maps supports YouTube, Vimeo, Instagram Feeds, Matterport Virtual Tours or other media formats. Users can paste the code into the back-end editor to display the media in the map. It is our belief that supporting all media formats makes the interactive map a more valuable resource for our clients.
The Interactive Map Builder is easy to use and fully customizable to your needs. It has many useful features, yet one can learn to navigate it in minutes. Its design is intuitive and user-friendly. Exploring a resort property has never been easier or more engaging.
The 3D resort maps allow us to show huge areas that are hard to capture with aerial drone photography. It also allows the client to omit the surrounding structures and just focus on the resort. No matter if your property is a single-hotel resort or composed of multiple buildings and facilities, we can showcase it in a unique way. We have created many types of resorts in various scale ranges over the years and know how to make each of them shine.
Third party developers can incorporate Visrez products such as Floor Plan Builder, Interactive Maps and Virtual Tours into their applications using our API resources. This guide explains the steps required to integrate Visrez products into any third party application with support available from our team.
To prevent forged requests to steal API keys from users, we restrict the domains in the return_to parameter (see Authentication below), so we need to authorize your domain.
We require a integration_partner parameter when creating a Plan, we’ll provide one for you once we have verified your company account. Please contact our support team directly here.
Note: The testing environment gets overwritten every night with a copy from production.
Authentication
Each API call require an API key, which is linked to an account in our system. To obtain this API key, send your users to our login URL, adding get_api_key=true and return_to=<your_url> parameters. After user login, we’ll send back to the URL provided in return_to , adding the API key in api_key parameter.
Example:
Send user to: https://clients.testing.visrez.com/users/sign_in?get_api_key=true&return_to=https://yourdomain.com/set_api_key
After login, we’ll redirect back to: https://yourdomain.com/set_api_key?api_key=xxxxxxxxxx